This guide shows you the steps you can take to set up a second monitor in Windows 10
The operating system supports multi-monitor systems of various configurations by default and therefore you do not need to install a third-party software to configure multiple displays.
The need to use a second monitor is primarily to expand the workspace, which in some cases makes it easier to perform multiple tasks simultaneously.
It is important to note that some video cards do not support multiple monitors, and that older displays may not always connect automatically.
To connect a second monitor, you need a computer (laptop) or with an additional video output to an external display using various connectors, such as HDMI, VGA, DVI port or DisplayPort, as well as a corresponding cable that connects the monitor to the connector (port).
CONTENT:Switching between display modes
By connecting the monitors to your computer, you can select the appropriate display mode.
There are four display modes available in Windows 10.
PC screen only
The image will be displayed on the first computer monitor or on the main laptop screen. The second monitor will not be used and nothing will be projected onto it.
Duplicate
The contents of the main monitor are copied to the second monitor. This option is optimal for presentations.
Two monitors turn into one large virtual screen. This makes it possible to display one file, for example, a large photograph, on two monitors.
Second screen only
Only used additional monitor. This mode allows you to check the resolution of the second monitor. Accordingly, if you have a laptop from which the presentation is projected onto a large monitor, then choose this option to get optimal results.
Depending on which device you are using, the appropriate display mode will be automatically selected.
When connecting a second monitor to a laptop, the display mode is set by default Repetitive
When connecting a second monitor to desktop computer the default display style is set Expand
To quickly switch between modes, press the key combination + P, this will bring up sidebar PROJECT with four options.

You can also select the display mode using the screen options; to do this, open sequentially: Screen Options

Then on the right side of the window, click on the drop-down list Multiple displays and select one of the items.

After this, save the selected option.

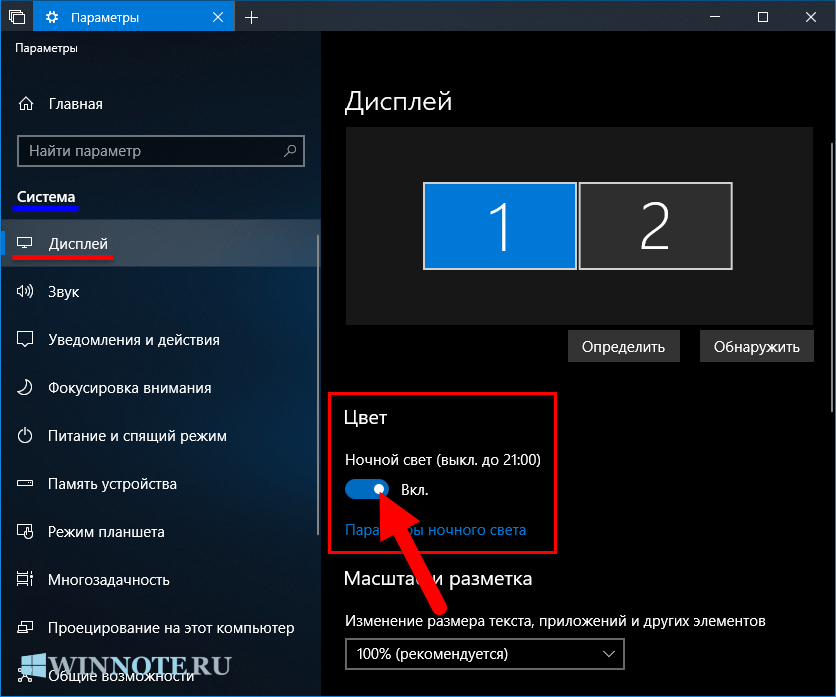
Setting display options
Set up and control displays with using Windows is very simple, to do this, open sequentially: Windows Settings ➯ System ➯ Display, or click right click mouse in an empty area of the desktop and in the context menu that appears, select Screen Options

Each of the monitors is represented by a small rectangular miniature.

Drag the thumbnails on the screen so that their relative position matches the configuration of the monitors on your desk.

Use zoom to enlarge text and other content. (This is suitable for more high resolutions or for people with vision problems).

You can also change the desktop resolution.

Select landscape or book orientation to change the selected screen orientation.

The multiple display option allows you to switch display modes (as described in the section above).

In advanced display options you can look general information about connected displays, as well as the properties of the video adapter for the display by clicking on the corresponding link.

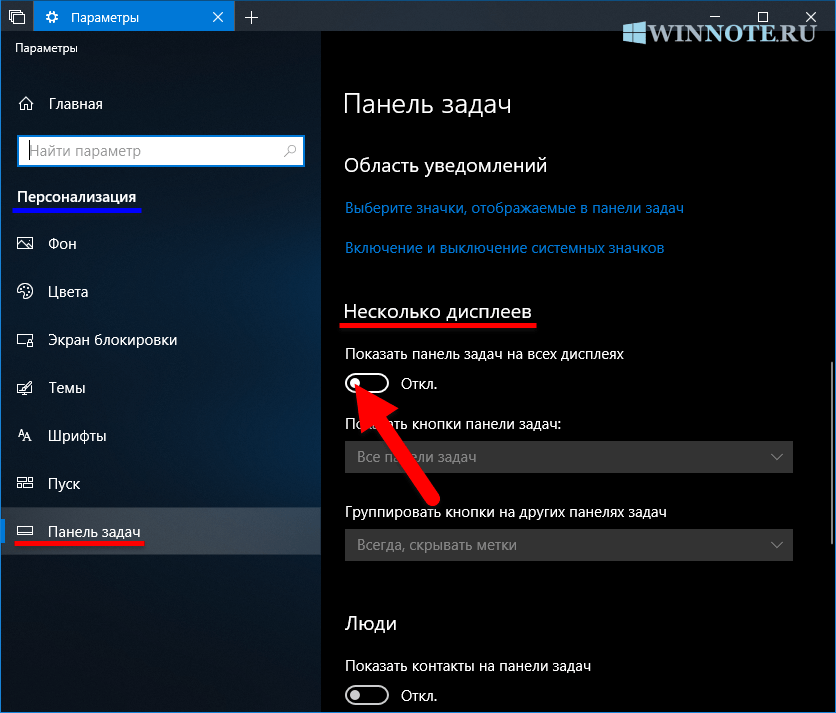
Taskbar Settings
When you connect a second monitor, the taskbar appears on all displays by default. You can completely remove the taskbar from one of the monitors or leave only icons of applications running on this monitor on each panel.
To customize taskbars, open: Windows Settings ➯ Personalization ➯ Taskbar, or right-click in an empty area of the taskbar and select the item from the context menu that appears Taskbar options

To make the taskbar appear only on the main monitor, in the section Multiple displays, set the switch Show taskbar on all displays to Off position
If you prefer the default configuration, where each monitor has its own taskbar, you can set the behavior of these taskbars using the drop-down list Show taskbar buttons:

All taskbars
The default mode where the same panel is present on both monitors.
Main panel taskbar and the taskbar in which the window is open
In this case, the taskbar on the main monitor contains icons of all running applications, while on the second monitor it contains only icons of applications that are running on it. For example, on your main monitor you ran Microsoft Edge and Word, and PowerPoint and Excel are displayed on the second monitor. The taskbar on your main monitor will now contain icons for Microsoft Edge, Word, PowerPoint, and Excel. On the second monitor there will be only PowerPoint and Excel icons.
Taskbar with a window open
In this mode, the taskbar on each monitor will contain only icons of applications running on this monitor. As a result, if we recall the above example again, only the Microsoft Edge and Word application icons will appear on the taskbar of the first monitor, and PowerPoint and Excel on the taskbar of the second monitor.
Background settings on monitors
With a second monitor connected, you can personalize your desktops.
To configure screen design settings, open: Windows Settings ➯ Personalization ➯ Background, or right-click on an empty area of the desktop and select Personalization from the context menu that appears

Then, in the right part of the window, select a suitable background and right-click on it, in the context menu that appears, select one of the menu items, for example Set for monitor 1

In the same way, select the background for the second monitor.

Having invested considerable effort in an ambitious project of intertwining reality and holograms - Microsoft HoloLens glasses, the software company, even in the current Windows 10, unfortunately offers only basic functionality to unlock the potential of another, less ambitious, but real and accessible to almost everyone way of “expanding horizons”. We are talking about working with multiple screens connected to a computer. Not every user needs a second monitor, unless he is a professional in the field of design and graphics, but many have one in their home digital tv, which . No other data streaming technology can offer such speed and convenience when outputting media content from a computer to a TV, as by transferring the video player window to another screen. Direct connection to a computer (via VGA, DVI, HDMI) will turn any budget, low-functional TV into a huge entertainment portal. The disadvantage of using a TV as a second computer screen is relative. It will only appear when two people participate in a situation: when one user watches TV, and the other uses the main monitor for his needs. But this drawback could have been avoided if Windows had been at least a little more flexible in this regard.
What capabilities does Windows offer for working with multiple screens? We will look into this in detail below. But first, let’s look at what Microsoft’s operating system cannot yet do in this regard.
1. What Windows can't do when working with multiple screens
Implemented in latest version Windows 10's multi-desktop feature is nothing more than a psychological organization tool virtual space, for example, for work, for games, for web surfing.
Windows tools it is not yet possible to organize completely autonomous operation two or more screens. You cannot move to a different desktop on just one of the screens. It is impossible to assign to each of them the launch of certain games and applications. And having opened any of the programs whose shortcut has been moved to the desktop of the additional screen, we will see its window on the screen where it was last closed. Windows understands the specified screen expansion mode literally and defines the second monitor as a logical continuation of the first.
Screen expansion mode is only available in Windows environment and does not work in full-screen 3D applications. Considering that the system does not have the ability to bind even 3D applications, even ordinary windowed ones, to run only on a specific screen, gamers who want to enjoy the game on a large screen TV connected not as the main one, but as additional screen, there are only 2 ways to do this - either permanently turn off the main monitor in hardware, or every time before playing in the settings Windows screen change the extension mode to display mode only on the corresponding screen.

Windows also provides additional panel for manual switching between display modes, opened by pressing keys quick access+P.

Perhaps Windows today offers the very necessary package of capabilities, more than which users who use the computer for web surfing on social resources, media entertainment, and office work do not need. But for the audience of gamers and professionals in the field of graphics and design, the functionality offered by the operating system for flexible settings Several displays are not enough.
Well, now about the possible. What functionality for working with multiple screens is implemented in Windows?
2. Basic screen settings
Direct access to Windows screen settings is implemented in the context menu on the desktop. This is the "Display Settings" item in Windows system 10.

And this is the “Screen Resolution” item in Windows 7 and 8.1.

In Windows Display Settings you can:
- Assign any of the connected monitors and TVs as the main display, and all others as additional ones;

- Set such screen interaction modes as: duplication (aka cloning), expansion (the same logical continuation of the computer space of the first display on the second display mentioned above), display on only one of the screens;
- Set the position of the displays in space relative to each other for ease of cursor movement;

- Set landscape, portrait and inverted orientation for each screen;
- Set different resolutions;
- Install different frequency screen updates.

3. Different scales
Since version 8, Windows has learned to apply different scales for different screens. In the Windows 8.1 screen resolution settings, you must first click on the desired display, then select the option to change the size of text and other elements,

then uncheck the option to set the same scale for all displays.

After this, a slider for adjusting the screen scale will appear. The changes made must be applied using the appropriate button below.

Scaling each individual screen in Windows 10 is simpler - both because the slider is placed in the primary screen settings window, and because after making changes you do not need to restart the system, as in Windows 8.1.

4. Different desktop backgrounds
Although Windows has not learned to assign separate single images for each screen as a desktop background, but, starting from the same version of the 8 system, different images can be displayed on different screens using themes that can be downloaded on the Microsoft website by going to link from the personalization section window.

There will also be different pictures on desktops in Windows 8.1 and 10 if you install a background slide show from a custom photo collection.

And for two identical monitors, you can use panoramic wallpapers from a small selection of themes on the same Microsoft website.

5. Hotkeys for moving windows between screens
You can drag windows between screens not only with the mouse, but also with the help of hotkeys. Windows keys+ Shift + right/left arrow will instantly move the window to another monitor and, if it is not maximized to the full screen, will place it in the same area where it was located on the previous monitor.
6. Different position of the taskbar
Starting, again, with version 8, Windows can display the taskbar on all screens. The system does not prevent you from setting its different positions - top, bottom, left, right - on different screens, but it also does not prompt the user about this by the presence of such an option in the taskbar properties. You can manually configure the taskbar to be positioned differently on different screens. We call on her context menu, first uncheck the “Lock the taskbar” checkbox, then open “Properties”.

We activate the option to display the taskbar on all displays. If necessary, we can set the desired type of label grouping open windows. Click “Apply” below.

Next, hold down the taskbar with the left mouse button and drag it to the desired location - up, to the left or to the right side of the screen. Then call up the context menu again and activate “Lock the taskbar” again.

7. Windows settings are few: what to do?
A bit further Windows features Gone are the video card drivers that offer more for different screens operating system fine tuning color, solving the problem with non-standard resolution, more choice screen interaction modes and other nuances. But we are not talking about every video card and its driver. For example, not available in Windows settings The Span mode of screen interaction, which stretches the image across all of them vertically or horizontally, is not always provided for by the video driver settings, since the video cards themselves may not be designed for this.
Only Windows and video card drivers can offer more features special programs, providing offline settings for multiple screens. Of course, we are talking only about functional ones, as a rule, paid programs, such as Actual Multiple Monitors or DisplayFusion.

After all, many free minimalistic utilities for setting up multiple screens, created at one time to solve problems in versions of the XP, Vista and 7 system, have been made irrelevant by Windows in the process of its evolution.
And finally, about a radical way to “expand horizons.” One good thing is always better than two so-so things. If display equipment has not yet been purchased, and for gaming or professional activity It is planned to purchase two identical monitors; perhaps, as an alternative, it is worth considering purchasing one monitor, but with a large screen diagonal. True, if we add an IPS matrix and a low response rate to the large screen diagonal, we get a rather expensive project. Alone, but big screen guaranteed to get rid of possible problems in the process of setting up the mentioned Span mode for two or more displays, and will also unlock the multitasking potential of the operating system by dividing the screen into areas. Users dissatisfied with the capabilities of the standard Windows features Snap will always be able to find third-party software as an alternative to perform this task. Plus, some modern monitors are equipped with their own software to implement the split-screen function, which allows you to distribute space into several areas and use the “picture-in-picture” mode. Such features can be found in monitor models from LG, Samsung, and Dell.
Have a great day!
What to do if the application launches on a non-existent screen? The window of this application is displayed on the taskbar and appears as active when accessed, but cannot be seen on the current computer monitor. This happens when a second monitor or TV was once connected to the computer, and work with the application, accordingly, was carried out on a second such monitor or TV.
The second display was subsequently disabled by hardware, but information about it is still stored in Windows system settings. And applications that were once transferred to this second display continue to run on it.
Here you can do things differently.
1. System screen settings
In order for the application window to move to the main display, you need to remove information about the second display in Windows settings. To do this in Windows 7 And 8.1 You need to open the context menu on the desktop and select .


Next on the screen we will see a number 1 , 2 and further in order if more monitors were connected. And this number must be selected in the settings window below, in the column. You need to specify a value “Display desktop to...” and then select 1 or 2 . Or another number. Select and click "Apply".


In Windows 10, everything is done exactly the same, but in the format UWP-parameters. On the desktop select "Display Options".

Click.

Below we select "Show only on..." and indicate the number of the current monitor.

2. Screen settings menu using the Win+P keys
If we are dealing with an annoying situation, that just the control panel window or application "Options" Win10, where everything described above is configured, opens on a non-existent display, you can resort to the following method.
Press the Win + P keys to launch a simplified screen settings menu. Here you could immediately disable the second display by selecting either "Computer screen only", or "Second screen only". But to do this, you need to know exactly which display is listed under which number in the system. If we turn off the main monitor by mistake, then we will have to start in safe mode. So it’s better to select in this menu "Duplicate", which will lead, accordingly, to duplication of the image on all connected screens.
Then we can configure the main monitor as shown in the first paragraph of the article.

The menu using the Win + P keys works in all current Windows - 7 , 8.1 And 10 .
Once the system has applied the settings for one screen, all applications will move to it. And they will run only on it.
If you need to connect a second display again, you will need to return the settings back. Otherwise the second monitor or TV Windows won't see.
3. Move a window using hotkeys
A way to very quickly return a window to just one desired application to the main monitor, without fiddling with the system screen settings - just move such a window using hot keys.
We activate the application by clicking on its shortcut on the panel Windows tasks. And then press Win + Shift + right / left arrow. You can press any of the arrows. This combination works in all current Windows and is used to quickly move windows between displays.
Windows never puts much thought into choosing where a new window will appear, leaving it up to applications to remember the windows' positions. The problem is that many apps have a hard time remembering where they were when closed, and using multiple screens only makes the situation worse.
With new ones Windows versions You can do a little trick. Start by launching the application and watch where the window opens. Drag the window to another screen, then hold Shift and click the close button. The next time you open the program, it will appear on the same screen. Shift-H didn't work? Along with forgetful apps, there are utilities for forcing them to open in the right place, for example, the Actual Tools Multiple Monitors program described in the previous section allows you to specify whether a new window should open on the active screen or on the screen where the main window is located. You can also write specific rules for each program.
This problem may occur due to video card drivers; Go to your video card manufacturer's website and download the driver update, then try again.
In reality, it is up to the application developer to ensure that the program remembers which screen it was last launched on. If the program behaves incorrectly when working with multiple monitors, do not hesitate to contact the developer and ask for troubleshooting methods.
How to deploy one application or game on multiple screens
Perhaps the strangest limitation for a multi-monitor computer is that Windows doesn't allow you to expand a window beyond one screen. Of course, you can manually stretch the windows of most applications to cover the entire desktop, but this is too labor-intensive a task, since it must be done with one click on a button.
The DisplayFusion utility mentioned earlier allows you to maximize windows to the entire desktop, as well as use hotkeys.
Most people have problems playing games and watching videos. Any program that uses a 3D graphics card processor or video overlay may not work correctly when stretching a single window across more than one screen. To test how well your computer behaves when stretching a video image, open the clip using the player Windows Media Player, and then drag the window so that one half of it is on one screen and the other half on the other. If this works, then Hardware Supports Hybrid Stretch Mode. If not, check for updates to your graphics card driver. The driver is a key factor in determining how well your PC handles the multiple monitor feature. If both monitors use the same video adapter, or you have two video cards with the same graphics chip that can be driven by the same driver, then you'll likely be able to stretch your 3D games across multiple monitors.
When developing Windows 10, Microsoft specialists changed the familiar screen settings interface. It has become simpler, allowing users to produce various settings on an intuitive level. Determination of optimal screen parameters occurs already during installation of the system in automatic mode. All that remains is to configure them for a specific user, if the need arises. The set parameters must correspond to the maximum capabilities of the display screen and video adapter. This achieves the clearest graphics and color gamut.
Setting the screen resolution
Setting up the screen on a personal computer, tablet or laptop with Windows 10 is not very difficult for any user. Its interface is simple and intuitive, which allows you to modify the screen at your discretion in a few clicks. To configure:
- Click on the “Options” icon. In the Start menu, click on the Settings icon
- Click the System icon in the Settings window.
 In the "Options" window, click on the "System" icon
 - Open the "Screen" tab.
 Review your screen settings
 - Check your screen resolution. It must match the recommended resolution of the device.
- If the resolution is set correctly, then click on the “Properties” button graphics adapter».
 Click on the "Graphics Adapter Properties" button
 - Make sure that your adapter is selected in the “Adapter Type” tab.
 Check that the video adapter is installed correctly
 - Close Graphics Adapter Properties by clicking OK.
- Change the screen resolution if necessary.
- Close the System Settings window.
- Screen setup is complete.
Other screen parameters can be adjusted as needed.
When installing Windows 10, all screen settings are usually configured automatically. The exception is rare or outdated types of video adapters, the drivers of which are not in the database on Microsoft servers. In this case, the driver is downloaded from the manufacturer’s website or installed from optical disk, which is included with the computer or laptop when sold. It contains distribution kits of all drivers for installed devices.
Video: how to change screen resolution on a computer, monitor or tablet with Windows 10
Increase or decrease screen brightness and contrast
Brightness and contrast are some of the main screen settings. Each user adjusts them individually to their own requirements.
Contrast on laptops and tablets is adjusted automatically. On monitors and displays personal computers There is a Menu button with which you can adjust the contrast using the device menu.
There are several options you can apply to change the screen brightness settings.
Changing screen brightness in system settings
There are two ways to access screen options:

Video: How to change screen brightness through Windows 10 settings
Changing screen brightness using the keyboard
Almost all modern types of keyboards have the ability to change the screen brightness without resorting to system settings. Previously, only laptops had this feature, but now this function is also inherent in many types of personal computer keyboards. As a rule, you can change the brightness using two keys, which have a sun icon and an arrow indicating increase or decrease brightness. They are most often found in the upper or lower case of the keyboard.
 Use the keys to adjust the brightness level of your screen
 In some cases, you may need to press the Fn key along with these keys to change the screen brightness.
If the keys do not respond to commands to change brightness, download and install the keyboard driver from the manufacturer's website.
Changing screen brightness through Notification Center
In the Notification Center, you can set the screen brightness level only in fixed positions. To change the brightness level, follow these steps:

Change screen brightness using the battery indicator on the "Taskbar"
On laptops and tablets, there is a battery charge indicator on the “Taskbar”, which can also be used to change the screen brightness:
- Left-click on the battery charge indicator.
 Click on the battery indicator
 - Click on the screen brightness change tile.
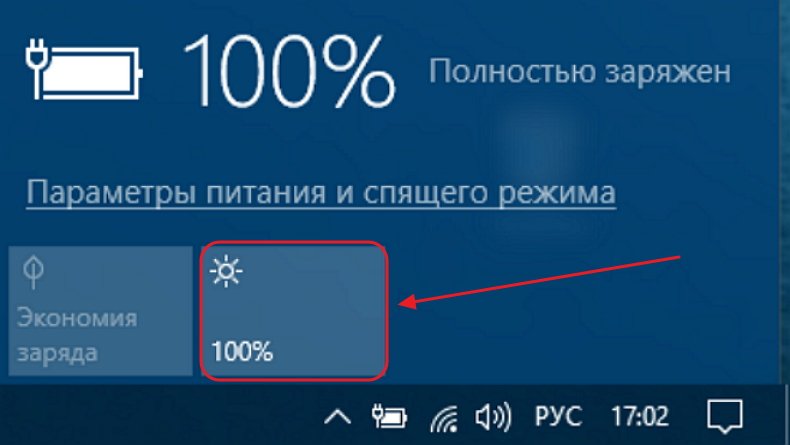 Adjust the screen brightness level
 - You can change the brightness level using fixed values from 0 to 100% in 25% increments.
- Click on the "Power and Sleep Options" tab.
 Click on the "Power and Sleep Options" tab
 - Click on the line “Advanced power settings” in right side the "Settings" window opens.
 Click on the "Advanced Power Options" tab
 - In the “Power Options” window, set the required brightness using the “Screen Brightness” slider.
 Adjust the screen brightness level using the slider
 - Click on the “Power Plan Settings” tab.
 Click on the “Power Plan Settings” tab
 - In the “Change circuit parameters” panel that opens, use the “Adjust brightness” slider to achieve its optimal level when powered from the mains and from the battery.
 Adjust brightness on mains and battery power
Changing screen brightness through the Start menu
You can also use the Start key to access the screen brightness settings panel. To do this you need to do the following:

What to do if the screen is flickering
Frequent screen flickering in Windows 10 can be caused by two problems:
- using outdated video adapter drivers;
- incompatibility of what is installed on the computer software application and system requirements.
The problem does not occur as often as it did when Windows 10 first began to spread.
This is due to the fact that the main companies that produce components for computers have brought their software applications to the required parameters. On those computers with video adapters manufactured 6-7 years ago, incompatibility may occur, since their drivers were not developed taking into account modern requirements.
To resolve the error, you need to find out whether the driver or software application is the source that creates the screen flickering. To solve the problem and restore normal operation of the screen and video adapter, you must use the following method:
- Click right key mouse on the “Taskbar”.
- Click on the “Task Manager” line.
 In the menu, click on the line “Task Manager”
 - Check for blinking in the Task Manager panel. If the panel blinks along with the screen, then the reason is the old video adapter driver. If this does not happen, then the reason is in one of the installed software applications.
 Check for blinking Task Manager panel
 - Double-click the “Control Panel” icon on the “Desktop”.
 On the “Desktop”, double-click on the “Control Panel” icon
 - Click on the “Administrative Tools” icon in the “All Control Panel Items” window.
 Click on the “Administration” icon
 - Double-click Computer Management in the Administrative Tools window.
 Double-click on “Computer Management”
 - Expand the Event Viewer tab in the Computer Management window.
 Expand the Event Viewer tab
 - Expand the Windows Logs tab.
 Expand the Windows Logs directory
 - Check the Application and System tabs for errors.
- If a software application compatibility error is detected in the “Application” tab, then remove it. Then download the latest version of the application from the developer’s website and install it on hard drive.
 Click on the Application tab and check for errors
 - If an error in the “System” tab indicates that an updated video adapter driver is needed, then perform the same operations as for the software application to replace it.
 Click on the "System" tab and check for errors
Video: how to update video adapter drivers in Windows 10
What to do if applications or games do not open in full screen
All modern programs automatically adjust to the screen size. If you install an application or game that was developed many years ago for older editions of Windows, then it can be deployed in a reduced size. In this case, it becomes necessary to expand them to full screen. There are several ways to solve this problem:
- Using hot keys:
- Press the Alt and Enter keys on your keyboard at the same time;
- the application will expand to full screen;
- When you press the keys again, the application will return to its previous state.
- Changing launch options:
- right-click on the game or application icon on the “Desktop”;
- Select “Properties” from the drop-down menu;
 Select “Properties” from the drop-down menu
 - in the panel that opens, click on the “Compatibility” tab;
 Click on the Compatibility tab
 - press the “Run Compatibility Troubleshooter” button;
 Click on the "Run Compatibility Troubleshooter" button
 - If the application is not maximized to full screen, then check the “Compatibility Mode” box and select the required edition of Windows from the drop-down list. It must be kept in mind that Windows edition 10 is not on the list. Last on the list will be Windows 8.
 Select the required edition of Windows
 - Click the "OK" button.
- Update video adapter drivers:
- determine the video adapter model in “Device Manager”;
- go to the manufacturer’s website;
- download and install the new driver.
- Change graphic settings games:
- launch the game;
- go to settings;
- find the item for changing screen settings;
- set full screen mode;
- restart your computer.
- Changing screen resolution:

If a game or application requires a screen resolution of 640X480, then you can set it in the “Options” block on the “Compatibility” tab. But it must be a very old game or application that was created during emergence of Windows in the software market.
Video: How to run an application in compatibility mode in Windows 10
Calibrate the touch screen on Windows 10 tablets
Calibration touch screen must be performed for the tablet to respond adequately to finger touch. If the device is not calibrated, then instead of the letters you press, others will appear on the screen or the image will rotate one hundred and eighty degrees.
To calibrate the touch screen, you need to do the following:

Disable turning off or dimming the screen
With prolonged inactivity, the display screen goes dark after a certain period, and after a few minutes the computer goes into sleep mode, turning off completely. In the system parameters, you can set the option to turn off sleep mode and screen dimming. To disable the energy saving mode, you need to perform a number of operations:
- Left-click on the “Start” button.
- Open Settings.
- Select the "System" section.
- Click on the “Power and Sleep” icon.
- Click the "Advanced power options" button.
- In the “Power Options” window, click on the “Configure power plan” button.
 Select "Power Plan Settings"
 - In the “Turn off display” line, disable screen dimming when running on AC power or battery power. To do this, select “Never” from the drop-down lists.
 Select "Never" from the drop-down list
 - Similarly, in the fields next to the “Put the computer into sleep mode” icon, disable putting the computer in the off state.
 In the drop-down list, click on “Never”
 - Click "Save Changes".
Video: a non-standard way to disable screen dimming
One of the main criteria GUI brightness, contrast and color gamut are considered. The clearer the display looks graphic objects, the more comfortable the work will be for the user. Therefore, do not neglect spending a few minutes in order to achieve maximum effect when displaying graphics and text documents. It should be remembered that incorrectly setting the screen parameters also affects the user’s visual system and can lead to a gradual deterioration of vision. To adjust the screen and fix minor problems with the image, you can use the methods given in this article. If they do not lead to the desired result, then you should contact the service center specialists.
Related posts:
No similar entries found.


