The appearance of the taskbar in Windows 7 is different from the taskbar in Windows XP. In Windows 7 it has an elegant, translucent appearance.
However, a separate panel quick launch, as in Windows XP, not in Windows 7. Program shortcuts are placed directly on the taskbar, along with tabs open source software. And placing a shortcut to the programs you use every day on the taskbar is not difficult.
Left-click on the icon the desired program on the desktop, and without releasing the mouse button, drag the icon down to the taskbar (shown by the red arrow). Then you release it, and the shortcut will remain on the taskbar, becoming available at any time.
When the shortcut on the taskbar becomes unnecessary, click on it, without releasing the left mouse button, drag the shortcut up and “throw” it onto the desktop. The shortcut will immediately disappear from the taskbar.
Practice - you may not succeed the first time. Sometimes the taskbar disappears if the settings are set to: Automatically hide the taskbar. By the way, you can customize the taskbar yourself as you like. I'll tell you how to do this. 
Right-click on the Start button. A context menu will open in which you select the Properties link. 
The Taskbar and Start Menu Properties window opens. If you want the taskbar (the strip at the bottom of the screen) to be visible all the time and not disappear anywhere, then check the box next to Pin the taskbar, and uncheck the box next to Automatically hide the taskbar.
If you want the taskbar to appear only when you move the cursor to the bottom edge of the screen (desktop), then vice versa - uncheck the "Pin the taskbar" box, and check the "Automatically hide the taskbar" box. The rest of the taskbar settings are less important, so I won’t dwell on them.
How to Install Quick Launch Bar in Windows XP
You say: I don’t have such a panel! This means it is not activated.
To activate the Quick Launch toolbar, anywhere on the taskbar (but click right click mice. The taskbar context menu will open. Select Properties. 
The Taskbar Properties window opens. 
Here, check the box next to Show Quick Launch Toolbar. If the checkbox is not checked, then your panel is disabled.
check mark opposite Display the taskbar on top of other windows.
And I also check the box next to Automatically hide the taskbar. If you don’t put it, then it will stick out at the bottom of the screen all the time. I think it’s more convenient when she hides, you just need to get used to it.
The remaining points of this tab are not so important and are understandable without explanation. If you uncheck the box next to Show clock, then your clock will disappear, etc.
Just remember to activate all the checkboxes that you have set, click the Apply button, and then OK.
How to add a shortcut (icon) to the Quick Launch bar in Windows XP

To add an icon to the Quick Launch bar, move the cursor over the desired icon on the desktop, left-click and drag the icon to the taskbar. When a vertical black line appears, release the button and the icon appears on the panel.
If you decide to move the icons relative to each other, you also grab the icon with your cursor and drag along the Quick Launch bar, and the vertical bar will move and show where the icon will end up if you release the mouse button. This way you can place the icons in the order you like.
Of course, you may like the convenience that the Quick Launch panel provides and you will start dragging icons there in an unlimited number. As a result, icons can fill the entire taskbar, which is no good!
But there is a way out of this situation! You can hide some icons. To do this, move the cursor over the separator (circled in red pencil in Fig. 5). The cursor will turn into arrows pointing left and right. At this moment, press the left mouse button and drag the separator to the left. As you move the separator, the icons will begin to disappear. I usually leave 4-5 icons visible.
You don’t have to worry about hidden icons - they won’t go anywhere! Just click on the arrow (circled in red pencil in Fig. 6) and that’s it. hidden icons will appear before your eyes. Click any icon and the program starts! 
The taskbar (also known as taskbar) V operating systems ah of the Windows family is called a special control and visualization showing the current launched applications, connected devices, watches, etc. Initially located in bottom parts of the screen. It also contains icons of programs or folders for fast launch if this function has been enabled in the settings. To the left of the taskbar is the famous button Start, by clicking on which most users begin their work. Let's go through the points related to settings and other features taskbar.
Returning the panel to its original position
You need to perform some steps to return the taskbar position to its original position.
Through standard settings
Right-click on the menu Start or a free part of the taskbar in the opened context menu select " Properties«.

A window for changing startup settings and taskbar will open. Switch to the tab " Task bar", In chapter " Position of the taskbar on the screen» select what you need. For example, let's try changing it to " From below". Press the button " OK» to save the results. 
Users Windows XP will not find setting the position of the taskbar in the standard start options, as can be seen from the screenshot, there is no such section in the design section at all, so they are recommended to use the following instructions.
Using drag and drop
Move the mouse arrow to panels, right-click on the empty area and uncheck the “ Lock panel". We do this in order to enable the user move taskbar to the right place, otherwise the system will block the panel and will not allow you to perform the necessary manipulations. 
Now right-click on free part of the panel and, without releasing the button, drag it to necessary edge of the screen. Can be moved to the left edge, top, right or bottom. Afterwards, click on again free taskbar parts and we fix panel by checking the corresponding box.
Using the Registry Editor
More experienced users can use the following method. The position of the taskbar is controlled by the registry key " StuckRects2", which is located at " HKEY_CURRENT_USER\Software\Microsoft\Windows\CurrentVersion\Explorer\StuckRects2". In this registry branch we find the file “ Settings", which will need to be changed.
Open the settings file double by pressing. In the window that opens we will see a set of numbers and letters, and this is what needs to be changed.

Delete everything and enter the values below (do not enter commas):
- For moving down: 28, 00, 00, 00, ff, ff, ff, ff, 02, 00, 00, 00, 03, 00, 00, 00, 3e, 00, 00, 00, 2e, 00, 00, 00, 00 , 00, 00, 00, 82, 04, 00, 00, 80, 07, 00, 00, b0, 04, 00, 00
- Up: 28, 00, 00, 00, ff, ff, ff, ff, 02, 00, 00, 00, 01, 00, 00, 00, 3e, 00, 00, 00, 2e, 00, 00, 00, 00 , 00, 00, 00, 00, 00, 00, 00, 80, 07, 00, 00, 2e, 00, 00, 00
- Left: 28, 00, 00, 00, ff, ff, ff, ff, 02, 00, 00, 00, 00, 00, 00, 00, 3e, 00, 00, 00, 2e, 00, 00, 00, 00, 00, 00, 00, 00, 00, 00, 00, 3e, 00, 00, 00, b0, 04, 00, 00
- Right: 28, 00, 00, 00, ff, ff, ff, ff, 02, 00, 00, 00, 02, 00, 00, 00, 3e, 00, 00, 00, 2e, 00, 00, 00, 42 , 07, 00, 00, 00, 00, 00, 00, 80, 07, 00, 00, b0, 04, 00, 00
After that reboot computer
Hiding the taskbar
Windows allows you to make the panel appear only when you hover over it with the mouse (over the area where the taskbar is located):

Changing the size of icons
I have an opportunity decrease or increase panel icon sizes, if they were previously reduced. For this we open properties menu Start, activate the tab “ Task bar" and check the box " Use small icons"or remove it if such a result is required.

Let's go back to Windows XP again. There not implemented Changing the size of icons through launch properties. Coping with the situation in the following way:

Can increase number of icons in the quick launch section. For this:
Frequent taskbar problems
It may happen that the taskbar and Start are simply disappeared, and instead of them only the desktop picture is displayed. Causes may be different - this is the malicious work of viruses or various system errors. The solution may also be different, sometimes it is necessary manually edit some sections of the system registry, and sometimes it helps simple computer or a separate restart of the service " explorer. exe«.

Restoring the taskbar in Windows 10
If the panel not displayed in Windows ten:
- launch command line on behalf of the administrator, enter the command or copy from the article (then right mouse button and paste the copied text) " exe /Online /Cleanup-image /Restorehealth". We are waiting for the completion of the execution process;
- upon completion, enter new team « Sfc /scannow", press the button " Enter"and wait for the end.
Upon completion restart system. 
Method two:
- run the program with administrator rights " PowerShell«;
- paste or print » Get-AppXPackage -AllUsers | Foreach (Add-AppxPackage -DisableDevelopmentMode -Register "$($_.InstallLocation)\AppXManifest.xml")"(without quotes), press Enter. Reboot.
If the user cleaned the system registry before the problem occurred third party programs, That recommended restore cleared keys (if archiving of cleared results is supported by the program and was enabled earlier), the program may accidentally deleted the necessary data along with garbage.
Additional features of the taskbar
Taskbar displays Quick Launch Bar, which can be disabled in the Start menu settings, open folders and launched programs. You can add various toolbars to the taskbar. You can turn on the display hours or hide them altogether.
Can be enabled grouping similar panel buttons or disable this function, configure the button action shutdown on the keyboard, change design And functional menu to classic or standard, enable or disable display list recently used programs and open files.
The taskbar is one of the main mechanisms for managing and interacting with the system in Windows. Therefore, the comfort of your work with the OS and the computer as a whole will directly depend on its configuration and the settings of those important elements that are located on it.
Task bar
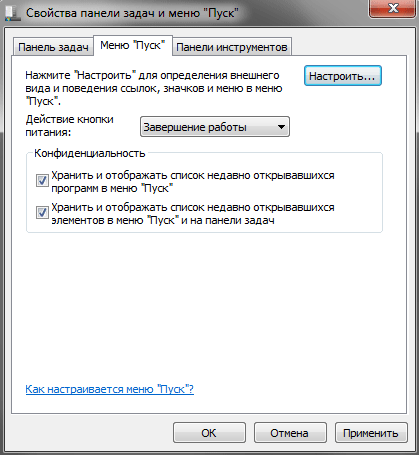
To go to settings Taskbars And start menu you need to right-click on Start button in the lower left corner of the screen and select the item in the context menu that opens Properties. After this, a window will open in front of you Taskbar and Start menu properties, the component settings of which we will consider.

By the way, you can also access taskbar settings from Control panels by clicking on the item with the self-explanatory name Taskbar and Start Menu.
The taskbar and Start menu window contains three tabs: Task bar, Start Menu And Toolbars, which are responsible for setting the parameters of the corresponding Windows components.
Customizing the Taskbar and Notification Area
At the top of the tab there are settings that are responsible for the design and display of the taskbar.
Pin the taskbar . By checking this box, you can fix the taskbar on the monitor screen in the place where it is located on this moment. In this case, it will be impossible to stretch, move or collapse. As a rule, this item is checked by default. If you want to increase the height of the taskbar (when located at the top or bottom of the screen) or its width (when located on the left or right of the screen), and also change the size of the notification area and toolbar, then uncheck this item. After this, you can perform all the operations described above by dragging the boundaries of the desired areas with the mouse.
Automatically hide the taskbar. Activating this option will allow you to use the maximum desktop area when working, since the control panel will be hidden and will no longer be displayed on the screen on top of all windows. To open the panel in this mode, you need to move the mouse cursor to the edge of the screen along which it is located.
Use small icons. This option allows you to make program icons smaller and open applications located on the taskbar. In this way, you can expand the workspace and increase the number of displayed elements on the panel itself.
Position of the taskbar on the screen. Allows you to select from the drop-down menu where the panel will be placed on the screen. You have four options: Bottom, Top, Right or Left.
Taskbar buttons. At this point you can choose how icons will be displayed on the taskbar running programs and open windows:
- Always group, hide labels. This mode is activated by default and allows you to expand free space on the taskbar due to the fact that icons of similar open applications are grouped, and the icons themselves do not have labels of their names. For example, if you have several Explorer windows open at once, they will be grouped into one icon on the taskbar, which will be displayed as several rectangles superimposed on each other.
- Group when taskbar is full. Unlike the previous option, this mode is more informative for the user. All icons for open applications are located separately on the taskbar and are labeled with the names of the windows in which they are running. Icon grouping occurs only when the taskbar is full and there is no free space to accommodate new icons.
- Do not group. Grouping of open program icons does not occur under any circumstances.
In the middle of the Taskbar tab there is an item Notification area , which is responsible for configuring the display of system icons and icons background programs, as well as their messages in the notification area (tray).
After clicking on the Settings button, a window will open in front of you with a list of all background and system applications, next to which you can select their behavior in the tray from three available options:
- Show icon and notifications
- Hide icon and notifications
- Show notifications only

Below the general list of all icons there are items Turn system icons on or off(Clock, Volume, Network, Power and Action Center), as well as Restore default icon behavior. You can also activate the option Always show icons and notifications on the taskbar.
And finally, in the lower area of the tab we are considering there is an option setting Desktop previewusingAeroPeek. Activating this function allows you to hover the mouse cursor over the button Collapse all windows, perform quick temporary viewing of content Desktop. Wherein open windows do not collapse, as happens when this button is pressed, but become transparent.
Customizing the Start Menu
Let's move on to studying the next tab of the window with a self-explanatory name Start Menu. As you probably already guessed, here are the options responsible for setting the parameters of one of the key components of Windows system management, which is called up using the button of the same name located at the very beginning of the taskbar.
On appearance the Start menu and the elements of which it consists, as well as the behavior of objects and icons in it, is influenced by a lot of parameters that simply would not fit on this tab. This is probably why the developers put them in a separate window, which opens after pressing the button Tune. We'll talk about this a little later, but for now let's return to our tab and look at the few parameters that are still located on it.
Power button action . Using this item, you can configure the system action that will occur after you press the physical power button located on the computer case. To do this, you must select any of six options from the drop-down menu:
- Shutdown- leads to the complete closing of all programs, logging out and shutting down the computer. This action is set by default.
- Change user- causes the user to log out to the selection screen account without closing running programs.
- Ending a session- causes the user to log out of the system to the account selection screen and close all running applications.
- Locking your computer- leads to blocking of the system without closing running programs. To resume operation, the user will need to enter a password. - leads to closing all applications, logging out and restarting the computer.
- Dream- puts the computer into state reduced energy consumption. In this case, all parameters current session work is preserved, allowing work to be resumed quickly in the future.
Confidentiality . This option contains two items that allow you to display or hide recently opened programs, files or documents on the left side of the Start menu. Everything is simple here - if the checkboxes are checked, then display is allowed, if unchecked, it is prohibited.
Now let's look at the options that are contained in the window Customizing the Start Menu called by the above button Tune.

This window contains quite a lot of settings, but there is no point in considering all of them in detail. Many points have self-explanatory names and do not need any additional comments, but we will still make small explanations about some.
Most of the Start menu settings concern the display of thematic themes in it. custom folders and menus, including: Videos, Music, Documents, Homegroup, Games, Pictures, Personal Folder, Favorites, Recent Documents, TV Recordings and Downloads, as well as the main controls: Administration group, Run command, Computer, Control Panel , Network, Connect to, Default Programs, Help, Devices and Printers.
Depending on the menu item, several display options can be applied to it:
- Don't display this element
- Display as menu- the group will be displayed on the right side of the Start menu as a folder with an arrow that opens automatically when you hover the mouse cursor.
- Display as link- the item will be displayed on the right side of the Start menu as regular link, after clicking on it, a new window will open with the contents of the folder of the same name.
Highlight recently installed programs . If this option is checked, the system in the Start menu and All Programs group will highlight new (recently installed) applications and the folders in which they are contained in dark yellow.
Search other files and libraries . An item that allows you to expand search locations necessary information or speed up the search process itself by disabling scanning of public folders.
Search Control Panel programs and features . When this option is activated, you will be able to search for the desired objects in Control panels systems.
Large icons . Unchecking this item will reduce the icons of the most frequently launched programs, the list of which is located on the left side of the Start menu. This will increase the number of applications displayed in this list.
Allow context menu and dragging of objects . Activating this parameter allows you to call up the context menu of Start menu objects, as well as drag them with the mouse into various work areas of the system. For example, you can drag a program icon from the Start Menu to the Desktop or, conversely, add a link to an application to the Start menu by dragging an icon from any open window there.
In addition to the parameters discussed above, at the bottom of the settings window there are two more elements with which you can adjust the size, or rather the height, of the Start menu. They regulate the display of the number of positions in lists of recently used programs and items.
Customizing Toolbars
As in previous versions operating systems, Windows 7 provides the ability to work with toolbars that serve to quickly launch program components and access resources.
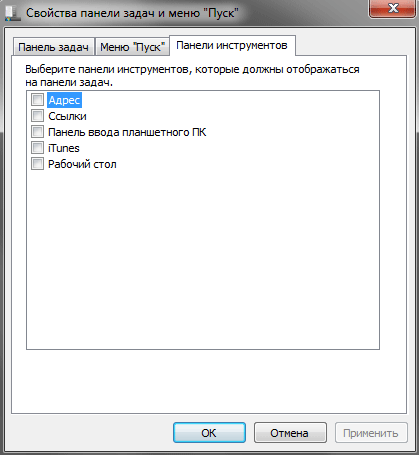
Initially, the system includes only a few standard toolbars: Address, Links, Tablet PC Input Panel and Desktop. But as new applications are installed, the list of these panels will expand. For example, in our case you see the appearance additional panel iTunes.
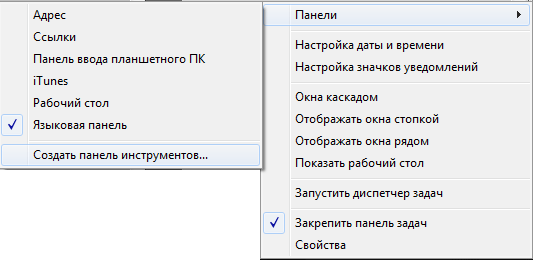
You can also create your own toolbars yourself. To do this, right-click on an empty space on Taskbars and in the context menu that opens, select Panels and then the command Create a toolbar V.
Controlling the display of toolbars is carried out at an intuitive level. To do this, just uncheck or check the box next to the desired panel and press the button Apply.
The taskbar has excellent functionality in Windows 7. It has several very interesting features and improvements that improve performance compared to other versions. Therefore, it is important to write a series of articles on such topics. , certainly should not be ignored. Now let's look at how to customize the appearance, size, and location of the main tools.
How to open the taskbar properties window
To open these settings, you need to right-click on any empty space on the taskbar and select the “properties” command.
The parameters we need are located in the first tab, which is called the “taskbar”. In the following articles we will look at all tabs in more detail.

How to change the appearance and location of the taskbar
Sets of settings in the window that opens will help you change the appearance and location. Thus, you can make the following changes:
- Pin the taskbar- if this option is selected, the start menu bar will remain motionless. You won't be able to move it to another location or resize it.
- Automatically hide the taskbar- this option allows you to hide the taskbar when you are not using it. Then, when you hover your cursor over its location, it smoothly pops up.
- Use small icons- if this checkbox is checked, pinned icons appear smaller, which helps save desktop space.
- - parameters allowing you to determine the location. To do this, click on the drop-down menu as shown in the image. Choose the position you like best.

There is another way to move. Left-click on an empty space in the Start bar, while holding down the button, move the cursor to the desired side of the monitor. After moving the cursor, release the button and the panel moves in the direction we need. If you can't drag, make sure the "pin taskbar" option is disabled, uncheck it, and try again.
In fact setting windows panels 7 is not difficult to learn. With the right approach, you can easily learn to manipulate it.
- Taskbar buttons- Helps determine the appearance of open application labels. There are three options here:
- Always group, hide labels- labels of one application will be combined and their names will be hidden. Applies by default.
- Group when taskbar is full- combines labels into one if several tabs of the same application are open. This setting also shows the names of open elements.
- Do not group- will display all labels separately and will never combine labels of the same application as one. If you have 15 windows open google browser chrome, they will be shown separately. If shortcuts occupy the entire length of the taskbar, then in the right corner you will see an arrow, when you click on it, a new workspace will open, with labels that do not fit. When the taskbar is full, label names are not shown.

Setting up the panel windows tasks 7 allows you to change its height. To change the size, hover your mouse over the edge until a cursor with two arrows (up and down) appears. Hold down the mouse button and set the height as needed.
Note: You can change the size if the "dock the taskbar" option is not enabled.
View Aero Peek desktop
When this option is enabled, you can move the cursor to the desktop preview button, which will make all open windows translucent. This is useful when you want to view a gadget or other information on your desktop without minimizing open windows. Move the cursor off the button and everything will return to its place.

If the feature is of no use to you, uncheck "Use Aero Peek to preview your desktop" and it will be disabled.

If you click on the desktop preview button, all open windows will be minimized. Click again and all windows will be shown in their original state.
how to add toolbars
A feature that is not new, but allows adding additional tools. To add standard or custom tools, right-click an empty space on the taskbar. In the menu that opens, go to the "panels" item and select the option you want:
- Address- will add address bar, into which the URLs of sites are entered. When you enter an address, the link will be opened by your default browser. This line can be used to access a folder or file, but it is not very convenient. It's easier to enter the items you're looking for in the Start menu search.

WITH links- this adds URLs to your favorite sites in Internet Explorer. If you use a different browser by default, it's pretty useless. In my screenshot you can see that the icons are opera. This is due to a recent jamb. Any browser opens in Opera. There was no time to fix it, so I had to make such a screen.
- Tablet PC input panel- creates a button that you can use to quickly launch the Tablet PC input window.

- Desktop- will add a toolbar with all desktop shortcuts.

- Create a toolbar- The most useful option because it allows you to add custom toolbars. When you select this option, a new window will appear. Navigate to the folder that you want to use as a tool and click "select folder", after which you will get fast access to the selected element.

You can also see an element such as " ", when you click on it, the usual language switching panel will move to a separate place. Hover over language bar, hold down the left button and drag it anywhere on the taskbar. After which the panel will be installed in its original place. Setting up the Windows 7 taskbar will not take up much of your time.
Sometimes it can take a few minutes to find where to turn on the bookmarks bar in some browsers. Let this one brief instructions will help users in this matter. After all, sometimes we need to quickly find a link to the desired website and quickly open it. Sometimes a lot depends on it. Below is how this is done in different browsers- from more popular to less common.
Google Chrome
Click the button Menu.
Select an item Bookmarks.
Check the box Show bookmarks bar:
Opera
Click the button Opera.
Go to menu Bookmarks.
Check the box Show panel:

Mozilla Firefox
Right-click on the empty field next to the tab title.
Check the box Bookmarks bar:

Yandex browser
Click the button Menu.
Go to menu Bookmarks.
Select Show bookmarks bar:

Internet Explorer 11
Right-click on the window title.
Check the box Favorites panel


