On startup operating system- one of the most common mistakes encountered by users. Signs of this Windows errors 7 look like this: Immediately after the download completes, when the welcome and user selection dialog should appear, nothing happens. The screen remains black, no controls are displayed, and no error messages appear. The causes of this problem may be different, and in order to understand how to remove the black screen of Windows 7, you will have to diagnose your computer yourself and look for a solution.
The computer shuts down improperly or the power goes out
If the error when starting Windows 7 is due to an unexpected reason, for example, a power failure, then running the Last Known Good Configuration will help fix this. The essence of the solution is that Windows writes important parameters to special file and if the computer starts successfully, it marks them as operational. If, after accidentally changing any of these parameters, the system cannot start, then it is possible to use the old configuration. To do this you need to do the following:
- turn off computer;
- re-enable it;
- wait until the very first screen, which usually displays the title, goes out motherboard and model or list of connected devices ( hard disks, CD drives);
- Hold down the F8 key and wait for a menu to appear with a choice of actions.
Among the boot options displayed, you can see options such as “Safe Mode”, “Safe Mode with network drivers" and others. Find among them the “Last Known Good Configuration” parameter, select it using the arrow keys and press Enter.
When selecting this menu item 90% of the time Windows boot pass without errors, and the computer returns to normal operation.
Error caused by installing new driver versions

We all love updates. Computer hardware manufacturers are well aware of this and periodically release preliminary versions of drivers, marking them as beta versions. And if, in pursuit of a couple of extra frames per second in your favorite game, you downloaded and installed this version, and the computer greeted you with a black screen when rebooting, then there is a solution for this too. It should be noted that such an error can also appear during a regular update, when you download the final stable version of the drivers, but the installation fails with an error. In any case, if a black screen appears after you install Windows 7, you need to do the following:
- following the instructions from the previous section, launch a window with a choice of options for booting your computer;
- Use the arrows to select the “Safe Mode with Network Driver Support” option and press Enter.
Next you need to wait until everything is disabled unnecessary services and drivers, including the sound and video card driver, so starting the system in this mode almost always succeeds if the problem lies in them. You should remove the problematic driver and replace it with a working one. This is done as follows:
- Click right click Click on the “Computer” icon and select “Properties” in the context menu.
- In the window that appears, on the left side, find the “Device Manager” item and click on it.
- Find the “Video adapters” section in the list of devices and expand it by double-clicking the left mouse button.
- Right-click on the name of the video card, open and select “Properties”.
- In the window that appears, open the “Driver” tab and select one of the possible actions:
- “Roll back” (the current version of the video driver will be deleted and the previous one will be restored);
- “Delete” (the current version will be completely deleted installed driver from the system).
If there is such an opportunity, then it is better to select the “Roll Back” option. In any of the options, after selecting an action, follow the instructions of the “Setup Wizard”, wait for the operation to complete and reboot the computer. It should be remembered that after complete removal from the system, you need to download them again from the manufacturer’s website or install them from the disk that came with the equipment.
Black screen after installing a program

This script is extremely simple and almost exactly repeats the steps of the previous section, so most readers will most likely have already guessed how to remove the Windows 7 black screen that appeared after installing a new software. The procedure is as follows:
- Following the instructions in the previous section, start your computer in safe mode.
- Click “Start” -> “Control Panel”.
- Find “Programs and Features” and click on it.
- A list of programs and components appears, presented in table form. You need to sort the list by installation date by clicking on the corresponding column, then start searching for programs that were installed on the day the black screen appeared.
- Select required component by clicking once with the left mouse button and clicking the “Delete” button that appears.
After this, you should restart the computer and evaluate the result.
Black screen caused by changing system settings
There are times when uninstalling the program that caused the black screen to appear is not enough. Many of the programs as well official updates from Microsoft, in addition to copying your own files to HDD, change some system parameters. If this is exactly what happened to you, and you don’t know how to remove the Windows 7 black screen and restore old settings, you need to do the following:
- following the instructions from the previous section, start the computer in safe mode;
- Click the “Start” button and enter the word “recovery” in the search bar;
- in the results that appear, select “System Restore” by left-clicking once;
- in the window that appears, click “Next”;
- select the restore point to which you want to roll back the system and click “Next” again, then “Finish”.
There is no need to worry about the safety of files created after the date to which we decided to roll back: files created by the user will not be affected during recovery. All that remains is to wait for the operation to complete and boot the computer again.
When nothing helps

If all the methods described above did not help in any way, and you still do not know how to remove the black screen of Windows 7, you should think about radical measures. Ordinary users can seek help from specialized service centers, where professionals will save you from this mistake. More advanced users can try reinstalling Windows. Although this measure requires some knowledge and preparation, it guarantees one hundred percent success in getting rid of the black screen. In any of the scenarios you choose, you should do backup copy necessary files, logging into the system in safe mode, and only after that take decisive action.
Suddenly after another Windows startup 7 instead of the login screen account or desktop, a black background may appear with a cursor on it. Before we begin solving the problem, let’s delve into its essence, because even a few template instructions for different cases will not always help.
Most often, a black screen and a cursor on it are the result of a virus or malware. This program interferes with system settings, making it so that instead of the explorer.exe process it starts itself or completely replaces the above-mentioned file (many remember the Win32 family of viruses that hid files and directories, replaced them with their own “bodies” and even copied their icons for disguise). After all, he is responsible for GUI Windows: everything the user sees on the desktop, etc.
One cannot help but recall the Avast antivirus, which tends to block system processes, including explorer.exe due to excessive activity when starting the PC.
The likelihood of sudden conflicts between video card drivers and the operating system is low, although if they have been recently updated, it increases significantly. And drivers downloaded from nowhere or the use of driver packs only fuel the situation.
More deplorable will be the appearance bad sectors on the hard drive, and even when they contain fragments of system files, the same explorer.exe. Partially damaged planks random access memory We won’t ignore it either, but last but not least.
First of all, let's try to start the computer in one of the additional boot options - from the last successful configuration. It is a set of system parameters stored in the registry for the state of drivers, applications and services with which Windows 7 successfully booted for the last time. If, before restarting or shutting down the PC, you installed something, edited the registry or the list of automatically launched applications, this method will clearly help. To implement it we do the following steps.
- Let's reboot.
This is done using the Reset key or through the task manager.
- In the second case (it is recommended to use it) we call the dispatcher using Ctrl + Alt + Del.
- Move the mouse cursor to the “File” main menu item and call the “New task” command.

- Execute the command “shutdown /r” to reboot the system.

- After the BIOS information appears, click F8 until a menu of additional boot options appears.
- Using the cursor keypad, select “Last successful configuration” and press Enter.

Did not help? This means the source of the trouble is different. Let's move on.
Avast
If the “seven” is protected by a comprehensive antivirus solution from Avast, the application may be the culprit for the fact that the explorer does not load. Removing the antivirus is not an option, but adding the file with which the problem is occurring to the exceptions is necessary.
It’s not relevant for all versions of Avast, but it’s worth a try since similar behavior has been noticed.
- Open the Task Manager.
- We launch the “AvastUI.exe” process, as in the previous case, by finding the executable file in the folder with installed antivirus(in Program Files).
- In the application menu, click “Security”.
- Then go to the “Antivirus” subsection, where we click on the “Behavior Screen” tab.

- Click “Browse” or enter the path to the reliable process manually - as shown in the screenshot.

- Click “OK” and restart.
Has the blinking cursor appeared on a black background again? Let's move on.
Manually launching Explorer
There are several simple ways to open the program responsible for the graphical interface on the problematic computer.
- If we stop at this option, we reboot again, and after completing the hardware self-test procedure, press F8.
- In the window, select “Safe Mode with Command Line Support.”

- In text CMD line enter “explorer.exe” and press Enter.

If the process does not start, then the corresponding file is damaged, missing, or cannot be accessed.
Rolling back the system, which we will touch on later, restoring the “seven” from the installation flash drive, fighting viruses and their consequences, or editing registry entries will help here. In the latter case, you will have to acquire boot disk with an antivirus program, start from it, selecting CD/USB with the distribution kit in the BIOS antivirus program. Depending on it, the method of starting a scan may differ, but the meaning is obvious: we find and remove all viruses at least on the system volume.
If viruses are annoying
Even a laptop that is not currently infected with viruses can crash, displaying a black screen without or with a cursor. By the way, in the first case, the source of the problem may be the video driver. And all because the virus did its own thing, replacing the path to explorer.exe with its own. It is noteworthy that the following method works even without booting into safe mode, and you can also call the Registry Editor through the task manager.
- Open the “Run” window through the task manager.

- We write “regedit” and press Enter.

- Expand the HKLM branch.
- Go to the Software section.

- We follow the path indicated in the screenshot.

- Open the Shell key editing window.

- In the “Value” field, set “explorer.exe” and apply the settings.

- Let's reboot.
If this does not help, you will have to return to one of the previously saved states of the computer’s operating system.
Rollback
Here we will do time travel, provided that the system recovery function is activated.
- Through the task manager, open the command execution dialog.
- We register rstrui.exe and execute the command.

- We indicate the recovery options (it makes sense to select the last created rollback point before the black screen appeared or stop at the recommended one).

- Click “Finish”.

- We get acquainted with the warning and click “Yes”, but there is no other choice.

Once the process is complete, a notification will appear.

The next time you turn on your PC, the desktop should appear.
When the graphics driver is naughty
Rolling back drivers during a system rollback is extremely rare. It's good if the installation graphics driver was made quite recently, and if it was installed a couple of weeks ago, when resuscitating the “Seven”, many files and applications may be damaged. Rolling back the driver will help you get rid of such software, and only if the problem does not occur when you start it in safe mode.
- Let's start in safe mode.
- Calling context menu my computer and click “Properties”.
- Click "Device Manager" in vertical menu left.

- Open the “Properties” of the video adapter used (there may be several of them in the system: integrated, discrete, built into the central processor).

- In the “Driver” tab, click “Roll Back”.

You can also try to remove or update the video adapter driver by downloading it from the official website.
Before this, you should test the RAM sticks using a utility like Victoria 4.47, check the HDD for failed memory cells (chkdsk C: /f) and the integrity of important system resources (command “sfc /scannow”). They are executed via the command line.
Black screen after standby
After resuming from standby mode, a black background may appear instead of the desktop or user selection interface. In such cases, there will be several options, depending on the situation:
- rollback or installation more old version graphics driver, if problems began after updating the video card driver, especially when using driver packs or installers downloaded from third-party resources;
- alternately switching between the four main values of the ACPI Suspend Mode parameter (responsible for software control power supply for computer components) located in BIOS section called Power;
- reinstalling Windows 7 using the original image, and not the next author’s assembly - it is likely that this caused the problem (removing and disabling some system functions to save disk space and facilitate assembly could have had an effect);
- updating drivers for USB controllers, mice and keyboards downloaded from official resource their support;
- disabling the PC to go into standby mode;
- prohibiting one of the input devices from waking up the PC from standby mode.
Let's look at the last option in more detail. You can restore your PC using a mouse or keyboard. It is possible that one of the devices is blocking the computer from returning to a normally functioning state, and this is easy to determine, at least by the increased activity of the fan blades. In this case, deactivating the option to disable sleep mode for the mouse or keyboard will help.
Do not disable it for both devices at the same time, because you will not be able to exit sleep mode later!

A black Windows screen with a blinking cursor that suddenly appears instead of your favorite wallpaper is still much nicer than a blue one! For those who don't know: blue screen Windows professionals call it the “screen of death.” And the presence of a black screen only means that a virus has entered your computer and discovered itself in this way. Let's figure out how to remove the black screen of Windows 7.
The tricks of Mister Virus.
First, let's think about why the computer seems to boot, but there is nothing on the screen? The explorer.exe process is to blame, or rather, the one who ruined its launch. To make sure that the diagnosis is correct, press Ctrl + Alt + Del (the keyboard works for us) - a key combination to open the task manager.
In the task manager window, select “File”, go to “New task”, enter “explorer.exe”, “OK”.

We were right - everything returned to its place. But! These actions return the desktop to its place, but the next time you boot the operating system, everything will happen again. Problem still exists. Therefore, let's move on in order to get rid of the Windows black screen of death once and for all.
Look to the root!
Initially, you need to get rid of uninvited guests by running not only your installed antivirus program, but also third-party utilities. Why is there not enough of our own? He has already missed this virus on his computer, and it is likely that he will not notice it during scanning. After the anti-virus scan, we will have to look into the “holy place” - the registry editor, the repository of all Windows settings.
Click “Start”, enter the command “regedit”, “OK”. We look for the keys in the registry:
Don't be happy if you find them! They should be removed! This can be done by right-clicking the context menu, or using the “Del” button.

We find the Shell parameter in it. Its value should be explorer.exe and nothing more! If this is not the case, right-click to call up the context menu, “Change”, and enter the correct value. If there is no such parameter at all (and this may happen!), in an empty area of the Registry Editor screen, call up the context menu and select the “Create string parameter” item. Give it the name “Shell” and assign the value “explorer.exe”. All changes made to the registry will take effect after the computer is restarted.
Also note the Userinit parameter. Its value should be exactly like this:
If the situation described above repeats, you should take more care reliable protection computer from virus attacks.
03.12.2012 Frank 0 Comments
Today (12/03/2012) it is no longer common (if everything is done correctly) for black to appear windows screen 7, vista, XP or the completely new 8.
However, such troubles can arise. Mechanical and software errors can contribute to this.
The first includes damage to the video card, hard drive, or even the screen. There are other “small” ones, but they are insignificant.
The second reason why when you turn on (when starting, loading) a computer (netbook) or laptop is a software failure, including virus infections.
How to remove black screen from windows
What to do if after downloading (installation, launch) a black screen appears, vista, XP, 8. Do not panic, but determine what caused it. If you see what is in the picture below
Start the system in safe mode. If you succeed, then you can try to restore the system to remove the black screen of Windows 7.
In the same window there is an option: Last Known Good Configuration. It refers to the recovery point.
If you have one (it is created for everyone by default), use it. This work is that you will return the system configuration (state) to the previous normal functioning when the black screen did not appear.
Windows won't start black screen
What else should you do if Windows won’t load? A black screen appears. If there are a few more points, I just don’t want to dwell on them, since some knowledge (more than basic) will be required.

If windows does not start (a black screen appears) due to the penetration of viruses, and you have a computer, regardless of the operating system (7, vista, XP, 8) one of the best and most effective ways(helps 100%) is to remove the hard drive (available to everyone on their own), install it on another computer (ask friends) and remove it from there (you can use the healing utility from Doctor Web).
You will definitely be able to remove the black screen of Windows 7 (in this way if there is a virus). With laptops (netbooks), everything is not so simple. You won't be able to remove the disk.
New viruses constantly appear (hundreds of them every day), and antivirus software cannot keep up with them.
If you have picked up a “newbie”, most likely, you will have to dress up and reinstall the system, there is no difficulty in this (everyone can do it on their own).
The worst thing is to lose some data, but it’s still better than constantly having a Black Screen on Windows 7, Vista, XP or 8.
You need to immediately clarify what “after loading” means. You should not think that this applies to the case when the user turns on the computer, but it does not react to this in any way and the monitor screen remains black, as before turning on the PC. “After loading” means that the user sees on the monitor screen the results of the so-called post (power on self tests), BIOS messages about the computer configuration, the initial Windows 7 welcome screen. But then the usual desktop is displayed (or may not be displayed) in black, and sometimes with some details in the lower right corner. Why doesn't Windows start in its normal mode?
We list the most common causes of a black screen (in order of increasing difficulty in eliminating them):
- Short-term hardware faults, such as power outages.
- Problems with the video card, such as a damaged video driver file.
- Virus attack attempting to damage system files and/or the Windows registry.
- Attempts to update the pirated copies of Windows 7.
- Problems with OS activation.
The simplest reason is a short-term power failure in the electrical network, which can be checked by trying to turn on the computer again and boot Windows 7. If this was the reason for the black screen, then when you try again starting Windows the black screen will disappear and everything will work as expected. Otherwise, the user will have to work a little harder.
In any case, the absence of a normal desktop means that Explorer (explorer.exe) was not launched for one of the reasons given above. First, let's assume that for some reason the explorer does not start, and we will try to start it. For this:
- Use the Ctrl+Alt+Delete or Alt+Ctrl+Shift buttons to open the task manager.
- In its window, open the “Applications” tab.
- Click on “Create a new task”.
- In the window with this name, set explorer and click “OK”.
Now you need to restore the normal launch of Explorer so as not to perform the described steps every time you start Windows.
To avoid the hassle of editing system registry, let's use the AVZ utility. We launch it and open the “File” item in the main menu, then click on “System Restore”. A window opens with a list of recovery actions. In it, check the items “Restore Explorer settings” and “Restore Explorer launch key”, then click “Perform selected operations”.
 Upon completion of AVZ, we reboot, after which the explorer starts normally.
Problems with the video system
Typically, a black screen occurs for two reasons - due to overheating of the video chip or distortion (substitution) of the video card driver file by some malicious application. The first of them is easy to determine if you find out the temperature of the video chip using one of the many computer health monitoring utilities, for example, AIDA64. As a rule, the video chip overheats when the fan blowing on it stops or when it is overloaded with modern “heavy” games. For most video cards, the maximum temperature limit for the video processor is 100 degrees Celsius. If a black screen appears when the PC is running due to overheating of the video processor, then repeated attempts to boot will lead to nothing - you should wait a while for its temperature to drop, then try to boot again.
Black screen as a result of a virus attack
Problems with the video card driver, as a rule, arise either due to the impact of viruses on the video driver file or after an unsuccessful attempt to update it and the resulting incompatibility of the new video driver with the OS version. In any of these cases, you should boot Windows in safe mode. To do this, after turning on the computer, you need to press F8 to make additional boot options appear and select safe mode in it. If after booting in this mode the black screen disappears, then most likely you need to reinstall the video card driver. Of course, reinstalling the video driver is only possible when Windows starts, and other than a black screen, there are no other problems. To reinstall the driver, you need to go to the website of the video card manufacturer, download the most latest version driver and install it. You can also update the driver in another way. You need to go to the device manager, select the desired video adapter in it, right-click on it (RMB) and select “Update drivers” from the menu.
But we can’t close our eyes to possible consequences exposure to viruses. In this case, restoring system files and rolling back to the last working system configuration can help.
Recovering system files
For this purpose it is used system utility sfc. It runs in a window command mode on behalf of the administrator by typing the command sfc /scannow. This utility will check system files for corruption and, if necessary, restore them. Sometimes it may ask you to install a disk with Windows distribution 7, but usually this does not happen, and the files are restored from their copies on the hard drive. 
Last Known Good Configuration
This feature is available in the Advanced Boot Options menu, which you can access by holding down the F8 key immediately after turning on the computer. 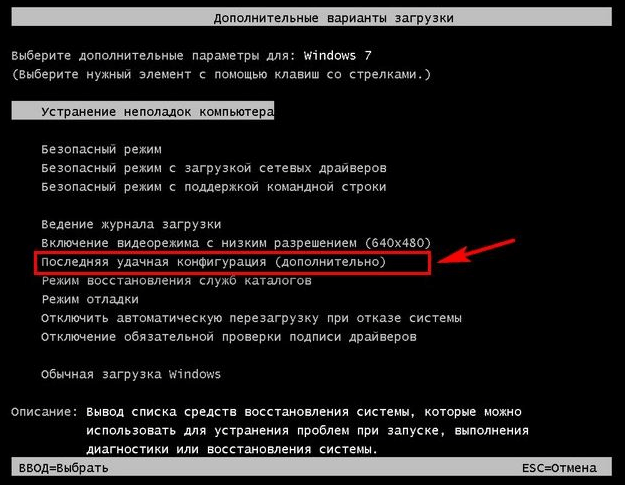
It is possible that restoring a successful configuration will not help, since it may also be corrupted by a virus attack. It remains to apply the following recovery option.
Rollback to one of the previously created restore points
This can restore the contents of system files and the registry and get rid of their corruption and deletion as a result of viruses. To perform such a recovery, the following steps are required.
We boot into safe mode, call up the control panel, in which we select the “System” item. A window appears, on the left side of which select “System protection”. After this, we are presented with a window that looks like: 
If the system partition hard drive If “Enabled” is not indicated in the “Protection” column, then there is no point in continuing further, since there are no rollback points due to the fact that the user did not bother about it. However, let’s assume the opposite - the user showed concern for the “health” of his PC and protection system disk installed. Then you can click on “Restore” and get a window asking you to select one of the rollback points:
 This photo shows a point automatically created by the system during installation Avast antivirus. If you check the “Show other restore points” checkbox, you can select earlier rollback points. You should choose the point at which the system was as stable as possible. Having set the rollback point, click “Next”, after which the system recovery process starts, which ends with a reboot. You can be sure that there will be no problem with a black screen when booting the system.
Problems with activating and updating a pirated copy of Windows 7
These two points of the reasons for the appearance of a black screen are closely related, so the author of the article combined them into one point.
It will not be a big secret to say that many users install unlicensed Windows versions 7. Therefore, they may periodically experience a black screen after installing system updates distributed by Microsoft. Authentication occurs with every update installed system, and in the case of a “pirate”, when the system boots, the user receives a black screen, in the lower right corner of which there is an inscription stating that fake copy operating system that has not been authenticated. Moreover, some curious but inexperienced users try to verify its authenticity with their own hands, and as a reward for their curiosity they receive a black screen. Why, because he knows that this is a pirated version.
In this case, you can get rid of the black screen by following these steps. You need to go to the “Center” through the control panel Windows updates,” in which you need to click “View update log”, and in it “Installed updates”. In the window that opens, the user will see everything installed updates, among which you need to find KB971033, delete it and reboot.
To prevent this from happening again, this update should be disabled altogether. To do this, in the Update Center, select “Search for updates” and search for this ill-fated update. Then you need to right-click on it and select “Hide update” from the menu. In addition, you need to remove the check mark in the small window next to the update name, then click “OK”.
Well, in order to finally “discourage” the system from checking authenticity with each update, it is recommended to edit system file hosts, which is located on the system partition in the Windows/System32/drivers/etc directory, placing the line 127.0.0.1 validation.sls.microsoft.com.
In contact with


