Registering your ASUS laptop is not mandatory, but it enhances the customer experience. If you need to contact ASUS support in the future, they can quickly find your product information along with your registration information. By registering your notebook, you will also receive email updates and alerts that can improve your user experience. You also get access to support forums that unregistered users cannot access. Registering your ASUS laptop online takes just a few minutes and eliminates the need to mail a registration form.
Registering your ASUS laptop entitles you to special promotions.
Step 1
Go to the ASUS member registration site. To register your notebook online, you must become a registered ASUS member.
Step 2
Create a username and password. Your username is your address Email, which you want to associate with your product. Your password must consist of letters and numbers.
Step 3
Fill in your personal information. You must provide your name, telephone number and address.
Step 4
Select the email newsletters you would like to receive. If you do not want to receive any messages, do not check the boxes.
Step 5
Enter the CAPTCHA code and check the "Authorization Agreement" checkbox. Click "OK" to confirm your registration. The online survey you are asked to complete is optional. If you do not want to fill it out, close the window.
Step 6
Access to account the email you registered with ASUS.
Step 7
Click on the activation link in your email. To go to the site and register your ASUS laptop, you need to activate your account. You will be redirected to the registration page to register your notebook. Click "Yes" to register.
Step 8
Sign in to your account. Using your email address and password, log in.
Step 9
Enter information about your product. Select your product type and name from the drop-down menu. Enter the requested laptop vendor information. Click "Submit".
We already have it on our website detailed instructions by entering the settings on routers from different manufacturers, and there is even a . Today we will look at how to access the settings on Asus routers. The process itself is practically no different from other manufacturers, but since devices from Asus are very popular, this article will definitely not be superfluous.
We will do everything according to the standard scheme: first, connect to the router via network cable, or wi-fi network, then through the browser we go to the control panel. You can go into the settings and change them from almost any device. From a computer, laptop, tablet, phone, etc. But, if possible, I recommend using a laptop or desktop computer and accessing the settings via a network cable. Via Wi-Fi is also possible, just don’t flash your router over a wireless network, otherwise you might get bricked :)
Getting access to the settings of the Asus router
If you are already connected to your router, then scroll down the page a little. You can skip the connection process. If not, then you need to establish a connection via cable or Wi-Fi. Let's first look at how to connect to an Asus router using a network cable.
Everything is very simple. We take the cable that comes with the router and connect it to the router’s LAN connector (look carefully, do not connect to the WAN, they are signed). And on a computer or laptop, connect the cable to the network connector. Like that:
Power on the router (if you haven't turned it on yet) and we can continue. If there is also a WAN cable connected to the router, then you don’t have to disconnect it, it won’t interfere with us.
Wi-Fi connection
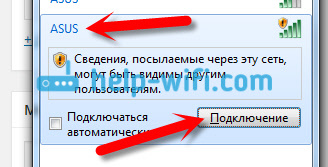
If you have already set up your router, then connect to your wireless network. I think you know how to do this (if not,). If you have a new router, then immediately after connecting power to it, it will begin broadcasting a wireless network with a standard name. Most likely, it will be called "Asus" and will not have a password. Just connect to it from the device from which you will access the control panel.
How to enter settings if you forgot your Wi-Fi password?
If you have forgotten your wireless network password and you do not have any connected devices from which you can go to the control panel and see the password, then you can go to the settings via cable. And if this is not possible, then you can reset your Asus router (press the RESET button for 10 seconds) and configure it again (wi-fi network will be without a password).
Go to the address 192.168.1.1
After we have connected to the router, open the browser and address bar dial the address 192.168.1.1 . Follow it. If the router has not yet been configured, then most likely the settings page will immediately open, there will be a wizard quick setup Asus. If you are prompted for a login and password, then the standard ones are admin And admin. If you haven't changed them yet. And if you changed the password to enter the control panel and forgot it, you will have to reset the settings.

The standard data for accessing the settings is indicated at the bottom of the router itself.

What to do if you can’t enter the settings of your Asus router?
It all depends on what kind of problem (error) and at what stage you have it. For many people, problems appear at the stage of connecting to the router. Or, after connecting, the “Page Unavailable” settings simply do not open in the browser; it is impossible to go to the address 192.168.1.1. These are the most popular problems.
Try the following:
- Check out this article on this issue:
- Necessarily .
- If the IP settings are set to automatic receiving, but the problem remains, then check whether you have correctly connected the cable to the computer and router. Or whether you are connected to the router's Wi-Fi network. Check if the router is powered on (the power indicator should be on).
- Try logging into the control panel from another device.
- If you can't go into settings Asus router If you connect via cable, try connecting via Wi-Fi. And vice versa.
- Reset your router settings and try opening the address 192.168.1.1 again.
If something doesn’t work out, you can write about it in detail in the comments, and we’ll sort out your problem together.
In order to configure an ASUS router there are two ways. The first is to use the special Quick Device Setup Wizard. It is specially integrated into the web configurator so that an unprepared novice user can easily connect the router to the provider’s network and set up a Wi-Fi wireless network. Of course, its capabilities are very limited, but it allows you to configure the most basic functions of the router without any problems.
The second way is to work with a full-fledged web interface, which allows you to fully reveal the full potential of the device, if necessary, squeezing out of it everything that it is capable of. Let's consider each of the options separately.
In both cases, in order to enter the configuration interface of the Asus router, you need to enter the device’s IP address in the address bar of your web browser - 192.168.1.1 . When prompted for authorization, enter the login "admin" and password "admin".
Quick Internet setup on an Asus router
When you first access the web configurator, you will see a wizard prompt to quickly configure the device. We agree. The first step is to change the default access password:

Instead of the default "admin" use any other one. It is desirable that it be more or less complex: consist of 7-8 characters, contain letters of the Latin alphabet, numbers and special characters @#$%&.
Next step There will be a choice of Internet connection type:

Asus routers can work in the network of almost any Russian Internet provider - Rostelecom, Dom.ru, TTK, etc. The main thing is that you must first technical support clarify in advance which communication protocol the telecom operator uses.

Most often, either "Automatic IP (DHCP)" or "PPPoE" is used.
In the first case, usually, you don’t need to specify anything additional, but in the second, you will need to enter the login and password for the connection, which you were given when concluding an agreement with the provider. Click on "Next".
In the next step, we will configure the Wi-Fi wireless network:

Here you will need to enter the network name SSID and the password for it is Network key. If you are setting up a dual-band router, here you will need to enter the name and WiFi password for the 5GHz range. Click on the "Apply" button.
At the last step of the wizard you will see summary information:


How to set up an ASUS router for Rostelecom, TTK and Dom.ru
This instruction is relevant for ASUS routers RT-N10, RT-N11P, RT-N12, RT-AC51U, RT-AC52U, RT-N56U and RT-N66AU, as well as for all other models running on software ASUSWRT (web interface in dark colors).
In order to set up a connection with your provider, go to the “Internet” section, “Connection” tab. It looks like this:

In most branches of the largest Russian providers Rostelecom, TTK and Dom.ru use the PPPoE protocol. Select it in the "WAN connection type" field:

Be sure to ensure that the "Yes" checkboxes for WAN, NAT and UPnP are checked.
Below, please make sure that the “Yes” checkboxes are checked for the “Obtain a WAN IP address automatically” and “Connect to the DNS server automatically” items:

In the "Account Settings" section, you must specify the Login and password for connecting the ASUS router to the Internet, which were given to you when concluding the agreement.

There is no need to change any further parameters. Click the "Apply" button and check your Internet access.
Dynamic IP (DHCP)
Some branches of the Rostelecom and TTK providers use the "Dynamic IP" connection type, when the router receives the address from the provider's DHCP server and no other connections or protocols need to be used.
To configure, you need to select the WAN type "Automatic IP".

Be sure to check that all the points indicated in the figure are ticked.
Pay special attention to the fact that DNS server addresses should also be obtained automatically by the device.
How to set up an ASUS router for Beeline
On the Internet, the Beeline provider uses the L2TP protocol for connection:

We leave obtaining an IP address and DNS server in automatic mode.
In the account settings, enter the “Username” (usually this is a personal account) and the password that was issued by the operator’s representatives.
All that remains is to enter the address of the Beeline VPN server: tp.internet.beeline.ru
Click the "Apply" button.
Setting up Wi-Fi (Wi-Fi network)
To set up normal WiFi network in the 2.4 GHz range on ASUS routers, you need to select " Wireless network" and the "General" tab:

In the SSID field you must enter the name of the Wi-Fi network you are creating. Any word in English can be used in this capacity. Then you need to select the "WPA2-Personal" authentication method and enter the password in the "WPA Pre-Shared Key" field. As a rule, there is no need to change anything else, since the most optimal parameters are set by default.
To configure WiFi 5 GHz on ASUS routers (RT-AC51U, RT-AC52U, RT-AC55U, RT-N56U, RT-AC66AU and AC68U), you need to go to the " frequency range"set the value 5 GHz:

And then everything is exactly the same as usual: we enter the “SSID” (it is desirable that it is slightly different from the one used on 2.4 GHz), indicate the verification method “WPA2-Personal” and the WiFi password, Click the “Apply” button .
Old web interface
If you are using old firmware ASUS routers are made in blue tones (RT-G32, WL-520GC, etc.), then in this case just proceed by analogy. Here are some video instructions that you may find useful:
As you can see from the video - by the designation of key parameters in different versions There is no difference in firmware.
 Hello everyone Let's talk about a program like ASUS APRP, which stands for ASUS Product Register Program (well, sort of). From such a long name it is already clear that this program needed to register an Asus product, that is, a device.
To be honest, I don’t quite understand why this product registration is needed. Well, really. I read it on the Internet and came to the conclusion that Asus himself says that they say thank you for buying our device and for receiving warranty service REMEMBER to register the product within a month from the date of purchase. Well, it’s a little strange, because I bought my Asus board in a large online store and they didn’t say a word to me about some kind of registration in some kind of program. I bought it, the warranty card was already filled out, everything is as usual. So I think this online registration from Asus is just for show and nothing more. Hardly service centers They don’t accept Asus products under warranty unless they are registered through the ASUS Product Register Program, that’s nonsense.
But I also scoured the Internet and found information about what this Asus product registration provides... Unfortunately, it’s nothing special, you’ll just have some kind of personalized maintenance. Maybe this means that there will be technical support, then yes, there is such a thing. There is software for Lenovo devices and there is support there, that is, you can write directly in the program about any problems with the device. I certainly like this feature
Also, if you register your device, you will receive gift access to the WebStorage service ( cloud storage files), the volume of which is 5 gigabytes. Well, I don’t know what to say, this is absolutely gorgeous! However, many users have an Asus laptop, after all, the company is popular. So that's what I mean. Are they giving everyone 5 gigs of cloud? Maybe there are some special conditions there.. I don’t know, because I haven’t checked.. But it smells like enticement...
Well, actually, as I already wrote, there are NO additional advantages from registering a device with Asus. It would be much cooler if, for example, after registration you could get a 20% discount on post-warranty repairs. Well, this is just an example, but you must admit, it would be much more useful if it were like that..
So, let’s now go look at what kind of ASUS APRP program is in more detail, what and where it installs there and all that.. So the program is installed in this folder:
C:\Program Files (x86)\ASUS\APRP

As you can see, there are files aprp.exe (probably the main process of the program), APRPTaskScheduler.exe (something related to the scheduler) and ASUSProductReg.exe (probably related to the registration process itself).
I also looked in services, there is nothing there about the ASUS APRP program..
I tried to run executable files, well, from the folder where ASUS APRP was installed. I launched aprp.exe, no response. Then I launched APRPTaskScheduler.exe and also got zero response. But when I launched ASUSProductReg.exe, the following window appeared:

But what’s also interesting is that after seconds another page appeared in this window:

Do you know what I’ll even tell you? I’m not going to register, well, I’m actually a little confused about this, but I’ll advise you not to pass by! If you have time, then register your laptop there, well, I don’t know, it just won’t get any worse, but you might find out something interesting...
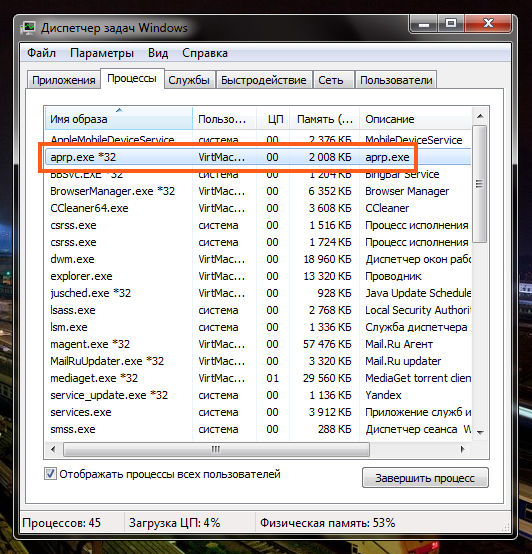
Oops! I did a short reboot and I see that there is already aprp.exe process in the task manager, that is, when I launched files from the folder there, apparently I activated something, well, I don’t know. In short, the process appeared and this is a motherfucker fact:
And then, after about five seconds, this window appeared:

This is a window and runs under the aprp.exe process! These are the pies...
When I clicked No thanks in this window, the window disappeared along with the process. Just for fun, I rebooted again and looked, the aprp.exe process was again in the manager, well, that is, everything is already clear, the program automatically starts along with Windows. But here’s another funny thing I noticed: if you press Win + R and write msconfig there, the System Configuration window will open. And in the Startup tab there is nothing related to the ASUS APRP program! Well, where does it start, you might think? To do this, I launched the CCleaner program, went to the Tools section, and there I selected Startup:

Then I clicked on the Scheduled tasks tab and most importantly, here I checked the Advanced mode checkbox and here there is an entry about the ASUS Product Register Program:

Well, here you can just click right click by entry and select Disable there:
That's it, the program will no longer load with Windows

Well, we’ve sorted out the program, otherwise I’m already a bit worried about it all..
Now let's move on to how to remove ASUS APRP. This means this can be done both in a simple and advanced way using a deleter. He will remove the program and will also find and remove all the garbage from it! But it’s up to you to suggest it, but whether to use a deleter or not is purely your decision...
Well, now how to remove it in a simple way. Well, as usual, click the Start menu and select Control Panel there:

If you have Windows 10, then no doubt it’s cool, but there this item is in another menu, to open it, then hold down Win buttons+X!
Now we find the Programs and Features icon there:

And here you need to find the program, although why look for it there, it should go first, then right-click on it and select Delete:

Then there will be a small message like this, click Yes:

A small window will open, it will hang a little, well, it’s like the program is being deleted there:

And all the guys, then everything will be deleted and the ASUS Product Register Program will no longer be on your computer!
That's all, from the bottom of my heart I hope that everything I wrote here was at least a little useful to you. Good luck in life and good mood
31.08.2016


