The phone does not connect to WiFi - it’s just terrible, why is this happening, we know the answer, read all the reasons why the phone does not connect Wi-Fi here!
First, you should find the reason why your phone does not connect to Wi-Fi. Let's start with this.
Possible reasons
If your smartphone does not connect to your home wireless network, there may be several reasons for this:
- incorrect;
- incorrect settings on the router itself;
- incorrect password;
- blocking the device in the router list.
Important! Often the problem is not due to the fact that there is simply no connection. So, if you followed the instructions below and did not see the result, try checking other indicators!
Now let's look at each of the reasons and try to clarify why the phone does not connect to Wi-Fi router.
Setting up a mobile device
First of all, we check whether Wi-Fi is active; if the wireless connection indicator on the device lights up normally, then we take the following actions:
First of all, delete the saved connection:
- To do this, go to settings and select WiFi

- Next, long press on the desired connection to go to its menu and select delete

- After this you need to restart your smartphone

- It would also be a good idea to reboot the router itself; to do this, you can simply turn it off and turn it on after a couple of minutes, using the standard power button.

- After rebooting all devices, wait for an active connection to appear in the phone settings and enter the password.

- If this is your home WiFi, then you can save it so that your phone connects to the Wi-Fi network automatically and you don’t have to enter the security code again every time.
There are also very often situations when WiFi connects but the pages do not load; in quite a large number of cases, the problem lies in the usual date and time settings! Yes, yes, you just need to install the correct data on your smartphone or tablet!
In case if this algorithm did not help, then you need to go to the router settings.
Modem settings
If the router has already been configured, but your new phone or a friend’s device does not want to connect, it may be in the settings WiFi channel connections.
You need to change the channel from “Auto” to 7 (or any other until the devices start working, but most often it is channel 7).
To do this, through a laptop or computer connected via a patchcord, you need to go to the router settings:
- Open the modem settings menu in the browser.

- The address can be found on the bottom of the router, it also contains the standard login and password

- We enter them in the appropriate fields and find ourselves in the router settings management environment

- Next, go to the Wireless network tab.

- And look for the Channel parameter
- Here you need to set the value to 7 and save the settings
Forgot your router password
In this case, it can be viewed through a computer connected to this network. We have prepared a separate article for you on how to view your WiFi password.
If this option If you are not satisfied, then you can do it Hard Reset router and configure it again (the link to our article on this topic was above):

If, after checking all the settings and carrying out the necessary manipulations, the phone still does not connect to WiFi, then most likely the problem is in the WiFi module of the smartphone itself.
Resetting your smartphone
The last option here is to reset it to factory settings:

Attention! All personal data on the device will be deleted, so we strongly advise you to back up your files using any special application and synchronize contacts with gmail account, for their further restoration.
Now you know what to do if your smartphone does not connect to the Internet via Wi-Fi. Also on our website you will find solutions to other popular problems related to Wi-Fi and others. Using our instructions, you can quickly fix all the jambs and problems with your computers and phones.
A laptop today is an excellent alternative to a desktop computer. It has smaller dimensions and, most importantly, mobility. Long gone are the days when you had to carry an Internet cable with you to move around your apartment with a laptop. Wireless networks have made life easier for users around the world. But it is not always easy to get them working. When the laptop does not connect to wifi, from mobile computer it turns back into a stationary one due to its constant connection to the cable.
Let's try to find out together the reasons for this problem and the main ways to solve it.
Let's start by listing the most common ones. In 90% of cases, the owner of a laptop experiencing difficulties with wifi is faced with the following:
- It is not possible to turn on wifi on the laptop at all (it does not see any available connection);
- The laptop refuses to connect to the desired network, but at the same time communicates with others without problems;
- The wireless network is detected, but the computer cannot connect to it (or has stopped connecting);
- The computer connects to the network, but web pages are still inaccessible.
This is the “bouquet” of the most common problems due to which a laptop may refuse to connect to the network. Next we will look at each in more detail with instructions. practical advice to eliminate them.
Complete lack of wifi
If you have a laptop in your hands, this does not mean that it can connect to wifi networks, or that it can see them at all. It was only a few years ago that having a wireless network module in laptop computers became the norm. Are you sure your laptop has it? If yes, it’s time to check whether this very module is enabled. This procedure is especially relevant if the laptop was previously connected to the network, but then stopped. You can do this in the following ways:
1. Using a wifi adapter switch
It is located in different ways: both on the sides of the laptop and on the back, near the keyboard (see Fig. 1).
Fig.1 Wifi switch on the left side of the laptop.
2. Using a separate button that activates the module
In modern models it is found much more often than a switch. If your laptop suddenly stops connecting to the network, but it didn't cause problems before, it's possible that you accidentally pressed this button. Finding it is generally not difficult, but if you have problems finding it, open the device’s instructions, where on the very first pages the solution to this simple “puzzle” will be waiting for you. A hint can be a schematic image of the antenna drawn next to the button or directly on it (see Fig. 2).

Fig.2 Key that activates wifi in a laptop (using the example of HP Probook 4540s)
3. Using a keyboard shortcut
Sometimes manufacturers refuse to provide space separate button responsible for the operation of wifi. Then the function key combination takes over its task. Usually, this is “Fn+F2” (see Fig. 3). The first is located near the left “Ctrl”, the second is above the numeric area of the keyboard (in the row of the so-called “F” function keys).

Fig.3 Key combination used to connect wifi.
- Not on all laptops this role is played by F2 (this basic installation, which can be changed by user settings);
- Additionally, if you recently reinstalled Windows but haven't yet taken care to install all the basic device drivers, the function keys may not work.
4. Through the operating system (using Windows 7 as an example)
In addition to activating the wifi adapter using buttons, there is also a software method.
To do this, go to the “Network and Sharing Center” shared access» (for example, from the control panel). Then select “Change adapter settings” (menu item in the left panel). A list of all available connections that your laptop sees will open. Among them there should be a “wireless network” (if it is missing, immediately skip this chapter and go to the next one, which describes in detail the process of installing drivers). The network icon can be gray (“Disabled”) or blue (“Active”). If you see a gray icon, click on it with your mouse ( right click), and then select “Enable” (see Fig. 4).

Fig.4 Turning on wifi through Network Sharing Center in Windows 7.
We looked at the main reasons for the absence wifi connections on a laptop. There is only one nuance left:
If you recently reinstalled Windows, but did not bother to download drivers from the official website of the laptop manufacturer, many of its functions may not work. The operation of the wifi module will not be an exception. And, even if there are no comments in the “Device Manager” next to the adapter, its correct operation is not guaranteed. Therefore, go to the official website and get drivers for your laptop. Quite often this can be the only correct solution to a connection problem.
Now that we have made sure that the computer has a working wifi module, we move on to the next two chapters of the article.
The network is detected, but the laptop does not connect to it
In most cases, this behavior of the laptop is due to the lack of necessary drivers on wifi. This mainly occurs as a result of incorrect termination Windows reinstallation when not all equipment “receives” its software.
And do not rush to consult the “Device Manager”. Often he does not even see the slightest inadequacy of the installed software or any malfunction. Therefore, in order to eliminate this problem, you should make sure that you have the latest drivers for the wifi module. You can get them for free from the manufacturer’s official website, where they are always available.
Where to see which wifi driver is currently installed
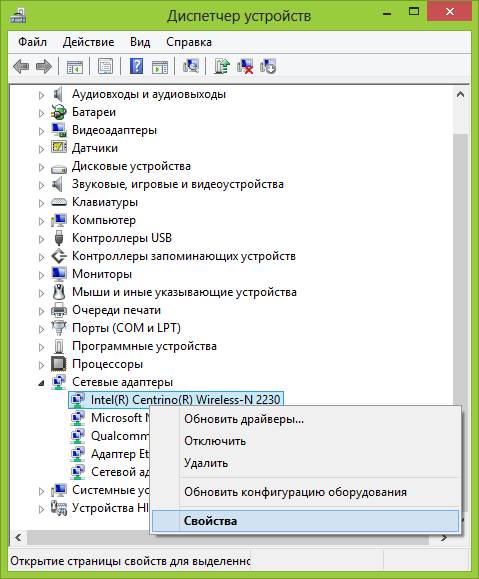
Regardless windows versions, hold down the Win and R keys at the same time, then (in the window that opens) type devmgmt.msc and press Enter. This will launch the device manager (see Figure 5).

Fig.5 Wifi module in Device Manager.
If this is your first time here, you may find that all devices are divided into groups. The module we are interested in, with which the laptop connects to wifi, will be in “Network adapters”, where we go. Then we find it and right-click, then left-click on “Properties”.
In the next window, find the “Driver” tab and go to it. Look at the lines “Driver Supplier” and its “Development Date” (see Fig. 6).

Fig.6 Information about the module driver.
And if the supplier is not “native” for the laptop (does not match the name of the laptop brand), and the date is several years out of date, run to the manufacturer’s official website. There, as mentioned above, you can easily find current version drivers and download it.
After successful driver installation, you may need to start the wireless network. All the nuances of performing the driver update procedure were described in the first chapter.
The network is connected, but the sites are still unavailable
In this case, instead of the normal network icon on the taskbar, you can find this:

rice. 7. Restricted connection.
All the reasons why the user sees this icon can be divided into 3 groups:
- Malfunction or incorrect settings of the router;
- Incorrect settings in the laptop, or its hardware malfunction (which happens much less frequently), due to which it does not connect;
- Problems are on the side of the provider, which temporarily stopped supplying the signal in full (for example, due to repairs to equipment on the line).
Let's first try to figure out why the network has limited access in your case. In other words, who should you suspect of the problem: the router or the laptop?
If the router is at fault
Try connecting to the network using another device (tablet, mobile phone). If they cannot establish contact with the router, either it or the work of the provider is to blame. To discard the last option, we call the service provider and find out how things are going on your line. If everything is in order, we continue to “interrogate” the router. You need to go into its settings (you can use the web interface, the entrance to which was described in detail in the corresponding article) and find out if everything is in order there.
You can also call specialists, but often their arrival takes longer than setting it up yourself.
Option two - laptop malfunction
If at least one other device connects to the network, then incorrect laptop settings are limiting access to wifi.
There are a number of explanations for this, some of which we will consider below.
1. Blocking the network with a standard program in a laptop
If you use a laptop with a pre-installed operating system, in the vast majority of cases it can be installed system utility, responsible for the operation of the wireless network. You can find this application either in the Start menu, in All Programs, or in Accessories.

Fig.8 Wireless network manager window (a standard utility in most laptop models).
And, if wifi is turned off here, then you are unlikely to be able to fully connect to it, even if the laptop sees the necessary network and connects to it.
2. Outdated drivers
The most common problem due to which the network does not connect. We discussed in detail the actions that need to be taken to eliminate it in chapter “2.3” of this article.
3. Incorrect wireless connection settings
These settings could have been lost due to an incorrect exit from Windows, or they were simply forgotten when creating the connection.
Go to “Change adapter settings” (this item is located in the “Network and Sharing Center”, and the last one is in the Control Panel). Then find among available connections wireless and click on it right key mice. In the drop-down list, select the bottom item “Properties” (see Fig. 9).

Fig.9 Network connections.
Here select “Internet Protocol Version 4”, then go to its “Properties” (see Fig. 10)

rice. 10 Select the desired protocol for setting up the network.
In the next window, you need to set automatic IP selection by placing black circles opposite the corresponding items (see Fig. 11)

Fig.11 Automatic selection IP.
In most cases, this should solve the problem (especially if the addresses were entered manually). If, after doing all of the above, the laptop does not see the network as it should, we recommend contacting specialists (preferably from your provider).
Other reasons
While you wait for the technician, you can try some more manipulations that can solve the problem:
- Check the router settings to see if the network name (SSID) contains Cyrillic characters. It’s better to set a new name using only numbers and Latin characters.
- Set (in the settings) USA as the network region.
- Bring your laptop closer to the router. Perhaps the only problem is long distance to the router, due to which the laptop does not see the network.
We hope that the tips from this article will be useful in quickly finding the reason why the laptop stopped seeing wifi and no longer connects to it.
Possibilities modern phones go far beyond voice communication. With no less success, they can be used to store and edit files and, of course, to connect to global network. Because the mobile standards most often limited by providers, to connect to the Internet, owners of gadgets on Android based and iOS are most often used Wi-Fi technology. But the mere presence of a Wi-Fi module in a mobile device does not guarantee a connection to the network.
It happens that the phone does not connect to Wi-Fi, displaying errors or notifying the user that the connection is impossible. Most often this happens due to a failure or incorrect settings of the device itself, but incorrect router configuration or modification can lead to the same results. system files, installation of custom firmware, mismatch of communication standards, virus infection and, in rare cases, failure of the Wi-Fi module. So, let's try to look in more detail at why the phone doesn't connect to Wi-Fi and how it can be fixed.
Incorrect password entry, temporary failure
This error usually occurs when the Wi-Fi network cannot recognize the device connected to it. The reason is most often trivial - the user makes a mistake when entering the password and, as a result, receives a corresponding message.
Check that the password you entered is correct and try to connect again. Also pay attention to the name of the network. The Wi-Fi module on your phone detects not only your network, but also other access points, which may have similar names, for example, mydoms and mydons. Make sure you are connecting to your network and not your neighbor's.
If up to this point there have been no problems with authentication, first try rebooting your smartphone and the router itself; perhaps there was some kind of temporary glitch. Is your phone still unable to connect to your Wi-Fi network? Delete the saved network in the WLAN settings and try to reconnect.


The example discussed above is the simplest, but more often everything is a little more complicated, being associated with incorrect settings of the router itself.
Router settings
You connect to the network, but the phone does not connect to Wi-Fi, it says saved WPA2 or WPA. After a few seconds, the “Authentication Error” message appears. If the password is correct, there is most likely something wrong with the router's security settings. It may also be that the phone says “Saved,” but the connection is still not established. It’s easy to get into the router settings; you just need to go to the internal address in the browser 192.168.0.1 or 192.168.1.1 . It is more difficult to understand its interface, since different models routers, it can differ significantly.
By default, the login and password are used to log in admin/admin(look at the bottom of the case). Before making any changes to your router settings, remove the network from your phone, or at least disconnect. It is also advisable to create a backup copy of your router settings - if you suddenly get confused or do something wrong, you can always restore. After making changes to the router settings, it also requires a reboot.

Region
Now a little more about setting up an access point. First, try changing the region.

In the settings this option is located in the section Wi-Fi - Advanced Settings, c – on the “Wireless” tab. In other models it may be located in a different location. In short, you need to first study the interface of your router. In the regional settings, the country in which you live should be selected, although this is not critical. Save your settings and reconnect.
Network mode
A much more important setting that can prevent a gadget from connecting to Wi-Fi is the wireless network operating mode. This is perhaps the main reason for authentication errors when connecting to Wi-Fi on a phone that may not support the current mode. There can be several modes: B, G, N, etc. If you have B/G/N mixed, install it, and you can try experimenting, choosing one or the other mode. Pay attention also to the channel. It should be auto.

Security Settings
Find the security section in your router settings and try playing with the settings. It is advisable that the network authentication be set to WPA/WPA or WPA-PSK (if mixed, enable it), encryption is AES, the key contains only Latin characters, only numbers, or both.

After changing the router settings, reboot it and re-establish the connection on the phone. Unfortunately, the two methods described above can cause problems with connecting other devices, such as a laptop or TV, if they do not support the changed parameters, so everything is not so simple here. If the password has changed, in any case it will also have to be changed on other devices.
Channel width
It is highly unlikely that this will help solve the problem, but just in case, you can try changing the Wi-Fi network channel width. In routers D-Link setup look in the subsection Wi-Fi Additional settings , in TP-Link – Wireless Settings – Channel Width. There are usually several available options: 20MHz, 40MHz, Auto and others.

Filtering by MAC address
Each electronic device has its own unique identifier - MAC address. Find the MAC filter subsection in the router settings and make sure filtering is disabled.

If it is enabled, determine the MAC address of your smartphone, check the settings in the router and, if necessary, remove the phone from the “black” list or, conversely, add it to the “white” list.
Phone stuck on getting IP address
Another common problem is the device getting stuck at the stage of obtaining an IP address. The phone does not connect to Wi-Fi, it says “Obtaining an IP address,” and this message can appear for hours. The cause of the problem, again, may be hidden either in the settings of the mobile device or router. The latter is indicated by problems connecting to Wi-Fi and other devices. The DHCP server in the router is responsible for distributing IP addresses to devices, changing the address pool and the router itself. If it is disabled, your device will never receive an IP address.
Is DHCP enabled?
Let's check the operation of DHCP. The location of this setting differs in different router models. In TP-Link you need to look for it in the section The local network or LAN, in D-Link it is usually located in the subsection Network – LAN.

The mode must be selected "Allow". Instead of a drop-down menu, the “Enable” and “Disable” radio buttons can be used in the router settings. Here, we believe, everything is clear too.
Static IP
You can solve the problem of “eternally” obtaining an IP address by setting a static IP in the advanced connection settings of your device.

To do this, click on your connection in the list of networks, select Change network – Advanced settings – DHCP – Custom(in earlier Android versions you will need to check the “Static” box).

In the panel that opens, enter the IP address 192.168.X.YYY in the appropriate fields, where X is 1 or 0, this depends on the address at which you access the router settings (you can try both options), and YYY is any number from 0 up to 255.
The gateway must match the address of your router, leave the prefix length at default, do not touch DNS 1 (8.8.8.8) and DNS 2 (8.8.4.4). If you have other data instead of those indicated in brackets, do not change them either - they are given by your provider. The exception is DNS 2, which can be left blank. If something is unclear or you doubt the correctness of the data entry, it is better to contact your provider’s support service - it is their direct responsibility to connect their clients’ devices to the network.
Automatic error correction tools
If you encounter an authentication error when connecting to Wi-Fi on Android, but it works for you Mobile Internet, install from the Store Google Play application Android WiFi Fixer. This utility is an analogue of the connection troubleshooting tool in Windows and is designed to find and automatically correct Wi-Fi connection errors on mobile devices under Android control. Once launched, the application checks everything network settings and tries to connect to Wi-Fi bypassing it.

Other reasons
The above examples of problems and how to fix them are the most common. In reality there may be more reasons. Why doesn't my smartphone connect to Wi-Fi? Perhaps you installed a proxy server program that was not fully developed, caught some kind of virus, rooted the device, changed the firmware, etc. Here you need to look at the circumstances. There have been examples where the wireless connection was blocked by antivirus programs.
In general, if the connection is lost after making some changes, most likely this is the reason. If all else fails, reset the device to factory settings, remembering to first create backups important applications and data.

Well, the most unpleasant thing that can happen is the failure of the Wi-Fi adapter. In this case, not only yours, but also other wireless networks will not be detected. There is nothing to do here; you will have to take your gadget to the service center.
There are many reasons why a laptop won't connect to a Wi-Fi network. In this article you will find a guide to solving the main options for this problem.
Why doesn't my laptop connect to Wi-Fi?
The most common problems with connecting to a wireless network occur in the following cases:
- router settings are incorrectly set (broken);
- deactivated wifi adapter on a laptop;
- The driver for the adapter is missing or damaged wireless communication;
- The Wi-Fi module of the laptop has failed;
- failures operating system.
The laptop does not connect to the Wi-Fi network - what to do?
It is worth noting that most often problems with connecting to a wireless network are incorrect settings router. It is its parameters that should be checked first.
Check the operation of the router
First, make sure that the router is connected to the network and is active. Then check if other devices can see the network that the router creates. Use for these purposes, for example, a smartphone or another laptop.
If other gadgets also cannot detect the network, then most likely the Wi-Fi connection on the router is deactivated.
The first thing you can do in this case is simply reboot the router and check its operation again.
If no changes occur, then do the following (discussed using the example of a DSL router):
- connect to the router using the cable that came with it;
- go to any browser and enter address bar 192.168.0.1 or 192.168.1.1 and press Enter;
- in the authorization window that appears, enter the word admin in the “Username” and “Password” fields and click the “Login” button;

- go to the “Set up Wi-Fi” tab;

- Make sure the “Enable wireless connection” box is checked, then click “Next”;

- if necessary, enter connection settings (to find out the exact parameters, contact your provider);

- At the end, don’t forget to save your changes.

The laptop sees Wi-Fi, but does not connect
The situation is a little different when the laptop sees Wi-Fi, but does not connect to the network. Below are ways to resolve this issue.
Make sure you enter the correct password
Probably one of the most simple options that can happen in this situation is entering an incorrect password. Make sure the password you enter when trying to connect is correct.
If you have forgotten your password, you can easily recover it by following these steps:
- connect to the router’s web interface in the same way as described above, but this time select “Configure manually” from the menu;

- then go to the Wi-Fi tab;

- select the “Security Settings” tab;

- in the line “PSK encryption key” there will be your current password, which, by the way, can be changed here.

Check your MAC filter settings
MAC filter is a special service that filters devices trying to connect to wireless connection. Sometimes such a service can be the reason why a laptop sees Wi-Fi, but does not connect to the network. To solve the problem, you can try disabling the MAC filter.
Process to disable MAC filter for DSL router:

Check the laptop's Wi-Fi module
If everything is fine with the router and other devices can easily connect to it, then you need to deal with the laptop itself.
First of all, check that Wi-Fi module laptop is turned on. Depending on the laptop model, a certain combination of function keys, for example, Fn + F5, or a special switch located on the body of the gadget, may be responsible for activating the module.

Make sure your Wi-Fi adapter driver is working correctly
If the wireless module is active, but the laptop does not connect to Wi-Fi, then you should check the driver of the Wi-Fi adapter.
To do this, use the following instructions:

If next to the module there is Exclamation point, this means that the driver or the device itself is not functioning correctly. Double-click on the adapter and check the error that appears in the window that appears.
The easiest way to solve this problem is to remove the current driver, reboot the system and install the driver again.
Adjust your wireless connection settings
If your laptop sees Wi-Fi but does not connect, and you have already tried the above methods to resolve the problem, then you should check your wireless connection settings.
Instructions:

After these manipulations, try connecting to the wireless network again.
37 387 Tags:If your laptop does not connect to Wifi, says limited access or no Internet access, you should look into this problem in more detail.
There are several reasons for the problem:
- outdated or completely missing drivers on the laptop;
- failure of the Wifi card itself;
- incorrect router settings, etc.
We are looking for the culprit - a laptop or router
To understand why the laptop does not connect to the Internet via Wifi, let's look at all aspects of this issue.
The first step towards solving a problem is identifying the culprit. Problems with Wifi can be in the laptop itself, or maybe in the router. Finding the cause is important so as not to make things worse by changing all the settings.
First, try connecting another device via Wifi - phone, tablet, laptop. The Wifi button on the router should glow green. If the connection is normal on other devices, then the problem is with your laptop. And if the selected network does not work everywhere, then the cause of the problem is in the router and its settings.
If the reason is in the router, then you still need to check whether there is internet at all. Connect the cable directly to your laptop or computer. If everything works, then the problem is definitely in the router settings, and if not, contact your Internet provider to troubleshoot the problem.
Checking the network driver version
A common reason for the lack of Wifi on a laptop is incorrectly installed or outdated network driver. This is indicated by this icon at the bottom right of the notification panel.

It shows that there are no connections available (even though there actually are). This often happens when reinstalling the system. Drivers that worked on Windows XP may not work on Windows 7, and drivers that worked on Windows 7 may not work on Windows 8.
You need to check whether the drivers are installed and, if so, their version, as follows:

- here look for the “Network adapters/boards” tab and your network adapter in it. It can be called differently, it all depends on your laptop;
If the device is there and there are no exclamation marks near it, then everything is fine with the driver.
To find out its version, you need to right-click on the driver and select “Properties”.

In the window that opens, select “Driver” and look at its development date.
Hardware enable adapter
The network device driver is working properly, but there is still no network? Or did the Internet work before, but now there are no available connections? This indicates that the network adapter on the laptop is turned off.
This is done differently on different models, but often this requires pressing the FN + F2 key combination at the same time or FN + another key with the Wifi icon drawn.
Some models have a special button on the body.
Video: How to distribute wi-fi from a laptop
In the system itself you can also enable wireless network.
If you have Windows 7, then follow these steps:
- open "Start";
- select "Control Panel";
- "Network and Internet";
- "Network and Sharing Center";
- "Change adapter settings".
If the wireless network icon in the window that appears is colorless, this means that the network is inactive and needs to be turned on by right-clicking
To do this on Windows 8 then:
- click the “Options” button on the right panel;
- further – “Changing computer settings”;
- select "Wireless Network". It must be turned on.

You can perform the same operation as for the 7th operating system to make sure that the network is turned on.
In Windows XP it's even easier:
- "Start";
- "Control Panel";
- "Network connections";
- turn on the wireless network by right-clicking.
The activation of the adapter will be indicated by this icon on the notification panel.
Laptop stopped connecting to WiFi
If the laptop previously connected to this Wifi network, and then suddenly stopped (the settings were not changed), a virus may be the cause of the problem. It may corrupt the file or change settings. Even if the antivirus scan showed nothing, the installation of some program on the laptop could have messed up the settings.
Simply removing this program will not restore the network. Alternatively, you can remove network connection and create it again, you can reset the router settings and connect it from scratch, you can search for a long time for the broken parameter on the laptop, but the easiest way is to restore the system to the level at which the program got into it.
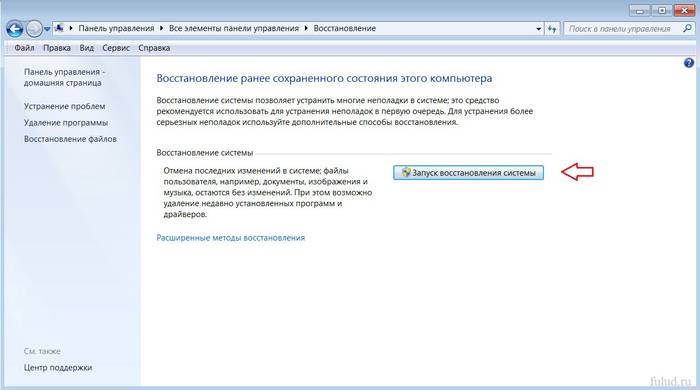
Restoring the system
Starting this process:
- "Start";
- "All programs";
- "Standard";
- "Service";
- "System Restore" ;
- “Start System Restore”;
- "Further";
- select a recovery point (updating and installing programs is recorded in the registry, so in the window that opens, select the desired recovery time);
- "Further".
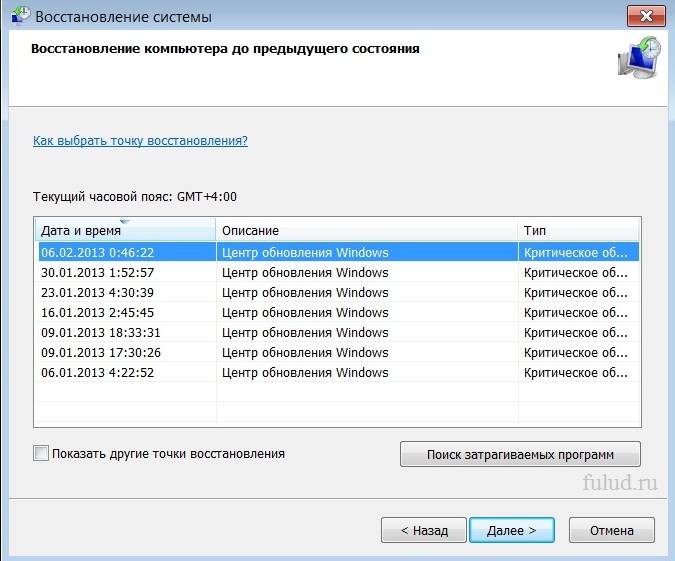
The recovery process will begin and upon completion the laptop will reboot. If the problem is malware, then after that Wifi will work.
Updating hardware drivers
If, when checking the network adapter, there is an exclamation mark next to the driver icon in Device Manager, right-click on it and select “Enable”.
The absence of a driver entry means that it needs to be installed. Then you need to download it from the manufacturer’s official website. Or use the driver disk that comes with your laptop.
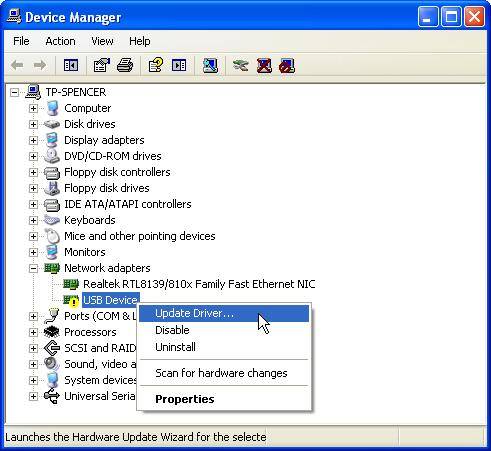
You can find out the name of the driver from the information in the device manager, in the description of the laptop, or using a special program.
You can update the driver by right-clicking on it and selecting “Update”. Or go to its properties and select this item there. Even if everything is fine with the driver, it is recommended to download and install it again.
Checking connection settings
To check connection settings:


When you try to connect to the selected Wifi network for the first time, a password prompt appears. Next to the network there should be automatic connection when turning on the laptop. But if the laptop does not want to connect automatically and asks for a password every time, check whether the “Connect automatically” checkbox under the network name is checked.
Internet no access or limited in Windows
It happens that after connecting, identification occurs without access to the Internet via Wifi and a yellow triangle appears near the network icon on the panel:

Also, if you go to the “Network and Sharing Center”.
Enter the connection properties. If everything in the window looks like this and the IPv4 connection says “No network access,” the problem is incorrectly entered IP addresses or a disabled DHCP server on the router.

Check that you did not forget to check the box to receive addresses automatically. But if they are already there, then try to do the opposite - register everything manually. Get network address You can do it in the router settings. But basically the IP address is standard 192.168.1.X, and the DNS is 192.168.1.1.
If the connection properties show an IPv4 connection “Without Internet access,” then the DNS server addresses or router settings were entered incorrectly.
In this case, we only change manually DNS settings, leaving the IP address automatic.

- 8.8.8.8 is Google's public DNS server;
- 77.88.8.8 – Yandex.
Some connection errors
If your laptop connects to the Internet, but sites load slowly, you might have gone too far from the router’s coverage area. And if at high Wifi signal The problem does not go away, most likely, you are receiving many other networks and the Wifi channel is busy.
This can be changed in the router settings. The default value is 6. You can try changing it from 1 to 13 and watch the speed change. You can also try the "Auto" option.
If the laptop connects to Wifi, but does not access the Internet, and at the same time programs such as Skype and ICQ are working, check the DNS addresses. They must be automatic or registered, as in the paragraph above.

If the laptop does not immediately connect to the Internet:
- open the Start menu;
- "Control Panel";
- "System and safety";
- "Power supply";
- “Power button actions”;
- Under Shutdown Options, uncheck the Enable quick start(recommended)" ;
- "Save".
Windows was unable to connect to...
By selecting the desired network and entering the security password for it, I suddenly got the error “Windows could not connect to...”:

You can try clicking “Troubleshooting” and look at the written reason. Will be checked network devices and settings.
This message also appears due to a router error. Try rebooting both it and the laptop.
In Device Manager, in the properties of the network adapter, disable “Allow the computer to turn off this device to save power.”
Long authorization process
If, after entering the Wifi security key, while connecting to the network, the message “Obtaining an IP address” is displayed for a long time, and then the connection is disconnected and tries to connect again, this indicates an error in setting up IP addresses. In this case, you need to configure automatic acquisition of an IP address in the connection properties. And if it doesn’t help, write them manually.
Unidentified network - what to do
If the laptop does not identify the network, check whether the Internet cable is connected to the router. Reboot your router and laptop. You also need to check the IP addresses and DNS servers, as described in the above paragraphs.
>There may be several reasons for the lack of Wifi on a laptop, the main ones are an incorrectly configured router (see instructions for setting up your model), problems with network adapter(outdated or not installed), IP address or DNS server is not configured correctly.


