Modern technologies Every year they develop more and more. The time has long come when one hard drive in a computer is not enough. A huge number of people connect a second HDD to a personal computer. The connection procedure is nothing fancy and even a beginner can figure it out. Let's look at everything more carefully and in detail.
Connecting a second HDD to a laptop or Personal Computer
There are two options for adding an additional hard drive:
- To the PC system unit. This method Great for standard desktop computers;
- Adding in the form of an external drive. This is a very easy method that is suitable for all devices.
Method 1: Adding to the system unit
The process of adding additional media to the system unit can be divided into several small stages. Let's look at each of them in more detail.
Type Definition
At the very first stage, you need to decide on the type of interface with which you interact. HDD. It is worth noting the important fact that the majority of computers have a SATA interface, therefore, it is advisable that the second hard drive be of a similar type. On motherboard The IDE bus may be missing because it is considered very old, which may cause some problems with installing older hard drives.
The best way to determine the standard is to carefully consider the contacts.
Example of a SATA connector

Example of an IDE connector

Adding a second SATA drive to the system unit
Addition additional disk- the simplest process that occurs as follows:

Boot priority for SATA drives
By default, there are four holes on the motherboard for adding SATA drives. It is worth understanding that their numbering starts from zero. Namely, the priority of the hard drive directly depends on the connector number. To set the priority yourself, you must use the BIOS. Each specific type of BIOS has its own special controls, as well as a special interface.
In the earliest version, you need to go to the “Advanced BIOS Features” menu and start working with items such as “First/Second Boot Device" In modern versions, the path looks like this: “Boot/Boot Sequence – 1st/2nd Boot Priority”.
Adding an additional IDE drive
There are also cases when you need to connect an old IDE drive. Step-by-step instruction The process looks like this:

Connecting the second IDE to the first SATA
If you need to carry out this procedure, you will need an appropriate IDE-SATA adapter. An example of an adapter can be seen below:

Step-by-step instruction:
- First you need to put the jumper in the Master position.
- The IDE plug is connected to the hard drive.
- Take a red SATA cable and connect one side to the motherboard and the other to the adapter.
- The power cable is connected to the power supply and adapter.
About possible display problems
Sometimes it happens that after an additional hard drive has been connected, the system cannot recognize it. Don't panic, because most likely you did everything right. Just for proper operation the second hard drive needs to be initialized.
Method 2: Connecting an external hard drive
Connection external HDD convenient if the stored files are needed not only at home, but also outside of it. In addition, this method is the only correct one for laptop owners, since they simply do not have a special additional connector for a new hard drive.
In fact, everything is easy here, because the external hard drive is connected via USB, just like any other devices (mouse, keyboard, flash drive, webcam and much, much more).

Hard drives that are installed in system unit, can also be connected via a USB connector. Here you will need an external housing for hard drive or a special adapter. The bottom line is this: the required voltage is supplied to the HDD through the adapter, and communication with Personal Computer happens via USB. Different hard drives have their own wires, so you should always pay special attention to the standard that specifies the dimensions.
When the first computers appeared, all programs, games and other files took up virtually no disk space. Now things are completely different, and it is often necessary to install additional storage media. Therefore, every user should know how to connect a second hard drive to a computer. In fact, this is not difficult to do, you just need to follow simple instructions.
First, the device must be purchased in a store. Please note that the hard drive has several connection interfaces. After purchasing the purchase, you can begin installing the device.
Preparing for installation
- How many hard drives are already connected to the motherboard? Most often, a computer has only one hard drive, so installing a second drive is not difficult. In most cases, the HDD is located directly under the DVD-ROM, so finding it will not be difficult;
- Is there additional space to install a second hard drive? If it is not possible to install a second or third disk, then you will have to purchase a USB drive;
- What type of cable is used to connect the hard drive to the computer? If the purchased device does not have the same interface as on a PC, it will be difficult to install it.
Please note that you will need a 3.5-inch hard drive. There is no need to buy small disks designed for laptops.
Physical disk connection
If the system unit has not yet been disassembled, disassemble it. Now it is recommended to get rid of static electricity. This is done by any means known to you. If you wish, you can purchase a special grounding bracelet in the store.

After some minor manipulations, the hard drive will be secured in the case; now all that remains is to connect the hard drive. Before plugging in the power cable and cable, it should be noted that the procedure is slightly different for the IDE and SATA interfaces.
IDE interface
When connecting a drive with an IDE interface, it is recommended to pay attention to such a nuance as setting the operating mode:
- Master (main).
- Slave (subordinate).
If you are installing an additional hard drive, then you must enable Slave mode. To do this, you need to use a jumper (jumper), which is installed in the second place. The first row includes Master mode. It is important to note that on modern computers, the jumper can be completely removed. The system will automatically determine which hard master is.

On next step, you need to connect the second or third hard drive to the mother. To do this, the IDE interface is connected to a cable (wide, thin wire). The second end of the cable is connected to the IDE 1 Secondary socket (the main drive is connected to the zero socket).

The final connection step is power supply. To do this, a white chip with four wires is connected to the corresponding connector. The wires come directly from the power supply (a box with wires and a fan).
SATA interface
Unlike IDE, a disk with SATA interface equipped with two L-shaped connectors. One is for the power connection, and the second is for the data cable. It should be noted that such a hard drive does not have a jumper.

The data cable is connected to a narrow connector. The other end is connected to a special connector. Most often, the motherboard has 4 such ports, but there are exceptions and there are only 2 ports. One of the slots may be occupied DVD drive ohm
There are cases when a drive with a SATA interface was purchased, but no such connectors were found on the motherboard. In this case, it is recommended to additionally purchase a SATA controller that is installed in a PCI slot.
The next step is to connect the power. An L-shaped wide cable is connected to the corresponding connector. If the drive has an additional power connector (IDE interface), it is enough to use one of the connectors. On this physical connection hard drive is complete.
BIOS setup
When all the manipulations with hard drive are completed, you should turn on the computer and then enter the BIOS. It is important to note that launching the BIOS on each computer is carried out differently. To do this you need to use the key:
- Delete;

After entering the BIOS, you need to proceed to configuration settings. It is important to assign booting from the drive on which it is installed. operating system. If the priority is set incorrectly, the system simply will not boot.
If one of the disks does not appear in the BIOS, it means that the hard drive was connected incorrectly or the cable was damaged. It is recommended to inspect all wires and reconnect (don't forget to turn off the computer).
Once the BIOS setup is completed, you can boot into the operating system. After this, all that remains is to assign a letter to the drive.
Final stage
Since connecting the hard drive to the computer is not enough, you need to make the final setup directly from Windows. On some computers, a similar procedure is carried out in automatic mode. To check this, you should open “My Computer”, and then see if the new disk.
If nothing happens, you need to launch the control panel. Then select “Administration”. Once a new window opens, you will need to select “Computer Management”. In the left column, you need to find the “Disk Management” tab (on some computers “Disk Manager”).

- At the bottom of the window, select disk 1 (if more than 2 hard drives are connected, select the disk with the highest number). This is what will happen new hard drive;
- You must assign a letter to the logical volume. To do this, click on the disk right click mouse, and then select “Assign letter”;
- As soon as the disk is assigned a new letter, it must be formatted. The procedure can take a long time, it all depends on the size of the hard drive. When formatting it is important to choose file system NTFS.
When the formatting process is complete, root directory“My Computer” a new drive will appear. If for some reason you cannot connect the HDD using the built-in manager, it is recommended to use third-party programs.
An excellent tool for working with hard drives is Partition Manager. In addition, such a utility allows you to split the disk into several logical volumes.
Conclusion
Connecting a hard drive takes no more than 15 minutes. If you follow the instructions, there shouldn't be any difficulties. Modern computers don't need additional settings BIOS, of course, if the disks are not installed in absolute new computer. Also, do not forget that how big the connected hard drive can be depends on the operating system.
Video review: connecting a hard drive
How to connect a hard drive to a computer?
With a desktop computer the situation is much easier than with a laptop, so let's start with it. So, you already know what characteristics to rely on when purchasing, so we’ll leave this topic outside the scope of today’s article.
- First of all, even before purchasing, you should have figured out what free drive connectors are available on your system board- old IDE or one of the varieties of SATA (I, II or III).
- And secondly, what free power connectors are available on the .
Modern hard drives, motherboards and power supplies work with SATA connectors. However, if they are all already occupied on the power supply, then also take care of purchasing a Molex-SATA adapter to connect your second drive to Molex-type power.
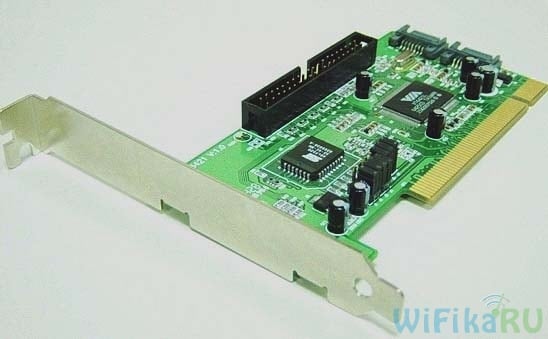
If you want to use a second old hard drive with a connection to an “IDE” type motherboard, and your latter is new and no longer has such an input, then we buy an adapter from IDE to SATA.
Another option to connect a hard drive to a computer that does not have a corresponding connector for it is to use a special IDE-SATA PCI controller. The advantage of it is that with it you can connect an old IDE drive to new board, and a new SATA drive to the old motherboard. It looks like an expansion card that is inserted into PCI slot on the motherboard and adds support for working with IDE devices. Let me remind you that you can connect two disks or drives to a standard cable at once.
Let's say you have already figured out all your nuances, purchased a second hard drive and, if necessary, adapters, and now you need to install it in the case and connect it to the motherboard and power supply. First, we secure the hard drive in a special basket in the case, or insert it along the guides and secure it with special fasteners or ordinary screws, depending on the type.

After that, we connect the “small” SATA to the corresponding connectors on the back of the drive and on the motherboard, and into the larger SATA socket (for power) we insert either an adapter connected to the cable from the power supply, or directly the power supply cable with a SATA plug. We do this carefully so as not to break the socket on the hard drive, since there is no limiter at the bottom and you can easily break off a piece of the board with the contacts of this connector.
In the screenshot below, green arrows indicate wide SATA arrows that connect the second hard drive to the power supply, and red arrows indicate narrow ones that go to the motherboard.

Yes, do not forget that all connections must be made with the power supply disconnected from the outlet, or with the power switch turned off, if there is one on it. As you can see, there is nothing complicated.
How to install a second hard drive in a laptop?
Is this really possible? Yes, today you can also increase the amount of space not only on a desktop PC, but also on a laptop. And to do this, it is not at all necessary to replace the standard hard drive that is already in the laptop, and therefore you will not have to face all the associated problems, such as transferring files and reinstalling Windows and all programs on a new hard drive.
The second hard drive in the laptop (let me remind you, 2.5 inches in size) is connected using a special adapter, which is installed instead of a laptop DVD drive - you must admit, almost no one uses this device now. And if you need to view discs, you can always use an external one connected via USB.
This is what this adapter, invented (or copied?) by the Chinese, looks like:

In online stores it can be found under the name “2nd SSD HDD HD Hard Disk Driver Caddy SATA for 12.7mm CD / DVD-ROM Optical Bay”. Inside and outside this adapter there is a connector for connecting a disk and for connecting the adapter itself to the laptop board.
So, we insert the hard drive into the adapter. You may also have to screw the mount yourself to the back of the adapter, through which it will be screwed to the laptop body.


And in its place we insert the adapter and secure it with the same screw. After this, the “Computer” menu will appear new hard a disk that can be fully used after formatting.
How to install a small hard drive in a computer?
Speaking about connecting a hard drive, one cannot help but touch upon the problem that users sometimes encounter when they need to install a hard drive or 2.5″ SSD into a computer whose case only has mounts for standard 3.5″ drives. For this case, there are also special adapters in which such a hard drive can be secured and inserted into a regular place under disks of larger diameter.

BIOS does not recognize the second hard drive
Another common problem that you may encounter when installing 2 hard drives- the computer simply does not see one of them. First of all, if you are using an adapter, then this may be the problem. Use known-good adapters.
If you haven’t used it or your adapter is working, then the whole point is BIOS settings, namely, the controller operating mode is incorrectly set hard drives.
We reboot the computer, go into the BIOS and look for the “SATA Controller” item (or SATA ATA/IDE/Raid Config, Mass Storage Controll or something else like that to set the mode HDD operation). If you connected a drive with a SATA cable to the motherboard and a modern operating system is installed on the computer ( Windows Vista, 7, 8 and above), then the AHCI, IDE, Native or Enchansed position can be activated in this item. Wherein
only in AHCI mode the maximum data transfer speed from the disk will be achieved.
If there is an older Windows, or if the hard drive was connected, then only IDE, Native or Enchansed.
The disk controllers themselves must also be enabled. Here are a couple of screenshots from different BIOSes with these settings:

If your computer has 2 hard drives (or a disk + DVD drive) and both of them are connected via IDE cables, then the problem may be that they are not configured correctly with each other. If you have just such a connection and in the BIOS you see the following picture:

then this is your case. In this configuration (when both are connected via IDE), one disk should be Master, that is, the main one, the one on which Windows is located, and the other Slave, that is, secondary.
This priority is configured using a special jumper installed on the contacts on the back of the case.

All possible positions of this jumper and their modes are usually described on a sticker on the disk body. They may differ from one manufacturer to another.

From our table we see that if Windows is installed on the disk and it will be the main one (Master), or if it is used alone, then we put a jumper on the first 2 vertical contacts. If it is secondary (Slave), then remove the jumper altogether.
We do this with our hard drives and go into the BIOS again. Now they will be automatically detected by the motherboard and the following picture should be drawn:


