In this article I would like to talk about a program such as TeamViewer 11, what it is actually needed for and how to install it will be shown below:
TeamViewer 11 is one of the free programs which is designed to remotely control your computer.
With it, you can administer and transfer files with just drag and drop! One thing, in order to carry out remote control, TeamViewer of similar versions must be installed on both PCs, if you use more new version programs.
TeamViewer 11: Installation and connection
So, in order to download TeamViwer 11 program you need to download it from the official website, to do this follow this link. In the window that opens, simply click on the inscription “ Download TeamViwer»

After you have downloaded the installer, double-click on it with the left mouse button, a window appears with the program running. To continue the installation, strictly speaking, we highlight the points that interest us, namely: in the installation options “ Install" and in use cases " Personal/non-commercial use" and accordingly press " Accept - complete»

The installation process will begin, TeamViwer program it installs quite quickly, after which it will automatically start and a small instruction will appear on the purpose of certain buttons or sections, after familiarizing yourself with some of the parameters, click “ Close»

As you can see the program can be logically divided into two parts on the left side it is " Allow control", here you can watch Your ID And Password.
Your ID– this is the IP address provided by TeamViwer in order to use it directly in the program, that is, to connect to your computer you need to know your ID.
Next you see your Password which will always be provided to you by default by the program, but you can change it and set any password, but for security purposes I recommend setting a password that will consist of more characters.

In the second panel we see an item for the partner ID; below there are three items for selecting a connection to your partner:
Remote control– the essence of which is that you connect to a user with the rights allowed to you, that is, the rights to control your partner’s computer
The next point is file transfer– your task is that you can share your files
Typically, to manage a remote connection, select the “ Remote control»
So let's enter Partner ID and click on the button “ Connect to partner»

Identification is in progress, after which you see a window in which you are required to enter a password, the password of the user you are connecting to, enter the password accordingly and click “ Login»

Next, you see that a window has appeared on your desktop in which you see your partner’s desktop, and you can also say that the so-called Work Panel appears here at the top!
It is worth noting the fact that the workspace is devoid of the graphic design that your partner has; this was done in order to speed up the operation of computers, since a huge amount of kilobytes of traffic is spent on transferring images and therefore the computer can slow down, but if you also have a slow Internet, some problems may arise, so in order to speed up internet on Windows 10 read .

TeamViewer 11 Features:
After connecting, you have the complete workspace of your client or partner, you can do anything, for example, go online, see what is stored on the computer, delete files, or upload certain files or folders.
To do this, open the item “ Files and additional features
" then click " Open file transfer»

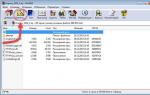
You get a window in which you see “ Local computer
"that is, your computer and " Remote computer» which belongs to your partner.
Let's select the files that are located on your PC and move them to a friend's computer, to do this, select required file and click " Send»

The file we sent appeared on your partner's computer

This is where I’ll probably end my article on the topic “ How to install TeamViewer 11“If you have any suggestions or questions, post them in the comments and don’t forget to subscribe to the newsletter!
Teamviewer online – the ability to administer a remote computer from your browser. The user does not need to install it himself, just go to the site and log in to your account. This function works subject to availability installed program Team Viewer on the PC to which the user will connect.
Using the online version of Teamviewer, users can manage all computers without installing the application itself on the device, which is very convenient for tablets and mobile devices. Online option Teamviewer is the most mobile way device management.
Connecting Teamweaver online
To connect to another device using Teamviewer online, you need to follow these simple steps:
- Go to the website https://login.teamviewer.com/LogOn
- Click “Login via web browser”.
- Complete registration.
- Confirm registration by email.
- Go to the “My Computers” section of the site.
- Click “Add” - “Add Computer”.
- Enter PC ID and password.
- Connect to TeamViewer online.
- Return to the main “My Computers” menu.
- Click Connect and select “Use the Web Client”.
- Subsequent use online versions With TeamViewer, you only need to enter your username and password to access the TeamViewer Management Console.
Features of Teamweaver online
Teamviewer online has a simple and intuitive interface, which is most comfortable for novice users to work with. you can use this function using your favorite browser from virtually anywhere.
For a more extended list of functions, there is the TeamViewer Web Connector service, which also provides the ability remote control using a browser. In addition, this service also provides more comfortable work, providing a list of your contacts as well as other tools. The ability to use TeamViewer Web Connector is provided for customers who have purchased a license from the Premium level.
Despite the fact that TeamViewer online provides the basic functions necessary to control a PC remotely, the developers strongly recommend using a full-fledged TeamViewer for remote control. This option provides the most stable connection, as well as significantly greater capabilities. You can download the latest version of Teamviewer on our website.
TeamViewer is one of the most popular utilities for remote access to a computer. Using the program, you can control someone else's PC, restart the device, communicate in voice or text chat, organize conferences and much more. However, users of the application often encounter various glitches; a fairly common problem is the lack of connection in the program.
When launching or working with the application, users may see the message “TeamViewer is not ready, please check your connection.” Most often, this error appears after the end of the allocated traffic. For users free version utilities have a limitation. The program, having exhausted the allotted time, stops working. But there are other reasons:
- Poor or no internet connection.
- Blocking the application by Firewall or antivirus.
- Using an outdated version.

- Teamviewer is not working properly or there is a system failure.
- Carrying out technical activities on the server.
- Incorrect launch.
A user who finds that he is not connecting to a partner or has stopped working needs to follow a few simple steps.
Restart and unlock
Often, connection problems arise due to the operation of the Firewall or antivirus. Most PC security applications monitor not only files, but also Internet connections. To troubleshoot a connection problem, you need to add the utility to the exceptions. This is done in the antivirus settings.
Web control is also carried out by the built-in Firewall program, which can stop TeamWeaver and disconnect the connection. Turning off the protection will help solve the problem; to do this you need to:
- IN Windows search find Firewall.

- Run the found utility.

- Go to the “Interaction Allowance” section.
- In the window that opens, next to the application name, check the “Private” and “Public” checkboxes.
You should know: You should run the remote access utility as an administrator. To do this, click on the utility icon right key mouse and select the required option.
Problems with the program
The cause of the problem may be incorrect work application or lack of update. Users are often interested if a message appears: TeamViewer is not ready, check the connection, what to do next?
Removing and reinstalling Teamweaver will help solve the problem with updating or failure. The user should completely erase the program, go to the official website and download the latest version.
Important to remember: Before deleting, you should check the availability of the Internet. The problem may be caused by a lack of connection.
The average user may actually need a lot. The first (and most common!) is that you need to get full access To to a third party computer, which is located at a decent distance from you. The second (also not uncommon!) is to establish a connection with a remote PC to exchange information (receive/transfer files). Also, the team viewer allows you to create/configure virtual private VPN networks (two-level networks consisting of “internal” secure connections and “external” ones through which communication is carried out). Well, and in addition to everything, this program allows video communication and the creation of web conferences and demonstrations between networked machines.
Installing TeamViewer
To start using the TeamViewer utility, first you need to download it, and then run it or install it on your PC (the application involves two types of use - with and without installation). On our portal you can always download TeamViewer for free latest version. There is no point in using a pirated version of the utility, since the program is absolutely free for private/non-commercial use. In addition, in the "Pirates edition" version, hackers can integrate various "hacks" that create security holes in connections/connections.
When installing the utility, you need to pay attention to a couple of points. First, the installer will offer you a choice of three options for using the team viewer: 1. "Just start"(does not require administrator rights and installation/installation of the application on a PC, suitable for urgent one-time use of the program), 2. "Install to then remotely control this computer"(provides round-the-clock access to your machine from any third-party computer/mobile device), 3. “Install” (complete installation of the program on a PC with all functionality for further session-by-session use, i.e. when required). Choose which option suits you best.
Second, in additional settings you will need to indicate whether you need the VPN connection creation feature (option "Use Teamviewer VPN).

After installing the team viewer on your PC, the application will offer you register(create an account) with the system. This will give you some extra functionality: Create/manage contacts, contact groups and remote PCs (for limitless communication with people and quick access to remote PCs). Take advantage of this offer.

Working with Computers and Contacts in TeamViewer
In the main program window, find (in the lower right corner) the option "Computers and Contacts" and click on the arrow icon (right) to open the menu. In it (at the very bottom) select any of the options you need "add remote computer" , "add contact" or "add group", then fill in the user data in the form that opens, and the new contact/remote PC will appear in your list.

Allow TeamViewer to connect to your own PC
In order for any third-party user to be able to connect to your computer and perform any actions on it, you need to transfer to him your user data (your ID and password) necessary to create a connection, which you will find in the section "Allow control" by launching the TeamViewer application on your computer. Use Skype, email, icq or, finally, telephone. A third-party user will need to create a connection through a team viewer on their machine. Wait until the screen turns black. This means that the connection has been established and the session has begun!

How to create a connection to a third-party PC in TeamViewer
There are two ways. First: ask the user "at the other end of the line" to provide you with his Teamviewer ID and password, launch TeamViewer (if you haven't already), under "Manage your computer" enter this data in the required fields and be sure to select the connection option "Remote control"/"File Transfer", after which, press the button "Connect to partner"(in the future the inscription will be lit "Clear connection"). Wait for the black screen and feel free to move your mouse!

Second way: enter the menu "Computers and Contacts", find the user you need, click on his contact rights. keyboard mouse and just select required action(see screenshot below).

Transferring files via TeamViewer
The exchange of information between machines connected to each other is done quite simply in the team viewer, almost as elementary as in the good old Total Commander. Take a close look at the screenshot below, and you are unlikely to have any questions!

That's all. To all Teamwiever users - successful, high-speed and secure connections!
TeamViewer is used for remote connection to the computer and is widely used throughout the world for assistance, administration and problem solving. Most often, users launch the program manually to get help and turn it off after solving the problem. About it . But in this article we will look at how to set up uncontrolled remote access to the computer from using TeamViewer.
Why is this necessary?
You will need permanent access if you need to systematically connect to your computer, but there is no one there to launch TimViewer manually. Or if you just don’t want to distract a person and wait for the program to launch on the other side every time.
Benefits of uncontrolled access in TeamViewer
1. TeamViewer is always running. The service is installed on the computer and there is no need to launch the program manually.
2. To connect, you use a permanent password that you choose yourself (and not a dynamic one, as is the case when starting the program manually).
Step-by-step instructions for setting up Unattended access
Download the program from the official website teamviewer.com.
Run the downloaded file.
Set the switches to the following positions:
- Install to then manage this computer remotely;
- personal/non-commercial use
and press Accept - complete:
The setup wizard will start uncontrolled access. In the first window, click Further:

Select a custom name for your computer, enter a password and confirmation. Click Further:

If you want, you can create account TeamViewer. This will allow you to add computers to your contacts list. But this is not necessary and you can select the item I don't want to create an account... and press Further:

Copy your computer ID and click Ready:
Now you can connect to your computer using both its ID and the password you set:

You do not need to enter the computer name to connect!
Now you can always connect to your computer using its ID and your permanent password. You just need the computer to be turned on and connected to the Internet.