We need on Windows based 8 create a software WiFi router that will receive the Internet in some way and be able to distribute this Internet via WiFi.
What do we need?
- Windows 8.
- Old WiFi adapter. For example, a USB WiFi adapter was used for this article TP-Link TL-WN722NC.
- Internet connection. For this article, an ADSL connection was used through the Rostelecom operator. But it can be any connection - PPPoE, VPN, GSM Dail-Up, LTE RNDIS, Ethernet, WiFi.
Step one
You need to make sure that the WiFi adapter is available, turned on and working. If it is not there, then install it. For example, if you have a laptop and it has a built-in WiFi adapter, it can be turned off in the BIOS or with a special hardware button. Without an adapter or with the adapter disabled, you will not be able to distribute WiFi with Windows 8.
Step two
You need to check that your Internet connection is working. Make sure that your computer or laptop has Internet access. Otherwise, what will you distribute over WiFi?
Step three
After this, you need to check whether the “WLAN AutoConfig Service” and “Internet Connection Sharing (ICS)” services are running. This check is done through "Control Panel - Administration - Services". By default, these services start automatically, but it may be that some smart guy “optimized” your Windows and disabled these services. This happens - a student reads a lot on the Internet and begins to “improve”.
Step four
After this you need to open Windows console(cmd.exe) with administrator rights. This can be done by opening home screen Windows 8, then from there go to program menu, there find “Command Prompt”, right-click and click “Run as administrator”:
Or open Windows Explorer 8, in it open the menu item "File" and then "Open command line - Open as administrator":

Or by opening WinX Windows menu 8. This menu contains special team:

This menu is opened from the keyboard using the Win + X keys.
Step five
In the console you need to type and execute the command:
netsh wlan set hostednetwork mode=allow ssid=winap key=123456789 keyusage=persistent
Instead of winap And 123456789 you can write a different name for the access point and a different password for it:

Note. Important!
The password must be at least 8 characters long, this is a requirement for the WPA2 security type that is used in Windows when creating an access point.
It is better not to use the Cyrillic alphabet in your password.
Letter case matters - A And A These are different symbols!
Step six
Now you need to start the access point. Again, type and execute commands in the console
netsh wlan start hostednetwork

The second command shows the current status of the access point.
Step seven
Open Control Panel, then Network Connections and there you should see something like this:

In this example" Ethernet Network 2" is a connection to the Internet. A "Connection via local network 2 winap" is an access point.
Now you need to share (enable Windows ICS) your Internet connection. Select this connection, then right mouse button, then “Properties”, “Access” tab. Enable ICS and specify the connection to which the Internet will be distributed - to the WiFi connection of the access point ("winAP"):

Step eight
Connect the client to this access point and check the Internet. And in the console you can type and execute the command
netsh wlan show hostednetwork
It will show the number of connected clients:

It can be seen that one client is connected.
How to connect a WiFi client to:
- Laptop (or computer) under Windows - Setting up WiFi in Windows 7.
- Laptop (or computer) running Linux - Laptop (or computer) running Ubuntu.
Windows 8 Hotspot Management
Stopping an access point with a command netsh wlan stop hostednetwork
Complete destruction of the access point by command netsh wlan set hostednetwork mode=disallow
If you want the access point to turn on automatically when Windows boots, then the start command needs to be added to autorun. It's about the team netsh wlan start hostednetwork. The command can be written into a cmd script; you must specify “Run as Administrator” in the properties of this script. Then include the script in autorun.
It is necessary that the connection to the Internet is also established when Windows starts. Otherwise, you will have an access point, but there will be no Internet through it.
Of course this is a very simple access point. But everything is at hand. No third party programs needed. Just Windows 8. And everything can be configured in a couple of minutes.
Some may say that this option does not have many of the capabilities that an access point should have. This is true. Only this is an option when you need to make a WiFi router very quickly and without problems. And just like this Windows feature 8 provides - with a minimum of body movements, what is called “on the knee”, create an access point.
And if your needs are broader and deeper, if you need an access point for every day, or in complex configurations, then you don’t need to use Windows, but buy a decent, or even good WiFi router. A decent WiFi router now costs less than a thousand rubles. And in such a situation, sculpting a design based on a computer and Windows is somehow absurd.
It’s another matter if you need an access point once a month, for a day or for a couple of days. Or on a business trip. Or on vacation. This is where Windows helps us out. You can quickly distribute the Internet via WiFi laptop on a tablet, smartphone or other laptops.
But if there is a need to make a permanent access point on a computer, then it is better to do it under Linux. How this is actually implemented in WiFi router X. For example, as in this article - Access point on Ubuntu.
Hotspot on Windows 8 does not work
There is no need to swear at Microsoft, at Windows - in general, look for the guilty on the side. The problem in such cases Always on your own computer(or laptop). It could be:
- Drivers for the WiFi adapter on which you are creating an access point.
- The WiFi adapter itself.
- You did something wrong.
- Any "left" services or drivers/programs that use the WiFi adapter or USB port (if your adapter is connected via USB).
For example, in the process Windows startup The WiFi adapter driver can put the adapter into standby mode. And when Windows starts the service hostednetwork the adapter does not wake up.
With a normal WiFi adapter and if you haven’t messed up your Windows with crooked programs and drivers, everything will work fine.
In general, always look for the source of the problem on your computer.
WiFi network protection
Ivan Sukhov, 2014 .
If you found this article useful or simply liked it, then do not hesitate to financially support the author. This is easy to do by throwing money at Yandex Wallet No. 410011416229354. Or on the phone +7 918-16-26-331 .
Even a small amount can help write new articles :)
In this article you will find all necessary information for setting up an access point on Windows 8 And Windows 8.1. We will set up Internet distribution from a laptop that runs on Windows 8 and connect our phone, tablet, another computer, TV, etc. to this laptop via Wi-Fi. Our computer will act as Wi-Fi router.
I have been meaning to prepare this article for a very long time, as this is a very popular topic on this moment. The article received a lot of views and comments. Yes, and even, also popular.
Briefly about what we will do and why we should launch an access point on a laptop.
For example, you have a laptop (Maybe Personal Computer With Wi-Fi adapter) , there is wired internet (or Internet via 3G/4G modem), and devices that can connect to the Internet via Wi-Fi. Modern smartphones, tablets, laptops, TVs, almost everyone has this opportunity. Do you have Internet via cable, or from a USB modem?
We connect the Internet to a computer that has Wi-Fi and launch an access point on it. In this article we will do this using Windows 8 as an example. That's all, our laptop receives the Internet via cable and distributes it via Wi-Fi to the devices we need. That's the whole scheme :) If you don't want to spend money on buying a Wi-Fi router, or you just don't need one (for example, Wi-Fi is very rarely needed), then this method is what you need.
Setting up Internet distribution on Windows 8 is practically no different from setting up on Windows 7 (link to instructions is at the beginning of this article). But, I understand that it is much easier to do everything according to the instructions that are written specifically for the operating system that is installed on your laptop. And since Windows 8 (8.1) is actively gaining momentum, this article will be useful.
What should you do before setting up an access point?
- You need to connect the Internet to your laptop. By cable or via USB modem. There may be some nuances with a USB modem, see the article if you have Internet via a modem. There's an article for Windows 7, but that's okay. If the Internet is connected via a network cable, then there should be no problems. The Internet must work, sites must open in the browser.
- Make sure that your laptop has Wi-Fi and the driver is installed on it. If you have previously connected to wireless networks from this laptop, then everything is fine, it means the driver is installed. If you don't know if the driver is installed on wireless adapter, then go to Control Panel – Network and Internet – Network Connections, and see if there is Wireless network. If there is, then everything is fine. If not, then download the driver for your model and operating system from the website of the manufacturer of your laptop (adapter) and install it. Driver for wireless Wireless LAN adapter.
That's all, you can start setting up.
Setting up a Wi-Fi access point on Windows 8 using the command line
This is the first method in which we will not use third party programs and we'll do everything standard features operating system. This method is a little more complicated than the second one, which you will find below. But sometimes it’s even easier to configure everything through the command line. Yes, problems can arise through third-party programs.
Click right click mouse to the lower left corner (or keyboard shortcut Win+X), and select Command Line (Administrator).
In the window command line enter the command (you can just copy and paste):
Where “f1comp” is the name of the network, it can be anything. In English letters.
And “12345678” is the password for the network. You will need to enter it on the device that you will connect to Wi-Fi. Please enter a password of at least 8 characters. You can use numbers and English letters.
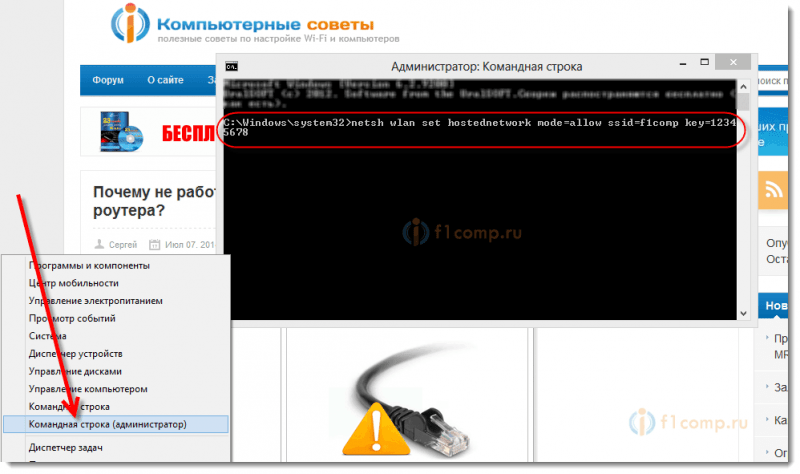 Click Enter.
The launch result should appear with information that the network name and password have been successfully changed.
Enter another command:
This is the command to start the access point. Click Enter, and we see this result:
 It should say that the hosted network is running. If you have the same result as me in the screenshot above, then you can continue. The command prompt window can be closed.
If you see an error Failed to start hosted network, then run two commands in turn:
netsh wlan set hostednetwork mode=disallow
netsh wlan set hostednetwork mode=allowGo to Device Manager, open in the list Network adapters , right click on Hosted Network Virtual Adapter and select Turn on.
We execute two commands to start the network, which I wrote about above:
netsh wlan set hostednetwork mode=allow ssid=f1comp key=12345678
netsh wlan start hostednetwork
We allow use public access to the Internet
Right-click on the connection icon in the lower right corner. Select an item Network and Sharing Center.
In the new window, on the left, click on the item Change adapter settings. Further attention! Right-click on the connection through which you receive internet ( I have it on Ethernet because it’s simple network cable connected to laptop), and select Properties.
In the new window, go to the tab Access. Check the box next to the item Allow other network users to use this computer's Internet connection.
Below in the list, select the network that appeared after starting the access point. Most likely, it will look something like the screenshot below.
Click OK.
You can take your device and connect it to the Internet via Wi-Fi, which is already provided by our laptop.
You can see instructions for connecting to Wi-Fi: , .
The most popular problem is when the device connects to an access point created on Windows 8, but the Internet does not work. Sites do not open. Or when problems arise with obtaining an IP address.
Solution: completely disable your antivirus, antivirus utilities, firewalls. Most likely, they are blocking the connection. If everything works after disabling the antivirus, then you need to add the connection to the antivirus exceptions.
Also, check your Internet sharing settings, as in the screenshot above.
How to start the network after rebooting the laptop?
You probably have a question, how can you restore your work? wireless network after rebooting the laptop.
You just need to run the command:
netsh wlan start hostednetwork
As we did above in the article. There is no need to enter the network name and password again. Just start the network.
We distribute the Internet in Windows 8 using the MyPublicWifi program
This is an easier way. We will launch the network not through the command line, but using the program MyPublicWifi. This is a free, small program with a clear interface, although without the Russian language. Instead of MyPublicWifi, you can use Virtual Router Plus, Connectify and the like. Their operating principle is the same.
Download and install MyPublicWifi. Version 5.1 can be downloaded from this link (I took the file from the official website http://www.mypublicwifi.com).
The installation is standard. After installation, reboot your laptop and launch MyPublicWifi. If an error appears during startup, right-click on the MyPublicWifi shortcut and select Run as administrator.
Select an item Automatic HotSpot configuration.
In field Network Name (SSID) specify the name of the network to be created.
In field Network Key specify the password that will need to be specified on the device to connect.
Put a tick next to Enable Internet Sharing and select from the list the connection with which your laptop is connected to the Internet.
Click on the button Set up and Start Hotspot.
You can already connect devices to the created network. If again, there is a network connection, but the Internet does not work, then check the Internet sharing settings (I wrote about this above in the article) and disable antivirus, firewall and other programs that may block the connection.
In the MyPublicWifi program, on the tab Clients you can see devices that are in currently connected to your network.
And on the tab Management You can further customize the program. For example, by checking the box next to the item Enable Firewall… we will prohibit devices that connect to your network from being used to download and distribute files through clients such as Torrent and the like.
And if you check the box next to MyPublicWifi Will be launched on every system start, then the program will start automatically when you turn on the computer.
All is ready! You can use the Internet.
If you encounter any problems, errors or other difficulties during the setup process, you can ask a question in the comments. Describe the problem in as much detail as possible, and we will try to figure it out together. Best wishes!
Also on the site:
We set up Internet distribution via Wi-Fi from a laptop on Windows 8 and Windows 8.1. Setting up an access point updated: February 6, 2018 by: admin
Thanks to modern technologies wireless communication Private home groups, which are created to combine several PCs, smartphones, tablets and other equipment, are extremely popular. This allows you to exchange data, as well as control household appliances and office equipment remotely without the use of cables. As a rule, wireless routers are used to organize such networks. But what if you don’t have a router at hand? How to create a WiFi hotspot on a Windows 8 laptop?
This is quite real. Moreover, it couldn't be easier to do this. You just need to know a few rules. In this article we will look at how to create a virtual access point on a laptop with operating system Windows 8.
How to create a private group using a laptop
I would like to immediately note that a private virtual network can be organized using any laptop that has a WiFi adapter. Moreover, if the laptop is connected to the Internet (using a cable or any other connection), then virtual group members will be able to access it. You will learn how to do this by reading this publication.
How to easily create an access point and distribute WiFi from a Windows 8 laptop: Video
So, in fact, you can create a virtual network in several ways:
- Using built-in Windows 8 tools.
- Using programs from third party developers.
Let's look at how both methods work.
How to create an access point on a laptop using built-in Windows 8 tools
First, you need to launch a command prompt with administrator rights. To do this, move your mouse cursor to the upper right corner. After this, a pop-up menu will open in which you need to find and start the search. IN search bar write “Command Prompt”, right-click on the result and select “Run as administrator”.
In the window that appears, you just need to type the command to create a virtual access point. After this, the system will detect the new device, and a new local network connection 3 will appear in the connections.
To manage a virtual network, there is a set of commands that must also be written on the command line:
- Creating a virtual access point – netsh wlan set hostednetwork mode=allow ssid=My_virtual_WiFi key=12345678 keyUsage=persistent. Here SSID is the network name, it can be anything (only in Latin letters), and Key is the group key that will be required to connect.
- Starting the created network – netsh wlan start hostednetwork.
- Stopping the network – netsh wlan stop hostednetwork.
Creating a WiFi hotspot on a Windows 8 laptop using the command line: Video
If everything is done correctly, then your WiFi access point on your Windows 8 laptop has been created. All that remains is to provide general access to network users. In addition, if the laptop is connected to the Internet, then it can also be distributed via WiFi.
This is done as follows. Launch the Network and Sharing Center. This is done in the same way as we launched the command line. In the window that appears, go to the “Change advanced sharing settings” item and turn on network discovery, as well as other services. Here you need to turn off sharing from password protection. Save the settings and return to the Network Control Center.
Now we are interested in the “Change adapter settings” menu. We launch the service and in the window that appears, look for a connection that provides the computer with access to the Internet - this can be a local connection, or a USB modem, or a wireless network connection. Right-click on the connection and go to connection properties.
Here we need the “Access” tab, in which we should check the boxes, and in the “home group connection” line, select the created network (local area network connection 3). Click “Ok” and close all windows. That's it, now your WiFi access point on your Windows 8 laptop is created and ready to use.
Organizing a home network using third-party programs
Creating a WiFi hotspot on a Windows 8 laptop using special program- this is the easiest method that does not require any knowledge from the user, the only thing you need to know is which program to install. There are quite a lot of such applications in the virtual world. Moreover, you can download them absolutely free.
Despite such diversity, they all work on the same principle, so they have almost the same set of settings. It all comes down to specifying a few points:
- The name of the access point to be created.
- Security key and encryption type.
- Selecting an Internet connection for distribution.
Of course, besides this there may be additional settings, however, is the basis of all programs for creating virtual access points. As a rule, there are instructions for the program, so there should be no difficulties.
How to distribute WiFi using Conectify Hotspot: Video
Now you know that a laptop as a WiFi access point in Windows 8 is possible and quite doable. Which method to use is up to you. It is only worth clarifying that the first method allows you to receive and distribute Internet via WiFi, which cannot be done with the second option. In addition, it is worth understanding that built-in tools always work more stable than third-party programs.
I have more than 10 years of experience in the IT field. I am engaged in designing and setting up commissioning works. We also have extensive experience in building networks, system administration and working with access control and video surveillance systems.
I work as a specialist at the Techno-Master company.
In this publication we will reveal the secret of how to do WiFi router from your laptop or operating computer Windows system 8. You will be able to distribute the Internet, turning your PC into WiFi hotspot.
You may need this in different cases if you:
- wired Internet and no WiFi router;
- GSM modem and no WiFi router;
- big flat(or office) and the signal from your WiFi router does not reach the far room.
So, the main application ideas: an alternative to a Wi-Fi router and strengthening the Wi-Fi signal.
We warn you that there is a lot of confusion and small inaccuracies on this issue on the Internet that do not allow you to achieve results. For this reason, please follow instructions exactly. A separate section of the article contains solutions to some possible problems.
Equipment check
First, let's make sure that your laptop or computer has installed Windows 8 can act as a WiFi router. The ability to operate in this mode is determined mainly network card your PC.
Let's go to the command line and find out if this feature is available. If you don't know how to run the command line, then learn.
So, if you have already figured it out, then let's move on. Type or copy (in cmd, pasting is done by right-clicking and selecting the menu line “ Insert"") control line: netsh wlan show drivers
And don't close the command line window - we'll need it later.
If the parameter " Hosted network support" has the meaning " Yes" - great, your computer can be turned into a WiFi Internet access point.
Now let's move directly to organizing the network in Windows 8.
Making a Wifi router from a computer
To activate the access point, enter the following control line, not forgetting to change the network name and password in it: netsh wlan set hostednetwork mode=allow ssid=Name_of_New_Network key=Password_of_New_Network
Name_New_Network will appear when the Wi-Fi network is detected by connected devices. A New_Network_Password will need to be entered when connecting this device.
Let's execute the given command by entering good secure password“fEgs5Jd36Wfs” and selecting the network name “site_WiFi”. Copy this line (right mouse button, “Paste”) and press the Enter button: netsh wlan set hostednetwork mode=allow ssid=site_WiFi key=fEgs5Jd36Wfs

To start the newly created network, you need to run one more command: netsh wlan start hostednetwork

If you see the response in the console “ Hosted network is running", then everything is fine.
The next step is to open " Network connections " Right click on the button Start(look for the Windows logo in the lower left corner of the screen) or do this by simultaneously pressing the Win + X keys. In the context menu that opens, click on the line “”.

The corresponding window will open:

Number in the picture (1) and the green rectangle indicates the current working wireless connection to the Internet. In your case, there may be a different type of connection - if you are connected to the Internet via twisted pair cable or via a GPRS modem. (In any case, exactly this and only this connection you will need to share).
Enclosed in an orange rectangle and marked with a number (2) newly created Microsoft Virtual WiFi Adapter with the name "site_WiFi".
Now very important point: you must right-click on the shortcut of your working connection through which your PC is connected to the Internet and click “Properties” in the menu that appears.
The wireless connection properties window will appear. Go to " Access»:

Check your options settings. If the first option has a checkmark, it means take it off and click OK. The need for this action is to reset the permission binding of a specific network. Then go to properties again the same connection.
Now, when you have gone into the properties of the working connection for the second time and there is no check mark on the previously specified item, you should check the box in the same paragraph (as shown in the figure below) and select from the drop-down list newly created new connection. For the example of this article - “ LAN connection* 13", since this is exactly what we activated Virtual WiFi.

The actions taken will lead to the appearance of an additional inscription “ Public»

It is done. After these steps, you can use your new Wi-Fi router and access the Internet through it.
Launch Virtual WiFi automatically when you turn on your computer
We figured it out how to distribute Wi-Fi and made sure that it is not so difficult. But the problem is that when you reboot and turn on/off your computer, you will have to repeat this again and again...
There are 2 ways to solve this problem:
- Create bat file and include it in startup.
- Install special software.
We automate the settings for launching a hosted network
Let us immediately warn you about the disadvantage of the first method of autoloading via a bat file. With standard security settings, every time you run such a file (that is, when you turn on your computer or laptop) The OS will ask for confirmation this action. This can be avoided by lowering the security requirements (via the hyperlink in the confirmation request window). But this is not recommended.
Now we will create a file with the extension " bat" using Notepad Windows. You will need the Windows capability change file extensions. To do this, you must have the "" option enabled in Conductor Windows.

So, let's move on to the algorithm:

Now every time you start the computer wifi_start.bat will be carried out automatically, expanding the access point. The autorun setup is complete.
Please note that the settings for sharing a working Internet connection described in the previous section only need to be completed once - they are saved when the PC is rebooted.
Creating a WiFi network using third-party programs
Alternatively, if picking in Windows settings- not your favorite thing, then you can install one of the special programs:
- program MyPublicWiFi- Very good decision Moreover, it is completely free. You can download the program on the official website www.mypublicwifi.com. We have already written in detail about this program and its configuration, go to this one.
- software package Connectify, official website of the author www.connectify.me. Includes a powerful range of different software for building complex network structures that include multiple WiFi networks. Supports different operating modes: Bridging Mode, WiFi repeater, firewall and others.
Problem solving
Infinitely obtaining an IP address
You did everything according to the instructions, but after successful authentication, the device connected via WiFi constantly reports “Obtaining an IP address” and this continues endlessly.
Possible reason - you enabled the option “ Allow other network users to use...» not on a working internet connection. Or they completely forgot to activate this option.
Understand the Internet Source, A then perform the algorithm step by step exactly according to the instructions. you also can completely deactivate new network , using the information below and do the entire procedure again without errors.
Other universal possible reason Problems - viruses. Run a full antivirus check your computer or laptop.
Your Internet has stopped working
What to do if, while deploying Virtual WiFi, you have lost access to the Internet. This is especially likely if you did not strictly follow the instructions, or created a Wi-Fi access point using an incomplete or erroneous algorithm found on the World Wide Web.
Disable a newly created network (read how to do this below). Then go to "" as described earlier and right-click on your working Internet connection (the one that allows you to access the Internet). Click on the menu " Properties" and then open the " Net».
Now find the item “ Internet Protocol Version 4...", select it and click the Properties button.

Now go to the " Alternative configuration» and see what mode is selected. If the item " User configurable", registered IP address, Subnet mask, then this is probably the reason for the “breakdown” of the Internet.
To correct the situation, activate the “ Automatic private IP address»:

Be careful with the actions you perform - this decision is given on the assumption that your Internet “disappeared” due to incorrect configuration steps virtual WiFi router.
Disable WiFi distribution
Stop a hosted network you can use the control line: netsh wlan stop hostednetwork
For complete deactivation of Virtual WiFi enter the command: netsh wlan set hostednetwork mode=disallow
That's all. We hope that the information in this article was useful to you and if so, we are waiting for your feedback in the comments at the bottom of the page. Thank you.
Video on the topic