– the most unreliable component modern computer. As a rule, modern models last up to 3 years, after which they have to be replaced. The worst thing in this situation is that you can’t predict exactly when it will break. HDD very difficult. Because of this, inexperienced users often lose important data. In this material we will talk about how to check a hard drive for serviceability and correctly assess its condition.
Serviceability check based on data from “S.M.A.R.T.”
If you want to check your hard drive for serviceability, then the first thing you need to do is install the program. This free program collects all available information about the drive and, based on it, provides an assessment of its technical condition. If the drive is fully operational, then its “technical condition” will be indicated as “Good”. If there are any problems with it, then you will receive an “Alarm” rating, but in cases where the HDD is on the verge of death, the program gives a “Bad” rating.
Also in the CrystalDiskInfo program you can view the source data of the “S.M.A.R.T.” system. (the program uses them to assess those conditions). To figure out what a particular parameter means, you can use . There is a table with detailed description all parameters of the “S.M.A.R.T.” system. In addition, in the CrystalDiskInfo program you can see the number of starts, the number of hours worked, the exact name of the model and even serial number drive.
Checking the health of the hard drive under load
If the S.M.A.R.T. system does not show any problems, then the hard drive can be checked for serviceability by creating a large load. To do this, simply try to write a large number of small files (a couple of megabytes in size) to the drive. For example, you might try to copy a large folder of photos onto it.
- If the disk is good, then the copying process should proceed without any incidents. In this case, the copying speed should be more or less stable throughout the entire copying process (with the exception of a slight drop in speed immediately after the start of copying).
- If the hard drive is faulty, the copy speed will fluctuate greatly (from normal to very slow). In some cases, the copying process may freeze or be interrupted. Some files may not be copied, and the system will report errors. In particularly advanced cases, a cracking or grinding sound may be heard, and the drive may turn off ().
If the file writing test went well, then try testing how data reading works. To do this, try copying data from the disk you are testing.
Checking for errors in HD Tune
The next stage is checking the serviceability hard drive using specialized programs. Such programs allow you to check your hard drive for errors and identify existing problems, even if they do not appear during normal use. Let's start checking with a free program (or its paid version HD Tune Pro).
To check your hard drive for errors, run the HD Tune program, go to the tab and click on the “Start” button.

After this, the HD Tune program will begin checking the hard drive for serviceability. During the verification, you will be able to observe this process. Normal areas of the hard drive will be marked in green, and damaged areas in red.

On a fully functional hard drive, there should be no damaged (red) blocks at all; the entire surface should be marked green.
Checking for errors using Victoria 3.5
To get the most accurate check, you need to use the program, you can download it as an iso file, for example, (here is version 3.5, which is best suited for checking outside operating system). The downloaded iso file must be written to a CD (or flash drive) and the computer booted from it. After booting your computer from this CD, you will need to select one of the versions of the Victoria program. For desktop computers you need to select the version “Victoria for Desktop”, and for laptops, respectively, “Victoria for Notebook”. Other options in this menu launch the operating system DOS system and Volkov Commander.

To start checking the entire surface of the hard drive, press the F4 key. After this, a menu with settings should appear. Here you need to select “Ignore Bad Blocks” and "Linear Reading". It should be noted that you need to use the Victoria program very carefully, since using some of its functions can delete data on the drive. For example, this can happen when you enable the “Write (erase)”, “Write from file”, and “BB = Erase 256 sect” options.

To start scanning, press the F4 key again. After this, all you have to do is wait until the verification is completed. At the end, if the hard drive is fully functional, you should see a screen like this.
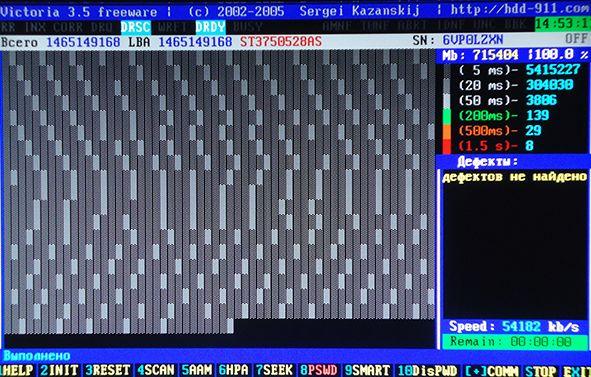
If the hard drive has any problem areas, orange and red blocks will appear on the scanning screen. The more such blocks, the worse the condition of the HDD surface. If the number of red blocks is large, this means that the hard drive is faulty and it is time to replace it. Detailed information about the problems found can be viewed on the right side of the screen, in the “Defects” window.
Error checking in Victoria 4.46
If you do not want to burn an iso image and boot from a disk from a computer, you can use Victoria program 4.46, which runs from the Windows operating system. You can download this version of the program, for example, .
After downloading, you will receive an archive that will need to be unpacked into any folder. To run the Victoria 4.46 program, open the folder with the contents of the archive and run the program vcr446f.exe. After launch, you will see the main Victoria window, it will look something like the picture below.
You should start studying the program from the “Standard” tab. Here on the right side of the screen is a list hard drives, which Victoria was able to determine, information about the currently selected drive is displayed at the top left (you can select another one if you wish), and at the bottom there is a log of events, errors and other information.
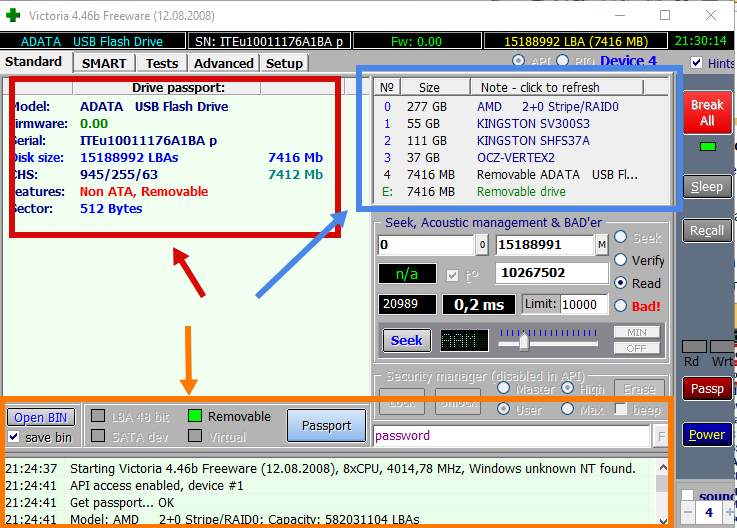
To check your hard drive for errors, you need to open the “Tests” tab. Here you must first click on the “ Passp” button (to get information about the drive), and then on the “ Start” button (to start the check).

After this, you just need to wait until the program finishes checking your hard drive.

During the scanning process, the Victoria program will find faulty and problematic drive blocks, the number of which will be displayed in the column on the right, as well as at the bottom of the screen.
Results of checking the health of the hard drive
A fully functional hard drive should pass all the tests described above without any problems. CrystalDiskInfo should be rated Good, manual read and write tests should pass without difficulty, and HD Tune and Victoria should not detect any problems. If everything is exactly like this for you, then most likely your hard drive is fully functional and will work for a long time.
But, of course, there are no guarantees here and cannot be. Therefore, the only way to reliably protect your data is backup. The most important data (personal photos, videos, documents) should always be stored on multiple drives.
A hard drive (hard drive, hdd) is the main storage device for information on your laptop or PC. Its name is associated with physical properties: Unlike floppy disks, disk data is recorded on hard plates, which can be made of aluminum or glass using the principle of magnetic recording. Very often, system slowness is associated with a faulty hdd, so before you send your laptop for repair, find out how to check the hard drive on your laptop and try to fix any errors you find yourself. We tell you how to do this in Russian in this article.
How to test a laptop hard drive?
HDD diagnostics using built-in tools of the Windows operating system
Regardless of which version of the OP you are using, the system has special built-in functions and utilities with which you can test the hard drive on a laptop.
Option one: in the “My Computer” folder, select the hard drive that you want to scan for errors. Next, click Properties > Tools > Run Scan. The computer can simply perform a report analysis, or it can immediately correct hdd errors (to do this, check the boxes for requests for automatic corrections system errors and recovery of system sectors). After this setting, click the Start button. If the system displays an error due to the inability to scan the hard drive it is currently using (usually this happens when scanning drive C), select “Disk scan schedule”. After this, you just need to restart the laptop (or PC), and during boot time a test for problems will occur. Its duration can vary from a minute to an hour, and after that the OP will be launched.
Option two: check disk utility. Detects file errors hard systems disk or floppy disk and fixes them. To run it, open the command line console (necessarily with administrator rights) and enter the command CHKDSK [volume[filename]] /F/V/R/X/I/C/L[:size]]/B , where
“[volume]” is the disk being checked (written as a letter + a colon, for example C:),
“[file name]” files that need to be scanned (if you need to scan the entire disk, there is no need to enter this),
/F means fix errors in the volume,
/V prints the full path and name of each file,
/R executes a command to search for damaged sectors and restore the contents that survived (the presence of the /F command is required for its execution),
/X will pre-mount the volume if necessary,
/I will enable less strict checking of index elements, /C will command skip checking of loops inside,
/L[:size]] will set the size of the log file,
/B Enables re-evaluation of damaged clusters.
At the same time, the full set of commands is used extremely rarely; the most common commands are /F and /R (when entering the letter designations of all other commands in the console, you just need to skip them, for example chkdsk D: /F/R). After entering the command in the console line to check the disk for errors, you will be prompted to run this command the next time you start the system; to confirm, press Y + Enter and reboot.
P.S. You can find out how to launch the administrator command line for your version of the operating system on the Internet; for example, in Windows XP, to open it you need to go to Start > All Programs > Accessories > Command Prompt.
It is quite possible that performing a disk check using the console and the utility is not clear to you, especially if you are not very familiar with the system. Well, don’t despair: specially designed and produced for such cases software, which will help you test not only more clearly, but also more completely. For those who still haven’t solved the question of how to test the hard drive of a laptop or desktop computer, we have collected the most popular free programs that will cope with the task.
Diagnosing the hard drive for errors using various programs

The most common program for scanning a hard drive for errors is Victoria. Although it should be immediately noted that its use also requires some experience and ability to handle software, it is not intended for beginners. You can download the program image for free from the official website. After that we do next steps in this sequence:
- Unzip the downloaded data;
- Burn data to CD/DVD;
- Boot from the disk on which you recorded the files;
- Select the Victoria program for your device;
- After launching the program interface, we find required disk(if the program itself has not identified it, press F2 to do this): press P and select the desired volume (by the way, for SATA interface you need to select the HDD port “Ext. PCI ATA/SATA");
- To check the disk surface, press the F4 key;
- After physical check the laptop/computer hdd surface is checked for errors and incorrectly functioning areas are corrected;
The procedure is long, usually from 40 minutes to 2-3 hours. - Finish: Remove the disk and restart the system.
Well, despite the popularity of this software, it is obvious that Victoria, being a powerful tool for diagnosing and correcting disk errors, is not intended for beginners. But besides her, there are several more good programs, which can cope with such a function as checking the hdd on a laptop/PC.
Seagate SeaTools– a free program for beginners in the field of checking hard drives. It can also correct identified errors, which means it is in no way inferior to the widespread Victoria program.
The program tests disks of all brands. You can download it for free from the manufacturer’s official website. It can work on two platforms - as a utility for Windows (while waiting for this, download “SeaTools for Windows") or as an iso image that is downloaded to a separate disk, similar to iso image Victoria (to do this, download “Seagate for DOS” from the site). At the same time, its significant advantage over the previously discussed program will be a complete Russian-language reference description-instructions on how to check the hdd on a laptop/PC (help section). It will help you understand the processes and results of the disk scan.
Active users of such software will agree that the Seagate SeaTools and Victoria programs are perhaps the most useful tools in identifying and eliminating hard errors disk. If the first is suitable for beginners, especially for users from Russia, since it has a Russian-language version, then the second will be useful for experienced users, or at least for those people who can fluently understand English vocabulary associated with computer technologies. There are other programs that will allow you to do testing, but they are either suitable for a certain type of disk or do not identify hard drive errors as fully as possible; that's why we only analyzed best options hdd checks.
And finally, our general advice for all those who feel abnormal operation of the hdd on a laptop or desktop computer (for example, its excessively noisy operation) and in general for all those who have personal computers: be sure to create backups your data and be prepared for lengthy repairs or even replacement of the hard drive of your equipment.
Experienced users are well aware that the health of a hard drive can be affected by even minor influences, for example, voltage surges, mechanical shocks and shocks, static voltage, etc. The hard drive mechanism itself can damage the surface of the drive where information is stored. Below is a guide on how to properly check your computer's hard drive for serviceability.
Main symptoms of a damaged hard drive
Already during the startup of the PC, it may buzz loudly or make cracking sounds. Such noise should immediately alert the computer owner and make him think about carrying out diagnosing hard disk. It is recommended that before testing this important element of your PC, you copy all important and personal files to external media or another computer, since the test itself will place a significant load on the hard drive.
It is imperative to take care, before launching the program for verification, to ensure good cooling hard drive, for example, open the case cover system unit and clean the internal equipment from accumulated dust. The source of grinding noises during the operation of a hard drive is the contact of its read head with bad sectors(bad sectors). If measures are not taken, their number will gradually increase and may lead to the loss of HDD performance.
Verification procedure
Experts have developed many different special utilities to test the functionality of this important PC element. The procedure can also be carried out using built-in Windows tools.
Using Windows tools
The operating system allows you to analyze the hard drive. This method is not very reliable, but it is useful for the user to know how to use it. In addition to analyzing the surface of the hard drive, OS tools can, if possible, correct some errors.
The sequence of actions algorithm consists of the following stages:

Using Seagate SeaTools utility
This convenient application has already helped a significant number of PC owners solve their problem. It is free, fully Russified and effectively copes with the diagnosis of hard drives from most manufacturers. It is available for download at seagate.com.
 The application has an intuitive interface. Having opened the utility, you will immediately see a displayed list of hard drives with which you can perform all the necessary tests. As a result, the user will be presented with a report, and most importantly, the program can restore faulty sectors.
The application is also freely distributed, but only works for equipment from one specific manufacturer." Western Digital" However, since they are widespread in the Russian Federation, this program can help a significant number of users.
 The functionality is similar to the program described above. You can install it from official resource"support.wd.com".
Allows you not only to do a free check broken HDD, but also get detailed information S.M.A.R.T., as well as carry out a large number of different equipment tests.
 In addition, the utility works effectively with flash drives, RAID, SSD.
This program should be discussed in more detail, since it currently provides high accuracy of testing results. The utility is available for installation on the “softportal.com” page.
The following sequential steps must be taken:

Note: It is not recommended to check the “Erase” box, as this will erase all files. 
Conclusion
The hard drive is one of the weakest points of a modern computer. Its normal service life does not exceed five years, but clearly indicate exact time impossible.
Therefore, the only way out is to regularly check it and diagnose the condition.
The ability to store data with you and use it at any workplace allows small-sized drives connected to the computer via USB port. Let's consider three main types of such devices.
Hard magnetic disks
Initially, they were exclusively internal, but necessity forced some to get out of the system unit. In another, more compact, adapter block from hard drive format (IDE, SATA) to USB.
Let's look at how to check the functionality of an external hard drive:
- connect to a switched off computer;
- launch and wait for loading;
- in the “My Computer” folder we check for the presence of a new disk.
If HDD drive not added, reboot the computer by pressing DEL or ESC to call Setup. If it does not detect the device, then it is most likely faulty. Either HDD, or adapter, or both. To determine more precisely, you can remove the hard drive and connect it to another adapter or directly to the hard drive controller.
Solid State Drives
The first SSDs, like HDDs, were internal and, for external use, an adapter was used. Nowadays this method is rarely used due to the large number of initially external devices.
Let's look at how to check the SSD for functionality:
- connect to the computer and wait for the operating system to detect new equipment;
- open the drive in the “My Computer” folder and work with it.
If the system does not respond to the connection, try restarting the computer. You can try formatting the SSD. () If the situation has not changed, then the disk is most likely faulty.
Flash drives
The closest relative, or rather, the ancestor of the SSD. Is different smaller capacity and dimensions, as well as the absence of a connecting cable. These include memory cards: SD and microSD – connected to USB via a card reader.
Testing external drives with software
An approximate and often sufficient check of devices can be carried out standard programs systems – formatting and copying. The process should proceed stably and evenly, without error messages.
For a more in-depth check, allowing you to identify hidden defects and speed characteristics of drives, there are many programs that perform these functions in whole or in part. They usually have a simple interface where you just select a device and run the test. If there is a fault, it will be indicated.
The hard drive is an extremely important hardware component of a PC. Therefore, the user may need to solve problems related to testing the hard drive for errors, as well as correcting them. What tools can be used for this? What are the most common errors in hard drive operation?
What problems can arise with the hard drive?
Before looking at how to test a hard drive, let's look at what might be a reason to carry out an appropriate check. What problems might arise in his work?
To use the utility in question, you need to go to the “Computer” section, then click right click on the hard drive icon. There may be several of them, in which case it makes sense to check each one in turn. After right-clicking on the hard drive icon in the menu that opens, select the “Properties” option. In the window that appears, go to the “Service” tab. Then click on the “Run check” button and follow the instructions.
In some Windows versions the utility in question is not configured to test the logical drives on which system files OS. But in this case, the Disk Check program provides an option: initiating testing of the hard drive upon subsequent loading of the operating system. You can select it and immediately restart Windows: during the startup process, the system itself should ask the user for permission to scan the disk on which the system files are located.
So now we know how to test a hard drive using the popular built-in Windows tool- Chkdsk programs. This decision allows you to quite effectively correct file system errors. But what if the supposed malfunction of the hard drive is associated with the appearance of bad sectors on it? How to test the hard drive of a laptop or desktop for relevant damage?
A wide range of solutions can be used for these purposes. The most popular of them include programs such as:
- Data Lifeguard Diagnostic.
- HDD Scan.
- Ashampoo HDD Control.
- Victoria HDD.
- AIDA64 (formerly Everest).
- MHDD.
Let's study their features.
Hard drive testing: Data Lifequard Diagnostic
This program was developed by the Western Digital brand, which is one of the world's most famous hard drive manufacturers. How to test a hard drive for errors using this software?

The corresponding program operates in several modes. The most informative mode from the point of view of reflecting information about errors on the disk is the extended testing mode - Extended Test. In particular, it can be used to find damaged sectors on the surface of the hard drive platters. If they are detected, the program will prompt the user to use an algorithm through which bad sectors will be excluded from those used by the hard drive to write and read files.
Hard drive testing: HDD Scan
Another popular solution for checking disks is HDD program Scan. How to test a laptop hard drive or desktop computer with her help?

The application in question also contains several tests. Among those that may be useful to us are: Surface test Tests. It, like the previous solution, allows you to analyze the surface of the disk platters for damaged sectors. It is noteworthy that the program in question allows you to detect not only bad sectors, but also those that have problems with reading and writing. Thus, HDD Scan can identify areas on the surface of the hard drive platters where the reading speed can be tens of times lower than normal values. In practice, this may mean, as in the case of bad sectors, it is desirable to exclude the corresponding sections from those used by the hard drive for writing files.
Disc testing: Ashampoo
Another popular program is Ashampoo HDD Control. How can I test my hard drive for errors with it?
It is worth noting that the application in question contains a fairly large number of tools for checking the hard drive, as well as working with detected disk problems. Of these, you can use, for example, the option for testing the surface of the device plates - Test Surface.

Based on the results of the corresponding test, it shows sectors that have high reading rates, as well as bad sectors.
Victoria HDD
The next popular solution for checking hard drives is Victoria HDD. It may be noted that this program allows you to both test the hard drive on Windows 7 (8 or any other) and check the hard drive via the DOS command line.

This feature increases the versatility of the solution under consideration. In addition, the corresponding software has very good functionality.
Thus, the program allows you to test your hard drive for bad sectors, reassign their use, and classify areas of the hard drive surface into different categories depending on the speed of reading files from them.
If you are using the English graphical version of the program in question, you need to launch it, then go to the Tests tab. It contains tests of the surface of the hard drive platters. If necessary, you can configure the program's actions when bad sectors are detected:
- ignoring the problem (with its subsequent reflection in the test results);
- sector reassignment;
- deleting sectors;
- restoration of damaged disk areas.
If necessary, you can use each of the specified program operating modes in turn.
Hard drive testing: AIDA64 program
Many users are interested in the question of how to test a hard drive. Now old versions of the corresponding software are available on various portals on the Internet. The fact is that in the newest modifications the program is called differently, its name sounds like AIDA64.

It is worth noting that this type The software is one of the most functional solutions for testing hardware performance. For example, using the program in question, you can test the speed of your hard drive, and not only that. You can also use it to measure performance random access memory, processor, flash drives.
The functionality of the program includes various stress tests, which involve testing in maximum load mode. The corresponding type of tests can also be carried out for the computer’s hard drive.
Checking the disk for errors: MHDD program
According to IT experts, the MHDD program is one of the most functional solutions for checking hard drives for errors. When considering which program to test a hard drive, specialists can choose the MHDD solution because:
- it includes a qualitative test of the surface of hard drive platters;
- it can be launched in a bootable format - for example, from a flash drive, which allows you to test the hard drive before installing any operating system on it;
- the program includes a large number of useful tests, as well as disk repair tools;
- the corresponding software is free.

Of course, the solution in question can also work from the operating system. The specific way to use it depends on the nature of the problem with the disks, on the hardware configuration on a particular PC, and on the specifics of the operating system used, if it is pre-installed on the computer.
MHDD program: testing the disk
Let's consider a number of practical nuances of using the corresponding popular program. Let's agree that the user needs to use the boot version of this software. To do this, you need to make a device with which the program will be launched, for example a flash drive or CD.
After the device is ready, you need to configure booting from it in the BIOS. By the way, many users also ask the question of how to test a hard drive through BIOS. Computer manufacturers may well sell in appropriate software interfaces necessary options to check the performance of hard drives.
When working with the MHDD program, you should take into account a nuance: the solution in question does not work with hard drives that are connected to the computer in Slave mode. If this is the case, the drives need to be reconnected, and only then should they be tested.
After starting the program installed on bootable USB flash drive or CD, you must select the specific drive that will be tested. Then enter in command line SCAN command, which initiates a media scan. If you do not need to set any additional scanning parameters, you need to press F4 to launch the corresponding test.
However, you may still need to specify additional parameters. For example, if we talk about the Start LBA option, it is used to indicate specific blocks on the hard drive from which the program should check the disk. In turn, the End LBA option is intended to indicate those blocks that are checked at the end of disk testing. However, by default the program checks the entire surface of the hard drive platters.
How to test a hard drive for errors and then reassign bad sectors using the MHDD program interfaces? It’s very simple: the Remap option is used for this. If you select the Erase Delays option, the program will ignore bad sectors, which will speed up scanning the disk if there are a lot of bad sectors on its surface.
The MHDD disk scanning program works quite informatively: the scanned sectors are displayed on the user's screen in real time. In a separate section of the interface of the corresponding software, the number of different blocks is counted.
Summary
Check state of hard disk, you can either use the built-in Windows tools, and when using special programs. At the same time, tools of the first type are designed mainly for correcting errors in file system, the second - to identify and correct bad sectors in accessible ways.
Specialized ones can be supplied in both graphical and console versions. Some of the corresponding solutions can be used in a boot modification: its use is possible even if the operating system is not installed on the computer.
It can be noted that how to test an external hard drive is practically no different from the procedure for testing a built-in hard drive. For this, the same solutions can be applied, the main thing is to connect them to the PC correctly. But this is only possible if the computer supports the communication interfaces through which the external hard drive is supposed to be connected.


