In the Windows operating system, you can connect shared access to a folder on a local home network to exchange data between computers using shared folders. It is very convenient and quick way for transferring files using a computer-to-computer scheme, without using external media(flash drives, external hard drives, memory cards, etc.).
In this article I will talk about creating a local network using the Windows 10 operating system as an example. Creating and setting up a local network in Windows 8 and Windows 7 is done in a similar way; these instructions are universal.
The article discusses the following option for using shared folders on a local network: several computers are connected to the router, connected via cable and wireless network Wi-Fi integrated into a home network. A shared folder is created on each computer; all computers included in the given folder have access to the shared folders. local network.
On computers connected to the home local network, the operating systems Windows 10, Windows 8, Windows 7 (different OS, or the same operating system) can be installed, connected to the router via Wi-Fi or cable.
Creating and configuring a local network takes place in four stages:
- first stage - checking the workgroup name and settings network card
- second stage - creating and configuring local network parameters
- third stage - connecting shared access to a folder on the local network
- fourth stage - data exchange over the local network
First you need to check the workgroup settings and network card settings, and then create a local Windows network.
Checking network card and workgroup settings
On the desktop, click right click mouse over the “This PC” icon (“My Computer”, “Computer”), in context menu select "Properties". In the “System” window, click on “Advanced system settings”.
In the “System Properties” window that opens, open the “Computer name” tab. Here you will see the workgroup name. By default, in Windows 10, a workgroup is named "WORKGROUP".
On all computers connected to this local network, the workgroup name must be the same. If on computers connected to the network in workgroups different names, change the names by choosing one name for the workgroup.
To do this, click on the “Change...” button, in the “Changing computer or domain name” window, give a different name for the workgroup (write the new name in capital letters, preferably in English).
Now check your network card settings. To do this, in the notification area, right-click on the network icon (Internet access). Click on "Network and Sharing Center" shared access" In the Network and Sharing Center window, click the Change adapter settings link.
In the Network Connections window, select a network card, Ethernet or Wi-Fi, depending on how your computer connects to the Internet. Next, right-click on the network card and click on “Properties” in the context menu.
In the network card properties window, in the “Network” tab, select the “IP version 4 (TCP/IPv4)” component, and then click on the “Properties” button.

In the Internet Protocol Properties window that opens, in the “General” tab, check the IP address and DNS service settings. In most cases, these parameters are assigned automatically. If these parameters are inserted manually, check the corresponding addresses with your Internet provider (the IP address on computers connected to the network must be different).

After checking the settings, you can proceed directly to creating a local network in Windows.
Creating a local network
First of all, configure the local network settings in Windows. Enter the “Network and Sharing Center”, click on the “Change advanced sharing settings” item.
The Advanced Sharing Settings window allows you to change sharing settings for different network profiles. operating room Windows system for each network used, creates a separate network profile with its own special parameters.
There are three network profiles available:
- Private
- Guest or public
- All networks
In your private network profile, under Network Discovery, select Enable Network Discovery.
In the File and Printer Sharing option, enable the Enable File and Printer Sharing option.
In the HomeGroup Connection option, select Let Windows manage HomeGroup connections (recommended).

After that, open the “All Networks” network profile. In the Public Folder Sharing option, select Enable sharing to allow network users to read and write files in public folders.
In the File Sharing Connection option, select the Use 128-bit encryption to secure sharing connections (recommended) option.
In the "Sharing with" option password protection» activate the option “Disable password protected sharing”.

After completing the settings, click on the “Save Changes” button.
Repeat all these steps on all computers that you plan to connect to your home local network:
- check the workgroup name (name must be the same)
- check your network card settings
- In sharing settings, enable network discovery, enable file and printer sharing, disable password protected sharing
How to enable folder sharing
In this case, I created a folder named “General”. Right-click on this folder and in the folder properties window, open the “Access” tab.
Then click on the “Advanced setup” button.

In the “Advanced sharing settings” window, activate the “Share this folder” option, and then click on the “Permissions” button.

Select permissions to use shared folder data from another computer. There are three options to choose from:
- Full access
- Change
- Reading

To save the settings, click on the “OK” button.
Go back to the folder properties, open the “Security” tab, and then click on the “Change...” button.

In the window that opens, enter the name “Everyone” (without quotes) in the “Enter names of selected objects” field, and then click on the “OK” button.

In the folder properties window, in the “Security” tab, configure the permissions that you previously selected for the shared folder.
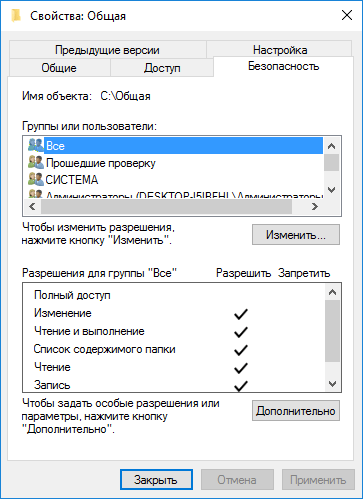
To change the permission for the “Everyone” group, click on the “Advanced” button. In the “Advanced security settings for a shared folder” window, select the “Everyone” group, and then click on the “Change” button to change permissions.
Setting up a local network in Windows is complete. In some cases, you may need to restart your computer for all changes to take effect.
Logging into your local home network
Open Explorer, in the “Network” section you will see all available computers connected to your local home network. To log into another computer, click on the computer name, and then click on the shared folder name to access the files and folders located in the shared folder.

The local network in Windows 10 has been created and configured.
Troubleshoot some network problems
Sometimes, after setting up the network, problems arise with accessing folders on the local network. One of possible problems, the network profile may be incorrectly selected. I encountered this myself on my computer. After reinstalling the system, I created and configured a local network, but my computer did not see two laptops connected to this network. From the laptop I could easily access the shared folder on my computer, but the computer did not see them at all.
I checked all the local network settings several times, and only then I noticed that my computer was running a public network, and not a private (home) network, like on laptops. How can such a problem be solved?
Enter the “Network and Sharing Center”, click on “Troubleshooting”. Select the “Shared Folders” section and run diagnostics and troubleshooting. At the very end, the application will offer to configure the network as private. Apply this fix, and then restart your computer. After performing this operation, my computer gained access to shared folders on laptops on the local network.
Problems often arise due to incorrect setting networks. Windows 10 has the option to reset network settings to default settings. Go to “Settings”, “Network and Internet”, in the “Change network settings” section, click on “Reset network” to apply network settings default.
Other problems may arise; look for solutions on the Internet.
Conclusions of the article
In Windows OS, you can create a local private (home) network between computers, organize data exchange using shared folders, and gain access to a printer. Computers on the same network can have different or the same operating systems installed (Windows 10, Windows 8, Windows 7).
Here we will look at information on how to become an Internet provider, what equipment is needed for this and what is needed in general.
To a large number of different people, and even some businessmen, the scheme for organizing the activities of an Internet provider may seem very complex and confusing from a technical point of view. Therefore, the number of entrepreneurs entering the telecommunications market is not so large. But everything is not as difficult as it seems at first. If you do not look at the organization of an Internet provider as complex technical system, but as for business, everything comes down to three simple points.
Necessary equipment
We present to you the minimum list of equipment that you will need to organize provisioning:
- Web servers;
- Mail servers (can be combined with web servers on small systems);
- FTP servers (usually combined with web servers);
- Identification and terminal servers;
- Master server;
- Secondary servers;
- News servers (optional);
- Servers for development and control;
- Registration server (for online registration, option);
- Calculation server (optional);
- Typical server (on large systems);
- Router;
- Protection against unauthorized hacking of the system;
- Network switches;
- Equipment racks;
- Cables, tools and control equipment;
- Remote access server;
- Administrative panel and printer;
- Sources uninterruptible power supply(at least 1 hour supply);
- Cabinets, racks, etc.;
- Spare parts.
All your main costs will be related to equipment. To purchase it at minimum prices and quantity (for a small Internet provider) will cost from 2-3 million rubles. Here it will be very important for you to seek advice from specialists, because... They will help you avoid making incorrect and unnecessary purchases.
How to become an Internet provider - organizational and legal part
So, let's look at the information on how to become a provider from the point of view of organizing this business.
Decor
Internet providing, just like every other type of business activity, must be headed only by a legal entity. Therefore, the first step is to register a “Limited Liability Company” and obtain all the necessary documents for the Internet provider. The process of registering a “Limited Liability Company” can take from five to thirty calendar days, and the time for registering a legal entity is about five calendar days. Upon receipt of all registration documents for an Internet provider, it is mandatory to obtain a stamp and open an account at a bank institution. The time it takes to open an account depends primarily on the bank you choose and ranges from two days to several weeks. Don’t forget - for bank account servicing operations, you will need copies of constituent documents, copies of state registration documents, and a certificate of tax registration.
The approximate cost is about 15,800 rubles. This amount includes:
- The state fee for registering a Limited Liability Company is 4,000 rubles;
- The minimum amount of authorized capital is 10,000 rubles;
- Notarized copy of the certificate – 100 rubles;
- Notarized copy of the Internet provider’s charter – 500 rubles;
- Notarized copy of the constituent agreement – 1,200 rubles.
Licensing
After completing all the work of the first stage, you should begin to fine-tune your business. To legalize the activities of our Internet provider, mandatory communications licenses are required, since it is a communications operator.
List of licenses:
- License for telematic services;
- License for data transmission, with the exception of data transmission for the purposes of voice information.
Additional licenses may be needed for the Internet provider, but this is only when you intend to provide services not only for client access to the Internet, but also others, such as IP telephony, hosting, data backup, cable TV and others. You can arrange licenses for an Internet provider yourself, but if you do not have enough experience in this area, you should seek help from a consulting company - this will give you the opportunity to save unnecessary costs and valuable time. The time that will be spent on at this stage, can vary from ten to forty-five days. It will take two to three days to check and submit all necessary papers to Roskomnadzor, and for up to forty-five days, according to the law, your application will be considered.
The approximate cost will be about 28,000 rubles. This amount includes:
- The state fee for obtaining two licenses is 12,000 rubles;
- Provision of services by a consulting company - from 16,000 to 20,000 rubles;
After receiving all the necessary licenses and documents, the Internet provider must begin to provide communication services, this is our final point.
Final part
After the time for reviewing licenses has expired, and having received a positive response, we will proceed to the final stage. To finally secure the status of an Internet provider, you need to create a project for a communication center and submit it to Roskomnadzor for examination. For a project to successfully pass the examination, it must meet a large number of criteria. These criteria concern both the project itself and the designers, as well as the technical equipment of the site. Software the Internet provider must be exclusively licensed and have all certificates of compliance in the Communications Certification System, special attention is paid to TM and PD servers, “Billing” and channel-forming equipment. After successfully passing the expert assessment at the Federal State Unitary Enterprise MIR IT., commissioning is carried out. The stage of technical preparation of equipment is the longest. Depending on the amount of work, designing a node can take from two weeks to three months, and an expert assessment of the project in MIR IT., from a month to a year.
Stages of putting a communication center into operation:
- Notification from Roskomnadzor about the start of construction of a communication facility;
- Collection of all necessary documents, in accordance with Order 113;
- Notification from Rossvyaznadzor about the completion of construction, with a petition to appoint a RSN representative to the selection committee;
- Review of documents by the RSN inspector, and inspection of PD and TM components;
- Obtaining permission to operate.
Approximate cost: 70,000 rubles. This amount includes:
- Unit design – 35,000 rubles;
- Expert assessment at the Federal State Budgetary Institution Center MIR IT. – amounts to 30% of the design cost.
- Commissioning – 30,000 rubles.
Today Wi-Fi has firmly taken its place in our lives, turning from new technology into everyday life. Having gone to drink coffee in a cafe or sitting on a bench in a park, many begin to look for the nearest access point, without thinking at all about security issues. Practice has shown that not only users, but also many administrators have a poor understanding of threats in wireless networks, exposing corporate systems to serious risks.
Why Wi-Fi? How this technology so attractive to an attacker? To answer this question, let's remember how wired networks work. The basis of modern networks are switches (switches), which send packets only to the recipient port, excluding access to them by other hosts.
 To intercept someone else's traffic, an attacker must not only physically connect to the network, which in itself is problematic, but also become involved in the packet transmission chain. Even if an attacker connects to a free switch port, he will not be able to intercept or listen to someone else’s traffic. To carry out such an attack you need to have physical access to network equipment and administrative rights, which makes it almost impossible.
Note. We deliberately do not consider situations involving the introduction of various types of malware into the network perimeter, gaining unauthorized access to active network equipment, etc., since this is beyond the scope of this article.
Wireless networks, due to the nature of the transmission medium, cannot provide access control to data; packets transmitted by a client or access point can be received by any device within the network coverage area.
 In normal mode network hardware accepts packets intended only for it, however, there is specialized and easily accessible software that allows you to intercept and analyze all network traffic.
Even if it is your guest Wi-Fi and it is reliably isolated from corporate network, it is still susceptible to the same threats, especially if your employees use it personal devices, and if they also turn to corporate services, then the risks increase many times over.
We will not give ready-made mechanisms for attacks on open networks; we will just say that the availability of appropriate software and instructions make this task accessible even to bored schoolchildren.
In addition, we also advise considering networks with WEP encryption as open; if there is network activity on the network, it takes 5-10 minutes to hack it, and this is done by specialized software in automatic mode and does not require any special knowledge from the attacker.
With WPA / WPA2 networks the situation is much better; if you choose a reliable key and abandon the compromised TKIP technology (in favor of AES), it is almost impossible to hack such networks without the use of special tools and deep knowledge. Again, let's not forget about secure networks whose key is known to the attacker, for example, a network in a restaurant where the key is given by the waiter along with the order.
There is software, for example, CommView for WiFi, which allows you to intercept and decrypt packets even in closed networks. Therefore, secure networks, the key to which is known to a wide range of people, should also be considered as open, with all the resulting precautions.
The main threat to open networks is the interception and analysis of your traffic. Therefore, sitting down on a park bench and finding an open network, do not rush to connect to it, but think about who it might belong to.
 It may well be that that guy with glasses on the next bench is the attacker, using a laptop and a 3G modem to set up an access point, collecting passwords, cookies and other “interesting” information from the passing traffic.
Therefore, take it as an axiom that when using open networks, do not log in to any resources that transmit authorization data in clear text. The attacker doesn’t even need your password, which can be transmitted in encrypted form; it is enough to intercept the cookie, after which he can easily log in to your account.
If you still need to log in, make sure that the site supports SSL and the certificate really belongs to this site. However, avoid connecting to resources with a self-signed certificate whose authenticity you cannot verify. We will talk about this in more detail later.
Also avoid, or better yet never, use open networks to access financial information or make payments.
Another danger awaits us where the identity of the access point seems to be known. An attacker can use another property of Wi-Fi networks - if there are several access points in the network, they can automatically switch to the one with the best signal.
 The attack scheme is extremely simple: the attacker creates an access point with the same SSID as the existing network, after which all nearby clients will automatically switch to the attacker’s point, without even suspecting that their traffic is being intercepted. As a result, gatherings with a tablet in your favorite cafe can end very sadly, and it’s good if personal information is damaged, and the access details to the corporate network are not lost.
This is where the problem of secure access to corporate resources comes into play, even if your organization does not use Wi-Fi. Where is the guarantee that an employee sitting in a park or cafe will not decide to check corporate email?
But even if you are convinced that there is only one access point and it belongs to the right person, do not rush to rejoice. There is a type of attack ARP spoofing, which is capable of directing your traffic through an attacker's device.
 Finally, an attacker can simply collect and analyze Wi-Fi traffic without interfering with the operation of the wireless network by transferring his Wi-Fi adapter into monitoring mode.
 It is clear that we cannot influence the ability to intercept packets in Wi-Fi networks due to the characteristics of the distribution environment. Refusal Wi-Fi usage in an organization will also not secure your infrastructure in any way. You cannot assign a guard to every employee and you cannot prohibit the use of corporate resources through open networks.
What to do? Completely eliminate unencrypted data access channels. Use SSL where possible, VPN where not possible. Another point is related to self-signed certificates. They can only be used inside the security perimeter, or it is better not to use them at all. If you are concerned about security, purchase a normal certificate; do not train employees to ignore security warnings.
Otherwise, you may become a victim of a man-in-the-middle attack. Its meaning boils down to the fact that when connecting to a protected node, the attacker independently receives a certificate from the node, passing his own certificate to the client.
 It is understandable that the browser will respond to such interference with a security warning.
However, if you have trained your employees to ignore this warning by using a self-signed certificate, then, as they say, they will not notice the difference and will safely ignore it now.
Therefore, if you do use self-signed certificates, then take the time to install a root certificate on each device to avoid this warning from appearing, which will help avoid developing the habit of ignoring it.
For the same reason, we do not recommend using ssl-bump technology, which is designed to filter SSL traffic on the gateway. The desire to filter traffic is understandable, but security is more expensive, and in addition, if the gateway is compromised, you yourself will carry out a man-in-the-middle attack on your organization.
Tags:
Hello friends! I went to my email today and decided to check my spam folder. (I probably haven’t checked it for a couple of months). Found a couple necessary letters, the anger of which is a question from a reader (visitor) of the site. The question was sent using the contact form and ended up in spam.
As a rule, I do not answer questions about e-mail, but I do it on the website, or on our . Well, also in the VKontakte group. But the question was very interesting and very well written(and not in a nutshell, as is usually the case). And the topic is very relevant.
Dmitriy (that's the author's name) sent it back on December 9 (and today is already December 24). It's a shame I didn't notice earlier. I thought that this situation (like Dmitry’s) is worrying many people now, and I decided to publish this question on the site and try to answer it.
I hope that Dmitry will not mind.
Question about security when connecting to open Wi-Fi
Hello, Sergey.
I read your article and comments to it.
The situation is this: I use MTS Connect, but the quality of the connection is such that it is a very slow Internet, which also disappears from time to time (connection is broken, etc.), unreliable in general. At the same time, I can see several Wi-Fi networks, almost all of them are protected by a password, some are open (but they are not allowed on the Internet and I don’t know what you can use there), and there is an open network where you don’t need to enter a password and let you into the Internet. Most likely it's someone's home Internet, one of the residents of the house, but I’m not 100% sure, of course.
And it seems to me that he left access open deliberately (there are people who do this, like they don’t mind, let people use it). At the very least, he could close access, but he hasn’t done so yet and doesn’t seem to be planning to. In such a situation, I continue to use MTS Connect and, if necessary, sometimes connect to open Wi-Fi.
My question is simple. What can the owner of this Wi-Fi do on my computer and maybe I won’t even be able to see it?
- Firstly, is he able to see the passwords that I enter somewhere? I was told that if you log in to any site via https, then it is impossible to see and steal the password, is this really true? Or is it better not to take risks?
- Secondly, are they visible to him if I am simultaneously connected via MTS connection? I check my email and some important sites (pay for something) I log in via MTS Connect, but there have already been cases when I simply forgot to disconnect from Wi-Fi while connecting to MTS Connect at the same time. And now I also don’t quite understand how the traffic flows in this case and was it possible to steal passwords?
- And finally, the biggest questions I have are about what the owner of this Wi-Fi can look at on my computer, whether he can open some files, whether he can delete them, copy them for himself, etc. And how can I protect myself from this? ? Those. I seem to have clicked on the drives that are on the computer (C, D, F) and there is no shared access to them, but I don’t understand this at all. Maybe there is access to some folders or files on the table. How to determine what a stranger can see?
I also encountered the fact that his computer now began to appear right next to my folders (I have Windows 8.1 Pro). Those. you click on Explorer, look, and there you can see some kind of someone else’s folder (computer) and it completely amazes me, it feels like I’ve been hacked and a stranger is climbing on my laptop. First, in the “This PC” section, where Explorer shows all the disks it has and the folders of these disks, this appeared (i.e. its folder).
And then also there below in the explorer in the section "Net" In addition to the name of my laptop, another computer began to appear! Amazing.
Now that I'm writing this, he's not there yet. (not connected to me, apparently, but later it will probably appear again, and Wi-Fi is open), but if you click on this section (“Network”), a tab appears "Computer" (only mine is there for now) and a little lower “Network infrastructure”, and it contains “Network router” – Debian Router. If you click on this Debian Router, then the IP address in the browser opens some kind of website with various information, of which I still understand little. Previously, when I log in via Wi-Fi, this did not happen.
But I think that now since this guy is setting up something there, I will see his computer in my Explorer regularly (when he goes online) and this raises security concerns for me, i.e. since I don’t know what files he can look at on my computer, download, delete them, etc., etc.
In addition to this, in “Windows Firewall” there is a section “Private Networks”, and there is a signature there “Connected”!
And there is an inscription “Active private networks” and next to it is the name of his Wi-Fi (or probably what is the same name of this Wi-Fi owner's computer).
Those. It turns out that it is already configured on my computer and sometimes actively connects to it, right?
In general, tell me what to do in such a situation? Is it worth using this Wi-Fi, not paying attention that someone is connected to my laptop (or maybe there’s even something looking at it), may even actually move in the direction of establishing interaction (through computers and not only maybe even) with the Wi-Fi owner or it is better not to connect to this Wi-Fi to avoid the above problems (fears that he sees my files and can do something with them or with my computer).
At the same time, I am ready to top up his Internet account (i.e. it is not free to use), since the quality of the MTS connection does not satisfy me, and its Wi-Fi reception is just fine. I'm generally willing to pay for quality Wi-Fi access, if some company gave it officially.
Thank you. Dmitriy.
Let's try to figure it out [answer]
I’ll probably start with the main thing, and then I’ll try to answer all the questions. In this particular case, I don't think this is open Wi-Fi network created by some “hacker”. If only because the number of potential victims is not very large (only neighboring apartments). There are better places to do this kind of thing.
Yes, and in a networked environment (on Dmitry's computer) computers of other users appear that are connected to this network. If this network had been set up by some “hacker,” he would hardly have burned his computer like that. Although, of course, I cannot say this 100%, no one can.
Now, let's move on to more detailed points.
About the security of passwords and authorization on websites
Not long ago, I wrote an article on just this issue. In it, I talked about security when connecting via public Wi-Fi networks. The network to which Dmitry connects is also, to some extent, public.
I would still advise Dmitry to use this network through VPN connection. Not necessarily through a paid service, you can also find free VPNs. But this is only advice, and Dmitry will be calmer this way.
As for connecting via https, yes, this protocol is well protected. But, unfortunately, not all sites use it. Yes, and there is no 100% protection, we must always remember this.
Can a neighbor see your passwords if you are connected to their router? No, just like that, never. Even if this is some kind of super user, he will have to work very hard to intercept your authorization on some site (if at all possible), especially if you are using a VPN connection and the channel is encrypted using https.
Connection via Wi-Fi and via MTS modem
Dmitry, most likely, when you have a connection via Wi-Fi and via a modem (simultaneously), you are using the Internet via Wi-Fi. I don’t know for sure, really, but it’s not that important, based on what I wrote above.
But, if it makes you feel better, then disconnect from Wi-Fi and do serious operations via a modem from MTS.
File security when connecting to someone else's Wi-Fi
As for the security of files that are located on a computer, which in turn is connected to open Wi-Fi, here everything is a little simpler and clearer.
It's probably worth starting with the fact that the computer, or rather operating system designed for the computer to connect to open networks in public places. And assume that the owner Wi-Fi router (to which you are connected), can just access files on your computer - stupid. Well, agree.
Of course, there is protection, there are appropriate settings, and so on.
Dmitry has Windows 8.1, unfortunately I don’t have access to this operating system now, so I can’t show you exactly. But I’ll show you using Windows 7 as an example. I advise you to set the status for the network to which you are connected Public (I just don’t know exactly how to do this in Windows 8.1).
You need to go to “ Network and Sharing Center" (Control Panel - Network and Sharing Center...). The network you are connected to should be displayed there. Below, under it, it should be written which network it belongs to. If it's public (or something like this), then everything is fine, let it be so.
If there There is homemade, then click on it and select Community Network.

Perhaps, just when you first connected to this network, you indicated that this was your home network.
But then you tell me, what if the network was in the status “ home network”, have my files been accessed? No, you won't be able to access your files just like that.
If only because password-protected sharing is enabled by default. And even if it were disabled, access would only be open to the folder Are common (if you have not shared other folders/drives). But as usual, there is nothing in it.
For complete peace of mind, I suggest going to “Network and Sharing Center” and selecting on the left “Change advanced sharing settings”.

And check the settings for both profiles: General And Home or work. Depending on what status you set for specific network, these parameters will be applied.
Make sure password protected sharing is enabled. You can turn off file and printer sharing. But, when you need it, remember this, otherwise access problems may arise.
Getting access to your files is not so easy, even if you are connected to the same network. But we must not forget about hacking and so on. Again, there is no 100% protection.
Some more nuances
Dmitry wrote that in Explorer, in the “Network” section, he sees other people’s computers, and this worries him very much. The fact that computers appear there does not mean that you have been broken. On the contrary, this most likely indicates that the user whose computer you see is not very experienced.
If more computers appear there, then most likely someone else will connect to the same network. And you most likely cannot gain access to these computers.
Also, Dmitry wrote that on the “Network Infrastructure” page the router (Debian Router) is visible. It's also normal. And if you click on it, the router settings open (most likely at 192.168.1.1). This again speaks of the illiteracy of the owner of this router. Access to the settings is not blocked (but it should be). You can go in and set a Wi-Fi password for them :)
The firewall most likely simply says that you are connected to the network, and its name is indicated. There is currently no way to accurately see this on Windows 8.1.
Afterword
Specifically, regarding the situation that arose with Dmitry: I think that this is just a network of an inexperienced user who simply does not know and does not want to understand it. Or for example: a specialist configured a router, and then the settings on the router were lost (this happens), and the network was left without a password.
The network is most likely one of your neighbors (if the signal is good). You can try to find it. Knock on the door and say: “Is this your network...?” 🙂 well, or come up with a more original way.
Thank you very much to Dmitry for this question!
Best wishes!
Also on the site:
Is it safe to use open Wi-Fi net? Can my computer be accessed via Wi-Fi? [question from a reader] updated: December 24, 2013 by: admin
This article will help you quickly answer any questions you may have. You can also study the entire material to get a complete understanding of network setup in Windows 7.
Introduction.
Purchasing an operating system Windows 7, the user must be prepared for the fact that sooner or later he will be faced with the task of setting up a network in the operating system. For some, this task is not difficult at all. Typically, installing and configuring a network in Windows 7 is next step immediately after installing Windows 7 ( if you have not yet installed Windows 7 and are not entirely sure necessary steps, then you should read this section: Installing Windows 7).
The network setup phase is required for the following steps after installation:
- downloading current antivirus software distributions from the Internet;
- loading latest versions video player, web browser;
- if necessary, download drivers from the network for some devices on your computer (if they were not downloaded and installed automatically, or if installation disks absent);
- use of an XBOX console;
- exchange of documents and fast access to shared resources of several computers or laptops. In this case, to use the Internet, you need to set up a wired or wireless network. As a rule, one computer or laptop serves as a kind of Internet distributor for all other pieces of computer equipment.
The same is true with MAC addresses and subnet masks. All these settings remain the same, they have long been familiar to users. Some changes only affected the interface of the Control Panel and its items through which network parameters are accessed. Everything else is without significant changes. This is another undoubted advantage of Windows 7. Users who previously used Windows XP will be able to understand the new operating system quite easily. As a rule, setting up a local network in such popular operating systems as Windows Vista,Windows 7, Windows Server 2008/2008 R2, starts with a component for configuring network properties, such as "".
This properties configuration tool allows the user to select a network location, set up printer and file sharing, and view a network map. You can also monitor the status of all your network connections. It is very convenient and practical.
How and where to open the Network and Sharing Center component.
Before you can use the full functionality to create network parameters, you need to find and open it. One of the following actions of your choice will help you open correctly active window « Network and Sharing Center»:
As you can see, if you are careful and read everything, then you should not have any problems finding the “Network and Sharing Center” component. It should be noted that to expand the ranges of used IP addresses in Windows 7, in addition to the previously existing IPv4 protocol, a new one was added - IPv6. True, providers have not yet enabled it, and when will this happen on this moment unknown. Most likely, the creators of Windows 7 were ahead of the curve.  Figure 1. The illustration shows the Network and Sharing Center window.
What does the network location of a computer mean?
Understand what " Network location", you need before you start working with this important component. For all computers, this setting is set automatically the first time they connect to the selected network. This also applies to the firewall and security settings of the network selected for connection. All of them are also configured automatically when you first connect your computer or laptop to the network.
The Windows 7 operating system supports several active profiles at the same time. This allows you to use multiple network adapters that can be connected to different networks with the greatest security.
By the way, Windows Vista uses the strictest firewall profile for all network connections. This may be why Vista is not as popular as Windows 7.
There are four main types of network locations:
| The first type is a home network. From the name itself it is clear that this network location is intended for a computer used at home. It is also used in networks in which all users know each other well. Such computers can not only create, but also join home groups. Typically, for the convenience of users when using home networks, network discovery is automatically enabled. Home networks provide all computers with high-quality network access. | |
| The second type is a network of an enterprise or organization. This type of network location also allows you to find the network automatically. The difference from a home network is that in an enterprise network it is not possible to join or create a computer to a home group. The network is intended exclusively for professional activity in an enterprise, organization or office. This type is called for short (SOHO), that is, it is used in a small office network. | |
| The third type is a public network. Cafes, airports, train stations and other public places - this is where computers use the third type of network location. By default, the ability to join home groups is disabled in this location. Network discovery is also disabled. Without exaggeration, we can say that this is the most strict arrangement. | |
| The fourth type is a domain network. The domain type of network location is almost no different from the work network. Except that in the domain type, the Network Discovery and Windows Firewall configuration is determined by group policy. This also applies to the network card. In order to existing network received automatically the type of network location “Domain”, the computer just needs to be connected to domain Active Directory. Only in this case can the network become a domain network. |
 Figure 2. Selecting the network location of the computer.
Network map.
In order to see the location of all devices included in a specific local network, a network map is used. This is a graphical representation of the devices included in the network and the diagram by which they are connected to each other.
The network map can be seen in the same “Network and Sharing Center” window. True, only the local part of the network card is displayed here. Its layout directly depends on the available network connections. In the upper left corner you can see a display of the computer on which the map is being created. On the left you can see a display of the remaining computers included in the subnet.
 Figure 3. Example of a network map.
You can view the network map at any time. True, only for locations such as “Home Network” and “Enterprise Network”. If the user gets curious to view the maps for the Domain Network or Public Network locations, he will see a message that the network message is disabled by default by the administrator. Network Administrator can enable mapping using Group Policy.
In Windows 7, not one, but two components are responsible for the operation of the network map. This Link Layer(Link Layer Topology Discover Mapper – LLTD Mapper). It is this important component that requests devices on the network to be included in the map.
Network connections.
In the window " Network connections"You can see the entire set of data that the user needs to connect the computer to the Internet, local network or any other computer from the home network.
This data is available for viewing only after all installations have been completed. necessary drivers for each network adapter on Windows 7 and after automatically configuring all network connections on a specific local computer or laptop.
There are several simple and available ways, with which you can easily and quickly open the window " Network connections»:
- Open the window " Network and Sharing Center" and follow the link " Change adapter settings"(see Figure 4);
 Network and Sharing Center"." href="/upload/nastroika-windows-7/windows-7-nastroika-seti-img-7.png">
Figure 4. Open the window “ Network connections" through " Network and Sharing Center».
Network and Sharing Center"." href="/upload/nastroika-windows-7/windows-7-nastroika-seti-img-7.png">
Figure 4. Open the window “ Network connections" through " Network and Sharing Center».
- Click the “Start” button and when the menu opens, enter “View network connections” in the search field. In the results found, select the “View network connections” application ( very convenient way);
- You can also use the classic keyboard shortcut Win+R. As a result, the “Run” dialog will open. In the "Open" field, which is located in the "Run" dialog box, you must enter the following command: ncpa.cpl or control network connection. Having done this, you need to click the “OK” button.
 Figure 5. Network Connections window
Window " Network and Sharing Center» similar Windows window XP. All detailed information about the network connection can be obtained by selecting the “Properties” option for a specific network adapter (see Figure 6). In Windows 7, to set up a network connection in the Properties window, you need to select Internet Protocol Version 4. In the same window you can also make necessary settings gateways, subnet mask, DNS server, IP addresses, etc. All this information can be obtained from the provider that provides Internet access services.
 Figure 6. detailed information about network connection.
Rename the network adapter.
The developers of Windows 7 made sure that by default the operating system itself assigns all network connections the names “Local Area Connection” or another option - “Wireless Network Connection”. If the user has more than one network connection on the computer, the system also assigns a number to the connection. There are three ways to rename the name of any of the connections you create.
- First way. Select the network connection and click on the “Rename connection” button located on the toolbar. After entering a new name, press the key Enter;
- Second way. Using the key F2: press, enter a new name and save using the same key Enter;
- Third way. To rename a network connection selected from the list, right-click on it, select the “Rename” command from the context menu that appears, rename and save the changes using the familiar key Enter;
Network status.
In addition to the ability to rename the connection, in this window you can also find out about the network status. Using this window, which is called “Network Status,” at any time you can not only view any data about the connection network, but also find out details such as MAC address, IP address and much other useful and interesting information.
There are providers that allow users to access the Internet using the MAC address of the network card. If for some reason the network card is changed or the entire computer is replaced, the MAC address will also change and Internet access will cease. For a new connection to the Internet, you must set the required physical address (MAC address).
How to see the MAC address of a network card in Windows 7?
To view the current MAC address, and full information about connection, you need to click right key mouse to connect to the local network, then select “Status” in the context menu that opens (see Figure 7). Figure 8. How to change MAC address network card (network adapter).
Network diagnostics.
If a situation arises where your network connection is experiencing problems. unexpected errors or failures, they can be eliminated using connection diagnostics. The diagnostic tool can be found in the Network Connections window.
Select the window " Troubleshooting”, which, analyzing the connection status, offers a choice possible malfunctions and troubleshooting methods. To start diagnostics, you need to right-click on the network connection and select the “Diagnostics” command in the context menu.
 Figure 9. Opening the Local Area Connection Troubleshooting Wizard.
The second way to start checking your network connection settings is to select the desired network and click on the “Connection diagnostics” button. The button can be seen on the toolbar.
In the dialog box that opens, to diagnose the connection, just follow the steps of the wizard to troubleshoot errors and problems. Nothing complicated.
Disabling a network device (network adapter).
Sometimes situations arise when network connection problems are resolved not with the help of an error resolution wizard, but by simply disconnecting the network adapter from the computer. This can be easily done by doing one of the following:
- Select a network connection and click on the “Disconnect” button network device", located on the toolbar;
- Right-click on the network connection and select “Disconnect” in the context menu that appears;
Conclusion.
The article details how to configure, connect and diagnose network connections.
If you have any doubts about your own network setup and connection capabilities, it is better to seek help from specialists, or carefully read the article again.


