Hello friends! I have already written many articles about what to do if Windows 7 does not boot. But I haven’t written yet about what you need to do first if your computer refuses to start, or maybe I did :). Well, it’s okay, twice is better than never :).
This will be some advice on how to hit the first one ambulance system in case of failure. I usually write similar tips and describe in them how to restore Windows operation 7 if a specific error occurs. But today I will write how to try to cure the system from the appearance of various errors and problems when loading. If you turn on the computer, and it frankly does not turn on. Well, you know how it happens, a certain error appears, blue screen, or the computer simply reboots itself, then you need to try to start the computer with the last successful configuration with working parameters.
If we talk about what can cause Windows to stop booting, there are a lot of options. For example, a failure may occur after installing some program or driver. After cleaning your computer from viruses. After incorrect completion of work (when, for example, there was a power outage). I had a problem where I normally turned off my computer in the evening, but in the morning it wouldn’t start, and it seemed like I hadn’t installed anything, but then this happened.
In such cases, the first thing we do is try to start the computer with the last known successful configuration. If this does not help, then you need to look for other ways to solve the problem, for example, searching by error. But as my practice shows, it very often helps to bring the computer back to life. Moreover, all these actions can be done in a few minutes. Now more details.
How to start Windows 7 with Last Known Known Configuration?
Everything is very simple. Reboot the computer and immediately actively press the key F8.
If Windows boots, then everything is fine, lucky. Well, if not, and the problem appears again, then you need to look for other solutions. You can read this blog, I described solutions to many specific errors. Good luck!
Crash problem when booting Windows quite common, despite the fact that Windows 7 and Windows 10 are very reliable operating systems and rarely crash. Of course, equipment also plays a huge role in this, which for home systems is very diverse, and budget solutions has a low fault tolerance factor.
In most cases, errors in loading the OS are caused either by the users themselves, who, for example, performed an incorrect shutdown of the PC or accidentally deleted a system file, or HDD, on which a faulty area has formed on the boot sector.
CHIP suggests using our tips for solving Windows boot problems and restoring system functionality.
Let's try to start
When faced with the impossibility of loading the Windows operating system, you should first restart the computer a couple of times, because the problem may be a one-time problem. If this does not help, then try turning off the power to the computer for ten seconds by unplugging it from the mains. In this case, you need to de-energize the block uninterruptible power supply, if one is connected, and if we are talking about a laptop, then remove the battery.
It also doesn’t hurt to temporarily disconnect external equipment: mouse, keyboard, printer, removable drives, modules wireless communication And so on. If the reason lies precisely in external devices, connecting each of them in turn will help determine the culprit.
Of course, the problem cannot always be solved with the simplest manipulations, which means you will have to start analyzing the text of the error message that appeared during the computer startup.
The bootloader may be damaged
If you see a message on the screen with the text “BOOTMGR is missing”, then the Windows 7 operating system boot loader is damaged or missing. To solve the problem, you will need a Windows 7 installation disk.
Restart your PC and during the first seconds of booting, press the function key to open the BIOS. These may be different keys for different PCs, such as ESC, F2 or F6. Pressing the F8 key in Windows 10 will bring up a menu of special boot options, including safe mode. If this doesn't work, hold down the Shift key when rebooting Tens.
 So, if you managed to get into the BIOS, go to the " Boot device priority" using the "+" or "PgUp" key, assign the CD/DVD drive as the first boot device. Then boot from the installer Windows disk and select the “System Restore” menu item. From the list of installed operating systems (if there are several of them), you need to select the one you need and click the “Next” button.
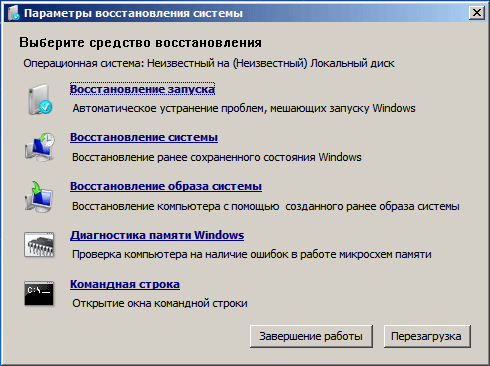
 In the “System Recovery Options” window that appears, we are interested in two items: “System startup recovery” and “Command line”. The first option will automatically fix the problem with starting the operating system, and if it fails, you will have to turn to the services of the second.
IN command line dial:
"bootrec /rebuildbcd"
press “Enter” and agree to changes to the boot configuration data by alternately pressing the “Y” and “Enter” keys. After this, all that remains is to create a new boot sector using the “Bootrec / FixBoot” command and reboot the computer.
Boot disk not detected?
 The error message “No bootable device” and its numerous variations (“No Boot device found”, “Invalid boot device”, “Non system disk or disk error”, etc.) indicate that the computer has not even started to start operating system, since it does not see the boot sector or even the hard drive.
To understand whether the problem lies at the software or hardware level, just go into the BIOS to the already familiar “Boot device priority” section. If the hard drive (HDD) is not visible among the proposed options, then the problem is related to the equipment. The power or power data cable may have come loose hard drive, or the drive has completely outlived its usefulness.
If the computer normally recognizes the hard drive, the reason is software in nature and lies in the master boot record (MBR) - it is damaged or missing. Unlike those discussed above this situation is relevant for both Windows 7 and XP, but can be solved extremely simply.
After booting from the installation disk, you just need to run just one command in the recovery console:
bootrec/fixmbr
Blue Screen of Death: Driver IRQL not less or equal
Messages about critical Windows errors, which due to the background color are called “blue screens of death” (BSOD, Blue Screen of Death), quite common problems not only in Windows 7 but also in Windows 10 (especially due to installing the wrong update). Moreover, in the top ten this screen can be green or red. The reason for the appearance critical error There may be malfunctioning hardware, such as RAM or missing system files.
 Most often, early boot BSOD messages appear after updating device drivers and contain the text “DRIVER_IRQL_NOT_LESS_OR_EQUAL” along with the file name with SYS extension. To remove the problematic driver in Device Manager, you can try starting Windows in safe mode, because it uses only a minimal set of drivers. To do this, press the F8 key while loading the OS and select “Safe Mode”.
If you still get the blue screen of death when you boot into safe mode, you need to revert to a previous version of the driver that didn't have any problems. This can be done using a restore point, if one has been created previously.
 In Windows 7, to do this, press the F8 key while the OS is loading and select “Troubleshoot computer problems” in the menu that appears. After which we find ourselves in exactly the same “Recovery Options” menu as when using the Windows installation disk.
This time we are interested in the “System Restore” item, where you can select one of the available restore points.
Returning a copy of the system file
The absence of some important system files in the system, primarily drivers with the SYS extension, is often found in Windows 7 and 10. The most effective method solve the problem - return the lost item to its place by finding a copy of it on the Windows installation disk, borrowing it from another computer with the same OS version, or simply finding it on the vast expanses of the Internet.
If you don’t have a second computer at hand, then to search, download and copy files you will need a LiveCD with an OS that does not require installation, for example, Kaspersky Rescue Disk 18.
 One of the most convenient options is the Puppy Linux operating system, which will be ready to work in less than a minute. This OS includes drivers for the most common models network cards, which means getting online won’t be difficult.
The exception is files system registry: System, Software, SAM, Security and Default, which are stored in the “C:\windows\system32\config” folder. Of course, it won’t be possible to replace them with copies from another computer, so the only option is to roll back to a restore point, if it was made at one time.
Restoring Windows 10 Boot
And so that the tool Windows recovery 10, you need to open the menu additional ways boot (by pressing F8 after turning on the computer) and go to the “Troubleshooting” section.
The chance of having time to press the desired key at this time (more precisely, the combination of F8 and Shift) is great if the system is installed on an MBR hard drive and the option is disabled quick launch. For fast system SSD drives you will have to try to press quickly or you will need bootable media.
In any case, you will need an installation disk with Windows 10. In our experience, the disk disaster recovery Windows 10 often cannot help restore the system. It is worth considering that the system image must be the same bit size as that installed on your PC. In addition, if you use a bootable USB stick, it must be with file system FAT32.
As an alternative, you can use the downloadable package of MS DaRT 10 utilities (Microsoft Diagnostic and Recovery Toolset for Windows 10). You can download it from the official Microsoft website. Windows 10 images are available for download from the Microsoft website.
Using Windows 10 bootable media
Connect the media to the computer, reboot, set this disk first in the BIOS settings and boot from it. After booting from it, select the system language. If Russian is selected, click Next.
 You will then be prompted to proceed to install or restore Windows. Click System Restore. On the Select Action screen, click Troubleshooting.
Tens launch recovery options
 In the recovery options section (Advanced Options screen) there are 5 subsections:
- System Restore. When you select this option, the standard utility rstrui.exe is launched, the purpose of which is to roll back the system to one of the saved checkpoints.
- Restoring the system image. Launches the Windows Deployment Wizard from backup copy, created by the OS's own tools.
- Boot recovery. Corrects errors in boot files and partitions.
Command line. Allows you to run various system utilities. - Return to the previous build. Rolls back to a previously installed version of the OS if it was upgraded to Windows 10.
Repair utilities
The cause of almost all Windows boot problems discussed in this article can be caused by corrupted hard sector disk (bad blocks). Even if, with the help of one of the manipulations discussed in the article, the operating system was brought back to life, it is not possible to check the working condition of the hard drive.
 You can do this using the free MHDD application (you can download it), which can be launched directly from the boot CD. In the program menu, you must select from the list the channel to which the hard drive with the OS is connected, indicating its number. Then you can view the S.M.A.R.T data, a kind of “medical map” of the hard drive (F8 key), or start scanning sectors for errors (F4 key), having previously allowed their correction - “Remap | ON".
If there are a lot of problem sectors, the procedure may take hours or even days. Considering that bad blocks, as a rule, are concentrated at the beginning of the hard drive, it will be easier to move the OS partition away from the problem area - an indent of 2 GB will be quite enough.
 A boot disk with free editor MiniTool Partition Wizard FE sections. In the program menu you need to resort to the operation “Partition | Move/Resize".
As we noted above, the cause of BSOD may be RAM, which is not capable, for example, of working on higher frequencies. In such cases, the following text may appear on the blue screen: “PAGE_FAULT_IN_NONPAGED_AREA”.
You can test RAM modules free application Memtest86. Like MHDD, Memtest86 can be run from a bootable CD. The application does not require configuration and immediately after launch it begins diagnostics using a number of tests. The “Pass” menu item displays the number of completed test cycles, while “Errors” displays the number of errors recorded.
Popular operating room Windows system The seventh modification sometimes refuses to load completely when installing updates. Users quite often complain that after installing updates, Windows 7 does not start. But they seem to be designed to improve the operation of the system. What is the reason for this phenomenon and what measures can be taken to restore the computer’s functionality, read on.
Why won't Windows 7 start after updating?
It’s worth starting with the root causes of this system behavior. It's no secret that today there are a lot of all kinds of pirated copies, repacks or stripped-down versions of this OS. Sometimes official update simply cannot be integrated into the system for purely technical reasons (it lacks the necessary components to install them).
On the other hand, it also happens that after Windows updates 7 the system does not start even if there is an official copy. Why? It is difficult to answer this question unambiguously. The fact is that the updates themselves, developed by Microsoft specialists, do not always look finalized, and if you also take into account conflicts with hardware, you yourself understand that there is no need to talk about any performance.
However, in most cases when Windows 7 does not start after an update, this is purely due to its own components. To resolve the problem, you can offer several solutions that usually correct the situation. And it’s worth starting with the simplest.
After updating Windows 7, the computer does not start: what to do?
Surely, every user knows that the system has an automatic recovery function. First, try to force restart your computer several times. Perhaps this tool will start.
If this does not happen, use the F8 key at startup, and from the menu select load the last known known configuration. If the recovery works, you will need to set the manual search updates and exclude the last ones found from the list. But this is not a solution either.

Sometimes restoring the system from removable media can help. There is no complete certainty, but it is worth trying to carry out such actions.
Uninstalling updates via the command line
When Windows 7 does not start after updating, from start menu You can select Troubleshoot and enter the recovery environment where you use the Shell. The best option would be the same choice, but with the condition of booting from removable media.

First, in the console you need to use the commands to select the system partition into which the updates were installed, as shown in the figure above. The disk number usually does not change.

Next, you need to enter a command to view recently installed updates (dism /image:D: /get-packages), after which, through RMB, you need to copy the package ID, highlighted with a red frame in the image above (there may be several updates).

The actual operation of removing packages is to use the uninstall command and insert the identity number after it (picture above). After completing the procedure, the system must be rebooted. If starting again turns out to be impossible, you will have to remove all the latest updates one by one, based on the date of their installation.
Uninstalling patches using Microsoft tools
Also, in a situation where Windows 7 does not start after updating, you can use specialized advanced tools like ERD Commander with the creation of bootable media. The recovery and diagnostics menu will remain the same, but the Diagnostics & Recovery Toolset item will appear at the bottom. This is what needs to be used.

After entering the main menu, you should use the line to remove patches, after which the corresponding “Wizard” will launch. A list of all installed updates will appear in a new window. To be sure, you will have to remove them one at a time, rebooting the system each time and checking its performance. Eventually, when the faulty update is found, the system will boot in normal mode.
Note: it is advisable to write down the numbers of all packages, set a manual search in the Update Center and exclude previously removed updates from the list.
Additional measures
In principle, you can use safe mode, if it works. In this case, you will not need to use the command line. Failed packages can be uninstalled through the Update Center or the Programs and Features section, where you select the appropriate menu for viewing installed updates. But, again, you will still have to uninstall the packages one at a time, and not as a whole list.
Finally
As you can already understand, the problem can be resolved quite simply. As for using the system tools, no matter what anyone says, it is best to use bootable media rather than the built-in system tools, which, by the way, may not be available. But in general, the main solution comes down solely to removing recently installed updates. Damage to the bootloader was not considered, although to be sure, you can use commands based on the Bootrec.exe tool with alternately specifying additional attributes using a right slash (fixboot, fixmbr, rebuildbcd).
Restoring the Windows 7 boot loader - performing steps to restore the operating system after problems occur when loading Windows. Due to a system failure, the user may lose data and personal files located on the computer.
At one point in time, the operating system will not be able to boot on the computer. Various messages (not always in Russian) appear on the screen, indicating a problem loading Windows.
The main causes of problems with the Windows 7 bootloader:
- user actions: attempt to use hidden system partitions, incorrect changes to boot files using EasyBCD, etc.;
- system failure;
- exposure to malicious software;
- the appearance of bad blocks on the computer’s hard drive;
- OS installed on your computer in the wrong order;
- hardware problems.
The problem with the bootloader must be solved, otherwise you will not be able to use Windows, because the system will not start on the computer. Problems can be resolved in a radical way: again on the PC.
If there is one created by the system tool, or using third party programs you need to restore from backup Windows image created in advance. Many users, unfortunately, do not remove due attention backup systems, so these methods will not suit them.
How to restore Windows 7 bootloader? To restore operating system boot files, use the built-in using Windows: automatic startup recovery, as well as using the BootRec and BCDboot utilities included in the operating system, launched on the command line.
Before using operating system tools, you need to know the hard drive layout. Modern computers have style hard marking GPT disk and a new BIOS - UEFI, and in Windows times 7, the disks used MBR partitioning and now an outdated BIOS. On some computers, Windows 7 64-bit is installed on UEFI and GPT drives, and in general, Windows 7 PCs use MBR (Master Boot Record) partitioning.
In this article, we will look at instructions on how to restore the bootloader in Windows 7 using system tools: first, we will perform an automatic recovery, and then we will try to restore the bootloader from the command line.
To perform operations to restore the bootloader, you will need either an installation DVD with the operating system, or a bootable Windows flash drive 7. Bootable media needed to be able to upload to personal computer Windows RE Recovery Environment ( Windows Recovery Environment), with which you can try to solve the problem with the inability to start the system.
Perform Windows 7 recovery automatically using the system tool
The easiest way: automatic recovery of the boot partition on the hard drive using the operating system. This action occurs without user intervention, you just need to boot on the computer with boot disk.
Immediately after starting the computer, using the keyboard keys you need to enter the boot menu ( Boot Menu) to select external device For loading: DVD disc or USB flash drives. Which keys to press depends on the hardware manufacturer, check this in advance. Another way: you can enter the BIOS and set the boot priority from the connected device there: USB storage or DVD disc.
In this example, I am using a Windows 7 installation disk; all actions from a bootable USB flash drive are performed in a similar way.
In the first window of the program Windows installations click on the “Next” button.
In the window asking you to start installing the operating system on your computer, in the lower left corner click on “System Restore”.

In the “System Recovery Options” window that opens, a search will begin. installed systems.
After a while, a message will appear stating that problems have been detected in the computer's boot settings.

Click on "Details" to view a description of the fix.

To run automatic troubleshooting of system boot problems, click on the “Fix and restart” button.
After restoring the bootloader, the Windows 7 operating system will boot onto the computer again.
Automatic troubleshooting using system tools can be started a little differently:
- In the "System Recovery Options" window, enable the option "Use recovery tools to fix problems when Windows startup. Select the operating system to restore" and then click on the "Next" button.

- In the window for selecting recovery tools, click on “Startup Recovery”.
- Wait for the operation to automatically resolve problems that are preventing the system from starting to complete.
If the problem is not automatically resolved, then move on to the following methods, in which the user will have to manually enter commands in the Windows Command Prompt.
Restoring the Windows 7 bootloader using the Bootrec utility
The next method involves restoring the Windows 7 boot loader via the command line. For this we use the Bootrec.exe utility. This method only works with disks that have a primary boot entry MBR.
From the boot disk you need to enter the Windows Recovery Environment using the method described above.
In the System Recovery Options window, click on the Command Prompt option.
The Bootrec.exe utility uses the following basic commands:
- FixMbr - The option writes the master boot record (MBR) to the system partition of the disk, compatible with Windows 7, does not overwrite the existing partition table
- FixBoot - using the command, a new boot sector that is compatible with Windows 7 is written to the system partition
- ScanOS - searches all drives of installed Windows 7 compatible systems, displaying entries that are not in the system configuration store
- RebuildBcd - searches all drives of installed Windows 7 compatible systems, selecting systems to add data to the boot configuration store
The FixMbr command is used to fix the master boot record, as well as to remove incorrect code from the master boot record.
The FixBoot command is used under the following conditions: the boot sector is damaged, the boot sector has been replaced with a non-standard boot sector, an earlier boot sector was installed on the Windows 7 computer Windows version(Windows XP or Windows Vista).
The ScanOS command searches all drives for operating systems compatible with Windows 7. As a result, all entries related to other operating systems installed on the computer that do not appear in the boot manager menu will be displayed.
The RebuildBcd command allows you to detect and add boot configurations installed on the system computer to the storage. This option is used to completely rebuild the system boot storage configuration.
In the command line interpreter window, enter the command (after entering commands in the command line, press the “Enter” key):
Bootrec/fixmbr

If the problem persists, you may need to enter the following command:
Bootrec /fixboot
The remaining commands are used if multiple operating systems are installed on the computer.
Close the Command Prompt, and in the System Recovery Options window, click the Restart button.
How to restore the Windows 7 bootloader from the command line using the BCDboot utility
Using the bcdboot.exe utility, you can restore the Windows 7 bootloader on computers with MBR or GPT hard disk partition styles.
Boot from the removable device, go to the window with the choice of system recovery method, and then launch the command line. Another option: in the very first window, press the “Shift” + “F10” keys on your keyboard to enter the command line window.
In the Command Prompt window, enter the command to launch the DiskPart utility:
Diskpart
To display information about your computer's drives, enter the following command:
List volume
We need to find out the drive letter (volume name) on which the operating system is installed.
The volume name (drive letter) in Diskpart may be different from the drive letter in Explorer. For example, in my case, in Explorer the system partition has the letter “C”, and in diskpart it is designated by the letter “E”.

To exit the diskpart utility, enter:
Bcdboot X:\windows
In this command: “X” is the drive letter on which the operating system is installed. In my case, it is the letter "E", you may have a different volume (disk) name.

Close the command prompt.
In the System Recovery Options window, click the button to restart your computer.
Conclusions of the article
If you have problems with the Windows 7 boot loader, you need to restore the system boot files by booting your computer from a Windows boot disk. You can restore damaged or missing files using operating system tools: automatic troubleshooting of Windows boot problems, using the Bootrec and BCDboot utilities, launched from the command line in the recovery environment.
Errors when loading Windows are quite common. It may indicate a hard drive failure, random access memory, processor or operating system.
Let's figure out what errors mean and how to get rid of them.
System boot
Read also: TOP 12 Programs for computer diagnostics: description of proven software tools
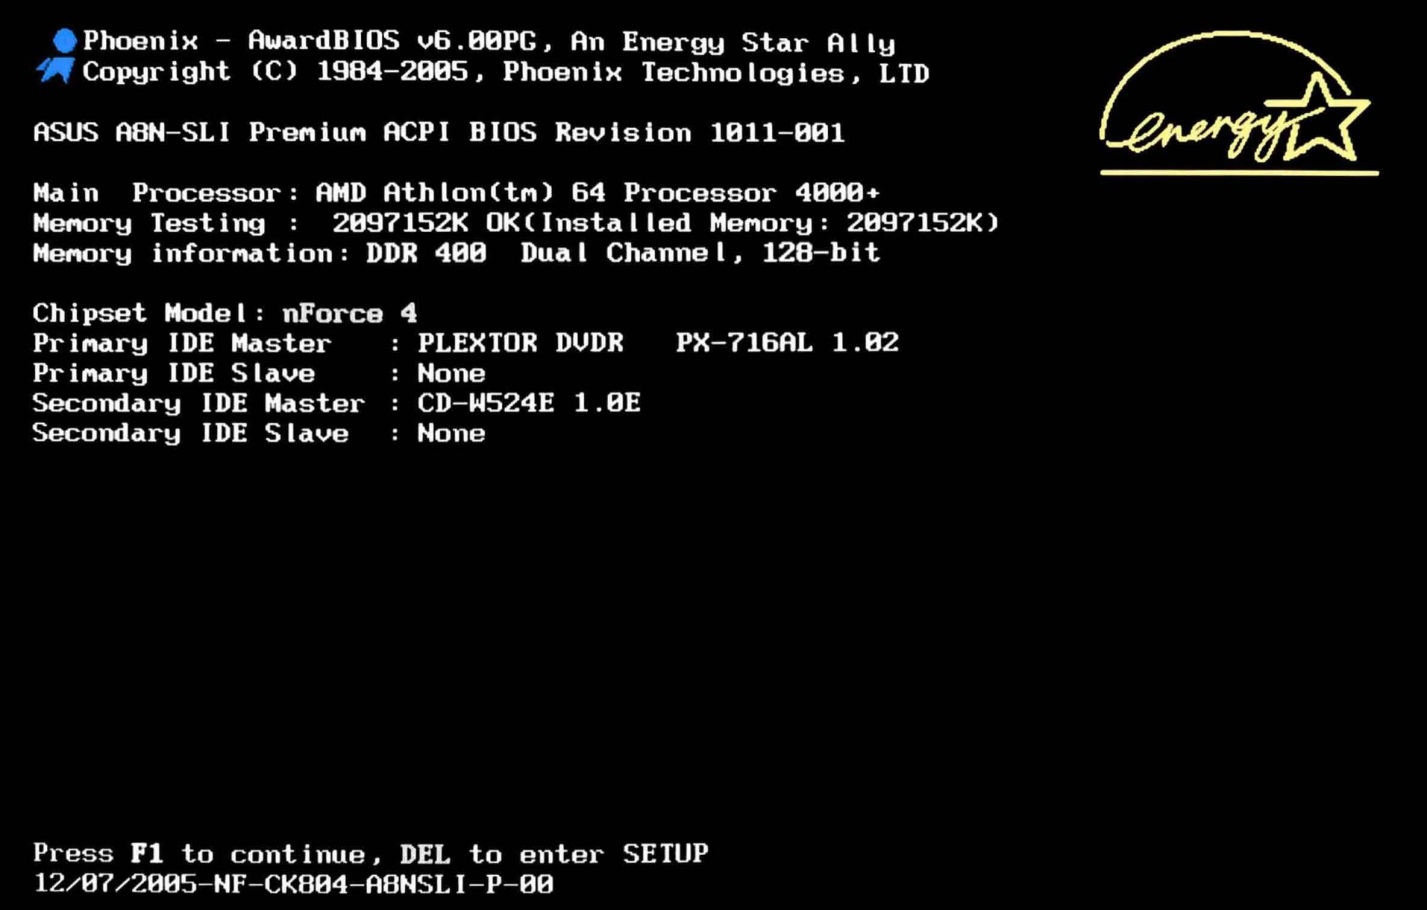
Let's look at the OS boot process. When the computer is turned on and successfully boots, the processor executes a series of instructions that the BIOS provides it.
These instructions are stored in volatile CMOS memory. After startup, the processor accesses the addressable cell of the chip. It depends on the underlying properties. It contains the BIOS code.
The initial set of instructions executed by the processor is called the POST (Power-On Self Test) procedure.
With its help, the following actions are carried out:
- An initial check of the hardware is performed, including the state of the processor and the size of RAM. At the same time, the operability of the OP is checked.
- Retrieving system configuration settings from CMOS memory.
- The bus frequency is set in accordance with the configured settings from CMOS.
- The presence of the device from which the OS will be loaded (hard drive, floppy drive, etc.) is checked.
- A sound signal indicates the end of the test.
- Other devices are being initialized.
- Once the POST procedure is completed, other adapters begin their internal checks, such as the video card, sound card, hard drive controllers. When checking, all information is displayed on the monitor screen.
The BIOS stops booting when it finds the master boot record on the hard drive (or OS record location) and transfers control of further booting to it.
Now the programs recorded on the media are loaded.
We list the main loading problems:
It is necessary to find out the cause of the failure and eliminate it. And so that problems do not arise again, do not repeat these mistakes.
This is very important for the further correct operation of the system, otherwise you will have to reinstall again and again software and operating system, which will lead to wear and tear on the hard drive.
The fact is that the error when loading Windows varies depending on the OS version.
Yes, y different versions the most common will be different errors. That is why you need to look for a solution to the problem for your operating system.
Read also: 3 ways to install Windows XP from a USB flash drive
At the present time this Windows version practically ceased to exist.
However, some computers (often these are older models) still run on this OS.
And although people who have known XP for a long time are accustomed to its mistakes, it is worth understanding the most common of them.
Lost bootloader
This is the most common problem when loading Windows XP. It usually occurs when trying to reinstall the OS.
When this error appears, the system displays one of two messages:
1 Violation when loading the OS.
2 Damage to partition tables.
Elimination of these errors is possible by following these points:
- start the recovery process from the disk on which the OS is recorded;
- run the installation program;
- After the greeting, press the “R” button;
- the recovery console will be displayed, you need to enter it installed version OS;
- enter “fixmbr” and press Enter.
After this, the system will restart and the error will be resolved.
Although there are other reasons for the loss of the system bootloader, the above happens most often.

NTLDR is missing
This problem is also quite common. When it appears, users often simply format the disk, which leads not only to eliminating the error, but also to the loss of all memory.
However this problem can be solved without such radical methods, it is enough to understand the reason for its origin. And eliminating and at the same time saving data is not so difficult.
This error is a black screen with the message NTLDR is missing.
Sometimes, to fix a problem, it’s enough to press the popular key combination Ctrl+Alt+Delete (this is written in the error screen).
This combination should restart the system, but this does not always help.
The error means that the files responsible for loading the system are not available. There may be several reasons for this:
1 Hardware failure. This is the most unpleasant problem, since it means that the fault lies in the hardware and is not a consequence of any failure in the system. Correcting this error will involve replacing/repairing the faulty component.
2 Connection extra hard disk. This is also the cause of the error. The problem is resolved using the BIOS after performing a series of simple steps.
3 Conflict between two installed operating systems. Some computers have two operating systems installed at once, which can lead to their reluctance to work with each other. The problem is resolved using the Windows installation disk.

HAL.dll
With this problem, when loading the OS, the user sees a message similar to “Cannot start HAL.dll” or “File not found or damaged.”
When it appears, the first solution that comes to mind is to reinstall Windows. However, you can cope without such drastic measures.
The fact is that this file is responsible for the interaction of hardware (the computer itself) and its software components.
The problem arises because XP, as the most old version, is most often subject to various errors.
As such, there can be many reasons for an error to occur. However, it can still be eliminated using a series of actions in the BIOS without reinstalling the operating system.
Nevertheless, it is worth understanding that sometimes only a radical method will help you cope.

Read also: TOP 6 Ways to clean Windows 7-10 from unnecessary junk, simply clear the memory cache, remove updates and clean the registry
Despite new versions of Windows, Windows 7 still remains the most popular. It's more a matter of habit.
Many people believe this version the most convenient and average between XP and the same eight (in principle, this is the case)
It is precisely because the version is the most popular that the Windows 7 loading error is a common problem.
Most often, when loading Windows 7, problems occur various codes errors that indicate a particular problem. It is worth dealing with the most frequent problems that arise.
System bootloader
Like Windows XP, the 7 has problems with the bootloader. The cause of the problem is the same as in the previous version.
However, you can restore the seven bootloader either automatically or manually.
The first method is the most convenient and even the most inexperienced user can handle it, but it cannot always help get rid of the problem.

0x80300024
This error occurs when installing the OS. This happens due to the inexperience of many users who, when reinstalling, forget to format one of the hard drive partitions.
This error usually indicates that there is not enough space to install the system.
To ensure that the error does not occur, you need to check the memory on your hard drive and, if necessary, format it.

"ERROR"
A well-known error that occurs when the system starts. Usually occurs after installing the OS. Large red letters are displayed on a white background.
To solve the problem, you need to restart your computer with installation disk inside and when turned on, start the disk.
Go to the “System Restore” item, and then check the box next to “Use recovery tools...”, however, it is worth considering that you will have to select the system.
In the command line you need to enter “bootrec /fixboot”. After this, the problem will be fixed.
Startup Repair Offline
Literally, this problem means “offline startup recovery”, sometimes it is eliminated after a reboot.
However, often the system tries to restore itself without connecting to the network and fails. Therefore, we will have to help her.
This is usually solved in several ways:
- Resetting BIOS settings.
- Connecting loops.
- Startup recovery.
- Using the Command Line.
All these methods require certain knowledge and it is better for an inexperienced person to call a person who is well versed in this.

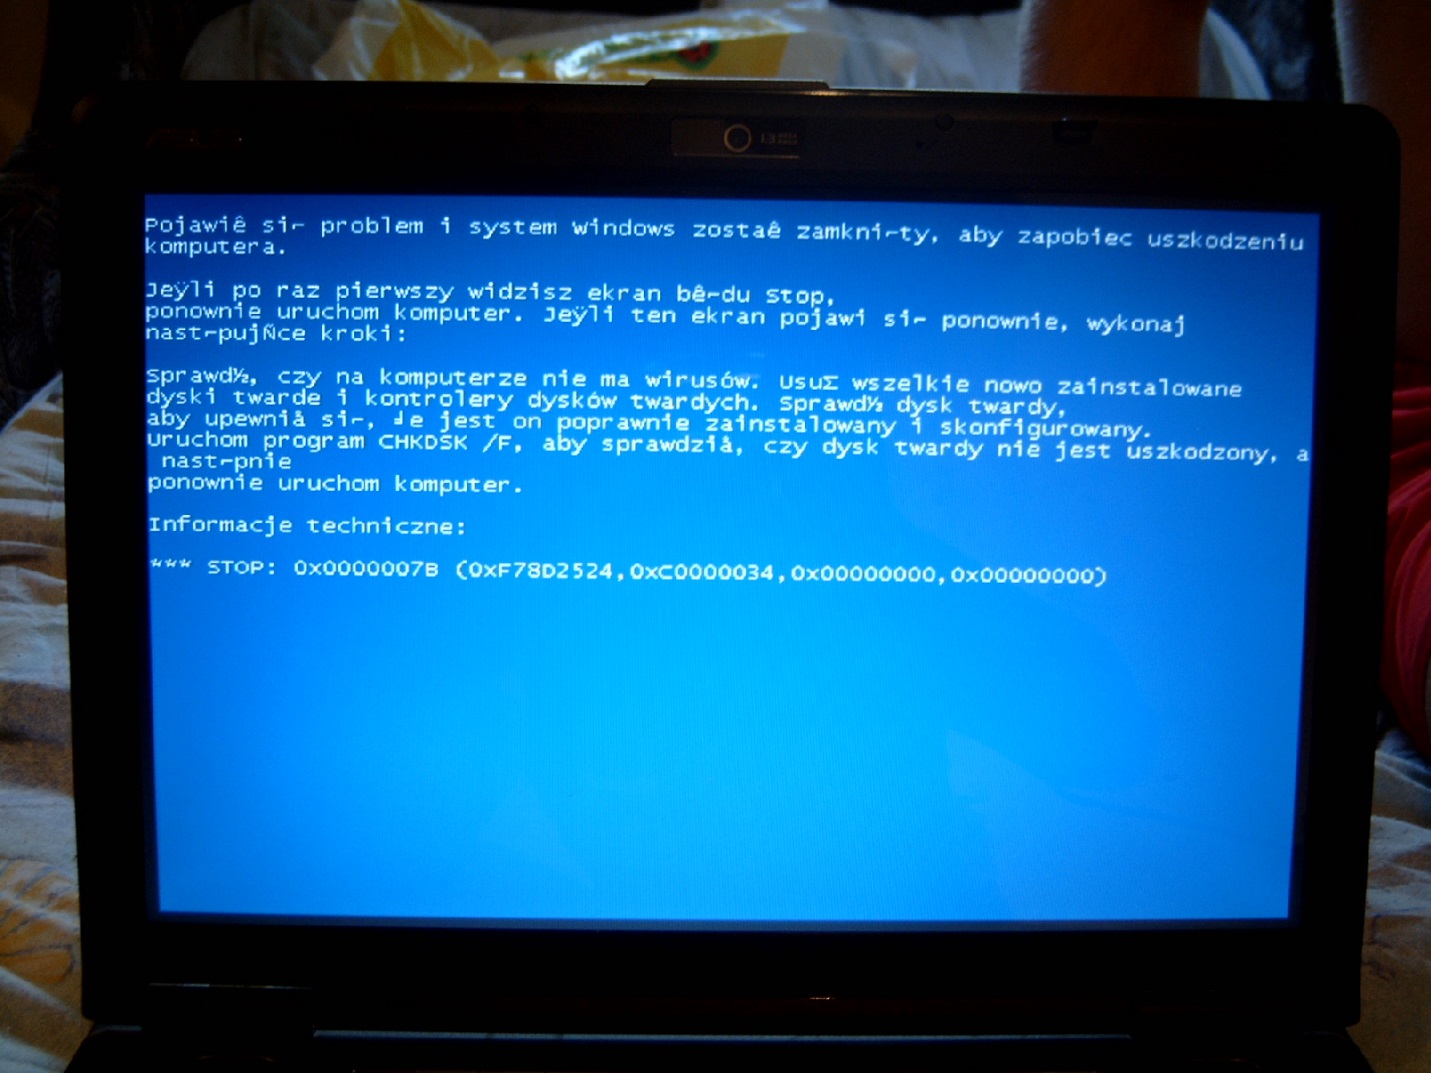
0x0000007b
The most frightening error for users is the “blue screen of death”. Often this means that the system has “gone down” and only drastic measures will help it.
However, sometimes it happens that after restarting the computer the error disappears and does not appear again, but it is worth understanding that in this way the computer signaled a serious problem that needs to be fixed.
There may be several main causes of the problem:
- Hardware incompatibility.
- Driver problems.
- Antivirus problems.
- Problems in the registry.
First of all, it is necessary to diagnose the error in order to find out the cause of the problem, and then begin to eliminate it, depending on the identified causes.