Manual installation ADB drivers
- Android development
- Tutorial
And here an unpleasant surprise awaited me - either the native driver turned out to be crooked, or Windows, or the wire... in general, the driver stopped working, the Windows Device Manager reported that the device was fully operational, but upon request adb devices I received an empty list in the console and, naturally, I was unable to test the application on the tablet.
I wrote a request to TeXeT support, they even answered me with a link to the driver itself, which, as I was already convinced, did not work. I started looking for an answer on the Internet and found a bunch of different assemblies of this driver and manuals, but still none of them started up properly, and even the native driver from the SDK didn’t work at all, which made me despondent... but not despair.
Here I decided to try my hand at writing drivers using the good old method of scientific poking and opened the driver inf file. What gave me hope was the understanding that the software part of the adb interface on the tablet side should be identical for all devices, and USB worked anyway. And so, after several unsuccessful attempts at manually editing the inf file, I found a recipe for treating the inf file seasoning so that it would install and, most importantly, work.
So let's get started.
Step 1. Download the driver. If you haven't done this already, open Android SDK Manager, find the Extras section, check the box next to Google USB Driver and click Install Packages. It's simple. Wait for it to load.
Step 2. Find the driver and make a copy of it in a separate folder. Go to the %android-sdk%\extras\google\ folder and see the treasured usb_driver folder there. Copy it somewhere, and we will carry out further manipulations there. In principle, you can edit the “original”, but I preferred to keep the original intact just in case.
Step 3. Edit the inf file. In the folder, open the file android_winusb.inf and look for lines like this:
;Google Nexus One %SingleAdbInterface% = USB_Install, USB\VID_18D1&PID_0D02 %CompositeAdbInterface% = USB_Install, USB\VID_18D1&PID_0D02&MI_01 %SingleAdbInterface% = USB_Install, USB\VID_18D1&PID_4E11 %CompositeAdbInterface% = USB_Insta ll, USB\VID_18D1&PID_4E12&MI_01
Make a copy of these lines and replace Google Nexus One on %your_device_name% for identification in the future and... open the Windows Device Manager. We are looking for our device there ( Android, Android Composite ADB Interface or something like that). Open the device properties, the “Details” tab, select the “Equipment ID” item in the list and see this picture.
We copy the line that is most similar to the one shown in the figure (It is, in theory, just a little shorter), and paste it into our inf file.
;TEXET TM-7025 %SingleAdbInterface% = USB_Install, USB\VID_18D1&PID_0003 %CompositeAdbInterface% = USB_Install, USB\VID_18D1&PID_0003&MI_01 %SingleAdbInterface% = USB_Install, USB\VID_18D1&PID_0003 %CompositeAdbInterface% = USB_Install, USB\VID_18D1&PID_0003&MI_01
In %SingleAdbInterface% we delete the end of the line; as you can see, in %CompositeAdbInterface% we insert the whole line. There’s probably no need to repeat everything twice, but I already have everything and I’m too lazy to experiment :)
We save (be careful - in some cases you need to run notepad with administrator rights, because in user mode you will not be allowed to overwrite the inf file).
Step 4. Driver installation. Now that everything is prepared, go back to the device manager and remove all previously installed adb drivers (if any). We update the list of devices and see our device without drivers. We open its properties and select “update drivers”, select the installation from the folder, specify the folder with the corrected inf and start the installation - our driver is instantly found, but during installation it may swear about incompatibility with the question “should I continue, nasalneka?” Let's continue. That's it, the driver is installed.
Step 5. Final. To be precise, unplug the USB port, wait until everything is detected, open the console (Win+R, enter cmd) and write adb devices. If everything went well, we see the treasured list item, indicating that adb now sees our device. 
From now on, you can safely launch eclipse and build programs, enjoying convenient automatic assembly, installation and the ability to debug directly on your device.
If the adb command does not work for you at all. Computer -> Properties -> Environment Variables. We are looking for the Path variable and at the end we add(in no case do we overwrite it) at the end there is a semicolon, and after that the address of the folder where adb lives (usually %android-sdk%\platform-tools\). After a reboot it should work.
Sometimes adb does not start automatically when the system starts. Start manually.
What was it?
It's actually simple. For some reason (Winda is a must-have / progers have crooked hands / the Google inf-file was written only for native Google devices / the Higgs bosons have ruined everything on your computer), Windows does not want to use the Google driver for non-Google devices that are not recorded in the inf-file. Apparently, everything there is tied to these ID equipment. But the software on the vast majority of Android devices is identical in terms of the debugger connector to the PC, so the driver should communicate normally with any Android device. Our task is to deceive Windows and force it to accept the device as a “driver-compatible” device, which we did by adding its ID to the driver inf file.
I hope this manual will help someone get their own Chinese or other device for which they forgot to make a normal adb driver when assembling the system, or for those who are bothered to download the official driver from the device manufacturer (this can be so annoying that it’s faster to do everything described above - This happened to me with the driver for the LG E510 phone).
P.S. I did not conduct mass testing this method, so I can’t guarantee that it will work 100% in all cases. But it worked for me on Windows 7, and then on Windows 8. I had to edit the file separately for each time, but I don’t think that’s such a problem.
ADB stands for Android Debug Bridge, that is, a debug bridge for Android. The program is designed for the operating room Android systems and works in conjunction with a computer. It allows you to change files, use root rights, restore the system.
ADB run, in turn, is an application that allows the user flash a device running on Android. It includes ADB and Fastboot. These applications are familiar to everyone who has encountered flashing their gadget.
ADB, ADB run and Fastboot
Android Debug Bridge allows you to manage Android using a PC. This application is installed directly on a laptop or computer, which is connected to a mobile device via a USB cable in debugging mode. Then after launch possible implementation special teams, allowing you to initiate any actions with the gadget.
The utility allows perform such actions, How:
Most often, the application is installed together with the Fastboot utility. This mode allows you to reset all settings to factory settings, which is why it is sometimes called Recovery - a recovery function. In addition, you can install firmware using Fastboot, but in this case only work via a PC is possible.
These two programs are better install together, allowing you to access more options.
In turn, ADB run simplifies work and automates common commands and actions most often used by users. Although it has a console, it has a visualized appearance and consists of 14 points.
This program is much simpler, it is suitable for those who find it difficult to understand the command line, who do not know how to work with it. It already provides a menu and items that you can select. She's different simple interface, greater functionality, without requiring additional installations programs.
All utilities can be downloaded, installed to operate and update your mobile device.
How to use ADB run
To understand how to use the utility, you need to become familiar with the installation and basic commands. Connection to the gadget is carried out using a computer and a USB cable or via a wireless network.
You can understand that the connection has taken place by entering adb devices. The message should then appear: " List of devices attached“, indicating that the connection has occurred. Connection via Wi-Fi occurs using adb wireless. The mobile device must be rooted.
To work, you need to enable USB debugging on your gadget. Usually this item is located in the settings. If it is not there, you can look for it in the developer options. This menu is hidden; to enable it, you should find the line with the build number in the Android settings and click on it several times (5 to 10 times). After about half of the clicks, a notification will appear that you are doing everything correctly, and then you will be provided developer rights. Then you can return to the settings, where the “developer options” item will appear. This is where debugging is enabled.
The utility has a number of positive qualities:
- Easy to install.
- Simple controls.
- Easy check for updates.
Installation
Before installing ADB, you need to download it, this can be done for free. You can download ADB on the website 4pda. The official resource does not allow you to download the utility separately, but only with the entire Android SDK package. The program is installed using the standard installation wizard. 
The whole process is simple and intuitive. The installer himself offers hints, directing all actions.
After this, you need to install drivers for your mobile device, otherwise the application will not see the device. The easiest way is to use the utility for automatic installation adbdrivers. But you can also download drivers for Windows 7, 8 or 10 from the manufacturer’s official website.
If there is no installer or driver, you can install manually, for this:

Overview of the ADB run interface and command
Let's look at all the menu items offered by the program and how they work:
- Device attached? - responsible for connection between PC and smartphone, but you must enable USB debugging.

- Move – is responsible for moving files from a laptop to a smartphone. There is both automatic and manual movement available here.

- Install Android App to Device – allows you to install applications, with options for saving and moving to a memory card.

- Reboot Device – various reboot modes Android:

- Fastboot – firmware, system flashing. All settings are set automatically.

- Unlock Gesture Key – unlocker graphic key, also copes with PIN codes and face codes.

- Manual – allows you to enter commands manually.

- Check Update - check new version programs.
- Intsall Bootanimation – installs and changes animation when turning on the device.

- Memory and Partitio – introduces blocks and sections Android.

- Run Script - working with scripts.
- Backup – create a backup copy.
- Odex – odex-ing of the firmware, taking into account various parameters.

- Screenshot/Record screenshots, video recording capability.

- Exit – accordingly exit from the program.
Flashing your phone using ADB run
The program allows you to change the gadget's firmware. To do this, just install it, connect to your PC and use the Fastboot utility. The files that need to be flashed must be in the same folder as the utility.
First you need translate device into bootloader mode using the menu. 
Then you need to unzip the pre-downloaded firmware files. After this, select the item Run SCRIPT and place the firmware files in the window that opens and close it. Click on Enter. The firmware has started. While the process is in progress, you cannot remove the cable from your phone or computer.
The program makes it possible to reflash all partitions step by step or only some:
- system;
- cache;
- data;
- recovery.
Using ADB
Using the utility allows you to:
- reboot gadget using various modes;
- carry files, folders from phone to PC or vice versa;
- work with applications by installing or removing them;
- work with firmware;
- perform various scripts;
- remove the lock graphic key.
The utility is usually installed and used together with the Fastboot application. 
Installation
You can install the application by visiting the official website. Necessary download archive SDK tools for Windows, having previously agreed to the terms of use.
After this it is required unpack the archive, go to the tools directory, select the bin folder there and access the sdkmanager. It just allows you to install the program. 
Next comes team work Windows line. Let's run it as administrator. After that, open the sdkmanager folder, prescribing the path to it C:\sdk-tools-windows-3859397\tools\bin. 
During installation, read license agreement
, press the Y key. 
If the whole process went correctly, then the platform-tools directory with the files adb.exe and fastboot.exe will appear in the root folder. 
How does ADB work?
Once you install the program, you can work with it. To make sure that everything is functioning properly and correctly, you should use command line open the folder with the adb and fastboot files and run the adb.help program. What you get should look like the screenshot below: 
Now you need to connect the device to the PC and check whether the application can see it. Connection occurs when usb help cable. Should select mode MTP – file manager, and then the “for developers” option. If such an item does not appear, then you should go to the “ about the phone", click 7-10 times on the build number. After that, in the “for developers” item that appears, you need to select “usb debugging”.
Then enter adb devices in the system command line. This will allow you to see information about the device. It looks like the screenshot. 
Afterwards, the fastboot program is checked, the fastboot reboot task is written in the console, and press enter.
After checking the functioning of the task, you can safely work with the program.
ADB Commands
The utility involves working with a smartphone, performing various actions. There are only 10 basic ADB commands:

It is enough to specify the path to the folder from which the information is copied and into which it is copied. 

It is also possible to access the “recovery” menu.

But it is worth remembering that after running this program, all data on the phone is deleted. 
- Shell – it can be used in two ways. The first is to enter it into the command line, followed by typing. This will allow you to enter terminal mode, where it is possible to execute any Android shell commands. But you should use it carefully, as the device can be seriously damaged.
Second option - single input actions. Thus, you can, for example, change the access rights to some folders.

Bonus utility – Sideload. It is suitable for Nexus device owners, allowing you to update official firmware on all company devices.
FAQ
What to do if ADB does not see the device
If suddenly ADB does not see the smartphone, then you need to check first USB debugging or check for ADB drivers on your PC.
It is also worth paying attention to other reasons:
- check the usb cable, it performance;
- check installation Android SDK, availability of its latest version;
- costs try switching mode from MTP to camera and back;
- Can try reconnecting device or restart the computer.
After all these steps, the program should work and the device should be detected. This problem often happens with unknown Chinese brands that are not familiar to the program.
ADB or fastboot is not an internal or external command
Sometimes when you enter a number of commands in the console, you may encounter a system refusal to perform the entered action. A message appears that this command is not internal or external. This is often due to the fact that the path to the file is not specified, who serves the team.
The reason for this message may be that the system does not have information about the location of the files. It's possible that required component is not in the system, then it needs to be installed.
In order to get rid of this error, you need to give the program the path To the necessary files. You should copy it to the clipboard.
- On the desktop you need to select " My computer", click on right button mouse, select the column “ properties»;
- now select " additional system parameters" and then "environment variables";
- there you need to find " system variables"and the Path parameter, to which you need to add the copied path and confirm the changes;
- then open the console and write required action, after which the error disappears.
Alternatively, after all the manipulations it’s worth to restart a computer.
A fairly very common problem in Android is the error waiting for device when working with ADB or Fastboot, in this article we will learn how to fix it!
What is this waiting for device?
This error waiting for device not really a mistake, if we literally translate this phrase - waiting for the device to connect. That is, when you try to do something in adb or fastboot and you get the message waiting for device on the command line, this means that your Android smartphone or the tablet is not visible!
Message waiting for device - adb or fastboot does not see the connected Android device!
To continue reading this article and to understand what we are talking about, it is advisable to read the following articles:
Although almost all the reasons for the message are solved in the same way, for convenience, the article will be divided into solutions for waiting for device in adb and waiting for device in fastboot.
Solution waiting for device in ADB
link page. Certain devices require a special ADB driver.
2. USB Debugging is not enabled! If you do not have USB debugging enabled, then working in ADB is not possible!
It is also worth noting that with Android 4.2 and higher, you must confirm trust in the connected computer on the device!

3. ADB only works when your Android is turned on!
4. Use original and undamaged cable microUSB cable! Everything should be clear here, if the cable is damaged, hence the visibility problem, perhaps you can transfer or receive files from this cable, but ADB will no longer work!
5. Do not use a damaged USB port on your computer! The reasons are the same as with the cable.
6. Use only USB 2.0 port! Despite the fact that the USB 3.0 standard has already existed for several years, it is still too early to talk about large-scale implementation. Although ADB is possible if the device is connected to a USB 3.0 port, it is still not desirable!
7. Do not use USB hubs! Never, under any circumstances, use USB hubs, working with ADB becomes like luck - you'll be lucky or unlucky.
8. Try connecting Android to a different USB port.
9. If you have an operating system installed Windows system 8.1, then you need to make some minor edits
Solution waiting for device in Fastboot
Not all Androids have Fastboot mode (99% of all Samsung and Lenovo), therefore these models will not work in this mode and will always give the error waiting for device!
1. The first thing you should pay attention to is, do you have the driver installed? You can download the driver on this page, find out how to install it on this link. Certain devices require a special Fatboot driver (for example Sony).
Have you installed the driver? Restart your computer!
2. Make sure that the device is in bootloader mode, otherwise fastboot will not see your Android!
3. Use an original and undamaged microUSB cable! Everything should be clear here, if the cable is damaged, hence the visibility problem, perhaps you can transfer or receive files from this cable, but ADB will no longer work!
4. Do not use a damaged USB port on your computer! The reasons are the same as with the cable.
5. Use only USB 2.0 port! Despite the fact that the USB 3.0 standard has already existed for several years, it is still too early to talk about large-scale implementation. Fastboot works only with USB 2.0 ports!
6. Do not use USB hubs! Since Fastboot mode is necessary for Android firmware, it’s good if Fastboot simply doesn’t see your device, but if there is any failure in the USB hub, then it will cost you a lot.
7. Try connecting Android to a different USB port.
8. If you have the Windows 8.1 operating system installed, then you need to make small changes, after which everything should work.
Everyone faces this problem at least once: you connect a smartphone or tablet to a computer via USB cable, but nothing happens other than charging. The computer does not see the phone or identifies it as an unknown device. The situation is common, but ambiguous, and there are quite a few reasons why it occurs. Today we will figure out what causes such problems and how to deal with them.
Software and hardware failures lead to a situation where the PC does not recognize the mobile device connected to it:
- Lack of device driver in the PC operating system.
- The driver does not match the device model.
- There is no USB driver in the system or it is malfunctioning.
- Connection with a cable that is not suitable for data transmission or is damaged.
- Malfunction of the USB socket (both on the computer and on the phone), group of sockets or USB controller on the PC.
- Failure of any of the computer equipment, blocking by static electricity.
- Error in phone system settings.
- Blocking access to the phone using security programs running on a PC (including when viral infection gadget).
- The application used to synchronize your phone and PC (if you are using) has crashed.
When software problems The computer, as a rule, does not display the contents of the phone’s memory, but the device charges normally when connected to it. If the problem is due to a physical malfunction, charging most often does not work either, but there are exceptions when only the data lines do not work.
Draw a circle possible reasons It helps to analyze the previous situation - what happened before the problem arose. For example:
- You reinstalled operating system on the computer or deleted some of the drivers (the reason is the lack the required driver).
- The phone (tablet) was no longer detected after flashing the firmware, cleaning it from viruses, deleting applications, optimizing and other manipulations with the OS (operating system malfunction mobile device).
- The device has been subjected to mechanical impact(the USB socket is damaged) or has been repaired (after replacing parts, a driver of a different version is needed or the fault has not been completely eliminated).
- You are using a USB cable that you have never used to connect your phone to a computer before (the cable is only for charging or is damaged), etc.
We quickly determine the culprit of the problem
Tracing a cause-and-effect relationship makes it much easier to localize the problem, but in about half of the cases there is nothing specific that precedes it. If this is the case for you, the following steps will help you determine where the failure occurred - in your mobile device, PC or USB cable.
- Move the cable in the area of the connectors (kinks most often form in these places) and see if the phone (tablet) is detected in the explorer or device manager of the computer. Or connect the devices with another cable that is known to work and is suitable for data transmission.
- Connect your phone to another computer, as well as another mobile device to this PC. If the phone is not detected anywhere, the problem is definitely in it. The same is the case with a computer.
- If the problem seems to be in the computer, check the phone in all USB sockets; perhaps the problem is in one or more of them (for example, only in the front group).
If you conclude that the cable is the source of the problem, simply replace it. What to do in other cases, read on.
The culprit of the failure is the phone. What to do?
If the diagnostics clearly indicate a problem with your mobile device, perform the following steps in order. After each step, check to see if the problem is resolved. If not, move on to the next one.
- Reboot your device.
- Connect your phone to your computer. After connecting, slide down the menu bar quick settings and make sure that the "Connect as" list does not have "charge only" or "camera" or "media device" checked. Select the "USB storage" option.

- Open system Android settings(in older versions - “Options”). Go to the section " Wireless network" Turn on modem mode. Or vice versa, if it is on, turn it off. In some editions of Android, this parameter controls not only the modem, but also the connection of the gadget to the PC as a drive.

- Experiment with putting your device into USB debugging mode. Open the “System” and “For Developers” sections in the settings. Uncheck or check the box next to “USB Debugging”.

- Disconnect the phone from the computer, turn it off and remove the battery from it (the phone) (of course, if it is removable). After 5 minutes, replace the battery, turn on the device and try connecting again.
- Remove applications that failed after installation. If the connection doesn't work in a particular sync app, clear its cache. If it doesn’t help, reinstall (both on your mobile device and on your PC) or try using an analogue.
- Scan your device with an antivirus.
- Reset the device's operating system to factory settings.
The culprit of the failure is the computer. What to do?
- Shut down the OS, turn off the PC from the outlet (or press the key on the power supply) and hold it pressed for 15-20 seconds power button. This will discharge the capacitors and remove stray static charge, which may block detection of the connected device.
- If your phone is not recognized by only one group of USB ports, open the cover system unit and make sure that their connections are secure. By the way, normal charging of a mobile device through the port does not mean that the second one is working properly.
- Boot the operating system. Open Device Manager and check if portable devices are listed in the equipment list, and your phone is among them. If it is present, but marked with a black arrow in a circle (disabled), right-click on the line and select the “Enable device” command from the menu.

- If there are unknown devices in the hardware list (indicated by an exclamation point in a yellow triangle), one of them may be the phone. To make sure it is him, disconnect your mobile device from USB. If the unknown device disappears from the list, then that’s it. And the reason for the failure is the lack of the required driver in the system. We will tell you below how to reinstall and where to download the driver for your phone.
- The problem with recognizing connected devices may also be due to boot failure, damaged or missing USB drivers. In this case exclamation marks will be in the “USB Controllers” section.
- Reinstalling drivers didn't help? Scan your computer disks with an antivirus and then temporarily disable security programs. By the way, the latter can block access to a mobile device as a carrier if it contains a suspicious or clearly malicious software. So it’s worth checking your phone for viruses too.

- Uninstall the programs whose installation caused the problem, or perform a system restore to a checkpoint created on a day before the problem occurred.
- If, in addition to the phone, the computer does not recognize other devices connected via USB - a mouse, keyboard, printer, flash drives, etc. (whether they are charged or not is not indicative), the source of the failure may be any faulty component of the system unit or something then from the periphery. You can determine the culprit at home by turning off the equipment one by one or replacing it with a known good one.
How to Reinstall Mobile Device Driver and USB on Windows Computer
iPhone
- Connect iPhone to PC.
- Open the folder %CommonProgramW6432%\Apple\Mobile Device Support\Drivers (to avoid typing the command manually, copy it from here, paste it into address bar any folder and click the go button). It contains 2 files (out of four) with the .inf extension - usbaapl.inf and usbaapl64.inf.
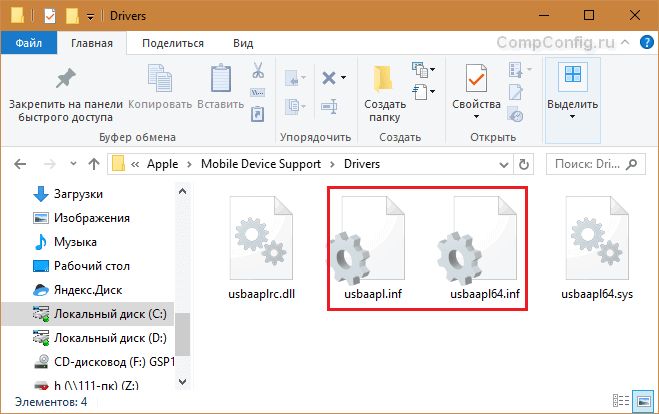
- Open context menu each of these files and execute the “Install” command.
- After installation, restart your computer.
Android
Smartphones and tablets for Android, such as Samsung, Xiaomi, Lenovo, Meizu, HTC, etc., as a rule, do not create separate folders for storing their drivers, and they are often not found on official websites so you can just download and reinstall. Therefore, to begin with, you should trust the reinstallation of the drivers already present in the system by Windows itself.
How to do it:
- Open the context menu of the problematic device in Device Manager. Select the "Update Driver" option.

- In the next window, first select automatic search updates. If Windows does not find anything suitable, check the second item - installing and searching for drivers manually.

- Next, click “Select from the list available on your computer.” All drivers will be displayed in a new window mobile devices, which are already installed on the PC.

- To narrow your search, in the “Select a driver for this device” section, check “Compatible only.” Check the one that best suits your request (if there is more than one item in the list) and click “Next” to proceed to the installation.

For the driver to work correctly, restart your computer.
If reinstalling the driver already installed in the system did not help, you will have to look for something else on the Internet (with the risk of downloading a virus instead of the one you are looking for), so download them only from reliable and trusted sites, like w3bsit3-dns.com, and check with an antivirus before installation.
Drivers for the most common models of mobile gadgets are also collected in the “USB Drivers for Android” application, which is available for free download on Google Play.
USB drivers for Windows can usually be found on the websites of laptop manufacturers or motherboards desktop PCs. Sometimes they are included in the chipset driver.
If the phone is not recognized in firmware mode
The fact that the computer and phone do not see each other in fastboot mode is indicated by the message “Waiting for device” that appears in the firmware program. Most often, this error occurs due to the lack of a mobile device driver in the system, so first of all, do what is written above - reinstall the driver or download and install it again.
If it doesn't help:
- Make sure that you follow the instructions for working with the firmware installation program exactly and that it is running as an administrator.
- Check if USB debugging is enabled on your smartphone (if not, enable it), and the device itself is in bootloader mode. If this mode is blocked, find instructions online for unlocking the bootloader specifically for your device model.
- Connect the phone to the rear USB socket as short as possible and with a known good cable, without using any adapters or hubs.
- Your phone may not support USB 3 (blue socket), so only connect it to USB 2.0 (black sockets).
- Install all released Windows updates on your computer.
If the problem persists even after doing this, try flashing the phone on another PC. And better - with a different version of the operating system.
When the problem is a broken physical interface
Faulty physical interfaces, especially on mobile gadget, it is advisable not to use it at all (do not load it with current to avoid aggravating the breakdown), even if the phone or tablet retains the ability to charge through them. You can organize content transfer either by wireless communication(Wi-Fi, bluetooth), or via cloud services, which are available on both devices. In particular, iTunes and iCloud for Apple equipment, Google Drive, Yandex Disk, Dropbox, Microsoft OneDrive and many others - for everyone.
Cloud services are convenient to use for transferring photos, videos, music, documents and other types of files. There are enough options to synchronize contacts on Android and PC Gmail. And to control your phone directly from your computer, you can install an application like MyPhoneExplorer (consists of 2 parts - for the phone and for the PC), which supports both wired and wireless connections of devices without requiring driver installation. Very comfortably.
 In short, there is always a way out and it is often much simpler than it seems at first glance.
Need to flash Android using FastBoot, but don't know how? This article gives detailed instructions on using the FastBoot utility, how to use it, where to download it from and how to flash an Android device.
This manual will fully explain how to use FastBoot! How to use Fastboot to clean partitions, flash IMG files, reboot and many others.
Downloading and installing FastBoot
Before flashing Android using FastBoot, you need to download this utility and install it on the desired computer:
- You can download FastBoot from the Android developers page included platform-tools .
- Or use the program Adb Run, more precisely better , in which everything is included, and also knows how to unlock the Android pattern.
Why is ADB RUN better?
Launching the Fastboot utility
Depending on what you chose, downloaded the fastboot utility separately or selected adb run, the launch may differ!
If you downloaded Separately Fastboot
Extract the files:
- adb.exe
- AdbWinApi.dll
- AdbWinUsbApi.dll
- fastboot.exe
- libwinpthread-1.dll
Move them to the C:\ drive, Windows folder. You have successfully installed ADB and Fastboot on your computer!
After you have downloaded and installed FastBoot, open the " Command line".
Windows command line example
Example of installing ADB and Fastboot.
If you downloaded ADB RUN
If your choice fell on proprietary program ADB RUN, then run it, type A and press Enter. 
It is advisable to place the files that need to be flashed in the same folder as the Fastboot utility.
Instructions on how to flash Android using FastBoot
It is very important to write commands and firmware files as they are specified!
If you have the command:
fastboot flash cache NazvaniAFiLe.img
then you need to write exactly this way, and not any other way. In other words case is important otherwise you will get - there is no such file.
Reboot Commands
Fastboot to firmware mode (bootloader)
- To start working with Android device Using Fastboot, first you need to put your smartphone or tablet into bootloader mode using adb:
adb reboot bootloader
- Reboot Android from firmware mode (bootloader) to the same mode:
fastboot reboot-bootloader
- Reboot Android from mode firmware bootloader to bootloader mode:
fastboot reboot-bootloader
- Reboot Android to normal mode from bootloader firmware mode:
fastboot reboot
The command "sees" your Android PC
Make it a habit before doing anything in Fastboot to check if there is a connection between your computer and Android:
- Checking whether the PC “sees” your Android:
fastboot devices
This command must be executed when the device is already in firmware mode (bootloader)
Commands for unlocking and locking Google Pixel, Nexus bootloader in Fastboot
- Unlock bootloader for Pixel, Nexus:
fastboot oem unlock
fastboot flashing unlock
- Lock bootloader for Pixel, Nexus:
fastboot oem lock
Command to find out bootloader version
Shows the bootloader version number installed on Android:
fastboot getvar version-bootloader
Commands for formatting a partition in Fastboot
Before flashing any partition in Android, you must first format it so that there are no problems with operation
fastboot erase Imya_razdela— erase partition: boot, radio, recovery, system, userdata and others.
- Erases the Cache partition in Fastboot:
fastboot erase cache
- Erases the Date section (Data/UserData) in Fastboot:
fastboot erase userdata
- Erases the System partition in Fastboot:
fastboot erase system
- Erases Recovery section in Fastboot:
fastboot erase recovery
Commands for flashing Android partitions in Fastboot
After you have formatted the partition or Android partitions, you can go to next step, firmware:
fastboot flash Imya_razdela imya_file.img— firmware of the selected partition: boot, radio, recovery, system, userdata and others.
- Flash the system partition:
fastboot flash system imya.img
- Flash the cache partition:
fastboot flash cache imya.img
- Flash the Data section:
fastboot flash userdata imya.img
- Flash the Recovery partition:
fastboot flash recovery imya.img

- Flash all partitions (boot, recovery and system):
fastboot flashall
Command to install update.zip
Flashes an update archive on Android in the update.zip format - ZIP archive with IMG images of various sections:
fastboot update filename.zip
For Sony devices
Checking the connection of the Sony device, if the answer is 0.3 device, then it is connected:
fastboot.exe -i 0x0fce getvar version
Unlock bootloader
fastboot.exe -i 0x0fce oem unlock 0xReceived_Key
More detailed information on unlocking Bootloader Sony - How to unlock Bootloader Sony
Waiting for Device error
If you have for a long time The message in the command window is lit waiting for device- Means:
- The driver is not installed or installed incorrectly - reinstall or install
- Android device is not in Bootloader mode - translate
- Incorrect connection to USB port- use the rear ones USB ports 2.0 computers, do not use USB hubs
Video example of working with the Fastboot utility
For those who don't understand anything!
For those who don’t understand anything, then use the proprietary application ADB RUN, this program contains almost all the commands that are needed for FASTBOOT!
Below is an example ADB work RUN - how to flash quickly Recovery file using ADB RUN in less than 5 seconds (just remember to switch to bootloader mode first)! 
That's all! Read more articles and instructions in the section Articles and Android Hacks. Stay with the site, it will be even more interesting!


