Every smartphone user has heard at least once the concept of recovery , let's figure it out What is this , in what cases you should use the mode and how to launch it on your device.
Contents:
Definition
Recovery (recovery mode)- this is factory software, which is included in mobile and desktop operating systems. Purpose of work – data backup, configuration system parameters phone/computer.
By logging into Recovery you can:
- Recover device errors;
- Flash your smartphone or reinstall the OS on your computer;
- Get superuser rights.
Let's take a closer look at how it works in all popular operating systems for smartphones and computers.
Recovery in Android

How to manage menus in Android?
After the recovery window has been successfully launched, the user must continue working with it, selecting the necessary actions.
Please note that the window does not have any auxiliary keys and you will not be able to move between its tabs using regular touches.
To control the system menu, use side buttons phone and the Home key. Move up and down or left and right using the volume keys.
Confirming your selection is by pressing the Home button.

To exit recovery, click on “Power”. Remember, never disable the system menu until the process is completed.
This can seriously damage your device (cancel firmware update and data recovery).
Start your phone after disconnecting or use the keys to reboot itself. system menu.
If the volume keys do not work on your gadget, you can connect a regular mouse to the device using a cableOTG and easy to operate system menu.
Explanation of mode names
Depending on the device manufacturer, the design and placement of tabs may differ, but the set of functions and control principles remain the same.
In 99% of cases, the recovery menu is displayed in English.
In order not to make a mistake in choosing the right item and perform correct setting your phone, First read the explanation of each option:
Mounts with Storage – This is a tab for memory management. With its help, you can format disk space partitions or view the usage of internal and additional memory;
Reboot system – forced reboot of the device at the moment. In practice, this function allows you to quickly rid your smartphone of most software problems without the need to reset it to system settings. After a reboot, all user files and applications are saved;
Install from SD – launching the installation mode of the archive with firmware, which is stored on the memory card. If you want to flash your smartphone manually, you should first download it to the card ZIP archive from Android for your device and then using Recovery to start the OS reinstallation process;
Wipe Cache Partition – clearing the device cache memory. Please note this function works much more efficiently than any third party program to clear cache and temporary files;
Factory Reset (or Wipe Data ) – return the gadget to factory settings. As a result, you will receive a smartphone with the firmware version that was installed by the manufacturer. All user files and programs will be deleted. The settings are also not saved. Before performing this process, we recommend that you create backup copy data and upload it to the cloud;
Backup or Restore – start the mode Reserve copy device data or selecting a copy to restore user files and settings.
Stock and Custom Recovery. What is the difference?

Wait until your smartphone is recognized in installed program and click on the “Other download” tab.
In the “SDK Tool” field, check all the proposed options and save the changes. Wait for all packages to be installed and close the program.
Now you can proceed to installing custom Recovery.

To install a third-party TWRP recovery menu, you will need a downloaded archive with a custom version.
Don't forget to select your device model and manufacturer.
Save the resulting archive in the memory of your PC - any directory and system disk. Follow the instructions:
2 Install and run the Android SDK utility on your PC;
3 On your smartphone, enable quick component installation mode. To do this, press the Volume Down and Power buttons simultaneously until the robot icon appears;
Phone to computer connection field follow these steps:
- Open the folder with the downloaded custom Recovery firmware. It must be in IMG format. Click on an empty space inside the firmware folder while holding down the Shift key. An item will appear in the drop-down list "Open in command window". Click on it:

- In the command prompt window that appears, enter the command "FASTBOOT FLASH RECOVERY FIRMWARE_NAME.IMG" and press Enter. Please note that FIRMWARE_NAME.IMG is the unique name of the file with the custom Recovery image, which is located in open folder on the computer.

The installation result will be displayed.
After installation, try launching a new Recovery. To do this, use a unique keyboard shortcut for your smartphone or tablet.
Detailed instructions for launching the recovery menu are described at the beginning of the article.
After the first launch, you need to select the interface language and the design theme you like. Unlock the screen by flicking to the right to allow changes. Continue to use the updated version with a convenient Russified menu for updating the OS, resetting to factory settings or managing memory.

Recovery on Windows Phone
Unlike, platform users do not have such a large number of recovery menu options.
Also, there is no possibility of installing third-party menu options.
However, you can still easily resolve OS problems and resume normal operation of your smartphone or tablet.
To login Windows Phone there is no need to use complex key combinations. Just download the special utility to your computer and install it.
Connect the gadget to your computer and open the recovery program. Wait until the utility recognizes your smartphone.
Then run troubleshooting and repair mode or install a new version of the OS. Information about current firmware is displayed in the main program window.

Also, users can view the battery status and check for errors. Using the troubleshooting window, you can run automatic troubleshooting for your OS.
Recovery in Windows 10
Recovery mode is also available in desktop Windows 10.
With this system utility you can quickly fix errors, bugs, and updates.
The menu is designed to minimize user interaction.
The computer performs diagnostics automatically and corrects problems on its own, up to and including instantaneous certificates.
How to launch Recovery in Windows 8/10?
To start the mode "Diagnostics and Recovery" in Windows 10, follow the instructions:
1 Open Notification Center by clicking on the corresponding key in the lower right corner of the screen;
2 Select a tile "Options";

3 You will be taken to a window for viewing and configuring OS settings. Click on the item "Update and Security";
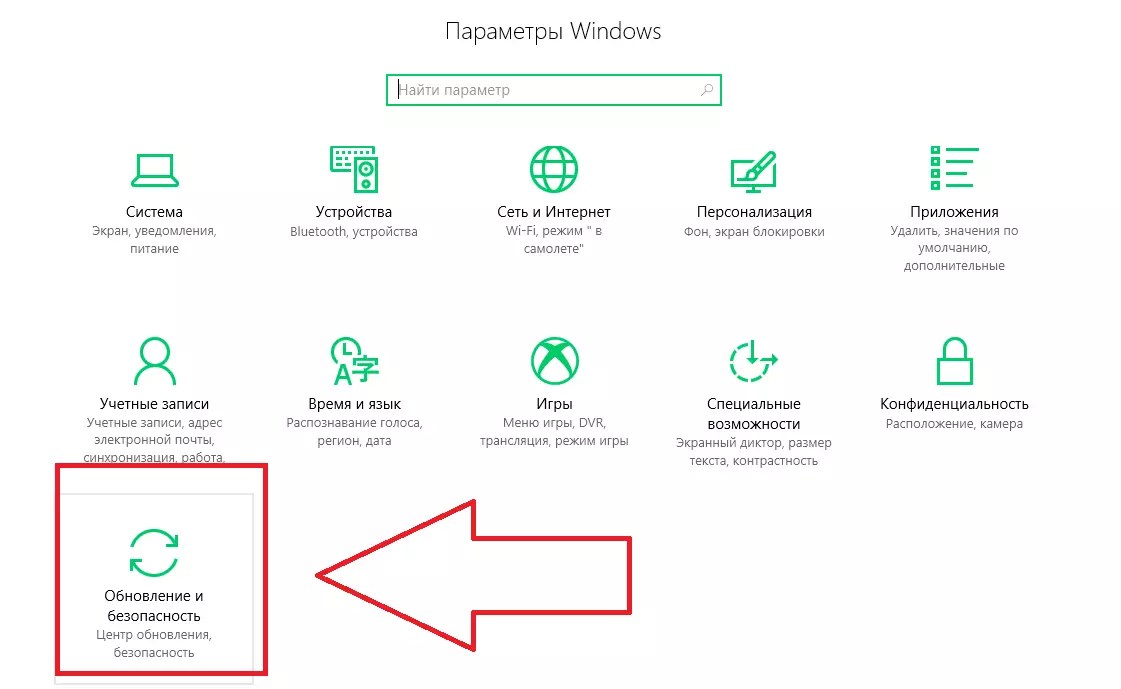
4 In the window that appears, select the tab "Recovery"(on the left side of the screen). At the same time, a window of available settings will appear on the right. Click on the button "Begin" to launch it.

After a few seconds the system will exit account user, and you will be taken to the Recovery window:

In the system menu, Windows 10 owners can:
- Restore system . By clicking on this tab, you launch a utility that automatically scans the entire OS and its interaction with PC hardware components. If problems are detected, they will be fixed without user intervention;
- OS image recovery . This option allows you to reset the settings of your installed Windows using an existing copy of the image. The image can be run on either disk; Windows . The mode will begin to reboot the OS, correcting all the problems that prevent it from turning on;
- Command line . Through Recovery, users can work with the command line, performing their own steps to troubleshoot OS problems;
- Built-in options UEFI – this option implies setting up the factory software (). It is recommended to use this function only for those who really understand the intricacies;
- Return to more old version assemblies . This tile in the window allows you to roll back to the old generation of Windows OS or to the previous update package.
Recovery on Mac OS
On Mac OS is a system utility with which users install a new version of the operating system from the Apple server. Also, this mode allows you to restore a backup copy of all files using Time Machine.
To launch Recovery, press the Command + R keys simultaneously and hold them there for 2-3 seconds.
The Utilities window will appear. In this window you need to select the item "Reinstall Mac OS" and confirm your choice.
- Working with backup files in Time Machine;
- Installing an update to your OS X;
- Reference– finding a suitable solution to your PC problems and contacting support;
- Disk Utility– a program for setting up work with the disk space of your OS. With its help, you can restore work from a boot disk or connect a new storage medium to your PC.

Remember to download new version The OS requires an internet connection.
Also, if your data is backed up, make sure that all your files are synchronized using the global network.
Thematic videos:
Custom or modified recovery is used by users to install certain applications and obtain Root rights. Also, one of the main purposes of using third-party recovery is to update the firmware of a smartphone or tablet. The most popular version now is recovery TWRP, which is used on most devices. This instruction will teach you how to create TWRP for your device with a Mediatek processor.
.
.


Read, how to create a disk or flash drive for Windows recovery 10 or 8. Where can I download Windows image and how to restore the system using the installation disk. A Windows 10 or 8 recovery disk is a tool that is used if the operating system does not boot or is working with errors, in order to restore its functionality or return it to previous state using the previously created backup.
Starting with Windows 7, when installing the operating system on a computer, in addition to the main partitions, hidden partitions are also created. These partitions cannot be seen in Explorer, they are visible only in Disk Manager - these are:
- System Reserved.
- Untitled (Recovery partition).
In chapter System Reserved The boot store configuration files (BCD) and the system boot loader (bootmgr) are stored. In this way, the system protects the boot files of the operating system and, using this section you enter the system recovery environment.
If as a result of damage system files the operating system loses its functionality and does not boot, you can restore them using the recovery environment. You can launch it by pressing during start the computer key F8.
Launching Recovery environment, select item System Restore or Troubleshoot your computer. The names of menu items may vary depending on the version of the operating system and the method of launching the Recovery Environment.
The recovery partition can be created on the hard drive when installing the operating system (usually the latest Windows versions that's what they do). This partition contains the data necessary to restore the system.
How to restore Windows 10 using a recovery disc?
How to create a Windows 10 recovery disk
Looking for how to create a Windows 10 recovery disk? Follow these steps:
- Go to Control Panel / Recovery.
- Select.
- Insert the disc into the drive.
- Select it as the location to create the system repair disk and create it following the system instructions.

To burn a recovery disc you will need a CD or DVD.
How to create a recovery flash drive for Windows 10 or 8
Are you looking for how to create a recovery flash drive for Windows 10 or 8? Follow these steps:
- Go to Control Panel / Recovery.
- Select Creating a recovery disc.
- Insert the USB flash drive into the drive.
- Select it as the location to create the system repair disk and create it following the system instructions.

To create a recovery disk, you will need a free USB flash drive.
Where to download the recovery disk image
If for some reason you did not create a system recovery disk, and Windows has lost its functionality, then it can be restored using an operating system recovery disk image.
Such an image can be created immediately after installing the OS and software or at any other time.
You can download free utility from Microsoft and create an image. To do this, do the following:

Note. Do not run the system repair disc from working Windows. To use it correctly, install the system image media in the BIOS as the first boot device and reboot the computer.
Important: It is necessary to create an image only on a working system that is not infected with viruses and does not contain errors. After recovery, you will receive an exact copy of the system at the time it was created.
Restore Windows 10 using an installation disc
Looking for a way to restore Windows 10 using an installation disc? Do the following:
- Set the BIOS or UEFI to boot the operating system from a CD, DVD or USB disk(depending on the media of the installation disk).
- Insert into drive (or connect to USB port) installation disk Windows.
- Restart your computer and confirm booting from the CD.
- In the proposed menu, select Diagnostics / Computer recovery. Follow the wizard's further instructions. The recovery program will carry out further work automatically.
- Wait for the recovery process to complete and restart your computer.

System recovery disk from the laptop manufacturer
To restore Windows, the same methods apply as for a desktop computer. An additional option for restoring the system on a laptop, unlike a desktop computer, is the ability to return the laptop to its factory state using a hidden Recovery Partition, which is preinstalled by the manufacturer.
When restoring the laptop to factory settings:
- All user data on the system partition of the laptop will be deleted.
- The system partition of the laptop will be formatted.
- All programs and applications preinstalled by the manufacturer will be installed.

To restore your laptop to factory settings:
- Run the factory reset (system reset) program for your laptop.
Note. This happens differently for different manufacturers. In some manufacturers, this utility is launched by pressing one or a combination of keys when turning on the laptop, while others carry out the recovery process using their own software (usually pre-installed). - Select the system restore (or factory settings) function from the proposed menu and follow all system instructions.
- Wait for the system recovery process to complete.
- Restart your computer.
As a result you will get operating system laptop in the form in which you purchased it from the store.
Recover hard drive data
If, as a result of reinstalling or restoring the system, Windows reset 10 to factory settings has been formatted HDD and you have lost data, most in an effective way will use the program Hetman Partition Recovery.
For this:
- Download, install and run it. Check out the program's capabilities and step-by-step instructions.
- By default, the user will be prompted to use File Recovery Wizard. Click "Further" and the program will prompt you to select the drive from which you want to return the files.
- Twice click on the disk and select the analysis type. Specify "Full Analysis" and wait for the disk scanning process to complete.
- After the scanning process is completed, you will be provided with recovery files. Select the ones you need and click the button "Restore".
- Select one of the suggested ways to save files. Do not save recovered files to the disk from which they were deleted - they can be overwritten.

Recover hard drive partitions
Recovering a deleted, damaged or lost partition hard drive impossible to implement using standard Windows features. WITH using Windows you can only determine the loss of the partition and create new section on top of the lost old one. In this case, Disk Management will detect an unallocated or unallocated area on the disk.

Recover a non-system hard drive partition
Do the following:

Recover the system hard drive partition
If the system partition is lost, it is impossible to boot the computer.
Recover your hard drive system partition using LiveCD
If it is not possible to connect a hard drive with a lost or damaged system partition to another computer, you can restore such a partition by starting the computer using LiveCD - an alternative portable version operating system.
Hi all.
We all know that if any problems arise with the system, it can be reinstalled. The Recovery section helps us with this. During a clean installation of the system, it is created automatically, but it happens that you install macOS after Windows (which is incorrect) or you accidentally/intentionally deleted the Recovery HD partition. What to do in this case, if the system is already installed, but it is not possible to tear it down and reinstall it?
Perhaps there is a similar solution floating around the Internet, but I will describe it as I did.
A little background.
I had macOS 10.13.1 developer beta installed on APFS. Since the work of this file system I wasn’t happy with it, I wanted to upgrade to HFS+ through a clean reinstallation. The trouble was that Windows was already installed, and after deleting the APFS container, the Recovery partition disappeared. For some reason, system 10.13 refused to install for me, so I restored backup 10.12.6 from Time Machine to an empty partition. After recovery, the Recovery partition did not appear. I easily updated from 10.12.6 to 10.13. There was still no recovery partition.
A couple of days ago I decided to upgrade from 10.13 to 10.13.1, and what was my surprise that the installation of the system at the final third stage simply did not reach the end and threw it on the desktop with an error.

A couple of days later, yesterday, I also tried to install the system, and got the same error.
After thinking briefly, I immediately realized that the error was the absence of a Recovery HD partition. Accordingly, I started googling how to restore it. There were many methods, they were all written during the reign of Tsar Pea, and they were not suitable.
I decided to do something simple: what if I cut off the partition from the system manually, get files from the Recovery partition from the system backup, and assign the partition type to Apple_Boot? This is what I will describe in the next steps.
Creating a Recovery partition.
1. Separate a new section.
This is what my disk layout looked like using the “diskutil list” command.
╭─[email protected]~ ╰─➤ diskutil list /dev/disk0 (internal, physical): #: TYPE NAME SIZE IDENTIFIER 0: GUID_partition_scheme *120.0 GB disk0 1: EFI EFI 209.7 MB disk0s1 2: Apple_HFS Macintosh HD 78.9 GB disk0s2 3: Microsoft Reserved 134.2 MB disk0s3 4: Microsoft Basic Data Windows 40.0 GB disk0s4 /dev/disk1 (internal, physical): #: TYPE NAME SIZE IDENTIFIER 0: GUID_partition_scheme *500.1 GB disk1 1: Microsoft Basic Data Files 151.3 GB disk1s1 2: Apple_HFS Time Capsule 348.7 GB disk1s2
As we can clearly see, there is no Recovery HD partition after Macintosh HD.
In Disk Utility, I separated the 650MB partition from the main one.

After that, the markup looked like this:
╭─[email protected]~ ╰─➤ diskutil list /dev/disk0 (internal, physical): #: TYPE NAME SIZE IDENTIFIER 0: GUID_partition_scheme *120.0 GB disk0 1: EFI EFI 209.7 MB disk0s1 2: Apple_HFS Macintosh HD 78.9 GB disk0s2 3: Apple_HFS Recovery HD 650.0 MB disk0s3 4: Microsoft Reserved 134.2 MB disk0s4 5: Microsoft Basic Data Windows 40.0 GB disk0s5 /dev/disk1 (internal, physical): #: TYPE NAME SIZE IDENTIFIER 0: GUID_partition_scheme *500.1 GB disk1 1: Microsoft Basic Data Files 151.3 GB disk1s1 2: Apple_HFS Time Capsule 348.7 GB disk1s2
2. Change the partition type.
Everything seems to be correct, but there is one thing. The Recovery partition type must be Apple_Boot, not Apple_HFS. Well, let's change it. Open a terminal and enter the commands:
Diskutil unmount /dev/disk0s3 sudo asr adjust --target /dev/disk0s3 --settype "Apple_Boot"
Attention:/dev/disk0s3 numbers may differ for you!
Check the output of the diskutil list command. Let's make sure everything is correct.
╭─[email protected]~ ╰─➤ diskutil list /dev/disk0 (internal, physical): #: TYPE NAME SIZE IDENTIFIER 0: GUID_partition_scheme *120.0 GB disk0 1: EFI EFI 209.7 MB disk0s1 2: Apple_HFS Macintosh HD 78.9 GB disk0s2 3: Apple_Boot Recovery HD 650.0 MB disk0s3 4: Microsoft Reserved 134.2 MB disk0s4 5: Microsoft Basic Data Windows 40.0 GB disk0s5 /dev/disk1 (internal, physical): #: TYPE NAME SIZE IDENTIFIER 0: GUID_partition_scheme *500.1 GB disk1 1: Microsoft Basic Data Files 151.3 GB disk1s1 2: Apple_HFS Time Capsule 348.7 GB disk1s2
3. Transfer the contents.
Now all we have to do is drop Recovery files partition from backup.
I’m sharing my backup with you., it is from the system 10.13.1, I have not checked the performance with 10.12.6.
You need to put the com.apple.recovery.boot folder in the root of the Recovery HD partition, before that you need to mount it with the command:
Diskutil mount /dev/disk0s3
This is what the contents of the Recovery partition will look like:

ClockworkMod Recovery - recovery for android devices, an alternative to the factory one, with many useful functions: creating backups, restoring the system from a backup, installing firmware and much more.
Any user of a device running on the Android OS who is just beginning to delve into the essence of this operating system, visiting various forums, blogs and websites someday, will definitely come across a rather strange and mysterious name - ClockworkMod Recovery. Most often, it is mentioned when it comes to replacing the kernel, flashing the firmware of a smartphone or tablet, and other “hacker” frauds.
Many people are probably wondering what kind of ClockworkMod Recovery this is, and also, what is it for and what to do with it? These are the questions I will answer in this article, in the form full instructions Operating instructions for ClockworkMod Recovery.
In short, ClockworkMod Recovery, or CWM as it is also called, is an alternative recovery for devices running Android OS. The instruction manual for ClockworkMod Recovery consists of several sections:
1. Recovery. What is it?
2. What is ClockworkMod Recovery and what is it for?
3. Installing the ClockworkMod Recovery utility.
4. Launch the ClockworkMod Recovery utility.
5. Analysis of the ClockworkMod Recovery menu.
6. System recovery, as well as creating backups using CWM.
7. Main features of ClockworkMod: installation of updates, firmware, kernels and other elements on Android devices.
Recovery. What is it?
All devices running on the ANDROID OS have a factory recovery, which, if necessary, can be loaded when you turn on your smartphone or tablet using a special key combination. The factory utility, as a rule, can clean the system and install OS updates from the update.zip file.
What is ClockworkMod Recovery and what is it for?
ClockworkMod Recovery is a utility for working with the system, an order of magnitude more powerful than the built-in factory one. Thanks to it, you can create complete backup copies of the operating room Android systems, and also install various software and all kinds of kernels and firmware on the device, and much more that factory recovery does not perform. ClockworkMod Recovery is installed instead of the factory menu, in a special department internal memory deviceThere are situations, seemingly hopeless, in which ClockworkMod Recovery can help. For example, if a smartphone or tablet cannot boot for any reason, this utility will help restore the operating system, with all its applications and settings.
Below are some of the most important operations that can be performed using ClockworkMod Recovery:
1) Connect to a PC via a USB cable when using removable storage mode.
2) Install unofficial kernels and custom firmware.
3) Install factory system updates, as well as various fixes and additions.
4) Restore the device using a previously created copy.
5) Work with the ADB program by connecting your device to the PC using a USB cable.
6) Create a complete backup copy of the current firmware, as well as its parts, such as settings, applications and OS.
7) Create and edit partitions on the device’s memory card.
8) Return to factory settings (Wipe – data/factory reset), reset statistics battery(wipe battery stats), clear Dalvik-cache (wipe Dalvik-cache) and clean the cache (wipe cache).
ClockworkMod Recovery utility was designed and subsequently created by developer Koushik Dutta, known under the pseudonym Koush. For most devices running Android OS, there are CWM versions.
Installing ClockworkMod Recovery
It can be noted that for most devices, installing the ClockworkMod Recovery utility is a fairly simple procedure. To do this, you just need to download and install the program from the Market and run it. The first item in the menu will be to install ClockworkMod. For other smartphones and tablets, there are other separate utilities that are similar to the application used on the tablet Iconia Tab. Well, or you can install ClockworkMod Recovery on them, but only with the help ADB programs, which is integral part Android SDK and you can download it.
Launching ClockworkMod Recovery
You can load your device into ClockworkMod Recovery in several ways.
1) Using the ROM Manager program, you will need to select an item in the menu called “Load Recovery Mode”.
2) Using a specific key combination, when turning on Android devices. Most often, the combination depends on the brand and model of the tablet or smartphone. But in most cases, this is a combination of pressing the volume down rocker and the power key at the same time.
3) Using the ADB program. When setting up the connection of your device to a PC using this program, in order to boot the device you will need to enter the “command”: adb reboot recovery.
Analysis of the ClockworkMod Recovery menu
When you boot your tablet into the ClockworkMod Recovery utility, first of all you will see its main menu:
The screenshots were taken in version ClockworkMod recovery 3.0, one of the most popular and widespread. In other versions, including newer ones, the menu may change slightly, but, nevertheless, its main functions, as a rule, remain unchanged.
On many devices, moving through menu items occurs using the volume rocker. And in order to select a specific item, use the power button. But some Android devices may use other keys, for example, to return to the previous menu.
No matter what submenu you are in, in order to return to the previous menu, you can use the +++++Go Back+++++ item
Let's move on to the purpose of the main menu items:
1. reboot system – directly, reboot the device.
2. apply update.zip from sdcard - without a doubt, the item that is used most often than others.
Thanks to him it becomes possible installation official and custom firmware, as well as themes, kernels and other software, which must be in the update.zip file, and you must move it to the root of the memory card. For example, in file manager of a device running on Android OS - this is the /sdcard folder.
Once you have selected this item, you will automatically be taken to the following menu, in which you must confirm your choice by clicking on Yes – Install /sdcard/update.zip

3. wipe data/factory reset – full reset of settings, cache and data. That is, after you use this item, the device will return to the state it was in when it was sold in the store. CWM will clean the /data and /cache partitions in the internal memory of the device. And also from system folder".android_secure" located on the memory card, everything will also be deleted, including the sd-ext partition.
4. wipe cache partition – clearing temporary data accumulated while using the system and various programs, that is, cleaning the /cache partition located in the internal memory. Most often this item is used before starting installation new firmware or kernels.
5. install zip from sdcard - installs from a memory card, zip file. Once you select this item, you will automatically be taken to the following submenu:

And its points mean this:
1) apply /sdcard/update.zip - well, this item fully corresponds to the second item of the main menu “apply update.zip from sdcard”.
2) chooze zip from sdcard – this item is needed in order to select a .zip file on the memory card for installation.
This item is also similar to menu item 2 and is used to install various firmware, kernels, and other modifications. But there is still a difference - installation can be done from absolutely any file with a zip extension, having any name, and located anywhere on the memory card. After selecting this item, you will see the entire list of folders and files on the device’s memory card, from which you need to select a .zip file for further installation.

3) toggle signature veritification – enable and disable file signature verification.
When the signature check mode is enabled (Signature check: Enabled), installing firmware that has not been signed by the developer will become impossible. And the majority unofficial firmware, just without the developer’s signature.
4) toggle script assert – enable or disable the assertion script.
This item is needed for internal use in ClockworkMod Recovery, that is, you won't need it, so it's better not to touch it at all.
5) +++++Go Back+++++ - well, this item, as described above, is needed in order to return to the previous CWM menu.
6) backup and restore – this item is needed when creating and restoring device backups. Also, one of the most basic points of CWM. Thanks to it, you can make a complete backup copy of the tablet system, including all applications along with data located in the internal memory of the device. This procedure is also called “Nandroid backup”, which means “System snapshot”. This is necessary in order to return the smartphone to its previous state. It looks like this:

And its points mean this::
Backup – creating a backup copy of absolutely all partitions located in the internal memory of the device.
The copy, after creation, will be located on the memory card. Initially, the name of the backup consists of the time and date it was created. But it can be renamed. But you should remember that the name must consist of numbers and Latin letters, spaces and Russian letters are not allowed.
Restore – restore all partitions after selecting a specific backup.
After selecting this item, the entire list of available backups located on the memory card will open in front of you. To restore, you just need to select one of them.
Advanced Restore – this item means restoring only a specific partition from the backup you select.
The choice of any individual partition that you want to restore is yours: system, cache, sd-ext partition, data or boot. You can see more details in the screenshot below:

7) mounts and storage – an item thanks to which you can mount individual partitions, as well as format them and mount the device as USB storage when connected to a PC. After mounting, folders and partitions become available for use.

This menu consists of several items:
1. mount /system - mounts the system partition;
2. unmount /data – unmounts the partition with data;
3. unmount /cache - unmounts the partition with the cache;
4. mount /sdcard - mounts the device’s memory card;
5. mount /sd-ext - mounts Linux, namely, the ext partition on the memory card, if of course it is available;
6. format boot, format system, format data, format cache - formatting partitions corresponding to the names.
Important! Be extremely vigilant with these menu items. For example, formatting the system partition will completely destroy your OS, that is, the current firmware. And after you format the boot partition, the device will not boot.
Format sdcard - formatting the device’s memory card;
format sd-ext – formatting a Linux partition on a memory card;
mount USB storage – connects the device to a PC in removable device mode.
8) advanced – use of additional CWM functions.

This menu also consists of several items:
1. Reboot Recovery – reboots the device back into recovery;
2. Wipe Dalvik Cache - clears the cache of Dalvik - a virtual Java machine used to run various applications. Most often, this menu item is used before installing custom firmware.
3. Wipe Battery Stat - resets battery statistics. This item is most often used to reset incorrect battery meter information.
4. Report Error. This item allows you to report an error to the developers of the ClockworkMod utility. In this case, the error log is written to the device’s memory card and can be sent using the ROM Manager program.
5. Key Test – with this item you can check the functionality of the device buttons. It works as follows: when you press a button, its code is displayed on the screen.
6. Restart adb – restarts the ADB server. This item can be used if the device has stopped responding to commands from the ADB program when connected to a PC via a USB cable.
7. Partition SD Card. Using this item, you can create partitions on the device’s memory card. That is, you can create /sd-ext and /swap partitions on the memory card. The /sd-ext partition is needed for use by certain firmwares in case of insufficient internal memory of the device. And the /swap section is needed to speed up Android work devices.
8. Fix Permissions. This item will help correct access rights to partitions and files. That is, access rights to files and folders of the system are returned to the factory state if changes have been made due to incorrect operation various root applications, which could lead to failures and freezes in the operation of the device.
Restoring the system, as well as creating backups using CWM
Well, you already know that thanks to ClockworkMod it becomes possible to create complete backup copies of the device’s firmware. This utility creates snapshots of all partitions that are in the internal memory of the device, as well as the “.androidsecure” folder, which is located on the memory card. Moreover, a “snapshot” is taken of both the OS, along with its settings, and installed applications.
Create a backup (Nandroid Backup):
- Open the "backup & restore" item.
- Select "backup".
- Confirm your choice by clicking on "Yes".
- After creating copies, exit CWM using the "reboot system now" item.
After that, go to the clockworkmod/backup folder. This is where the full backup will be located. Its name, as already mentioned, will consist of the date and time, but you can give the file a different name. Do not use Russian letters under any circumstances.
We restore the device from a backup using CWM:
- Reboot your device into CWM recovery.
- Click on "Backup & restore".
- Select "restore".
- Now you need to select the required backup copy from the list.
- Well, confirm your choice by selecting “Yes”.
After the recovery is complete, exit CWM using the Reboot system now item.
Note:
Some individual applications from the CWM backup, SMS, as well as WiFi settings, at the same time, without touching the current firmware, you can restore it using an application or program.
Main features of ClockworkMod: installing updates, firmware, kernels and other elements on Android devices
All potential firmware, custom kernels and other applications and add-ons that can be installed on the device using CWM are packaged in files with a zip extension.
Before installing anything on your smartphone or tablet, make a backup copy of the original firmware so that, if necessary, you can do everything as it was.
Make sure your device's battery is fully charged and disconnect it from your PC and charger.
Copy the file you want to flash to the root of the memory card, but never unpack it, and also make sure that its name consists only of Latin letters and numbers.
If you are interested in installing full firmware, then do complete cleaning using the "wipe data/factory reset" item.
Only after this proceed to the firmware:
- Insert the memory card into the device.
- Reboot your device into CWM.
- Select "install zip from sdcard".
- Open the item "choose zip from sdcard".
- In the window that opens, find the file. It should be located at the bottom, immediately after the list of folders, if there are any of course.
- Confirm your choice using the "Yes" option.
- After the firmware is completed, return to the previous menu using the “++++++Go Back++++++” item


