Users modern smartphones They know that you can fully use all the functions of the device only if you are connected to high-speed Internet. Despite the development of 3G and 4G mobile Internet technologies, many prefer to use a Wi-Fi connection when possible to access the network. At the same time, situations often arise when the phone does not see Wi-Fi. We will look at why this happens and what to do to fix the problem in this article. But first, let's briefly dwell on the extremely interesting model a smartphone with which you will definitely never have problems accessing the Internet. This.
Briefly about Wileyfox smartphones
We decided to pay attention to this young promising brand for a number of reasons. The company entered the mobile gadgets market in October 2015. Thanks to the significant advantages that each model from the Wileyfox smartphone line has, the company managed to quickly gain not only the trust of users, but also attract interest from experts. These are functions and features such as:
- Work with two SIM cards;
- Support for 4G LTE mobile data networks;
- Stylish original design and high-quality materials used in the manufacture of the case;
- Powerful hardware and high quality components and elements;
- Loyal pricing policy.
The new brand was noticed and received support both in the market and among experts. The most important achievements of the company:
- In December 2015, Forbes magazine experts named the Wileyfox Swift smartphone of the year;
- The brand won first place at the British Mobile News Awards 2016 in the manufacturer of the year category;
- In October 2016, the authoritative online publication Hi-Tech Mail.ru, summing up the results, awarded the Wileyfox Spark+ model first place in the category “Best smartphone under 10,000 rubles.”
The device attracts attention with its original design and powerful filling. The stylish modern model has a fingerprint scanner and NFC module. Traditionally for modern smartphones, Wileyfox Swift 2 has Glonass, GPS and Assisted GPS navigation modules on board. High speed and performance are provided by a powerful 8-core Qualcomm processor Snapdragon 430 MSM8937 with an operating frequency of 1.4 GHz.
The model is equipped with 2 GB of RAM and 32 GB of internal memory. It is possible to install a microSDXC card up to 64 GB. The device received a 16-megapixel main camera and an 8-megapixel front camera module.
Most often, the problem of connecting a smartphone to wireless Wi-Fi Internet occurs when the distributing equipment is not a router, but a laptop. It is worth noting that, in fact, it does not matter which device “distributes” access. The connection principle does not change. The network is exactly the same as from the most ordinary router.
The only differences are that the router has a wider range of settings and parameters. Most often, the phone does not see the Wi-Fi network created on the laptop due to the fact that it was not organized correctly. Yes, when creating Wi-Fi The network on the laptop has the ability to connect like “computer to computer”. Your smartphone simply will not be able to recognize this type of network, since it is designed only to work with computers and laptops.
But if the network is organized by a router, you first need to look at its parameters, since they are configured in the router. The fact is that the Android operating system on which your smartphone runs is created with the expectation that the user practically does not have to configure anything. And if your phone does not see the Wi-Fi router, then most likely the problem is in the router or laptop that distributes the Internet.
There can be only four reasons why the phone does not see Wi-Fi:
- Error when entering the network password (security key);
- Incorrect router (router) settings;
- Router malfunction (software freeze);
- Error in Android OS.
The last reason is extremely rare, but you shouldn’t completely discount it. Now let's look at each of these reasons in more detail.
Often the phone cannot connect to a wireless Wi-Fi network because you enter the security key incorrectly. To ensure that all characters are entered correctly, check the “Show password” box when entering it. Check carefully that each character is entered correctly, taking into account the case and language of the key input. You are probably entering the wrong password simply because you forgot it. In this case, you need to connect to the router.
This can only be done through a desktop computer or laptop. To enter the router security settings, you need to enter the IP address of your router in the address bar on your computer. This information is contained in the user manual for the router and on its case. But even if you don’t know the address, the situation is not hopeless.

Just open the command line and run the IPCONFIG command, after which you will get all the information about the connections. In the window, find the line “Default gateway” - this is where the address needed to connect to the router is displayed. When you access it in the address bar of your browser, you will need to log in. By default, the login and password are set to “admin”.
After you connect to the router's management interface, you need to find the security settings menu. Depending on the router model, this menu may be in different places, but most often it is located in the advanced settings. In the “Encryption key” line you will find the password to enter the wireless network. It is this that must be entered when connecting the smartphone to Wi-Fi.
Router settings
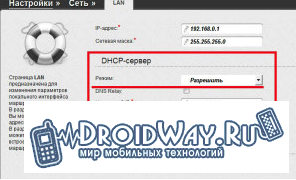
The inability of a mobile gadget to connect to a wireless network can also be explained by errors in the router settings. The problem may be that modern routers use DHCP technology, which means that connection information is sent to the smartphone automatically. This is what all Android devices rely on - they wait for an IP address to connect. But if the address is not sent, connection becomes impossible.
The problem may be that this function disabled on the router. To check this and enable it, you also need to go into your router settings. The option we need is in the “LAN” section. In this section you need to enable DHCP by selecting the “Allow” option. After this, you need to reboot the router and try to connect to the network using your phone.
The phone may not see or not connect to the network because the router is frozen. Despite this failure, your laptop or computer can continue to work and connect to the Internet without any problems. A router malfunction may simply result in DHCP being stuck. As a result, it turns out that previously connected devices to the router work normally, but new ones cannot connect. Similar problems may occur with other router options.

To eliminate this possibility and fix the problem, just reboot the router. To do this, you don’t need to go into its settings, and you don’t even need a laptop or computer. Just turn off the power to the router and turn it on again after a few minutes. After that, try again to connect to the network from your smartphone. It is worth noting that such problems are typical not only for budget routers. It’s just that on expensive models such errors occur less frequently.
Android OS malfunction
If, after you have checked all the probable reasons for the failure of the router, but you cannot connect to the network, there is one last option left for why the phone does not see Wi-Fi - a malfunction in the operating system of the smartphone itself. Mobile gadgets have wireless adapters, which can give errors or freeze. In the case of a telephone, no settings are provided for the user. Just try restarting your smartphone.
Conclusion
If, after doing all the above operations, you still cannot connect to the network with your phone, the problem probably lies deeper. Try connecting to a different wireless network. If you also experience failure, you need to seek help from a service center to repair your phone model.
Why can't my Android phone see the WiFi network from my laptop? This question often worries users. It is worth noting that the result is the same network as using a regular router. Therefore, the principle of its operation and configuration is practically the same.
The only difference is that the router has more extensive and flexible parameters. In addition, you should know that you can organize an access point on a laptop in different ways. One of them is organizing a “Computer-to-Computer” connection. In this case, your phone or tablet simply will not detect the network, since it is designed exclusively for computers.
There can be many reasons for this. If you organized a network using a router, then first of all you will need to enter the settings, since all settings are made exclusively in the router. How does a Wi-Fi router work? If the network was created on a laptop, then you should go to the operating system settings. As you can see, you don’t need to configure anything on the tablet or smartphone itself.
The fact is that the Android operating system is made in such a way that all the settings have already been entered and users simply have nothing to configure. Everything is extremely simple. Therefore, we will look for the cause of the error directly at the access point itself (in the router or laptop). So, let's look at both options in more detail.
Why Android may not see the WiFi network: Video
Setting up the router
Very often Android does not see the WiFi network due to the router. So let's go into the router menu and make all the necessary adjustments. To do this, connect to an access point on your laptop or desktop PC. Open your favorite browser and enter the router's IP in the address bar. How to recognize him. As a rule, there is a sticker on the device itself with all the data. But if she's not there, necessary information can be found in the user manual. If there are no instructions, then we do the following.
Press two Windows keys + R at the same time. In the window that appears, write CMD and click “OK”. So we launched command line. You can see it here detailed information about the network to which the computer is connected. To do this, write ipconfig and press "Enter". After this you will see the connection information. Here you need to find the line “Default Gateway”. This is the address we need to enter in the browser. As a rule, most routers have the following IP – 192.168.0.1 (but there are also 192.168.1.1) It all depends on the model.
How to easily find out the IP address of a WiFi router: Video
So, after we have entered the desired address, press “Enter”. After this, we need to enter a username and password. Here we write admin, admin respectively. If you changed these values, then enter your data.
That's it, we got into the router parameters. The interface may vary depending on the model and brand of device. We will analyze further steps using the D-LinkDir-615 router as an example. But it is worth noting that all access points operate on the same principle, so their configuration is practically the same. The only difference is in the design of the menu and the names of some sections.
First of all, click on the “Advanced settings” button at the bottom of the screen. After this, additional sections will appear. We are interested in the item called “WiFi”. Here we enter the main settings.
First, let's check if the wireless connection is turned on. There should be a checkmark in the line “Enable wireless connection”. If it’s not there, then install it, save the settings and check if Android finds our network.
If the problem is not solved, then we move on. Now you should check the channel. Try changing it. Here it is recommended to set the value to “Auto” ( automatic detection). A little lower you need to select the network mode. It is recommended to select 802.11 BGNmixed from the list. This is a mixed mode in which devices that support different WiFi communication standards can connect to the network.
Now find the line “Hide access point”. This feature hides your network. Because of this, devices simply cannot detect it. In this case, the connection to the router must be created manually. If there is a checkmark here, uncheck it, save the settings, restart the router and try connecting your smartphone or tablet to the network again. This completes the router setup.
Articles on the topic
Why Android won't connect to Wi-Fi: Video
Setting up a virtual access point on a laptop for network discovery
A very common question is why Android does not see the WiFi network created on a laptop.
The fact is that simply creating a virtual access point is not enough. After this, you should open access to it and enable detection.
This is done simply. First, we need to log into the network control center. To open the tool we need, find the network icon in the tray (in the lower right corner of the desktop). Right-click on it and select the required item from the menu that appears.
A menu will open in which you should enter the “Change advanced sharing settings” item. Here you just need to enable network discovery and allow file and printer sharing. In addition, at the very bottom of the menu you need to disable network access with password protection.
If you use to create a wireless network on your laptop Virtual application Router Plus, then in more detail about its configuration
The problem when a mobile device (smartphone, tablet) cannot find a wi-fi network and, accordingly, connect to it, is not uncommon. Devices running the Android operating system are no exception. If android does not see wi-fi, what do they do? b? Let's look at why such a problem may arise. Does the mobile device see your network specifically, but does it see other networks (neighbors, cafes, etc.), or does it not see any network?
- Check the router through which you are connecting to the Internet (perhaps it is frozen and needs to be rebooted, or it is simply not turned on). It is possible that your mobile device with Android OS is trying to connect and the connection process stops at the stage of obtaining an IP address. In this case, the problem can be solved by rebooting the router.
- Android does not see your wi-fi network, but it catches other networks. In this situation, reconfiguring the access point (router) can help you. You need to go to the settings of the wi-fi access point. Finding the section "Wireless Network Settings", then select the item "Enable Auto Channel Selection".If there is a checkmark next to this item, you need to uncheck it. After this, the field will become active "Wireless Channel" with drop-down lists where you can select default options.
- If android still does not see wi fi, what should I do then? Try resetting your mobile device (smartphone, tablet) to factory settings. If this option does not work, then you should contact a service workshop. It is possible that your device's antenna or built-in module that provides wi-fi functionality is damaged.
If you came to this page, then most likely your phone has stopped seeing the Wi-Fi network, or networks. This could be a home network, somewhere at a party, a public wireless network, etc. The problem is that the network we need does not appear in the list of available ones on the phone. He simply doesn’t find it, doesn’t see it, and accordingly it’s impossible to connect to such a network. There are often cases when a mobile device does not find a specific Wi-Fi network. Which, for example, a laptop sees and connects without problems. Or it may be that the phone does not find any networks, but other devices see them and work perfectly with them.
In this article I will try to collect all the most popular reasons and solutions that can help you solve this problem. As usual, it is first advisable to find out what the problem is: in the mobile phone, or Wi-Fi router e. If there is a problem with the Wi-Fi network at home, then we have a better chance of fixing everything, since we have access to the router itself. If this is someone else's network, then it is unlikely that anything will be done.
Basically, it doesn't make much difference on which device you have the problem. It is clear that this is most likely an Android or iOS phone. Well, maybe Windows Mobile. Since this problem can hardly be solved in the settings of the mobile device itself, it doesn’t matter what device you have. Same thing with the router.
Note! We will look into the problem when the phone doesn't see at all the Wi-Fi network we need, or no network at all. And not when there is a problem with the connection, or access to the Internet after connecting.
I have already written separate articles on Android and iOS devices:
The phone does not see the Wi-Fi router: possible reasons
1 Disable/enable Wi-Fi, restart your phone and router. To get started, just go to your phone’s settings and turn off Wi-Fi. I think everyone knows how to do this.
Then turn it back on.
Reboot the phone:
- On Android, just press and hold the power button, then select "Restart". Depending on the manufacturer and version of Android, the steps may vary slightly.
- On an iPhone, you need to press and hold the Home button and the Power button. The phone will reboot.
Reboot the router. If you have access to it. It is enough to turn off the power for a minute and turn on the router again. You can perform several reboots in a row. You can read more details.
2 Let's determine what the reason is.
Check all three points:
- If your phone doesn’t see any Wi-Fi networks, but they exist and other devices find them, then it’s clear that the problem is specifically with your smartphone. All I can advise is to reboot it and remove the case from it. If he is. If this doesn't help, you can try doing a full reset. If this does not help, you will have to take the device to a service center.
- When a device does not find one network, the first thing you need to do is check whether other devices can see it. If they don’t see it, then most likely the problem is on the router’s side. First we reboot it. If this does not help, then see the article:.
- If other devices find the Wi-Fi network, but your phone does not, but still sees other networks, then most likely the problem is in the router settings. As a rule, changing the wireless network channel and region helps. Below I will talk about this in more detail.
3 Change the router settings.
You need to go into the settings of your router, go to the section with, and try to set a static wireless network channel and a different region. You can also set the channel width to 20 MHz. It's better to take turns.
On TP-Link routers it looks like this:

More details in the article: . You can experiment with the channel and region. For example, set the region to USA. If you had a static channel set in your settings, then set it to "Auto".
Other problems with detecting Wi-Fi networks
I also noticed that people often write that the phone does not see the laptop’s Wi-Fi. As I understand it, the problem occurs when distributing the Internet from a laptop or PC. In this case, I advise you to first make sure that the laptop distributes a wireless network. For example, view from other devices. You may have started the access point incorrectly. This is where the article will come in handy. Bring your phone closer to your computer.
The next case is when problems with Wi-Fi appear after the phone has been repaired. For example, after replacing the battery, screen, glass, case, etc. In such cases, I advise you to immediately take the phone to the workshop where it was repaired. Since the master most likely did not connect the antenna, or he himself Wi-Fi module.
Well, there is no need to rule out hardware failure. Everything breaks down, and the module that is responsible for connecting to Wi-Fi is no exception.
As usual, you can leave your question in the comments, or share useful information on this topic. I am always happy to answer your questions and grateful for additions to the article.
Nowadays, more and more often, to access the Internet, they use not a computer or laptop, but mobile gadgets, such as a tablet or smartphone. And there is an explanation for this - most of the Internet is used to visit sites, versions of which are designed specifically for small screens (social networks VKontakte, Facebook, Odnoklassniki, Instagram), and you can’t put a laptop in your pocket. It’s good when a smartphone connects to the network via a 3G or GPRS connection, then it does not require additional equipment, but if through a wired provider (for example ADSL or a local network with shared access to the Internet), then the mobile phone first needs to connect to the router, and sometimes the router does not sees the phone or another error is displayed, solutions for which will be discussed further.
By the way, mobile devices have several modes of accessing the Internet, some of which are for distributing it to other connected devices (access point mode).
Smartphone hotspot mode
There is also a 3G modem mode, in which the smartphone connects to the computer using USB cable, and thus the computer gains access to the network via a 3G connection.
But this article will discuss the mode of connecting a smartphone to a wireless Wi-Fi router, and in rare cases the problems associated with this.
Connecting your phone to the router
In order to successfully combine into computer network phone with a router, the first thing you need to do is make sure that the router is turned on, the Wi-Fi module is active, and the WPS function is enabled (if available).


Found Wi-Fi networks
If the network is password protected, a window will open in which you must enter that password.
The password is entered only once, the phone remembers it and does not require entry during subsequent connections.
If there are no errors, the “Connected” status will appear under the network name. That's it, the phone is connected to the router's wireless network.
If you can't connect
But everything is not always so easy and simple, and for a number of reasons you cannot connect to the network.
Let's look at the most common cases:
- 1. In the router settings, check the “Hide SSID” checkbox.

Hiding a Wi-Fi network
If a ban is set, the router does not broadcast the name of the network, and to connect to it you need to enter the network name manually in your smartphone;
- 2. Standards do not match. For example, a router operates in the IEEE 802.11g 2.4 GHz standard, and a smartphone operates in the IEEE 802.11n 5 GHz standard. In this case, they will not be able to work in pairs; the standards must either match or be compatible;
- 3. The router settings may have a limit on the number of subscribers you can connect, and your smartphone simply turns out to be superfluous.

Limiting the number of subscribers
- 4. And, as practice shows, a fairly common reason is simply the router freezing. Turn it off and on again, it may help, but it won't make it worse. In this case, try updating the router firmware to a more stable one.
Third party software
We looked at how to connect a phone to a router without help, only using the phone’s own operating system. But there are programs aimed at helping in this matter. Let's give an example of one of these.
Appearance of the program
The program is called WeFi, you can download it on the program’s official website for free: http://www.wefi.com/download/
I am very pleased with the multi-platform nature of the program. We select the operating system of our smartphone and download the program to the computer, and then to the phone.

Selecting an operating system
For example, select the Android version. After installation on the smartphone, launch the application and see the initial window.

Initial program window
A big plus of this program is its funny animation. The little man at the bottom of the screen is frankly happy when he can connect to the Wi-Fi network without any problems.
But, nevertheless, the purpose of the program is somewhat different, namely to facilitate connection, and WeFi copes with this task perfectly.
Connecting the program
One of the main features of the program is automatic connection to the network with the most highest level signal. Of course, it can be configured for a specific network, but still the program is designed specifically for automation. The only thing is that you will have to enter the network password once, but without this there is no way.
Also very useful feature, as continuation of Wi-Fi activity after the smartphone goes into sleep mode.

Setting up the program
The only small drawback of the program is the absence of a blacklist; in some cases it may be needed (for example, in public places with paid but not blocked access).
Screenshots:
Description:
So, what to do if this unfortunate inscription appears? There are several reasons for this unpleasant situation and options for getting out of it.
Sometimes the phone does not connect to wifi and says wpa2 protection is saved. This can happen both when trying to connect to a public network or to a home one. This mostly applies to Android devices. This can be done equally by tablets and smartphones.
So, what to do if this unfortunate inscription appears? There are several reasons for this unpleasant situation and options for getting out of it.
Let's start by rebooting the router
1. Select the correct region. To do this, go to the "Wireless" tab and in the "Region" line, select the name of your country and save.
2. Check the wireless network password. Before changing your password, try connecting again. To do this, click on your network and delete it. Then click on the network again, enter the password, make sure it is correct and try to connect.
3. Check the Wi-Fi network operating mode in the router settings. This may be the main cause of the problem. Your tablet or smartphone may simply not support the operating mode of this router. Check whether the device will work with other parameters, remembering to restart the router and disconnect and connect Wi-Fi on your smartphone or tablet after each change you make.
4. Check the security type and encryption type, change the router password in the settings. You need to set the following: WPA/WPA2 – Personal, WPA-PSK version, AES encryption. The PSK password must consist of eight digits. Then we save the new settings, reboot the router and disconnect and reconnect the phone. Don't forget to do the same on other devices running on the same wireless network.
5. Change the working Wi-Fi channel. Of course, this rarely happens, but it’s worth trying to experiment with the channels to be one hundred percent sure.
6. Change the width of the connection channel. To do this, you need to go to the router settings. In the “wireless network” tab, change the value opposite the “channel width” line, save the changes and reboot the device.
In conclusion, answering the question why the Android phone does not connect to wifi, writes saved protected, it is worth noting this can be like technical problems, as well as a number of errors associated with forgetfulness or inattention of users. There is an opinion that the reason lies in the Android OS itself, or rather in small flaws that cause various unpleasant moments. But if it happens that there is a problem with your Wi-Fi connection, you can successfully deal with it using these tips.
Sometimes a problem arises such as not being able to connect Android to a wireless point. How to solve this problem? Find out in this article!
And so you came to visit or are in a cafe, or perhaps you bought a new router and configured it to distribute the Internet via WI-FI, but your Android smartphone or tablet does not want to connect to the network or does not even see it! Don't worry, there is a way out!
Possible problems and solutions
1. If Android sees the network, but cannot connect to it, make sure that you enter correct password!
2. If Android sees the network, but cannot connect to it - perhaps Android does not support protection type installed in the router, change the type of protection (read router settings below)
3. If Android does not see the network, make sure that WI-FI network is functioning, reboot the router (on/off)
4. If Android does not see the network, perhaps Android does not support WI-FI standard
5. If Android sees the network, but cannot connect to it, restart Android and the router
6. If Android sees the network, but cannot connect to it, install a special application on the device from the Google Play store - Wi-Fi Fixer. After installation, restart Android and if the Wi-Fi Fixer application does not start, launch it yourself, then try connecting to the access point (you do not need to enter any settings into the application)
7. If Android sees the network, but cannot connect to it, although the password is entered correctly - perhaps Android does not support WI-FI standard on which the router is running (read below for setting up the router)
8. If you have custom firmware installed on your Android tablet or smartphone, then this may be the problem, reinstall it to the official one
9. Reverse advice to the previous one, if installed official firmware, then you should change it to a custom one (for example, CyanogenMod), since it’s possible that the WI-FI driver has already been updated there
12. Perhaps you have a Dlink router?
Setting up the router
First of all, you need to get into the router settings.
Go to router settings
To do this, it is better to use a computer, as well as the FireFox browser or Internet Explorer. Let's open one of them. Next, you need to find out the entry address, which can be found by knowing the network gateway.

This address must be entered in address bar and move on. Next, you will be asked to enter your username and password, which, as often happens, is located on the bottom of the router case.
Setting up WI-FI
1. First of all, if Android does not connect, you should switch the WI-FI channel to auto
2. Change the WI-FI transmission mode standard to Mix or G only

3. It is also worth checking the number of allowed device connections to the wireless network

4. Try changing the network security method, change the encryption type from open to WPA

5. Another point worth paying attention to is the enabled DHCP server, which allows you to give internal IP addresses on the network. If you disable the DHCP server, you may experience problems connecting to WI-FI and not only with Android devices!

6. Make sure that the MAC filter is not installed in the settings!
A MAC address is a personal (individual) serial number of a network device.Depending on the router, there may be white lists of MAC addresses or black lists.
Blacklisted- devices that are prohibited from entering the network, but other devices can.
White list- only those devices that are in this list and no other devices can connect.
To find out the personal MAC address of Android you need to go to
Settings -> About smartphone (Tablet) -> General information
Try disabling the MAC address filter to resolve the connection problem.

If after all the data Android settings does not connect to WI-FI, then you should update the firmware either on your smartphone or tablet, as well as on the router, in rare cases there is simply incompatibility, then nothing can be done!
The connection process is accompanied by the following comments from the operating system:
- Connection;
- Authentication;
- Saved, WPA protection
When unsuccessful authentication of the user-provided password occurs authentication error.
First of all it's worth re-enter your password manually and try to establish a connection with the access point. After making changes to the router settings, you must delete network from the memory of an Android device, which can “remember” the previous identifier. This is done quite simply:
- open on your smartphone Wi-Fi settings and find the desired network;
- then press on it with your finger and select the item that appears “ Forget»;
Even when choosing " Change» authentication problems are not always solved, so the best solution will reset all settings.
The problem of connecting old devices is solved regime change. It comes in three types:
- b– up to 11 Mbit/s;
- g– up to 54 Mbit/s;
- n– up to 600 Mbit/s.
Old devices does not work in 11bgn mode it is mixed, since they do not support the last one - n. The issue is being resolved installation 11bg mixed, after which reconnection is made without errors.
Infinitely obtaining an IP address
This problem may be due to the fact that the router disabled DHCP server parameter. Moreover, such a situation sometimes turns out to be simply consequence imperfect operating system.
The location of the parameter in the router interface may differ depending on the manufacturer. TP-Link, for example, takes it out a separate item main navigation menu.

Most quick way which is worth trying is reboot router. Then it will reset all its parameters to default values and the DHCP server should turn on automatically.
If the connection is still unavailable, most likely the problem lies directly in the device on Android. To solve it you need:

After the above changes, the connection should work properly.
Problems with the router
Sometimes a smartphone can simply do not see the desired network. This is often due to settings channel - a certain subfrequency, which is a kind of road, a route between the device and the router.
The router can support up to 13 such “roads”, and some mobile devices only 10. Thus, if, for example, channel 11 is set in the router settings, the smartphone will simply does not see this “road”, and therefore ignores this access point.
Changing this parameter is not difficult. For example, in devices manufactured by TP-Link this is done as follows:

When there are a large number of access points in the environment, it is better to set the “ Auto" Then the router will independently select a free one from the available channels. If there are not many networks around, it is worth choosing a specific channel, which will allow speed up the process traffic exchange. To solve the problem with connecting an Android device, you need to select a channel within 10.
Recently I helped one of my blog readers solve a problem with a wireless network. The gist of it was that his phone did not connect to the WiFi router. Moreover, it was not just some cheap Chinese Lenovo, but an expensive (albeit also Chinese) fashion iPhone 6S. We spent a lot of time, tried many different options and, in the end, found a solution to the problem. Looking ahead, I will say that the “root of evil” was the incorrect configuration of the home router.
After all this, I decided to combine all our actions into one universal instruction - what to do if a tablet or phone does not connect to Wi-Fi, does not see the network, or sees it but cannot connect to it. Go.
1. The phone does not see the WiFi network
The most common reason is a mismatch between the region settings for the router and the tablet or phone. The fact is that almost all home routers and access points that are sold in Russia have the “Russia” region set by default, which uses 13 radio frequency channels. But phones, especially those brought from abroad, have a different region by default, which may have 10 or 11 channels. This is exactly the problem that most often occurs with iPhone smartphones and iPad tablets that came to us from the USA. The funny thing is that you can connect to the router, enjoy the benefits of a wireless network for some time, and one day discover that your phone does not see the router’s WiFi network. The solution is very simple. First, reboot your router. With a high degree of probability, after a restart it will occupy another radio channel and everything will work fine again. To avoid falling into the trap again, you can go to the router’s settings by entering its IP (or) in the address bar of the browser. After this, you need to go to the main WiFi settings:

In the “Region” field, try replacing “Russia” with the value “USA”:
You can do without changing the region. In the “Channel” list, replace “Auto” with the value 1 or 6:

As a rule, after this, iPhones no longer lose the wireless network and everything works like clockwork.
2. Can’t connect to Wi-Fi
In this case, usually all devices see the wireless network without problems, but when they try to connect to it, they are simply rejected. There are several options here:
- Endless connection
This usually happens when the communication standards used on the devices do not match. For example, the router is forced to use 802.11n, but the smartphone uses 802.11b or 802.11g. Or vice versa. Therefore, it is best to set the router to a mixed type - 802.11bgn.

- Infinite authorization
This very trouble can happen if the password on the router is changed, but the old one remains in the smartphone’s memory, which is why it cannot connect to the WiFi network. Try to find it in the list of available ones, click on it and select the “Delete this network” option in the menu that appears.

After that, select again from the list and try to connect.
It doesn’t help - then go to the security settings of the router and try setting the “WPA2-PSK” standard with “AES” encryption.

If this does not help, completely disable security and observe how the connection proceeds.
- The message “Obtaining an IP address” appears
This usually happens when the DHCP server is disabled in the router settings. We go to the web configurator, find the LAN or DHCP section and make sure that the DHCP server item is set to “Enable”.

Sometimes you may get stuck in obtaining an IP address due to the fact that a static IP address is registered in the Wi-Fi settings on the phone or tablet itself. To check this, open the “Settings” -> “WiFi” section and click on the connected network. In the menu that appears, select “Change”. A window like this will open in which you need to check the “Advanced” box. Next, make sure that the “IP address” field contains the value “DHCP”.

3. There is a connection, but no Internet
Start by checking whether other phones, tablets or laptops work through this Wi-Fi. Are they working? Then we go into our device, namely “Settings”>>>”Wi-Fi”>>>”Change network”:

We check whether work through a proxy server is enabled.
This option is also possible, although very, very rare, when an incorrect or non-working DNS server is assigned when connecting. It’s easy to check - in your phone, click on the desired network, select “Change” in the menu, check the “Advanced” box, “Manual” IP address and enter the full IP address from the router’s subnet, mask and gateway. But in the DNS servers field we enter the following values:
8.8.8.8 77.88.8.8
On an Android phone or tablet it looks like this:

These are public DNS from Google and Yandex. They are 100% working, which will completely eliminate this option.
If none of the above methods help, then try this. Take your device and check it on another wireless network - from a friend, acquaintance or comrade. If there the phone or tablet does not connect to WiFi router too, then the problem is clearly in your device and it needs to be taken in for repair.
Quite often, Android users are faced with the fact that their smartphone or tablet does not connect to wifi, it says “saved”, but there is no connection. Alternatively, it should. Most often, this situation occurs due to malfunctions or errors. Before changing settings on your phone or tablet, you need to make sure that in your router:
- the correct region is set;
- the correct time is set - time desynchronization will not allow the device to create a timestamp;
- the wireless signal operating mode is configured;
- The encryption type is specified and supported by the device.

To make sure that you are entering the correct connection data, you can view the saved parameters in the router settings. To do this, from any connected device you need to go to the browser, enter 192.168.1.0 or 192.168.1.1 into the address bar (as a rule, it is registered on the router itself). In the menu that opens, find the SSID and PSK lines.

The reason why an Android smartphone does not connect to WiFi and says “Saved” may be a change in the encryption type, SSID or password.
What to do if, when connecting to WiFi, it says “Saved”, but there is no network
Regardless of whether the device is a tablet or a smartphone, the troubleshooting methods are the same:
- Check the router settings. What to pay attention to was described above.
- Reboot the router. Even if the router settings are correct, rebooting can help solve the problem: the connection will appear and the system will stop reporting the error.

- Re-create the connection on your phone or tablet. To do this, you will need to delete old data.
In general, the last point, when it does not connect to Wi-Fi with WPA2 protection, but writes saved, is quite simple:

- Delete. You need to go to Settings, click on the wireless connections tab (depending on the version, the name may differ). Having selected the desired connection, hold your finger on it and select delete in the menu that appears.
- Reboot wireless module devices. After this, all available networks will be searched.
- Pass authentication. When a network is detected, you will need to re-enter the password. If the network is hidden, then you can add the SSID yourself. To do this, go to Settings – Wireless connections – Additional settings– Add new. In the window that appears, you need to write the name (SSID), security protocol and password.
These instructions should help if WiFi does not connect on your phone and it says “Saved” and “Without network access.”
Doesn't detect, turns off, doesn't pick up wi-fi.
Many users encounter a problem when phone or tablet on Android based starts to be capricious. It seems that it didn’t fall anywhere and wasn’t “watered” with anything, but it doesn’t work as it should.
For example, the device has problems with reception with wi-fi. The reason for this may be:
1st: Software glitch - i.e. the problem is the crash software
2nd: Hardware failure- i.e. the problem is in the hardware (i.e., replacement or restoration of spare parts for the gadget is required)
However, do not rush to get upset - in 90% of cases there are problems wi-fi smartphone or Android tablet is to blame software glitch which you can easily fix on your own.
Fixing a software glitch:
Method 1. Quite simple - go to "settings", find there « backup and reset", in which you choose full reset settings with deletion of all data. Be careful, using this method is often effective, but it entails deleting all photos, contacts, passwords, music, games, videos and, in general, all information stored on your smartphone e or tablet e. Therefore, first save everything you need by connecting the gadget to your computer. If this method does not suit you, or if after this the problem is not resolved, see Method 2.
Method 2.
Based on solving problems with communication and network reception phone number and tablets based on Android by introducing additional software. Utilities that control all processes inside gadgets. Today, there are quite a lot of them, however, the fewer functions an application contains, the more effective it is, as a rule. It best controls the functions of a system that is small and easy to handle, free utility for Android devices. Download the app from Google Play and watch it additional options in the description it is possible . After installing the application, all that remains is to launch it. Further, in principle, nothing more is required from you. The application will take full control of the device's functions. (By the way, among other things, the gadget will begin to charge 20% faster, and its performance will also increase significantly, which will affect the loading speed and operation of all applications, games, and the system as a whole. On average, after scanning, the system runs at 50% faster.)
- Also, to achieve maximum data exchange speed over the Internet, it is recommended to install on your Android device high speed browser Yandex Browser You can download it from Google Play.
Method 3.
Changing the device software, or as it is also called "re firmware ".This method, as a rule, requires certain skills and can be resolved by contacting the Service Center. To carry out this task yourself, you need to contact the website of the manufacturer of your device, download the utilities necessary for flashing the firmware and the firmware itself, and then reinstall it on your gadget.
If none of the methods brings results, unfortunately, you will have to contact Service center For repairing your tablet a or smartphone a.
Problems with WI-FI on your smartphone or Android tablet./ The phone or tablet does not detect, turns off, does not pick up wi-fi.
A very common situation: a user tries to connect to Wi-Fi from his phone, but nothing works. After reading the information below, you will learn why this is happening and how to solve the problem.
Initial phone check
Manufacturers are actively working to improve the stability of mobile phones. operating systems, but periodically any program crashes. That is why it is recommended to start solving the problem by checking the functionality of the phone. For Android, iOS and Windows Phone ( Windows Mobile) the recommendations in this case are identical. Follow the sequence below.1. Restart your device and try connecting to Wi-Fi again.
2. Evaluate the number of connection signal strength indicators. If there are less than 3, try moving closer to the router or other source you are using wireless internet to improve connection quality.
3. Make sure Battery Saver mode is turned off. If necessary, connect the network adapter.
4. Turn off Bluetooth. Wireless connections may operate in the same range, which causes interference.
5. Turn off Airplane mode, if active.
6. Try to activate access to information about your location and connect to Wi-Fi - the legislation of some countries blocks the connection via wireless network when the mentioned option is inactive.
If the WiFi connection worked previously
If you have successfully used the currently problematic network in the past, remove this connection from your phone's memory. To do this, go to the list of networks, click on the problematic connection for a few seconds (until the context menu) and delete the connection.If all else fails, try connecting from your phone to any other available connection. Failure in this case will most likely indicate a breakdown of the radio module - only service center employees will help correct the situation.
Check if the connection is working. To do this, try connecting to it using any other device that has Wi-Fi functionality. If the connection does not work, change the router settings.
Important note! The procedure for entering the router settings varies depending on the manufacturer and model of the equipment. In most cases, to gain access you need to enter the address 192.168.0.0 or 192.168.0.1 into the address bar of your browser. The standard login and password are admin. If this doesn’t work, check the manufacturer’s instructions for the information relevant to your router.
First, try simply rebooting the router - quite often they freeze, which is why access to the Internet is blocked.
The further procedure is as follows.
First, you must ensure that the security key you entered is correct. Try entering the password to connect to the selected access point again, but more carefully, with the “Display symbols” (show password) option activated.
If you don't remember the password, check it in the router settings.
As an example, the order of interaction with D-Link router. In your case, everything will be almost the same; minor changes may only affect the interface, menu item names and other little things.
Once on the router settings page, do the following:
click the “Advanced settings” button;
in the Wi-Fi window, open the “Security Settings” link;
in the “PSK encryption key” line, look at the password and make sure that this is the combination you enter when trying to connect to Wi-Fi from your phone.

Secondly, make sure your router settings are correct - you need to check if DHCP technology is enabled. If it is turned off, the phone will not be able to obtain an IP address, which is why the connection will not work.
On the router settings page, click “Advanced settings” again and in the “Network” window, find the “LAN” category.

Enable DHCP if the function is disabled by changing the “Mode” line to the “Allow” state.
Save the changes, restart the router and try connecting to Wi-Fi from your phone.
If this does not help, there are 3 options left:
call the provider’s support service and find out whether the Internet works at all and whether any changes have been made to the connection settings;
submit your phone for repair;
have your Internet router repaired/replaced.
If our instructions did not help solve the problem, then write in the comments and we will definitely look into your problem.


