Almost every user has, if not encountered, then certainly heard about such a thing as “ blue screen death of Windows." This topic is extensive, so read carefully! In the article we will discuss what a blue screen of death is, what to do in this situation, and of course, I will try to show everything clearly. The name for this phenomenon was invented just right - frightening and memorable. In today's article I will consider in detail the causes of the blue screen of death, as well as possible solutions this problem.
Blue screen of death - serious problem, which drives PC users into a stupor. Before you start reading the article, I recommend that you put all your affairs aside and so that no one distracts you. If you understand the essence of the occurrence and solution to this problem, then in practice it will be much easier. I have been approached with this problem more than once, and there have even been situations when in their practice administrators did not know what to do when a blue screen occurred. Instead, they told users what they needed to replace. system unit, fully. WHAT? If you were told so, then take the noodles off your ears and read the article to the end.
What is this error
As a result of the problem, operating system(OS), being unable to correct the error on its own, urgently shuts down. Naturally, no user data is saved ( open documents and so on.). The only thing Windows manages to do is write information in the log and create a dump file, if the settings indicate the creation of this file when such errors occur.
To avoid unfair accusations against Windows, I’ll immediately make a disclaimer: the blue screen of death does not appear without serious reasons, and shutting down in such a situation is the only way out.
The blue screen of death looks like this:

From the screenshot, I think it’s clear where the word “blue” came from in the title. As for “death,” this means the death of the operating system, that is, its inevitable reboot, and in some cases, reinstallation. In practice, most causes of blue screens of death can be successfully eliminated without reinstalling the OS, provided, of course, that the response is timely and correct. The most important thing is to understand where the legs come from. I mean that if you don’t know why the blue screen of death appears, then it’s difficult to solve the problem.
What does Windows tell us on the terrible blue screen of death?
To make it easier to understand, I will conditionally divide it into several blocks and describe each one separately (for those who know English language, understanding most of it on your own will not be difficult).
1. Here Windows reports that a problem has been found, and to prevent damage to the computer, it was necessary to urgently shut down the system.
2. The type of error is indicated here. There are a limited number of them, and for each such error, information can be easily found on the Internet.
3. In this part, the OS reports possible reasons occurrence of the problem, and also gives some recommendations for troubleshooting.

4. In the section called “Technical information” the error code is indicated, and it is also possible to indicate the name of the problematic driver (more details below).
After viewing the blue screen, you should understand what the error is or find out about the file that may be listed on the screen.
Causes of Blue Screen of Death
The Blue Screen of Death can appear for various reasons.
The most common reason is drivers. This includes drivers that are incompatible with each other or with the operating system, and other failures associated with them.
I have a little story for this case, this information not only so that you honor it and forget!!! With this story, you will learn how to solve the Blue Screen of Death problem.
I once worked as an administrative assistant and maintained a fleet of 80 computers. Almost 20 computers experienced a blue screen of death from time to time. When I asked the administrator about the reasons for this misfortune, he just shrugged his shoulders and said that he didn’t understand what was going on at all (I think he just didn’t want to figure it out). After his answer, I became interested in finding the essence of the problem myself.
First of all, I looked at what error appeared on the screen, then wrote down on a piece of paper the error code and the name of the file that the blue screen of death pointed to. After wandering around the Internet a little, I found out that this file is used for Wi-Fi adapters. After that, I did a short walk around the problem computers and made sure that they were all really working on the network via Wi-Fi adapters.
Next, I decided to find out what drivers the administrator installs when connecting these devices. His answer left me stumped. It turned out that he installed the drivers that came with the equipment. After that, I spent 2 hours, but still found a topic that interested me on the Internet. It turned out that these particular devices are buggy with standard drivers.
It’s strange, because D-link is considered one of the best, but in reality it turns out that it supplies drivers for adapters that do not work with them. At that time, a topic with a similar problem had already been created on the d-link manufacturer’s forum. And for about 2 years now this problem exists for many users of these adapters.
To get out of our situation, it was decided to use other drivers (from other developers). We installed them on the problem computer and asked the user to be sure to notify us if a blue screen of death appears. Of course, I didn’t know which drivers to install instead of the official ones. After reading completely all the topics on the forum, I found a dozen reviews that tried a different driver (I don’t remember which one now) and this problem was solved for them.
A few days later he still didn’t call or visit us, which means that no more problems arose! After making sure that everything was fine with his computer, we installed this driver on all computers and users breathed a sigh of relief.
Problems with computer hardware.
Often problems with hardware are more of a consequence, but the cause may be overheating of components. This also includes equipment problems that occur independently, random access memory or hard drive.
Problems with programs.
The screen of death can be caused by antivirus applications and various emulators. Also, sometimes the blue screen of death is caused by viruses; this doesn’t happen often, but it also happens.
What do we have to do
First, you need to prepare in advance for potential problems. Windows is configured by default so that the screen of death appears for just a couple of seconds, after which the computer automatically restarts.
However, this does not give us the opportunity to have time to record error data, which does not suit us at all.
Note: If it does not reboot automatically, then use the “Power” button.
It will be enough for us to configure Windows so that it does not automatically reboot. Thus, we can understand why the blue screen of death appears. Since in this error you can read the error code or file that is to blame for the blue screen of death. After this, the Internet will help us. To set this up you need to do the following:
On Windows XP: “Start” - “Settings” - “Control Panel” - “System” - “Advanced” - “Boot and Recovery” - “Settings” - “System Failure”. In the window that appears, you need to uncheck the “Run automatic reboot", and in the "Write debugging information" block select "Small memory dump" and click the "OK" button.
In Windows Vista/7: “Start” – “Control Panel” – “System and Security” – “System” – “Advanced system settings”. In the window that appears, select the “Advanced” tab, the “Boot and Recovery” subsection, and click the “Options” button. All that remains is to uncheck “Perform automatic reboot”, enable a small memory dump and click “OK”.


You can also access this window by clicking right click mouse on “Computer” - select “Properties” - on the left click “Advanced system settings” - go to the “Advanced” tab - for me this method seems easier.
Secondly, when the blue “enemy” first appears, you need to write down the data from the blue screen on paper. This data can help in finding the cause of the problem.
Well, thirdly, let’s show you how to remove the blue screen of death.
You need to understand that the death screen appears much more often after some user action than on its own. Therefore, the first thing to do is to try to return the computer to the state in which it worked stably.
If no special manipulations were carried out with the computer, that is, you were just working, and suddenly “He” appeared, you will have to look for answers on the Internet. Since the most common cause of BSOD is drivers, the first priority is to find the name of the faulty driver.
If the information was indicated on the death screen itself, then in this case we only need to find a description of the error or problem that the driver caused. To do this, simply enter in any search engine the name of the known faulty file. This way we will find out what kind of file it is. For example, if this file is needed for the video card to work, then you need to remove the video card drivers and download a new one from the office. manufacturer's website.
Otherwise, the search must begin with the data that you have transcribed manually. Using this information, you can roughly navigate the possible causes. If we couldn’t find out anything useful, we move on to analyzing the memory dump.
Do not install various assemblies that were made by unknown authors. If your neighbor Uncle Vasya even advised you to install his assembly, then my advice to you is - DO NOT DO THAT! It is better to install a full-fledged original Windows distribution and you will be happy.
If problems with drivers have not been identified, you need to check the hardware components of the computer, which may be the cause of the blue screen of death. First of all, this is RAM, HDD or overheating of any system components (video card or processor). You can use the AIDA program to check the temperature.
If you think that the problem is with the hardware, then borrow this part from your friend from his computer and install it on yours. Once you are sure that this particular part is working unstable on your computer, you can then buy it in the store.
To test RAM, I recommend the MemTest86 program, and for hard checks disk Victoria program(I will describe a detailed discussion of the operation of these programs in separate articles). In addition, it wouldn’t hurt to full check for viruses by first updating the virus signature database.
Let me remind you that a dump is a file that is created when a problem occurs and contains detailed description the state of the system at the time the error occurred, and therefore can tell about the cause of the failure.
Let's imagine a situation where your friend has a blue screen of death. He does not understand what it is and why the blue screen of death appeared. Naturally, he turns off the computer and tries to find out from his friends what it was. Of course, he didn’t write anything down on the piece of paper, that is, he doesn’t know what was written, but as you already know, in order to solve this problem you need to know why the error appeared.
That's exactly what it's for special programs, with which you can find out what the reason was. Now, even if you are in another city, you know how you can help your friend. To view the contents of the dump, you can use programs Debugging Tools for Windows or BlueScreenView.
Let's use the BlueScreenView program as an example to figure out how to view dumps. Download the Russified program for a 32-bit system.
Now run the file “BlueScreenView.exe”.

If there are no lines at the top, then there were no failures on your computer.
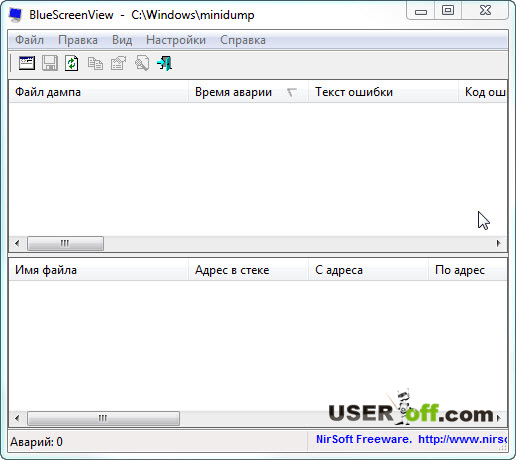
I didn't have the blue screen of death and so I had to borrow it ;). So now we have a dump that will help us understand how this program works.
To indicate the dump that I have, I need to make changes to the program. To do this, click “Settings” - “Advanced options” or “CRTL” + “O”.

Click “Browse” and indicate where our dump is located.
Note: If the program is on the problem computer, then nothing needs to be changed.

Now we see which files caused the error. Right-click on the line and select “Properties”.

Copy the “File Name” and go to any search engine to find out what kind of file it is.

After a couple of minutes we understand that this file is a video card driver. This is how in a few minutes you can understand the cause of the blue screen of death. But sometimes it takes an hour or more to find out the reasons.
I hope that now you will not have any difficulties in solving the blue screen of death problem.
See you soon!
A must-watch video, because there is something here that cannot be described in words:
Good afternoon, dear blog readers! We remember the good old days when the TV screen was on cathode ray tube suddenly changed color? The hand itself reached for the slipper, just like when hunting a cockroach. But even a modern monitor can suffer the same fate. I was once asked to figure out why the computer screen turned green. A very simple and quick diagnosis followed.
To carry out a quick diagnosis I needed:
- extra VGA wire
- laptop
First, it was necessary to disassemble the existing circuit - monitor + VGA cable + old desktop computer. Upon disassembly, it was discovered that the VGA cable was not a simple one, bought for three pennies in the transition, but with gold-plated contacts! Then the laptop was connected to the monitor first via VGA cable with gold-plated contacts, then through the cable that I brought. Which was without frills. The result was not long in coming, but... first things first. What potential reasons could there be for an unexpected change in the color of the monitor screen? Why is the screen color now green?
- problem with computer video card
- problem with the monitor
- there is a problem with the cable, for example, there is a break or rupture in its wires
- Problem in software settings colors
Let us briefly examine these hypotheses in order.
Video card problem
A malfunction in the graphics chip, for example, its partial failure, is the main reason that the video card “paints” the monitor screen a certain color at the output. Blade GPU we can cure it at home by warming it up with a special hairdryer. But, to be honest, I haven’t practiced this yet.
If you have on your computer discrete video card, then it must be inspected for swollen capacitors or other burnt parts. Swollen condensers can be replaced yourself if desired.
Overheating of the video card can lead to the result described. First, it is worth checking the temperature of the video card with the well-known GPU-Z program, so as not to waste something that is securely fastened with tape and works that way. We should not see numbers greater than 90 degrees in the GPU Temperature field. Once I saw the processor temperature about 100 degrees, and it continued to rise rapidly. I had to severely disconnect the computer from the network, otherwise it was in danger of self-digestion.

If it turns out that the temperature of the video card is really going through the roof, then it’s time to clean the inside of the computer using a vacuum cleaner or compressor, then, if necessary, check the functionality of the cooler on the video card and replace the thermal paste underneath it.
You can also damage the connector on the video card, especially if you pull the cable too hard. This can be checked by slightly shaking the connector itself. If it does not stay in place like a glove, then this may well be the reason for the monitor screen to turn a certain color.
The video card connector on the motherboard could become unsoldered during its life. If, when the video card is slightly shaken in the motherboard connector, something happens on the monitor - the screen tint changes, artifacts appear or disappear - then all this clearly indicates a problem with the connector on the motherboard. It is treated by re-soldering it. Or sending the motherboard to service center.
Finally, the video card drivers could fail. This should be checked last if we suspect a hardware problem, but we must keep this option in mind. Download from the video card manufacturer's website fresh drivers and install them. I hope it doesn't fall out for you!
Problems with the monitor itself
The screen color may have turned green or some other color due to a malfunction of the monitor itself. If the screen of your LCD monitor is painted in warm colors, then most likely the backlights are low. The only solution is to replace the burnt out lamp with a new one.
But still, the matrix, and not the backlight, is responsible for the color, so its malfunction leads to incorrect color rendition of the monitor. In particular, the screen may turn a certain color. Only replacing it will help.
Among the relatively light options is damage to the matrix cable. It is quite possible to replace it with another one. It’s easy to find out what gives the screen a reddish tint—the cable or the backlight—just remove the cable going to it from the matrix and turn on the monitor. If the backlight is to blame, then the backlit screen will remain reddish.
The control board may also be faulty. Just as in the case of a video card, a processor failure may occur on the monitor’s control board. In principle, this is also a curable disease with the same heating.
Cable problem
If successive changes of VGA cables had not led to a noticeable improvement in image quality, then it would not have been possible to identify the culprit so quickly. The problem was that there was not enough space on the table for the monitor, so they did this with the cable:

The rich inner world of the cable could not stand it and burst.
There is one adequate solution here - replacing the cable, and don’t do that again!
Problem with software color settings
If there is no reason to suspect the video card or anything else of a hardware malfunction, then it makes sense to reset the monitor’s color settings to default. Someone’s playful hands could well have rummaged through the screen settings. Of course, everything will be different on your monitor, but I will show you the very idea of how you can distort all the colors on the screen. Here is a slightly “collective farm” image:

It is clear that here you can creatively approach the issue of monitor color rendering. If you choose the wrong color scheme, you can then try for a long time to look for swollen capacitors on the video camera.
Or, for example, calibrate colors using the Panel Windows management. You can ruin everything there too! To verify this, you can go to Control Panel -> Hardware and Sound -> Display, then click on the “Color Calibration” link.
 The following calibration wizard window will appear:

If you compare the last two screenshots, the difference is visible to the naked eye, at least in the white areas of the window.
Also, do not forget that video card manufacturers supply their drivers with various control panels for them, for example, “Control Panel HD Intel graphics" Various profiles can be used here as color scheme settings. The profile can be configured in the “Display” section of this program.

So many enticing sliders!

Conclusion
This diagnostic option using an additional replacement cable and a laptop allows you to quickly discard unnecessary hypotheses.
First, we replace everything - both the cable and the computer with a laptop. If the monitor now displays normally, then everything is fine with it. Now we connect the laptop to the monitor using the old cable. If everything is fine now, then the problem was with the computer’s video card or driver settings. If the image again has the wrong colors, the problem is in the cable. However, if no replacements help, you should pay attention to the monitor itself, its color settings and its video connector.
Of course, after the initial sorting of causes, a more in-depth diagnosis should follow, identifying real problems and describing their solutions. Those. not “something with the monitor”, but for example, the wrong color scheme was selected in the monitor settings, which was replaced with a more suitable one.
Subscribe to blog updates!
Thank you You have successfully subscribed to new blog content!
Today we will look at:
In one of ours there we already raised the topic. Unfortunately, this problem affects not only PCs and laptops, but also iPhones and Android smartphones. And if everything is more or less clear with the computer (meaning that the causes of this problem are, as a rule, of a systemic nature), then everything is not so simple here, and the methods for solving the problem are radically different from those that could be applied in Windows . Therefore, if you see a blue screen on your phone, your iPhone or Android won’t start, and you don’t know what to do in this situation, then read further this article, where we will tell you how to remove the blue screen on your phone.
Causes of malfunction
On iPhone and Android, the reasons for the appearance of a blue screen when starting the device can be very different, and in order to know what exactly needs to be fixed or repaired in the smartphone, you need to be aware of where the roots of this error come from. So, we can highlight the following reasons for this problem:
- mechanical damage to the phone;
- malfunction of the software;
- violation of the integrity of working elements after assembly or repair;
- overheat.
An interesting fact is that in iOS, blue screens first began to appear in the IPhone 5s and higher series, although earlier models did not experience such problems. Regarding Android, these phones most often have a blue screen on this base: Meizu M5, Xiaomi and LG G3.
Home device repair
First of all, you need to understand that you have the opportunity to repair your smartphone at home only if there is no serious physical damage to it (of course, if it is not the battery). However, defects associated with contacts or some kind of chip are very difficult to detect with the naked eye, so we recommend starting checking your iPhone by calculating system errors.
Below are the repair methods IOS smartphones and Android, which in most cases will be suitable for both of these operating systems.
Complete system restart
First of all, if you see a blue screen on your phone, we recommend rebooting the device in a special way: when a blue screen is displayed on your smartphone, hold down the “Home” and “Power” keys at the same time, and then wait until the iPhone is completely rebooted. The same applies if a blue screen appears on Android (for example, you can perform the same actions on LG G3 and Xiaomi devices, on which the blue screen bothers you).

As a result, you should see the phone's OS boot normally. If after these steps you still see a blue screen on your iPhone 5S or LG G3 and restarting did not produce any results, proceed to the next step.
Complete blackout of iPhone
In the next step, wait until your iPhone or Android is completely discharged with the blue display on. Next, put your phone to charge using Charger, which came with the smartphone upon purchase (this is very important point). When the phone is charged, turn it on. There is a high probability that after this the blue screen on the iPhone will disappear.
Using backups
The next thing we recommend you do is restore the system using a backup copy of the files stored in iTunes (relevant only for iPhones). Android-based smartphones have a slightly different technology for creating and storing backup copies of files, however, it is quite possible to do this there too.
Let's say on Xiaomi phone, the blue screen on which does not allow you to use the smartphone correctly, a copy of the files is created through the MyPhone Explorer application, in which, after connecting the smartphone and opening its files through this utility, you need to select the “Miscellaneous” tab and click on “Create a backup copy...”. After this, the file with the backup data will be stored on your computer in the directory you specified. You can also perform file recovery in the same program.

Of course, there are other programs, but most of them work on the same principle as MyPhone Explorer. You can look them up online if you're interested.
The only disadvantage of this method is that you may not have such a copy, as a result of which there will be nothing to restore the system from. Therefore, when everything is in order with your phone, make sure that you have a backup copy of the data on your iPhone or any other smartphone you use.
Resetting system settings
Resetting the system is 90% of the problem disappearing. However, a huge disadvantage of this method is complete removal contacts, pictures, music, videos and other files stored on your phone. Here, of course, we should again refer to the above-mentioned backups where you can store everything necessary files while the settings are being reset. However, a blue screen on an iPhone or Android does not always allow this.
Previously, we have already made articles on how to reset settings to factory settings on Android and how to completely reset settings on an iPhone. Follow the link if you don't know how to do it.
"Cure" a blue screen using iTunes
Owners of iPhone 5s and other iOS phone models have an excellent opportunity to restore the iPhone system using iTunes.
Important! You will not be able to perform these steps on phones with blue Meizu screen M5, LG G3 and Xiaomi, since they do not run on the IOS operating system.
To do this you need to do the following:
- Download and install the latest one on your PC current version iTunes apps to your computer.
- Connect your iPhone to your PC via USB and open iTunes.
- In the utility, specify the model of the connected device.
- In the new window, click on “Restore”.
- Wait until everything damaged files will not be restored, and the smartphone operating system will not be updated.
Follow iTunes prompts to successfully restore and update your iPhone. After carrying out these steps and completely restarting the smartphone, the blue screen in LG G3, Xiaomi, iPhone 5S and other devices should disappear, and the system should work.
Of course, we do not guarantee that all the actions described above will be 100% likely to bring you success. However, this is the only thing you can do at home. Otherwise, we strongly recommend that you take your iPhone or Android to a service center, where specialists will help you fix the blue screen.
Blue screen of death, also known as BSOD and blue screen of death, is Windows’ reaction to critical errors in computer operation. White writing on a blue background suddenly appears on the screen, after which the device usually reboots, freezes, or turns off.
After restarting, the system works fine for some time. But then, if the error is not resolved, the BSOD appears again.
Sometimes this condition is caused by errors in drivers or failure of computer hardware. The reasons may also be a failure system settings, viruses or even installed programs.

What to do if a blue screen of death appears
Special services built into the operating system can help you.
If you have Windows 10, go to Start → Settings (gear) → Update & Security → Troubleshoot. Scroll to the bottom of the list of available services and select Blue Screen. Click “Run the troubleshooter” and follow the system prompts.

If you have more old version The OS or the tool mentioned above did not work, open the Windows Control Panel and go to the Security and Maintenance Center. In some versions of the OS, this path may look like this: “Control Panel” → “System and Security” → “Action Center”.
Expand the Maintenance tab and see if the solution recommendations appear here Windows problems. If yes, use the suggested tips.

If all else fails, move on to the next step.
The appearance of a blue screen of death can have hundreds of different reasons and each has its own solutions. Once you find out the cause of BSOD on your computer, you can find the best way to fix the problem.
On the Death Screen, Windows displays the error code that caused it. It may look like a series of numbers and letters (0x0000000F) or a combination of different words written in uppercase and often associated with underscores (SPIN_LOCK_ALREADY_OWNED).
You need to enter the error code in a search engine and thus find individual instructions for fixing it. There may even be a special QR code on the blue screen. By scanning it through mobile device, you will be taken to the Microsoft website with an interactive helper to solve the problem.

If the computer restarts immediately after the blue screen appears and you do not have time to write down the error code, disable automatic restart. To do this, right-click on the “This PC” icon and select “Properties” → “Advanced system settings”. In the window that opens, go to the “Advanced” tab, click “Options” and uncheck the “Perform automatic restart” checkbox.

If you do not want to look for the necessary instructions and delve into it, or the solution found on the Internet does not help, use the methods listed below.
3. Try simple universal measures
 ichip.ru
 These general measures affect many system parameters and help restore normal operation. They can also fix errors that lead to the blue screen of death.
- In system settings, go to "Center" Windows updates» and check for updates. If they are available, install them.
- Check the system with


