Often, after reinstalling their favorite Windows 7 OS, users find that they can go to global network became impossible. This usually happens when using low-quality system assemblies. Please note that the licensed installation disk, as a rule, contains everything needed to run the OS and the most important functions for the user, including the Internet. In such assemblies, the computer independently selects the connection diagram, installs the necessary drivers, etc. How to configure Windows if the Internet does not work? Let's look into it in more detail!
Installation official version Windows saves users from many problems
There are a number of most common reasons why the Internet does not appear. This:
- lack of correct and up-to-date drivers for the adapter;
- the problem is on the provider's side;
- Windows services are disabled;
- the network card is not configured correctly;
- one of the PC components is faulty.
Drivers
Lack of drivers is considered the most popular reason for network failure. The system is installed without a driver for the adapter, so Windows is not able to connect this electronic computer to the network. What to do?
It is important to check if your guess regarding the lack of drivers is correct. To do this, go to " Network connections" and then check if there are "live" connections in the specified window.

If the connection is found, but there are no changes, try the next method.
Windows usually accepts the driver adequately and even creates an active connection, but if the software is not suitable, the network does not work. To check this nuance, go to “Device Manager”. If the problem lies in the incompatibility of components, an exclamation mark will appear next to your adapter.

If such problems occur, you will have to reinstall the driver. The lack of Internet makes this task difficult to complete, because it will be difficult to get a suitable file without outside help. This is where the driver disk that usually comes with the computer when purchased is invaluable. You can install all the drivers from this disk and everything should work. But drivers are usually not included with laptops.
If you have a disk with installation files Windows, we recommend inserting it into the CD-ROM and letting the system “get” the necessary drivers. Nothing changed? Then you'll have to go searching required file to friends or neighbors whose Internet is more stable than yours.
Knowing the name of the adapter or your motherboard You may be able to download the required driver on the Internet. Alternatively, you can download a driver pack, for example, DriverPack Solution– the program itself will detect all computer devices, install all missing drivers and update outdated ones. But you need to download full version, which can work without the Internet.

Enabling services
If all programs are updated, but the network still does not appear, check the system services. To surf the World Wide Web, you need to launch a number of Windows 7 options, which are configured in the “System and Security” section. By clicking on the indicated shortcut, you need to select “Administration”, and then “Services”. A list of all OS services will now appear. Check if the following are enabled:
- telephony;
- network connections;
- Telnet;
- DNS client;
- network list service;
- DHCP client;
- computer browser.

All these options after transfer Windows installations must be turned on, otherwise it will be impossible to connect to wired Internet. To activate this or that option, first select “Properties” (click right click according to service). Here it is recommended to set the startup to the “Auto” position (the service will automatically start when the PC is turned on).
Equipment
Sometimes the problem is so basic that it is simply overlooked. Often the user starts changing connection parameters in Windows or reinstalling drivers, not suspecting that the problem lies in physical connection equipment.
Initially, we advise you to check whether the light on the network card is on. It is located near the connector where the provider wire is connected. If the indicator is green, it means there is indeed a connection between the provider and your computer. Otherwise, we advise you to call technical support from a company that provides Internet services, because, most likely, the problems should be corrected on their side.

The telephone connection is now considered obsolete, but some people continue to use it. For this type, you need to check whether there is a dial tone on the telephone line. We also recommend asking the company about alternative methods connections.
If access is carried out with wireless connection, you need to make sure that it is active. This can be seen by the blinking icon in the corner of the desktop.

As for the modem, it is important to check the battery charge when using it. In addition, experts advise using a cable rather than Bluetooth.
If you are using a connection to a Wi-Fi router, you need to make sure that it is working and that the computer is connected to it correctly. It happens that simply turning the router off and on helps - some models can sometimes simply “freeze”.
Connection features
If the Internet after Windows reinstallation on PC no, perhaps you entered the wrong settings. Often, the provider issues special instructions that help you configure all components (binding a MAC address, using a password, login, etc.).
When using the PPPoE protocol, the system waits for the user to enter login/pass. This direct connection method is considered one of the most famous; let’s consider it in more detail.
So, you should check the connection status, this is done in the Network Control Center. In connection settings, select “Internet Connection”, and then click on “High-speed with PPPoE”, which involves the participation of a provider cable or DSL.

Now you just need to come up with a name and enter login/pass from the provider agreement. If you do everything correctly, the Internet will appear immediately after applying the settings.
Good afternoon dear visitors of the blog site. Probably each of you wondered what to do after installing Windows? What needs to be configured, install first.
Since the most popular OS is Windows 7, the installation of which I described, we will configure it directly, although this plan will also be relevant for versions such as: Vista, 8, 8.1, 10.
Setting up Windows 7 after installation
Step 1: Activate Windows
The first step is to activate our system. If you have a key, it is entered during the installation process, or you need to go to Control Panel — system and safety— System, at the very bottom, find an inscription containing information that your copy is not activated until the end trial period left XX– days. If you click on this inscription, a window will open in which you will need to enter your activation key.
You can also activate Windows by phone, or use the best program for activation which I wrote about.
Step 2: Install the necessary drivers
If any drivers are not installed, then you need to use the disk that came with your computer or laptop, or update via the Internet.
It is important that even if the system has selected a driver for the video card and everything works and is displayed well, be sure to download and install the latest drivers from the video card manufacturer’s website, otherwise it will not work to its full potential!
Step 3: Disable User Account Control (UAC)
This service is aimed at ensuring computer security, monitors all processes in the system and notifies you about their activities with its constant “intrusive” messages.
By disabling it, you increase the risk of your computer becoming infected with malware. But if you use antivirus software on your computer, you can disable this service in the Control Panel. See how to do this.
Step 4: Selecting and installing an antivirus
Windows system setup involves installing an antivirus. TO this process you need to take it seriously, because the security of your computer primarily depends on anti-virus software.
In my practice, I tried many antiviruses, each had its pros and cons. In the end, my choice settled on two antiviruses: Avast And Dr.Web.
I install the first one for clients who do not want to constantly search for keys or do not understand these nuances, and it is also installed at work, on all computers.
The second one is in my home, on my favorite computer, and protects it from all “nasties.” I consider this antivirus to be the most optimal.
All the others that I used before, including nod 32, Kaspersky, Norton and others, in my opinion are much inferior to this antivirus product.
Step 5: Disable Windows Automatic Updates
Step 8: Windows visual effects, disable unnecessary ones on weak computers
By disabling visual effects on weak PCs, you can achieve a good performance boost.
But on any, powerful or weak computers I disable "Show window contents when dragging". For example, it is more convenient for me to drag a window and see what is under it.
Step 9: Set the paging file size for Windows 7 and other OSes
This file is used to store part running programs or any files in case of insufficient RAM.
Usually the system sets the default size relative to the installed random access memory. If the amount of RAM is large enough, then the size of the paging file should be reduced; if, on the contrary, then slightly increased.
It can also be transferred to another HDD(if you have several), for more fast work systems.
Step 10: Enabling ReadyBoost
Step 13: Install the necessary programs for Windows
The first thing I always do is install the archiver WinRAR, necessary for viewing and creating archives. Then you need to install a program to open text documents, it could be either MS Office, or OpenOffice.
To play multimedia files, you must install K-Lite Codec Pack , and some kind of player AIMP3 for playing music files.
These are quite popular and high-quality products that are easy to find on the Internet. You can also install CCleaner, to remove various garbage and clean the registry.
Step 14: Configuring Windows programs to start automatically, changing additional boot options
One of important points V Windows setup, affecting the boot speed of the system and desktop, as well as performance in general.
After installing the programs, you need to check autostart for the presence of extra entries, if there are any, then it is worth removing them, since these programs will hang in RAM from the moment the OS starts, thereby increasing the time Windows startup and reducing productivity overall.
In the additional download options of the utility msconfig, worth installing maximum number processor cores that will be used at startup operating system. This option will allow increase OS startup speed .
Step 15: Clean Windows from junk and defragment it
After installing the system and various programs There is always various garbage left: temporary files and so on that litter the system.
You need to get rid of them by using special program, For example, CCleaner. With its help, you can also clean the registry.
After cleaning the system, when there is no garbage or temporary files left in it, you need to defragment the system partition, which will increase system performance by arranging fragmented files sequentially on the disk.
Step 16: Disable autorun from removable media
To someone this function Autorun from media is pleasant and convenient, but it carries a hidden threat. Many types virus programs By autorun they infect computers while on a flash drive.
Step 17: Create a System Backup
When the system is maximally optimized and prepared for operation, it is necessary to make it backup copy – create an image of the system partition. This is done as standard Windows tool, entitled "Data Archiving".
Ask why is this necessary? I answer:
A backup copy is necessary to restore the OS in cases of damage and inoperability. If you restore it from this image, you will have a “clean” one, without errors, working system. All installed programs and the settings made up to the sixteenth step inclusive will be saved!
Well, that’s all, dear friends, now you know what to do after installing Windows. I have briefly described the seventeen steps of the initial Windows settings. If you have any questions, ask them in the comments.
When using a computer for a long time, any user sooner or later becomes puzzled by the fact that the system is cluttered, residual files do not want to be deleted voluntarily, and the laptop boots up at the speed of a wounded snail. Also, some viruses, although treatable at first glance, still leave their tiny traces. Subsequently, it grows exponentially and affects the entire system completely. Therefore, the user begins to ask the pressing question: “How to reinstall Windows system 7?
Of course, to solve these problems, you can use the services of plugins or start using a new antivirus, but such a solution will be temporary, and in a few weeks the situation will not only repeat itself, but will also worsen. In addition, sometimes the computer simply leaves no choice, threateningly greeting you with a “blue screen of death” with farewell instructions.
Reinstalling the operating system in a specialized salon costs a lot, so today we will save a couple of thousand and learn how to reinstall the OS ourselves. But before you reinstall Windows 7, there are several steps you should take.
Preparing and saving data
How to properly reinstall Windows 7? In order to protect yourself from losing important files after reinstalling the system, it is worth spending a little time and saving on a flash drive or disk those documents that may be needed in the future.
For example, not everyone wants to lose their achieved results in their favorite game. You just need to find and save one small file, which is located in the AppData folder of the user. If a folder with this name is not displayed, you need to go to “Computer” - “Local Disk” - “Users” - “your name” and there click on “Arrange”, then select folder and search options in the drop-down menu.
And put a marker on “Show hidden folders and files."

How to save favorites and links from the browser
- For Mozilla browser Firefox will need to go to “Local Drive” - “Users” - “Username” - “Favorites” and save the entire folder.
- To save Google data Chrome go to “Local Drive” - “Users” - “User Name” - “AppData” - “Local” - “Google” - “Chrome” and save the User Data folder.
- For Internet Explorer Just save the “Favorites” folder located in “Local Disk” - “Users” - “User Name”.
- When working with Opera, we go to the well-known path to the AppData folder and then Opera, you only need to save the bookmarks.adr file.
Saving torrent files
To save torrent files, go to AppData, find the uTorrent folder there and copy it completely. After reinstalling the system, the saved folder must be placed in the same location. This also applies to saved games and bookmarks in browsers.
When all the necessary data, photographs and other necessities have been successfully saved, we begin reinstalling the OS to the beat of the drums.
How to properly reinstall Windows 7
If you have a disk with an operating system, then insert it into the drive, after which the automatic reinstallation of the OS should begin, although in 60% of cases this does not happen. What to do in such a situation to understand how to reinstall Windows 7? “BIOS” is a mystical word, upon hearing which many begin to get nervous. In fact, there is nothing wrong with the BIOS if you don’t touch anything unnecessary (and even in this case, all parameters can be restored). In order to get to your destination, you need:
- restart the computer;
- Press the del key 2-3 times until Windows screensaver. If the transition to the BIOS does not occur, simply repeat the procedure again.
So, if everything is done correctly, the following image should appear before your eyes:

Next we find First Boot Device and set the value on the CD-ROM. This means that when your computer starts, it will automatically load data from the disk first. After installing the software, it is very important not to forget to return everything as it was, or the computer will continue to install the system forever (if you also forgot to remove the disk).

Press f10 to save changes. If all conditions have been met, the system will begin reinstalling.
The next window prompts us to select the language, date and set the time. We set some simple parameters, and feel free to click “next”, “install” and accept the license agreement.
type of instalation
- Upgrade - suitable only if the system is reinstalled for minor reasons. If the decision was made in connection with the “screen of death” or the computer was clearly malware, definitely choose the full installation.
- Full installation (custom) - reinstalls the OS literally from scratch, mercilessly destroying everything that can harm it.

Disk configuration
Here you have to choose which disk will appear as local, i.e. the one on which the software will be installed.

Logically speaking, the volume of the system disk should be within 35 GB, but not less. It’s worth considering that many of us like to save files using the “throw it on the desktop for now so as not to forget” principle. All documents, pictures, etc. that are located on the desktop are stored on system disk, as well as files from the Downloads folder. Thus, when calculating the volume local disk you should be more generous.
Click “Next” and go have a snack, we have at least 45 minutes. During installation, the computer will reboot several times, which will kindly warn you. You shouldn’t interfere with him in this, unless unforeseen situations occur in the process, after 45-50 minutes new Windows 7 will be installed successfully.
The next step is the username and computer name. If at some point you need to change these settings, then this is done simply: “Start” - right key mouse to “Computer” - “Properties”. Find “Computer name, domain name and workgroup settings” and click “Change settings”.
It is not necessary to set a password, so you can skip this step by clicking “Next”.
You will also need to enter your product key. You can find it on the bottom of the laptop or on a special sticker on system unit(if you purchased the equipment along with a licensed disk).
If the software was installed from another disk, then the key should be indicated on the box. Well, if the system was installed illegally, you can skip this point and forget about this issue for about a month. After 30 days, the beautiful picture on your desktop will be replaced by a black screen, and some functions and devices may be disabled. If this doesn’t bother you, then you can safely work with the system further or be puzzled by searching for a suitable key on the Internet.
When choosing the type of update installation, it is best to use the recommended settings. If the system is not automatically updated, then sooner or later minor problems may arise in working with the most frequently used programs. The update eliminates minor bugs and optimizes the operation of the OS.
How to reinstall Windows 7 without a disk or from a flash drive
Sometimes it happens that there is no disk with Windows, or the CD-ROM is blind and categorically refuses to cooperate. Don't despair, there are no hopeless situations. There are several ways to install the system using other media. For example, you can reinstall Windows 7 from a flash drive.
Reinstalling the system using a flash drive
First, download the OS image to your computer. After that, install the Ultra Iso program or you can use Daemon Tools, the algorithm is approximately the same.

Next, take a flash drive or memory card, but it’s worth noting right away that the BIOS will not see any of the drives installed via the USB-3 connector, so be careful and use USB-2. Externally, the connectors do not differ; in some devices, USB-3 is marked in blue. If there is no identification mark, then everything is simple. We find in any search engine information about the characteristics of a laptop or computer and then information about which side the connectors we need are installed on.
In order to prepare a flash drive for further work, it must be formatted, even if there is nothing on it. Next we perform the following steps:
- Open in UltraIso Windows image 7, which we have already downloaded (“File” - “Open” - select the program image).
- Find “Self-unloading” in top menu and select “Record image of a tough disk".
- In the window that opens, indicate the formatted flash drive.
- We confirm the check, and set the recording method to USB-HDD+.
- Click “Record”.
- We agree with the fact that all files will be erased from the flash drive (even though we formatted it, we still set it to “Yes”).
- Voila! If we see “Recording complete”, then the job is done and you can start reinstalling.
- We go to the BIOS in the known way described above, and in First Boot Device we select the recorded flash drive.
Reinstalling Windows 7 using an image recorded on a DVD disc
Another method will tell you how to reinstall Windows 7 via CD-ROM without a license disc.
Why DVD? Everything is elementary, a regular CD will not work for one simple reason - there is not enough space, and the OS image “weighs” about 3 GB.
If for these purposes you decide to use a DVD that already has something on it, then, as in the situation with a flash drive, you need to resort to formatting.
Now we open the already known UltraIso program, go to “File” - “Open” and find the downloaded Windows image.
Next, go to the “Tools” menu and click “Burn CD image”, in the window that appears, check the “Check” box, humbly accept the fact that everything on the disk will be destroyed and click “Burn”.
That's all, after the message “Recording complete” appears, our disk is ready. We think everyone has already guessed what to do next. That's right: go to the BIOS and select the recorded disk as First Boot Device.
How to go back from Windows 7 to XP
Sometimes it is difficult for users to master a new system, so for some it is easier to reinstall Windows 7 on XP. The installation procedure is not much different from that described earlier, with the exception of a few points:
- After proceeding to the installation, the system prompts you to select which partition (that is, which disk) the OS will be installed on. In order to completely destroy a previously installed Windows 7, you need to select the appropriate partition. After this, there will be 4 formatting options to choose from, the only correct one of which is “Format partition in NTFS system" After this, the computer usually restarts and begins installing the system.
- If there is a strong desire to install two operating systems on one computer or laptop at once, then, on the contrary, select the partition that is not occupied system files. This is usually drive D.
Reinstalling Windows 8 to 7
Despite the fact that most users rated the seventh version positively software from Microsoft, the “eight” received quite contradictory responses. Because newest version is fundamentally different from all previous ones, sometimes there is a desire to replace the OS.
In order to reinstall Windows 8 to 7, you will need to go into the BIOS and set the primary priority to the CD-ROM (how to do this was described earlier).

After this, save the changes and proceed to boot from disk or other media. Installation type when changing Windows 8 by 7 can only be " New installation", since the OS is different, there is no need to talk about any updates.
It is also necessary to delete all partitions, including hidden ones. After that, no longer thinking about how to reinstall Windows computer 7, do the rest:
- indicate the time, date and keyboard layout;
- agree to the terms, indicate the user name and computer name;
- enter the key, etc.
After installation (drivers)
As a rule, reinstalling Windows 7 on a laptop or computer is quite easy, but after the process of replacing the OS, many users have a number of questions. For example:
- "Why after installation new system Has the image quality deteriorated?
- “Why doesn’t my computer or laptop see the flash drive?”
- “Why has the sound gotten worse?” etc.
All this happens most often when the reinstallation was carried out by downloading the OS or purchasing a disc from someone else (you don’t have to think about how to reinstall a Windows 7 computer, but some “jambs” still pop up). In order to solve a number of similar problems, it is enough to download drivers from the manufacturer’s official website. Or pay attention to the drivers before reinstalling the system.
Let's look at it with an example. Let's say before you reinstall Asus Windows 7, the user was not puzzled by the issue of saving data from his laptop, or he simply did not have the opportunity to do so. What should I do?
It’s simple, just type in the search engine the model (the manufacturer’s company is enough) of the device and add the treasured phrase “Download drivers from the official website.” Then go to the link to the manufacturer’s website and indicate the full model of the laptop in the appropriate form. Next, you need to download all the presented drivers one by one and install them on the laptop one by one. There are no installation tricks, since the drivers install themselves where they should.
If for one reason or another the drivers have gone wild and are installed in the wrong place, you can go to the device manager and force them to update.
In order to get to the remote control, you can simply type “Device Manager” in search bar pops up when you click Start. Next, right-click on the driver that is marked with an exclamation mark. And select “Update drivers”, in the new window all that remains is to indicate that the required files must be searched on the computer itself and indicate the location where they were installed.
If all drivers are installed normally in the device manager, the image will improve and the screen resolution will increase to the required level.
Finally
The computer can “fly” at any moment, so it’s worth thinking about organizing backup storage for high-value files before reinstalling Windows 7. This way you can save a lot of time after installing the system, because it’s quite possible that even the most basic programs ( Word, etc.) will have to be searched and installed again.
Reinstalling Windows 7 on a laptop or computer is not difficult; even a novice user can cope with this task. The main thing is to approach the issue responsibly and spend an hour trying to save all useful information from the computer even before reinstalling the OS.
Sometimes, due to certain life circumstances, it is necessary to install an operating system. Quite often, users discover that the sound has disappeared after reinstalling the system.
The possibility of a situation where the sound disappeared after installing Windows 7, unfortunately, is far from uncommon. Fortunately, it can be solved quite simply if you know exactly the reason.
Possible reasons
There may be several reasons for the sound to disappear. The main ones are hardware errors, that is, a malfunction of the sound card. In this case, you cannot do without specialized help. Or there are problems in the software, and specifically, in the lack of drivers for the sound card.
If the problem is with hardware, then you are unlikely to be able to solve the problem without special equipment and skills. Solving software problems is much simpler and does not require special knowledge and skills. To do this, you just need to confidently use the computer and not be afraid of it.
Solutions options
So, if after installing Windows 7 there is no sound, then the first thing you need to do is check the connection of the audio system to the computer, and also that the audio system you are using is selected in the settings. The check is as follows:
If the audio system is turned on and in use, but there is still no sound, then the most likely reason why the sound may disappear is that after reinstalling Windows 7, the drivers for the sound card or audio device were not installed. This problem is not so terrible and quite easily solved.
Finding and installing drivers
There are several ways to get sound back after reinstalling Windows; the easiest way is to install control program distributions from the media that comes with the device; it has everything necessary drivers. But if it happens that there is no disk, you can install drivers using standard means Windows.
So, to convince the OS to reinstall the drivers, follow the path indicated in the address bar of Explorer: “ Control Panel» → « system and safety" → "". And select " device Manager».

After completing these steps, the following window will appear:

In the window that appears, select “ Sound, video and gaming devices "and from the list that opens, select the right system by double-clicking on the name. A properties window will appear in which you need to select the “ Driver».

In this window, you need to select the Update... button, and in the window that appears, click on the item “ Automatic search updated drivers" After this, Windows will begin to search for the program on the Internet and update or install it if such a need exists.
Manual installation
If the built-in Windows service tells you something like “The installed software for this device does not need to be updated,” this does not mean that you actually have it installed and do not need to be updated.
If you just installed the system, then there are no audio drivers there. But the system simply failed. Also quite often the service automatic update cannot find the required software, in this case the direct path to manual search and installation necessary programs.
To do this, the first thing you need to do is decide what sound card you have installed. If your card is integrated into the motherboard, then most likely it is from Realtek, which means that you need to go to the manufacturer’s website and download the necessary software there. Device Manager identifies built-in cards as High Definition Audio Device.
But since you may have another audio card, it’s better to find out which one in advance. To do this we follow Start, we find " Execute" and write in the search bar " dxdiag" and click OK.

In the window that appears, go to the “ Sound" (sound).

Line " Name"(name) will tell you what card you have installed. After that, feel free to go to the manufacturer’s website and download the latest version of the software for your card.
After installing the software, restart the computer and check for sound.
Using driver packs
If you have already tried everything, but after reinstalling Windows 7 the sound still does not work, then you have two options. The first is to take the computer to a service center or use specialized software to install drivers, for example. It is better to download it from the official website.
After launch, the program will diagnose the system and indicate those drivers that need to be updated. It will also select the software recommended for installation. Among other things, it will contain Avast And Yandex browser, if you don’t need this happiness for nothing, find the button at the bottom of the window Switch to expert mode and manually configure what should be installed.
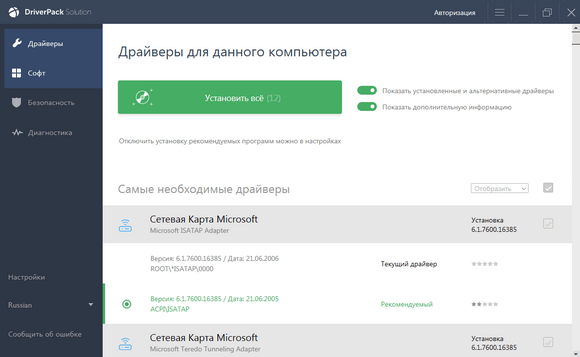
Feel free to install all the recommended drivers, but here are the software and programs that DRP suggests deleting, better viewing and changing the settings to those that suit you. The program may remove something you need.
Windows 7 Sound Service Problems
Sometimes the drivers are really fine, but problems arise because the audio service does not start. First, try changing the system sound a couple of times:

Hardware problems
If all the previous methods did not bring the desired result, then most likely there are problems with the hardware. The audio card may fail due to the failure of some individual elements, and not the entire board as a whole. But this will not reassure owners of integrated cards at all. The built-in cards are not repairable, so if it fails, you will have to buy a discrete sound card.
Discrete cards, as a rule, can be repaired, but try to fix them yourself this device without the appropriate skills and equipment, it’s not worth it; most likely, you will only aggravate the situation and spend a lot more money than if you gave the card to professionals.
Reasons for refusal:
- overheat;
- burnout;
- raw contacts;
- broken conductors;
- broken plugs;
- loose soldering;
- developer error or manufacturing defect.
To extend the life of your computer, clean it several times a year. This will allow the cooling system to perform its function most efficiently and problems such as overheating and damp contacts will most likely not affect you.
However, the lack of sound is not always a consequence of the fact that the audio card has failed. The first step is to check the functionality of the audio system; to do this, simply connect other speakers to the computer.
Also, cords can fail, replacing which is not difficult, this is especially true for headphones.
It is not always possible to determine at home without equipment whether the audio card has really failed or whether there is a problem with another device. Therefore, you should not panic right away; it is best to make a diagnosis in service center, as well as update your computer software.
Video on the topic
After installing the operating system, its initial configuration does not end. Now you need to teach her to understand the devices installed on your computer. Read about the intricacies of installing drivers in our article.
The first thing you need to do is understand what kind of hardware is installed in your computer. In order to find out this, you can use a computer diagnostic program, for example, AIDA64. The program is paid, but has a month of trial mode, which makes it suitable for our purposes.
Note! If the Internet does not work on your computer after reinstallation, then you will have to use another computer to download the program, and in the future the drivers themselves. However, remember that you need to install it on the exact machine you want to configure.
- Go to the official website of the program and download one of the versions.

- Install it following the instructions of the Installation Wizard.

- Run the program with administrator rights. This is quite important because she will need full access to your system.

- Let's start defining the equipment. We need to know the models of motherboard, video card, network cards and other expansion cards.
- Motherboard. Its model can be found by selecting “ Motherboard» and clicking on the icon of the same name. After that you will see its model, usually a combination of the type ASUS P4S800-MX SE. Remember this value.

- Video card. You can skip this point if you only have a video card integrated into the motherboard. But if you are not sure, you can find out in the “Display” item by selecting the “ Video Windows" If the device description says something like nVidia GeForce GTX560 or AMD Radeon 7665, then write down this data, and if you see Intel HD 4000 or something similar, you have a built-in video card and do not need to record it.

- Expansion devices. It’s the same here as with a video card - it’s quite possible that they are built into the motherboard, but if you installed a third-party network card or TV tuner, then you need drivers for them too.

Go to "Devices" in the "Physical Devices" section. The list on the right will display all installed cards. For example, the model of the network card is now highlighted - it’s worth writing it down.
- If you already have models of the motherboard, video card, network cards and other USB controllers, you can move on to the next point - downloading the program files themselves.
Finding and safely downloading drivers
It so happens that sites with all kinds of driver versions have the most viruses. Therefore, you should rely only on the official websites of the manufacturers, from where you will definitely download the required file.
Note! you may have from completely different manufacturers, so we will not be able to show the search process for absolutely everything. Let's look at the example of downloading drivers for a motherboard, for example, ASUS. Other manufacturers and devices have approximately the same logic; the main thing is to find the official website.
So, you need to find drivers for the motherboard ASUS boards P4S800-MX SE.
- Enter a search engine query like “ASUS P4S800-MX SE drivers”. Usually, as in our case, the official website has an address with the name of the company and is displayed first in the list. Go to it.

- On the support page, go to Drivers and Utilities.

- Select the operating system version you need from the list. Consider the bit depth.

- Each of the motherboard devices has a list of versions, and the top line is the latest version. Download it exactly. To do this, click on the “Download” button located next to the device.

- Repeat this operation for all devices on your computer and save the downloaded archives to a flash drive.
Note! For your convenience, after downloading each driver, we recommend renaming the downloaded archive so that you understand what kind of driver it contains. For example, “Driver for built-in video card.” This will come in handy in the future.
A little about the procedure for installing drivers
Usually this point is ignored, it is believed that the order does not matter. However, it is worth noting that an incorrect installation sequence can lead to errors in the system that will appear in the future. For example, if you first install a driver for a video card, and then install a driver package for the motherboard that contains a driver for the built-in video card, then some of the files responsible for video output in the system will be updated, and in the future the performance of your card will inevitably decrease.
The optimal order for installing drivers is as follows:

Installing drivers using standard tools
Most of the drivers you download will have own installers, the use of which is optimal in terms of convenience and efficiency.

After rebooting, your device will be installed. Repeat the operation with all other downloaded drivers.
Installing legacy device drivers
The standard installer is convenient and good, but some drivers are supplied without it, or you are the owner of an outdated printer for which drivers are only available for Windows XP. In this case, you will have to resort to a trick that allows you to install almost any driver for any device.
Note! The method described below also applies to any version of Windows, from Vista to the latest Windows version 10. The differences are not critical and relate only to design.
- Press “Win+R” and enter “devmgmt.msc” in the window that opens. Press Enter.

- Find your device and open its properties by double clicking.

Open the “Properties” of the device
Note! If you cannot find your device, use the "Update Configuration" button. The system will check your computer for unidentified devices and it will appear in the list.
- Go to the "Driver" tab and click the "Update" button.

- Select the second option.

- In the next window, click “Browse” and find the folder with the same .inf driver file on the disk. Click Next.

- The system will find the driver in the folder and install it. If the device update was successful, you will receive a corresponding message.
Note! It is worth noting that this method works with approximately 90% of outdated devices. If after several attempts with different versions If you didn't get the driver, then the device is probably completely incompatible with your operating system.
What's with the driver discs?

Manufacturers often include discs with software in their devices. Often, proprietary utilities on these disks offer convenient and automatic way installing drivers, but there are several reasons why this simple path is not recommended:
- The disk may contain an outdated version of the software. On its website, it efficiently constantly updates links, posting new, improved and corrected versions, while on the disk they remain unchanged and old. Therefore, you can use the disk unless your board is more than a year old, and then it’s better to update the drivers later.
- the manufacturer often installs on disks all sorts of unnecessary shareware software like Norton antivirus, which is working certain time and asks for money. Be careful about the checkboxes you select in the windows, and remember that when manual installation Drivers for this problem, as a rule, do not exist.
Driver packs and other automation.

The same story as with disks. There are a huge number of programs that automatically recognize your hardware and install everything necessary for it, drawing files from their internal databases, because most likely there will be no Internet on your computer without drivers. However, remember that static and non-updating databases face the same fate as disks - the drivers in them become outdated, and these utilities also have the sin of installing so-called “compatible” drivers - that is, programs for a device similar in description to yours, but actually not intended for him. With a high degree of probability, this can lead to a loss of performance, or even a system error. Therefore, take your time to install the latest drivers and continue to check for new versions every couple of months. Then the stability of your new system will always be at its best.
Video - Installing all drivers on Windows 7/8/10 in one click


