is a LAMP application created specifically for administration MySQL servers. Written in PHP and accessible via a web browser, phpMyAdmin provides GUI for database administration tasks.
Installation
Before installing phpMyAdmin, you will need access to the MySQL database on the same computer where you are installing phpMyAdmin, or on remote computer, available online. See the section for details. To install in the terminal, enter:
Sudo apt-get install phpmyadmin
When prompted, select which web server will be configured for phpMyAdmin. This section is intended to be used as web server Apache2.
In your browser, go to http:// servername, replacing servername to the current server address. On the login page, enter root as the username, or another user if you configured one, and the MySQL password for that user.
Settings
The phpMyAdmin configuration files are located in /etc/phpmyadmin. The main settings file is /etc/phpmyadmin/config.inc.php. This file contains configuration options that apply to phpMyAdmin globally.
To use phpMyAdmin to manage MySQL on another server, set up the following entry in /etc/phpmyadmin/config.inc.php:
$cfg["Servers"][$i]["host"] = "db_server";
Replace db_server to the current IP address of the remote database server. Also make sure that the computer with phpMyAdmin has access rights to the remote database.
After setup, log out of phpMyAdmin and log in again and you will have access to the new server.
The files config.header.inc.php and config.footer.inc.php are used to add HTML top and bottom headers for phpMyAdmin.
Today we will look at the installation process of a very popular web application phpMyAdmin, which is used for administration MySQL DBMS, we will install it on operating system Linux Mint 18.2.
Let me remind you that earlier in the material “Installing and configuring MySQL server and MySQL Workbench on Linux Mint 18.2” we looked at the installation of the MySQL DBMS and the MySQL Workbench client application, which has a graphical interface, but many administrators use, as I already said, the very popular web application for working with MySQL, phpMyAdmin, so now, especially for beginners, I will describe in detail the process of installing phpMyAdmin on Linux Mint 18.2.
As always, we will look at installation using a graphical tool ( program manager), and using the Linux terminal.
phpMyAdmin is a free web application with a graphical interface for administering the MySQL DBMS ( MariaDB support is also available). Developed by phpMyAdmin with PHP language and since this is a web application, it requires a web server, for example, Apache or Lighttpd, to function. The phpMyAdmin application is popular all over the world and it has currently been translated into 72 languages, including Russian.
With phpMyAdmin you can:
- View databases and tables;
- Create, copy, rename, modify and delete databases;
- Create, copy, rename, modify and delete tables;
- Add, edit and delete fields in tables;
- Execute SQL queries;
- Create, modify and delete indexes;
- Load text files into tables;
- Create and read dumps of tables and databases;
- Export data to SQL, CSV, XML, Word, Excel, PDF and LaTeX formats;
- Manage MySQL users and privileges;
- And also much more.
Installing phpMyAdmin on Linux Mint 18.2
As I already said, we will look at two ways to install phpMyAdmin, and we will start with a simple method suitable for beginners, i.e. using the program manager graphical interface.
Installing phpMyAdmin using the program manager
In order to install phpMyAdmin, you must first install a Web server, such as Apache. Therefore, now we will first install Apache and only then phpMyAdmin.
Open the program manager, for example, “ Menu->Program Manager" or " Menu->Administration->Program Manager».
Enter the computer administrator password.

Installing Apache web server
In the program manager, enter Apache in the search and press Enter. Then find Apache2 in the search results and double-click on it.


The installation is complete when the window displays “ Installed».

Installing phpMyAdmin
To install phpMyAdmin in exactly the same way, enter phpMyAdmin into the search and press Enter. Most likely, only one program will be found, which is what we need, double-click on it.


During the installation process you will be asked which web server you will use, since we have already installed Apache, accordingly we answer Apache and click “ Forward».

Then there will be a question about the phpMyAdmin database, i.e. if we want to configure it, we leave the checkbox and click “ Forward».

As a setup, we are asked to come up with and enter a password for phpMyAdmin databases, we enter and click “ Forward", then confirm it and also click " Forward» ( The password should be quite complex, although you will rarely need it).


The installation is complete when the message “ Installed" After this, you can immediately check the operation of phpMyAdmin.

Installing phpMyAdmin using terminal
For start Linux terminal click, for example, on a link on the panel or launch it from the Mint menu.

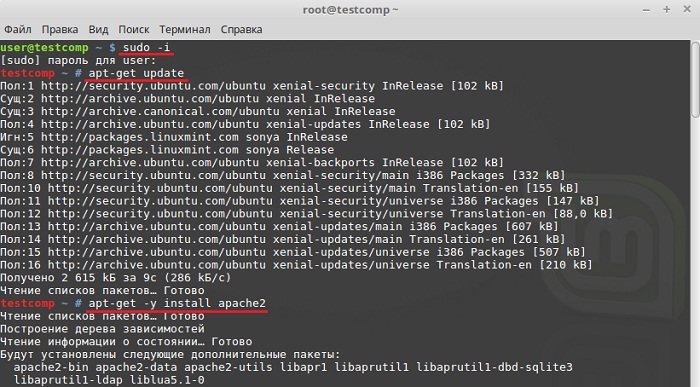
Installing programs, including phpMyAdmin, must be done as root, so let's switch to this user right away. To do this, write the command sudo -i (or sudo su) and press Enter ( input), then enter the user password.
Then we need to update the list of packages, for this we write a command.
Apt-get update
Then, as in the case of the program manager, we need to first install the Apache web server, to do this we enter the following command.
Apt-get -y install apache2
Apt-get -y install phpmyadmin

During the installation process we will be asked which web server we will use, we select Apache and click " Enter».

Then we need to configure the phpMyAdmin database, select “ Yes" and click " Enter».

Then we come up with and enter a password for the phpMyAdmin database, click “ Enter", in the next window we confirm the password, i.e. enter it again and press “ Enter».


After this, the installation will be completed.
Configuring Apache to work with phpMyAdmin
If we install phpMyAdmin using the terminal, then in this case, unlike graphical installation using the program manager, we need to manually connect the phpMyAdmin configuration file ( those. phpmyadmin settings file).
To do this, we write a command (with root rights), with which we will create a symbolic link in the directory with Apache configuration files.
Ln -s /etc/phpmyadmin/apache.conf /etc/apache2/conf-available/phpmyadmin.conf
Then we will enable this configuration file.
A2enconf phpmyadmin
Restart Apache
Systemctl restart apache2

That's it, after this you can proceed to checking the operation of phpMyAdmin.
If necessary, this configuration file can be disabled; for this purpose, there is the a2disconf command. After the Web server, Apache also needs to be restarted.
By the way, you can connect this configuration file in another way, for example, directly register the connection in the apache2.conf file, this method often found on the Internet, but the first option in this case is more correct. To edit apache2.conf, run the command (as root).
Nano /etc/apache2/apache2.conf
Add the following line to the end of the file.
Include /etc/phpmyadmin/apache.conf
We save the file with the keyboard shortcut Ctrl+O and press Enter, then close it also with the keyboard shortcut Ctrl+X only. Apache in this case also needs to be restarted
Systemctl restart apache2
Checking the operation of phpMyAdmin, connection to MySQL
In order to check the operation of phpMyAdmin, let's launch any browser and address bar let's dial the following address ( This local address phpMyAdmin).
http://localhost/phpmyadmin
If you see the phpMyAdmin welcome page, then everything is fine, in other words, both the web server and phpMyAdmin are working.
To connect to the MySQL server, enter your username and password; for example, I will connect as root ( although as you know, working as root is not recommended).

After logging in you will be taken to home page phpMyAdmin, where you can see the list of databases on the server and the basic settings of the MySQL server.

Uninstalling phpMyAdmin in Linux Mint 18.2
You can remove phpMyAdmin either using the program manager or using the terminal. Let's look at both methods as well.
Uninstalling phpMyAdmin using Program Manager
Open the program manager, and in the same way as during installation, find phpMyAdmin. After you open phpMyAdmin in the program manager, you need to click on the “ Delete».

During the removal process, we will be asked if we want to delete the phpMyAdmin database settings, we leave the checkbox, i.e. delete the settings, click " Forward».

Then there will be a question whether we want to delete the phpMyAdmin database, we check the box and click “ Forward", i.e. We will delete the phpMyAdmin database as we no longer need it ( If you need it accordingly, then you do not check the box).

The phpMyAdmin field will be removed. Now we can disable the phpMyAdmin configuration file in the Apache web server settings. To do this, in the terminal we need to run the command ( with superuser rights).
A2disconf phpmyadmin
And restart Apache
Systemctl restart apache2

If you do not need the Apache web server, then you, like phpMyAdmin, can remove it using the program manager.

During the Apache removal process, you will not have any additional questions will not be.
Uninstalling phpMyAdmin using Terminal
To remove phpMyAdmin using terminal, we have to launch it accordingly. Then we get root rights using sudo -i (or sudo su), since the deletion must be done with superuser rights.
To remove only phpMyAdmin, we need to first disable the phpMyAdmin configuration file. To do this, as before, we write the following command and restart Apache.
A2disconf phpmyadmin systemctl restart apache2
To remove phpMyAdmin we use the following command.
Apt-get -y --purge remove phpmyadmin
Key --purge means that we want to remove packages along with their configuration files.
During the removal process we will be asked if we want to delete the phpMyAdmin database settings, we answer “ Yes" and click " Enter».

Then, when asked about deleting the phpMyAdmin database, we also answer “ Yes", as I already said, unless of course you need it.

As a result, phpMyAdmin will be deleted.

To remove the Apache web server, write the following command.
Apt-get -y --purge remove apache2
To remove all related packages that we no longer need, we need to use the following command, thereby we can free up disk space.
Apt-get -y autoremove

That's all, I hope the material was useful to you, good luck!
phpMyAdmin is a LAMP application created specifically for administration MySQL servers. Written in PHP and accessible via a web browser, phpMyAdmin provides a graphical interface for database administration tasks.
Installation
Before installing phpMyAdmin, you will need access to the MySQL database on the same computer where you are installing phpMyAdmin, or on a remote computer accessible over the network. See the MySQL section for details. To install in the terminal, enter:
Sudo apt-get install phpmyadmin
When prompted, select which web server will be configured for phpMyAdmin. This section assumes use as a web server Apache2.
Sudo ln -s /etc/phpmyadmin/apache.conf /etc/apache2/conf-available/phpmyadmin.conf sudo a2enconf phpmyadmin sudo /etc/init.d/apache2 reload
In your browser, go to http:// localhost/phpmyadmin. On the login page, enter root as the username, or another user if you configured one, and the MySQL password for that user.
If in the previous step, when you go to the address http:// localhost/phpmyadmin, the server gives an error 404 - Not found, check the file location phpmyadmin.conf. In case of ubuntu 12.04: if the file is missing at /etc/apache2/conf.d/phpmyadmin.conf and at the same time exists at the address /etc/phpmyadmin/apache.conf, then move the file and restart the server: sudo ln -s /etc/phpmyadmin/apache.conf /etc/apache2/conf.d/phpmyadmin.conf sudo /etc/init.d/apache2 restart
After that, try logging in through your browser again.
Settings
The phpMyAdmin configuration files are located in /etc/phpmyadmin. The main settings file is /etc/phpmyadmin/config.inc.php. This file contains configuration options that apply to phpMyAdmin globally.
To use phpMyAdmin to manage MySQL on another server, set up the following entry in /etc/phpmyadmin/config.inc.php:
$cfg["Servers"][$i]["host"] = "db_server";
Replace db_server to the current IP address of the remote database server. Also make sure that the computer with phpMyAdmin has access rights to the remote database.
After setup, log out of phpMyAdmin and log in again and you will have access to the new server.
The config.header.inc.php and config.footer.inc.php files are used to add header and footer HTML for phpMyAdmin.
, | |
For correct operation of many web projects, database management systems (DBMS), for example, MySQL, are needed. However, interact with the system exclusively using command line MySQL is not always convenient.
With phpMyAdmin, users can manage the MySQL system through a web interface. This manual contains step by step instructions on installing and protecting the phpMyAdmin web interface.
Requirements
To follow this guide you will need:
- A non-root user account with sudo privileges (you can find out how to create such a user in the article “”);
- Pre-installed group of LAMP programs (Linux, Apache, MySQL, PHP); for instructions on installing LAMP stack on Ubuntu server 14.04, read.
Once you have completed the prerequisites, you can begin installing phpMyAdmin.
1: Install phpMyAdmin
phpMyAdmin can be quickly installed from the standard Ubuntu repository.
To do this, update the list of system packages, and then download and install the files using the apt package manager:
sudo apt-get update
sudo apt-get install phpmyadmin
In order to set up the installation, you need to answer several questions.
- Select apache2 as the server.
Note: If you don't press spacebar when selecting a server, the installer will not be able to move necessary files during installation. To select Apache, press Spacebar, Tab, and then Enter.
- When asked if you need to use dbconfig-common to configure the database, answer yes.
- Enter the DBMS administrator password.
- You will now be asked to select and confirm a password for the phpMyAdmin application.
During installation, the phpMyAdmin configuration file is added to the /etc/apache2/conf-enabled/ directory, where it is read automatically.
All that remains is to explicitly enable the php5-mcrypt extension, which can be done using:
sudo php5enmod mcrypt
Then restart Apache to update the configurations:
sudo service apache2 restart
Ready! To open the interface, visit in your browser:
http://domain_or_IP/phpmyadmin
To log into phpMyAdmin, use the root username and password you created during installation. The user interface will appear on the screen.
2: Protect phpMyAdmin
As you can see, installing and running phpMyAdmin is a fairly simple process. However, do not forget that due to its ubiquity, PhpMyAdmin is often subject to attacks by cybercriminals. On at this stage The interface must be provided with a sufficient level of security to prevent unauthorized use.
One of the most simple way phpMyAdmin security – hosting the security gateway. This is done using special files Apache called .htaccess.
Activating .htaccess override
First you need to activate the .htaccess file by editing the Apache configuration file.
So, open the Apache configuration file:
sudo nano /etc/apache2/conf-available/phpmyadmin.conf
To section
Options FollowSymLinks
DirectoryIndex index.php
AllowOverride All
. . .
By introducing the desired line, save and close the file.
To update the settings, restart the web server:
sudo service apache2 restart
Creating the .htaccess file
The application now supports .htaccess files; you just need to create such a file.
For correct operation, you must create this file in the application directory. So to create required file and open it in text editor with root privileges, type:
sudo nano /usr/share/phpmyadmin/.htaccess
You need to add the following code to this file:
AuthType Basic
AuthName "Restricted Files"
AuthUserFile /etc/phpmyadmin/.htpasswd
Require valid-user
Let's look at these lines in more detail:
- AuthTypeBasic specifies the authorization type; in this case, password authentication is used using a password file.
- AuthName contains the text of the authentication dialog box message. To prevent unauthorized users from obtaining additional information O closed application, this message should not contain details, but only general information (for example, “Restricted Files”, “Restricted Stuff”, “Private Zone”, etc.).
- AuthUserFile specifies the location of the password file that will be used for authorization. It must be outside of the served directories. Such a file will be created later.
- Requirevalid-user indicates that only authorized users can access this resource. It is this parameter that protects the resource from unauthorized users.
Save and close the file.
Creating the .htpasswd file
Now in the directory specified in the AuthUserFile line, you need to create a password file.htpasswd.
For this you will need additional package, containing the htpasswd utility, which can be installed from the standard repository:
sudo apt-get install apache2-utils
Remember, the file must be created in the directory specified in the AuthUserFile directive, in this case /etc/phpmyadmin/.htpasswd.
Create this file and pass it to the user by typing:
sudo htpasswd -c /etc/phpmyadmin/.htpasswd username
This article explains how to install Apache web server, PHP, MySQL DBMS and phpMyAdmin in Ubuntu Linux.
Installing Apache
Install Apache 2 from the repositories. To do this, run the command:
Sudo apt-get install apache2
After installation, the Apache server usually starts immediately (the message “Starting web server apache2” is displayed).
To manage the Apache server, we can use the apache2ctl utility. For example, you can view the current status of the Apache server by running the command:
Apache2ctl status
The commands to stop, start and restart the Apache server are as follows:
Sudo apache2ctl stop sudo apache2ctl start sudo apache2ctl restart
Checking Apache Server Health
You can check that Apache is working by typing http://localhost in your browser. If everything is in order, a blank page will open with the text: “It works!” .
Installing PHP
To install PHP (version 5), run the command in the terminal:
Sudo apt-get install php5 libapache2-mod-php5
After this, you need to restart the Apache web server. Ubuntu did this automatically for me. If this does not happen, run the command:
Sudo apache2ctl restart
Installing MySQL
To install MySQL, run the following command:
Sudo apt-get install mysql-server libapache2-mod-auth-mysql php5-mysql
After MySQL is installed, the following window should appear in which you need to enter a password. By default MySQL creates administrative user named root. In this window you need to enter the password for this user and press Enter, then re-enter the password. 
Installing phpMyAdmin
phpMyAdmin is a special web application for administering MySQL. It allows you to manage MySQL databases directly from your browser, perform SQL queries, view data and much more. To install phpMyAdmin, run the command:
Sudo apt-get install phpmyadmin
The installation of phpMyAdmin will begin. At the end of the installation, a window will appear in which you need to select the apache2 server (using the Space key; an asterisk should appear opposite the line apache2) and press Enter. 
Next you will be asked to create a database for phpMyAdmin. Select Yes and press Enter. 
Then enter the password to register phpMyAdmin on the database server and confirm the password in the next window. 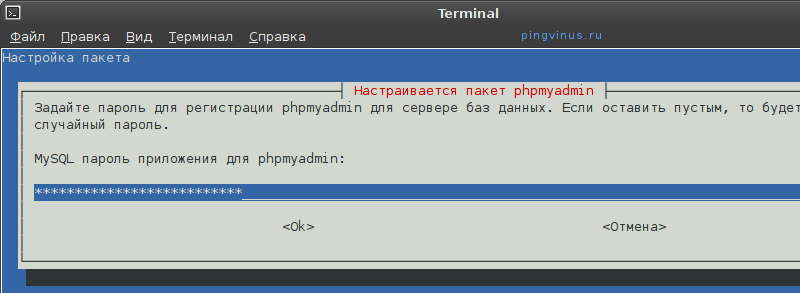
Checking the functionality of phpMyAdmin
In your browser, enter the address http://localhost/phpmyadmin. A form will open to enter your MySQL username and password to log into phpMyAdmin. For the username, enter root and the password is the one you specified for the root user when you installed MySQL.
Conclusion
We installed the Apache web server, PHP language support, MySQL DBMS and the phpMyAdmin application. The next step is to create virtual hosts (sites). Now (after installation) one virtual host has already been created, available at http://localhost. The files for the localhost virtual host are located in the /var/www directory. In one of the following posts I will tell you how to create virtual hosts for the Apache web server.


