TeamViewer (Russian: Teamviewer) is free program(for personal use for non-commercial purposes), allowing you to establish incoming and outgoing remote connections to access other computers, exchange files between the control and controlled machines, make video calls, take part in web conferences and much more.

Some features of TeamViewer for Windows
- Remote control of a computer or mobile device on Android based, iOS;
- Wake-on-LAN – turn on your computer from another computer using Teamviewer on a local network or through a router;
- Ability to transfer files;
- Instant messaging: group chats, web chats, offline messaging, etc.;
- Remote printing;
- Installation as a system service to provide access to remote devices at any time;
- Synchronous clipboard;
- Multiple monitor support;
- Saving individual connection settings for subsequent connections to computers, sorting them by groups and contacts;
- Control remote devices using hot keys;
- Cross-platform – operating systems supported Microsoft Windows, Chrome OS, iOS, ;
- Availability portable version.
And these are not all the capabilities of Teamweaver.
It is worth highlighting the simple and friendly user interface of TeamViewer in Russian, which helps to easily understand this program even for beginners who have not previously worked with software of such kind.
We also note high level TeamViewer 15 data exchange security: use of a cryptographic algorithm (private/public key RSA 2048) for data exchange and random passwords for one-time access, AES session encryption (256 bits), additional two-factor authentication, etc.
Also note that TeamViewer 15 is now fully compatible with (version 1909).
Download TeamViewer for Windows
Available for download on this page latest version TeamViewer in Russian for Windows 32 and 64-bit.
Download TeamViewer 15 for free, without registration.
TeamViewer is a free program for remote computer control via the Internet.
Version: TeamViewer 15.1.3937
Size: 25.1 MB
Operating system: Windows
Russian language
Program status: Free
Developer: TeamViewer GmbH
Official site:
What's new in version: List of changes
Today we will look at programs for remote access to a computer, relevant to system administrators, as well as users to solve technical problems, resource usage, or file transfer between your PC and the remote PC.

A remote access program will help you monitor and manage the desktop of a third-party machine, settings and functions, exchange material, chat, launch installed software and much more.
Programs |
Russian language |
License |
Rating |
File access
|
Phone control
|
| Yes | Free | 10 | Yes | Yes | |
| Yes | Free | 10 | Yes | No | |
| Yes | Free | 9 | Yes | No | |
| Yes | Free | 9 | Yes | Yes | |
| No | Free | 8 | Yes | Yes | |
| Yes | Free | 8 | Yes | No | |
| Yes | Free | 7 | Yes | No | |
| Yes | Free | 8 | No | Yes | |
| Yes | Free | 10 | Yes | Yes | |
| No | Trial | 6 | Yes | Yes | |
| Yes | Free | 7 | Yes | No |
![]()
Let's start our review with a popular assistant for accessing control of third-party PCs, which has useful options and high quality work. TeamViewer has a fairly simple operating algorithm, creates interactive conferences for up to 25 people, records videos and screenshots of current actions, allows you to exchange files, share the screen, chat and send voice messages. The program supports modern operating systems and bypasses various protections such as firewalls, proxies, etc. To work in the program, you need to install the product on both computers and enter the access code. Functioning in the utility requires an Internet connection.

The utility makes a remote connection to another PC, providing access to the software, functionality and desktop of a third-party device. AeroAdmin provides the connected user with access rights, has different connection modes, opens multi-sessions, selects the picture quality for the channel and encrypts the connection. Clipboard synchronization, file transfer and resuming if the connection is lost are also available. The program is distributed in four versions, the free version is just suitable for home use.

Professional software with extensive functionality and a high-quality interface for connecting and controlling a remote computer. In its work it uses the secure protocols SSH, Telnet, Rlogin, SCP, SFTP and Raw; the connection itself is made through the Network, confirmed with a password and protected from interception. In the settings, you can switch between options, select remote connection parameters, port forwarding, and use hot keys. The client has a file manager, connects to a Unix system, generates an RSA cipher algorithm and protects copied files from theft.
This client will help you gain access via the Internet to remote control of another computer and conduct high-speed data exchange between devices. AnyDesk guarantees high quality of the broadcast image, has settings for audio broadcasting, settings for blocking the mouse and keyboard of the client machine, as well as passwords for auto-connection without prompting. The functioning of the software consists of establishing a connection between two PCs by assigning email addresses.

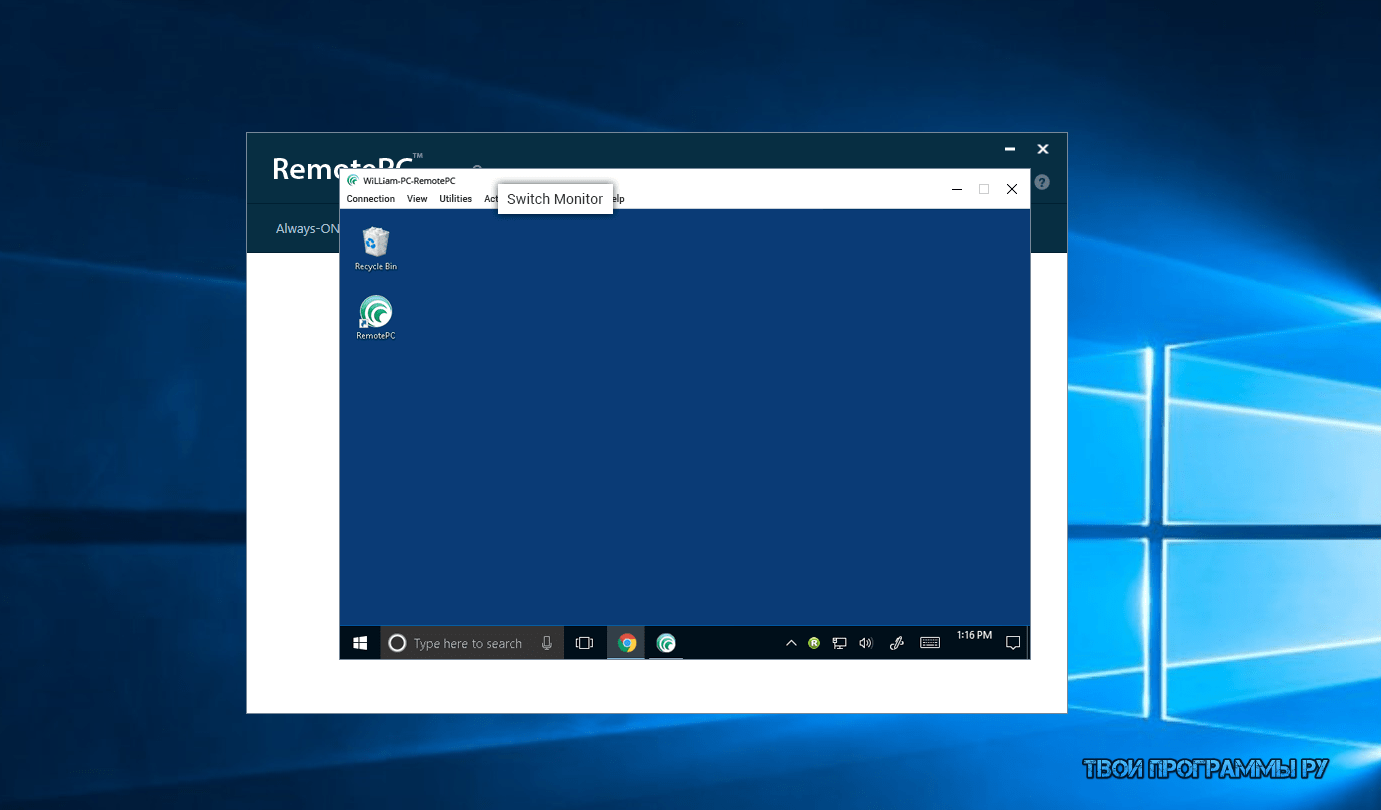
Excellent optimized for different Windows versions Application for controlling a remote PC and broadcasting images. The utility allows you to easily connect to your local machine, configure access to it, and synchronize with mobile devices. RemotePC has built-in options for administration, extensive options for remote control, Remote Mouse and Remote Access add-ons. Support for proxy servers is available, hiding user IP addresses, convenient identification with a password and login, and a single point for changing parameters. The program is convenient and easy to use, despite the English-language menu.
Radmin exercises control remote computer from the user, providing fast and high-quality work without freezes and problems. It is considered one of the best in its category and justifies this title with its capabilities and performance. Working in the software involves setting up remote access, transferring the necessary material and applying the functionality simultaneously on both PCs. The user can use text and voice chats, exchange files and open access to the desktop. The only downside is that there is only a month of free use.

A high-quality program that remotely controls other PCs using computer networks LAN and INTERNET. Helps you configure the control panel on a connected computer, authorize Microsoft, or transfer files. The remote device is controlled using your mouse and keyboard, supports multiple monitors, viewing the screen of another PC through a browser using a Java viewer and working through a proxy server.

A simple service for gaining access and control of a remote computer, managing your desktop and various functions devices. Having received remote control computer, you can exchange information and files over a local network, open streaming media content, synchronize with Android devices, edit office files, etc. In the Splashtop settings you can adjust the screen resolution, response parameters and stream pictures. You need to start working in the software by creating an account or authorizing with a Google account.
The work of the program is to form a client-server chain that organizes the management of a third-party desktop. When connecting remotely to the system of another PC, a high degree encryption of transmitted material, so users can exchange files, conduct seminars, online presentations and more. Supremo Remote Desktop has a file manager, supports a proxy server and allows you to make a huge number of connections, using a separate password for each. The downside is 21 days of work trial period and the lack of a “conference” option.
Surely not every PC user (especially a beginner) knows that a computer can be safely controlled from a distance, and fully! Those. as if you were sitting and working at your own computer, but from a distance, and doing it, for example, from a tablet or another computer. This can be very convenient and, for example, I use this opportunity regularly. Why do I need it? I work a lot on the Internet, but I can’t always sit at my computer. Sometimes I need to go somewhere or see someone, but some urgent matter comes up and I need my computer to open some program, run something, look at something. Carrying a computer with you always and everywhere is very problematic. It weighs about 4 kg, which feels good when carrying it :) But on the other hand, I always have a tablet or smartphone with me, from which I can connect to my computer at any time and from anywhere, which I leave turned on at home. And this way, I can work on it just as if I were at home. Another reason for remote access is the ability to ask a friend or colleague to help you sort out any problems in the settings or programs on your computer through remote access. You yourself can also help someone solve some problem on their computer by connecting remotely to this person. And lastly... It happens that the right computer is in a hard-to-reach place or you need to walk to it. In this case, the easiest way is to connect to it remotely and you’re done!
This article of mine will talk about how to remotely control a computer from any device, and with the help of this guide you will learn how to do it easily even if you are a complete beginner! We will consider the most, in my opinion, convenient program for this matter - TeamViewer, and today I will tell you about its main most necessary and useful functions. Yes, it is also free for non-commercial use! There are only 2 conditions for remote device management: the presence of an Internet connection on both devices, and the presence of the TeamViewer program on both devices.
Today, the TeamViewer program is supported, one might say, by all devices:
Smartphones based on Android operating systems, Windows Phone 8;
Tablets on the same Android systems,Windows Phone 8;
iPad of all modifications;
Computers based operating system Mac, Linux, Windows.
For all these devices, you can download the TeamViewer app for free.
It is also interesting that you can control it the other way around – smartphones and tablets from a desktop computer.
So, let's begin to understand the program step by step, starting with its installation process.
Installing TeaViewer
First you need to download the program itself. It is best to download from the official website, since the latest version will always be posted there. Go to the official TeamViewer website using the link:
teamviewer
At the top of the page that opens you can’t help but notice big button"Free full version." Here we press it:
After downloading the file, find it on your computer and run it. The file will be named: “TeamViewer_Setup_ru”:
The next program window will ask you to select the option to use TeamViewer. These settings can be changed at any time after installation. If you want to control this computer (on which you are installing the program) remotely, then immediately select the appropriate item. Otherwise, simply select Install.
Below, be sure to select the “Personal, non-commercial use” option, since the program is distributed free of charge only for this use case.
At the end, check the box “Show additional settings" and click the "Accept - Next" button:
Account control Windows entries may ask you for confirmation to continue with the installation. Just click “Yes”:
In the next window, check the path where the program will be installed and change it if desired. But I recommend leaving the default path. The options below may not be enabled. All of them, if necessary, can be set after installation. Click the “Finish” button:
A quick program installation process will begin, which will take from a few seconds to a minute.
This completes the installation of the TeamViewer program! Let's move on to its settings and application.
Setting up TeamViewer
Settings uncontrolled access to computer:

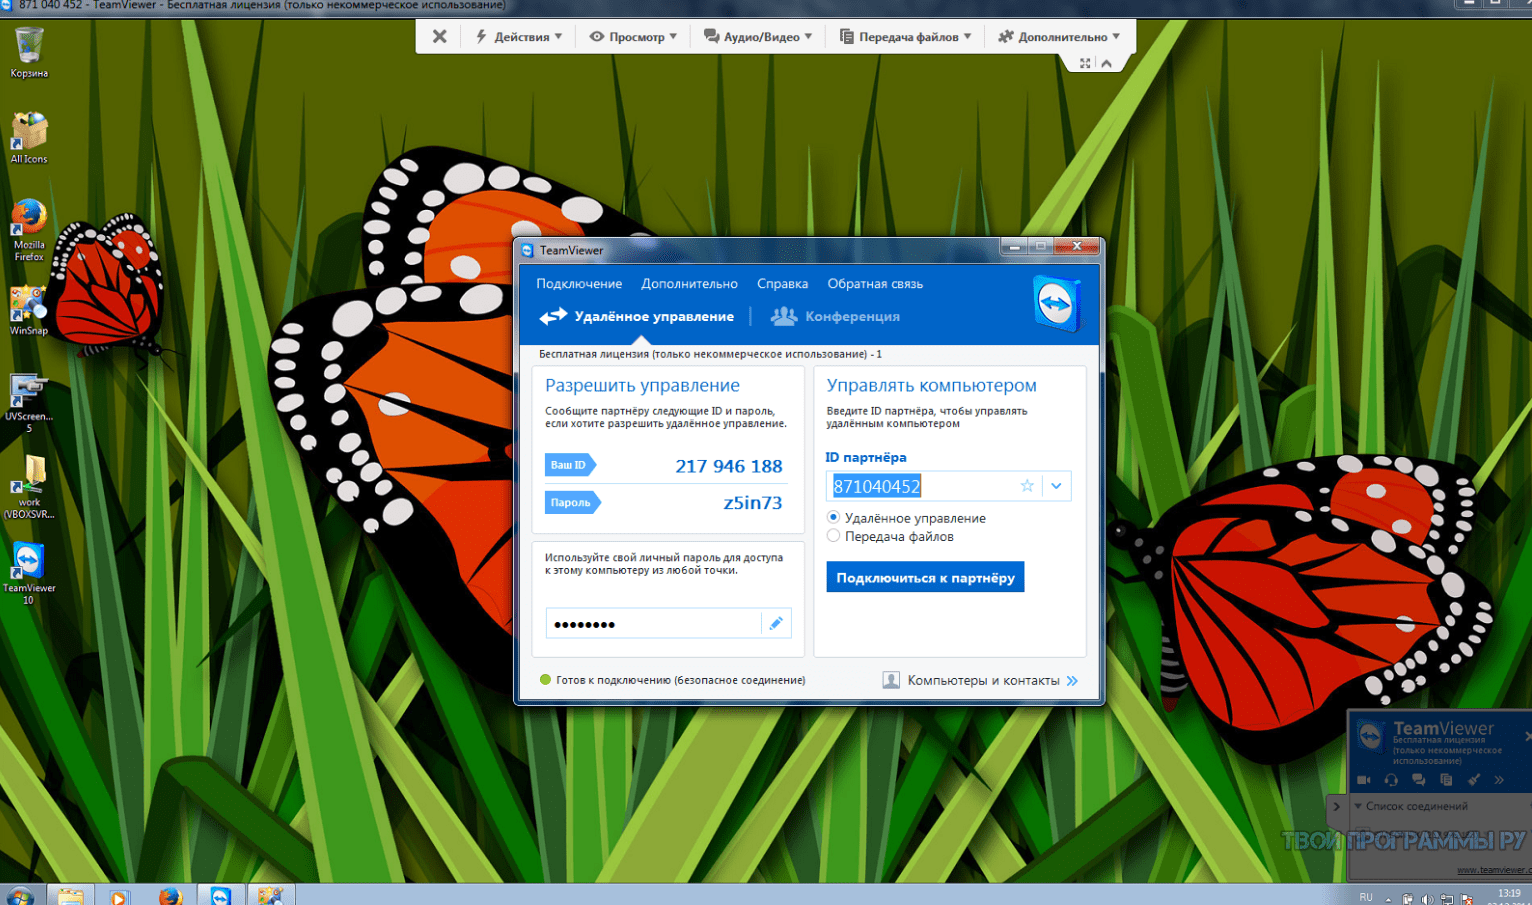
Now we can freely control this computer from any other device, no matter where we are within the Internet access zone :) But for this, let’s deal with the information that we (or anyone else) need to know so that we can connect to this computer remotely.
Data required for remote control of any device:
Perhaps the most important thing is to know the data by which you can connect remotely to your current computer.
To connect to this computer from another computer / device with TeamViewer installed, you only need to know:
ID of this computer;
Password for accessing this computer via TeamViewer (not to be confused with the password for logging into Windows!).
All this data is located in the main program window:
According to my example (see image above) to remotely access this computer in this moment I need to specify ID: 900 288 832 and password: 6sx71k on the remote device.
The ID in TeamViewer for each specific computer does not change. Those. the one that is indicated in the window you will always indicate during a remote connection. And there are 2 types of passwords in TeamViewer: temporary (random) and personal (permanent). Now more about this:

I hope you understand the difference in passwords :)
Now let's go through the main most important settings of the program.
Basic program settings:
To go to all program settings, open the “Advanced” menu at the top and select “Options”:
We will immediately be taken to the “Main” tab. Here you can enable or disable automatic start TeamViewer programs when booting Windows. If you are going to control this computer remotely, then I strongly recommend leaving this item enabled. Then you won’t have to launch TeamViewer manually, and even more so, if you are far away and TeamViewer is not running on this computer, you will not be able to connect to it.
Below you can see a message that you are linked to the account you created earlier. If you click the "Delete" button, you can break this connection.
On this tab, there are no more important settings that are not set by default. Go to the next tab “Security”.
On the “Security” tab we can change the “Personal” password by entering a new one and repeating it at the very top. Below you can set up a “random” password by specifying the number of characters. By default, such a password will always be 6 characters long.
In the last section, “Rules for connecting to this computer,” you can allow or deny logging in remotely using Windows password. It is most reliable to leave this parameter set to default, i.e. - "Is not allowed". The easiest way to connect is through a TeamViewer password and it will be safer this way.
“Remote control” tab. There are important settings here. All these settings are global - i.e. for any connection. But if you created for yourself account(as discussed), then for each computer added to your personal list, you can set your own connection parameters, but more on that later.
This is what the settings on this tab look like:
At the very top you can adjust the image quality when connecting to a remote computer. It’s better to leave either “Automatic quality selection” or “Optimize speed”. I always set speed optimization to connect to a remote machine and work with virtually no delays even through Mobile Internet. There is only one minus - the image quality (the way we see the remote computer) will not be the best, but sometimes this is not even noticeable.
Below, as you can see, the “Hide wallpaper on the remote machine” option is enabled. This means that when you connect to a remote computer, the desktop background there will become simply black. I always leave this option enabled so as not to waste resources on loading a sometimes large background image.
Even lower are additional settings that can be configured according to everyone’s preferences. For example, if the “Play computer sounds and music” function is enabled, you will accordingly hear all the sounds of the remote computer.
It can be useful to enable the “Send keyboard shortcut” option. If you enable this option, then when you connect to a remote computer, you will be able to use your usual keyboard shortcuts. For example, a quick way to open the task manager is “Ctrl+Shift+Esc”.
In general, here you configure it as you need.
Let’s go straight to the “Computers and Contacts” tab.
The “Computers and Contacts” tab will display your account settings, which will then show all the remote computers and users you have added. On this tab you can change your account information, as well as computer display settings.
At this point we have discussed the basic settings. Now let's move on to the main thing - remote computer control.
The principle of remote computer control
We can, as I already said, control a computer or any other device (TeamViewer must also be installed and configured on them!) from any point where there is access to the Internet and we just need to know the ID of the managed device and its password (random or permanent ). Knowing these 2 parameters, we can control the computer.
Let's try to connect to the computer remotely:
We specify the password if you know the “personal” password of the remote computer. Otherwise, leave the field blank.
Specify the network name of the remote computer (for your own convenience). It will appear in the list of your computers.
If you wish, you can specify a description of the remote computer to be added for convenience if you have a large list of them.
In the Window list, I selected Full Screen Mode. This means that when connecting to a remote TeamViewer computer will display the remote computer in full screen. It will look like you are fully working on that computer. You can select another option, for example “Windowed Mode”, and then the remote computer will be displayed in the window.
In the “Quality” list, I always select “Optimize speed” so as not to sacrifice performance, especially when connected to a slow Internet.
It is better to always set “Identification mode” to “TeamViewer Identification”. Then you will only need to know the password set for a particular computer in the TeamViewer program to connect to it.
In the main TeamViewer window, where the “Manage Computer” section is located, indicate the ID of the computer that we will manage in the “Partner ID” field.
If you created an account, then we can immediately add the computer to our “Favorites” list by clicking the button with an asterisk:
A window for access settings for the computer that we add to the list will open in front of us:
In the image above, I have marked the fields and lists where it is best to make changes:
The remaining settings can be left with the “Inherited” value, because, as a rule, there is no need for them and, in extreme cases, they can be configured at any time.
When the settings are set, click the “OK” button.
The computers that you will add to your list will be visible in a separate window, as in my example in the image below:
In the example, I added a computer named “Test TeamViewer”.
Now that the computer is in the list, to connect to it, simply double-click on its name. If you immediately specified a password, it will not be requested and the connection will occur immediately (within a couple of seconds).
Another way to quickly connect to a computer, if for some reason you did not create an account and do not add computers to your favorites list, is to simply enter the ID in the appropriate field and click “Connect to partner”:
The default mode is “Remote Control”, which is what we need. And we can enable the “File Transfer” mode at any time during a remote session.
Now a window will appear where you need to enter a password to connect to the remote computer:
Enter the password and click the “Login” button.
The connection usually occurs in a couple of seconds, but this depends on the speed of the Internet on both sides. After connecting to the remote computer, the window will look like this:
As you can see, the screen of the remote computer is black. As you probably remember, in the settings we left the “Hide wallpaper on the remote machine” option enabled. As a result, the wallpaper on the remote machine became black, which will reduce resource consumption, and immediately after disconnecting from the remote computer, its desktop wallpaper will return to its previous appearance.
This is how simple and easy it is to connect to a remote computer :)
You will be able to fully control your computer from any distance, and at the same time it will look exactly as if you were sitting at that computer.
Let me remind you once again that the same can be done from almost any device. If you, for example, have an iPad, then download TeamViewer onto it (it’s always free!), enter the ID and password of the remote computer, and that’s it! You will connect and be able to control it directly from your tablet, and it’s also very convenient!
Now let's look at some of the functions available to us during a remote session.
Functions available during a remote computer session using TeamViewer:
So, we are connected to a remote computer. At the top we see a panel with a set of functions. Let's go through the most necessary of them:
The button numbered “1” allows you to immediately terminate the connection with the remote computer.
After any termination of a TeamViewer session on both devices, a window will be displayed indicating that the free session has ended. Just always click "OK":
You can also instantly terminate the connection while on that remote computer. For example, someone remotely helps you set up a system or fixes a problem. If suddenly that person began to do some actions on your computer that, in your opinion, he does not need to do at all, then you can break the connection with just one button in the form of a cross (see image below):
The button numbered “2” allows you to hide this panel of remote session functions.
The button numbered “3” allows you to instantly switch to full-screen mode, which I use in 99% of cases.
A very useful feature is transferring files from a local computer to a remote computer and back. You can do this by simply dragging and dropping necessary files from your computer window to the remote computer window.
Another way is to use a special manager – “File Transfer”. It opens from the same panel that is fixed at the top. Select “File Transfer”, and then “File Transfer” again:
A special manager will open - Explorer. There is nothing complicated here either. We indicate from which folder on the local computer the file will be transferred, then indicate the folder where exactly the file will be transferred to the remote computer. Then select the file itself on the local computer that we will transfer and click the “Send” button:
The file will be transferred to the remote computer. In my example, I transferred an image file called "" from the "Downloads" folder to the remote computer's desktop:
After transferring the necessary data, the file transfer manager can be closed, and a window will be displayed with statistics on the transfer of your files, where you need to click “Close” again:
Or you can minimize this window.
There are 3 more very useful functions, which are available during the remote session. This includes voice communication, video broadcasting and chat support.
All these 3 functions can be activated by selecting the “Audio/Video” menu:
Here you can change the scaling, for example, enable full screen mode. Here, in the “Quality” submenu, you can select the quality you want for displaying content on the remote computer, for example, by turning on “Optimize speed”. Also here you can change the resolution of the remote computer (for example, if the resolution of your local computer is very different) and show / hide the wallpaper on the remote machine. Everything else is not so significant and necessary...
Well, that’s probably all the most useful things you need to know about how to remotely control a computer using TeamViewer :) Cool program, isn’t it? :)
The most important thing is that it is extremely simple, convenient, and even a beginner can handle it. And, of course, it’s free! In general, to be honest, I have not seen a better worthy replacement for the TeamViewer program.
And now I think that in a couple of weeks I will already write an article, and you will be able to familiarize yourself with the next testing of the new autoclicker!
Well, now I say goodbye to you for a week... Good luck to you and always have a good mood! ;)
Since our site is designed for average users, some disagreements arose within the non-Oshibka.Ru team regarding the usefulness of this article. Typically, such material is intended for more experienced users who at least have a good knowledge of the Windows OS.
On the other hand, where should a novice user go who has only a vague idea of what RDP, TCP, UDP are? But you really want to know? Again, is this necessary for the average user? Maybe one simple program is enough for him?
A difficult situation.
Explain in one article what it is remote access to a computer via the Internet, but in such a way as not to frighten off the visitor.
We decided to experiment. Talk about difficult things as clearly as possible. We will take your comments into account.
What is this article about?
This article will tell you about two types of remote connection, briefly tell you what it is ID. Will tell you about the programs Remote access And Remote Desktop. We will also try to configure your computer in order to access it remotely without using third-party programs. Complex terms in the article are highlighted in brown and provided with explanations in the form of tooltips.
Remote access concept
Remote access to a computer via the Internet is called operating system tools, or third party program, allowing you to gain visual or file access to a computer located at a remote distance, but still connected to the Internet.
How is the required computer identified on the Internet?
Conventionally, all remote access programs can be divided into two groups according to the type of connection:
- Using ID
- Using IP addresses And domain names
Remote access programs using ID
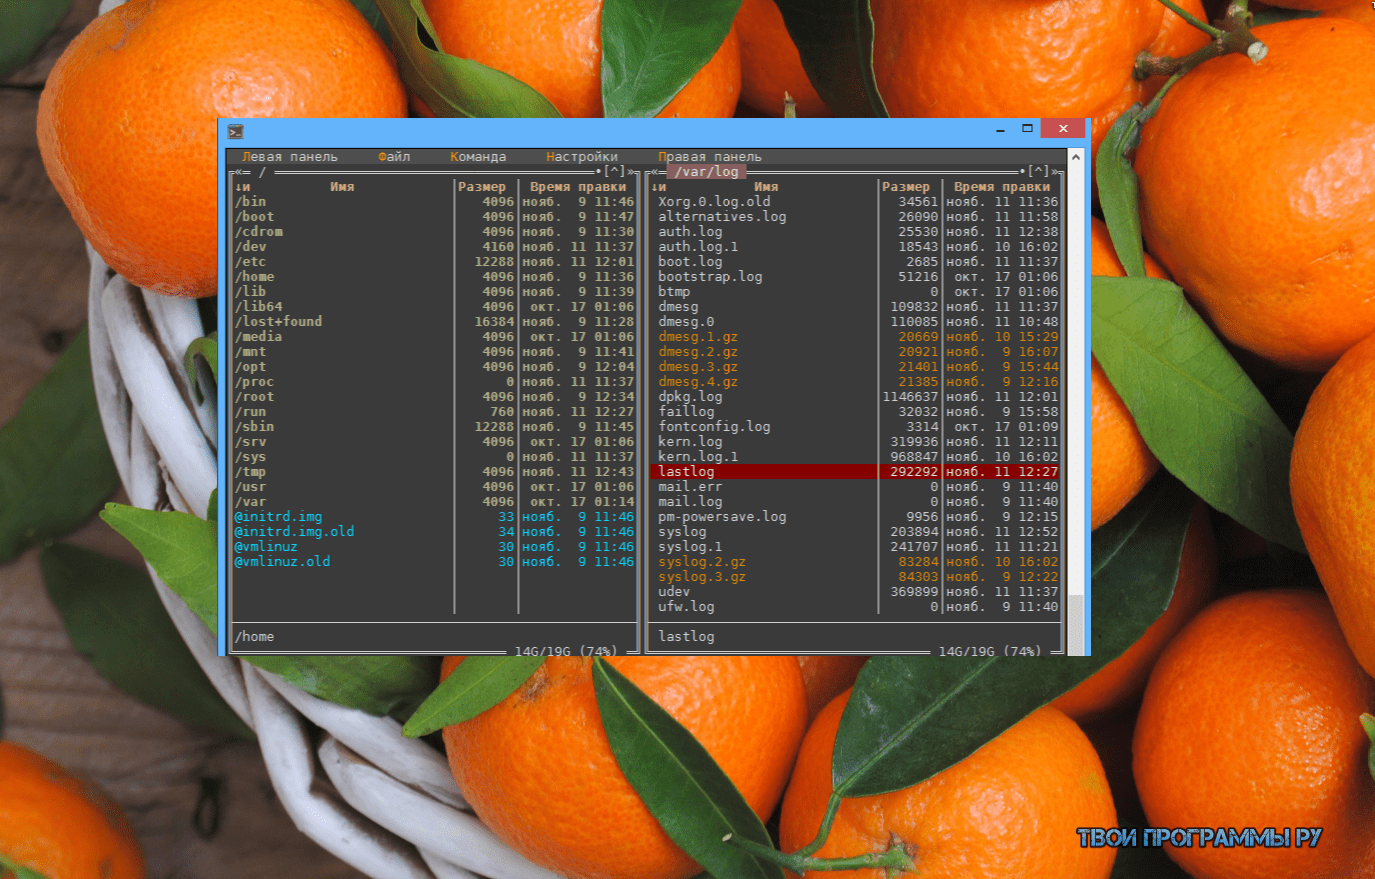
Of great interest are programs that use ID(unique identificator). Receipt method ID something like this: when a remote access program is launched on the computer to which you plan to connect, it sends a request to its server through which the connection will occur.
Having received this data, the server generates for the computer unique identification number — ID. This number is assigned to the computer. In the screenshot below it is highlighted in red.
Knowing this identification number and password, you can connect to a computer from anywhere in the world with this ID.
It remains unchanged until the hardware is replaced or the OS is reinstalled.
So using such programs is very convenient. When you change Internet provider, city, and even country, your computer ID Will not change.
Lack of programs using ID one - they are paid or shareware. Condition - you must not use the program for commercial purposes.
Example of programs using ID— TeamViewer, Ammy Admin. But the list is not limited to these two. They are simply the most popular and always heard by users.
We will not spend a lot of time on these programs, since their interface is simple and allows you to learn the program in 5-10 minutes. We may look at each of them in the future.
You won't have any problems with these programs. Use it for your health without overusing it. If TeamViewer will connect to a large number of ID- then sooner or later, the communication session will be limited to five minutes.
Remote access programs using an IP address or domain name
With this category everything is a little more complicated. Do they need a static IP address or Domain name. Connection via IP address, this is a classic connection type. It does not allow as much flexibility in the location of the computer and is most often used in "office space".
In order to use it, you need to do the following.
Connecting a fixed IP address or domain.
You need to connect with your provider additional service — Fixed IP address . This service is provided by many providers, including mobile ones. This service will assign your home network external IP address format 123.123.123.123
It is this address that will allow you to find your computer from outside.
An alternative to a fixed IP address can be the service DynDNS. When registering, you will be given a custom domain, for example:
neoshibka.dyn.com
Next, you simply install a program on your computer that, when turned on, will track your current IP address and send it to the server DynDNS, which in turn will match your current dynamic ip address , with address yourlogin.dyn.com
Thus, no matter where you are, no matter what provider you use, no matter how often your IP address—the address of your computer—changes, yourlogin.dyn.com
We won’t undertake to say, but getting a fixed IP address from a provider is somewhat easier and cheaper than using DynDNS. For example, at the time of writing this article, the cost of a dedicated IP address was only 20 rubles. / month
Advertising
Opening a port to a target - a remote computer.
Even now, knowing our IP address or assigned to us DynDNS domain, we can hardly connect to the computer - the firewall will not let us through. Most likely the port 3389 used by the program Remote Desktop which we will tame in this article will be closed. For everything to work as it should, we will have to open it and redirect it to the desired computer on the network.
Difficult? Not at all. Let's try to figure it out in practice.
Remote access to a computer via the Internet using Remote Desktop
So, first what we did was get a fixed ip address from our ISP. Let's remember, write it down, draw it.
Second. Let's find out intranet IP address our computer. To do this, we will follow the following path: Network and Sharing Center => Local Area Connection => Details  As you can see in the screenshot, the address of our computer within the network 192.168.1.102
Third the point will be opening the port 3389 to the above address. To do this, let's go into the router. In our case it is ADSL modem TP-LINK. We will show everything using his example. There’s nothing you can do about it, but you can’t do without instructions if you don’t know how to configure the modem yourself.
In our case we enter through Google Chrome by the address 192.168.1.1 and under the combination admin/admin. We get to the information page.
Let's go to Advanced Setup => NAT => Virtual Servers and press the button

Here you can choose ready-made services or create your own.
We will create our own and call it Udalenka, but the name can be absolutely anything. We register the local address of the computer, the one we spied earlier. In the table we enter the port everywhere 3389 and select the protocol TCP/UDP. We do all this based on a standard Windows application. Remote Desktop. For other programs, the ports may be different. A good list of applications and the ports they use is provided. (What we are learning may even be useful for games).
If, for example, you want to use Remote Desktop, and advanced RAdmin, then you will have to register a different port for it: 4899 .
Press the button

Item fourth, we will run on the computer we are going to control - Terminal Server Service. It’s worth clarifying something here.
Using the method described below is not recommended from the point of view of licensing purity if you do this in the organization where you work. Not sure about Windows 10, but in Windows XP - 7, the license was not violated if only one user connected to the computer.
We do all this for the purpose of familiarization and in order to learn the principles of remote access to a computer via the Internet.
So, to run it on your computer Terminal Server Service. In Windows XP this was done simply - Go to Administration — Services and applications — Services found it and simply turned it on. This allowed one user to connect to the computer. In this case, the user who was sitting locally was disconnected.
In Windows 10 we need to do things a little differently. We need a special patch. You can download it from here. This patch will allow you to run on the system Windows 10 terminal service.
Last time, search engines Google and Yandex began to consider this file as a viral threat. In fact, the file lay on the site for two years, and not a single scanner ever considered it to be malware. However, the file is now stored outside of notOshibka.Ru - you download it at your own peril and risk.
Let's unpack the downloaded file to any location. For example on Desktop. Run as Administrator file install.bat

A black window will indicate a successful result. command line with this content:

Fifth In this paragraph we will set a password for our user and also add him to the group.
For this purpose on the icon Computer And right click mouse select item Control.

In the window that opens, on the left side, we need to expand the list Local users and groups, select sub-item Users.
In the list of users, you need to find yourself and right-click.

Enter your password twice, press

Now we need to add our user to the group Remote Desktop Users.
To do this:
Right click on the user - Properties.
In the window that opens, go to the tab Group Membership and press the button <Добавить…>

Next, do everything in the same order as in the screenshot: 
As a result of the work done - Remote Desktop Users should appear in the general list of groups to which the user belongs.

We would like to draw your attention to the following. The above describes how to assign a password to your user. But it’s better to create a new one and add it to the groups. Otherwise, you may end up losing some data. For example, we logged out wherever possible. I had to enter all the passwords again.
Let's check if we were able to gain remote access to the computer via the Internet using Remote Desktop.
We go to another computer, go to START menu => All programs => Accessories and run the program "Remote Desktop Connection".
Enter the IP address previously assigned to us by the provider into the window that appears, click the button <Подключить> .

If we did everything we did earlier correctly, then we will be asked almost immediately Name And Password user on Remote machine. Enter them and don't forget to check the box to remember your credentials.

And the last “security touch” will be checking the Remote Machine certificate. Here, too, you need to agree with everything. And also check the box.

That's all. If everything works as it should, you can go through the settings Remote programs Desktop. Here you can turn on/off the sound, change the picture quality, connect local resources to the remote machine.
Free solutions
Remote control involves connecting to another computer to gain access and manage resources. Thanks to this feature, the user can solve many additional tasks remotely: provide consultations, diagnostics, computer monitoring. Thus, tasks are simplified that are often impossible or irrational to perform at a distance.
As part of the review, 10 solutions (6 free and 4 paid) will be considered for remote control. The main attention will be paid to the following features of the software of the selected category:
- Contents: what components are included in the distribution, types of installation on the host and client computer
- Connection modes: supported protocols, working with RDP (see below)
- Presentation functions: this means the possibility of audio and video accompaniment, screen capture, the presence of additional tools (“pointer”, “drawing board”, etc.)
- Security: supported encryption technologies, storage of confidential data, types of authorization on local and remote computers, availability of necessary settings
- Platform support: mobile platforms and OS, online version available.
Standard ones will not be ignored Windows features, namely the Remote Desktop Protocol (RDP), which will be discussed first. At the end of the review there is a comparison table with detailed information about the presence of the necessary functions in the mentioned applications.
RDP - Windows Remote Desktop Protocol
Starting with Windows NT, support for the Remote Desktop Protocol (RDP) is provided. Accordingly, Windows 7 offers the user RDP 7 (an update is also available for Windows XP), Windows 8 - RDP 8 (also available for Windows 7 SP1). The capabilities of the current version, RDP 8, will be reviewed.
Connecting to a remote worker is carried out using the mstsc.exe application, after entering the name of the remote computer. Connection parameters are also available in this dialog.
The “Screen” tab specifies the resolution of the remote desktop (with the ability to enable full-screen mode), color depth (up to 32 bits).
In the “Local Resources” section, you can select the audio playback mode (on the remote or current computer), and enable audio recording from the remote desktop. This section also configures access to the printer, local disk, drive, PnP devices, and ports.
The quality of data transmission is regulated in the “Interaction” tab. You can not only select a connection profile, but also independently determine the display parameters: desktop background, anti-aliasing, visual effects, image caching. All these options affect the data transfer speed during remote access and can significantly optimize network traffic.
Security settings are available through the System component (System Properties in Control Panel). In the “Remote Access” tab, you can allow remote assistance connections, as well as remote connections to the computer. Authentication is performed at the network level. You can also limit access by specifying a list of allowed remote desktop users yourself.

Thus, Windows provides basic tools for working with RDP protocol. But, as expected, advanced security settings, support for mobile platforms, and presentation functions are not offered to the user.
Teamviewer
TeamViewer is perhaps the most famous free remote control program. The toolkit allows you to establish remote access to home computer, manage the desktop from various platforms and devices, administer Windows server. In addition, developers highlight corporate TeamViewer features: The program can be used to organize conferences, consultations and help colleagues at work.
TeamViewer is available for Windows, Linux, Mac platforms (with restrictions), remote access from OS-based devices is possible. TeamViewer client full version distribution kit (“All in one”), as a system service (TeamViewer Host), in a portable format, on a terminal server and other options. It is worth highlighting the TeamViewer QuickSupport module, which does not require installation and is optimal for performing urgent tasks.
The full version of the program has client and operator parts available. The TeamViewer interface is represented by a main window with two tabs - “Remote control” and “Conference”.

Remote control
The user receives a unique ID to identify the computer on the network and a temporary password. Also, using the partner's ID (optional IP address) and knowing his password, you can establish a connection to a remote device.
Three connection modes are available:
- Remote control: remote control of a device or collaboration on the same computer
All actions are performed on another computer through the remote control window. At the same time, it is possible to change the resolution and scaling, switch between active monitors and other options. - File Transfer: Share files during a session
To exchange data in TeamViewer, a two-panel file manager is used, in which host and client resources and basic file operations for working with them are available, such as creating folders, deleting, copying, etc. - VPN: virtual network mode
You can set up a virtual private network between computers to provide public access to devices (printers, removable media and etc.).
Conferences
In this TeamViewer tab you can create a blitz conference or connect to an existing one. Among available tools You can note voice and video communication, screen sharing, session recording with the ability to convert to AVI. Whiteboard is used as a canvas for drawing, sketching, and commenting.

One of the undeniable conveniences of TeamViewer is the “Computers and Contacts” list, which provides fast access to devices. In addition, here you can monitor the network status of computers and exchange messages (group chat options are available). Looking ahead, it should be noted that not every review participant offers an address book for quickly connecting to other devices.
For security purposes, the program uses encryption of sessions (AES 256 bit) and traffic (RSA key exchange). Files transferred during the session are signed by VeriSign and the end user must consent to receipt. Through TeamViewer settings It is possible to restrict access: setting access to all operations only after confirmation or prohibiting outgoing sessions.
Summary
TeamViewer is a universal solution with the ability to choose a remote control method. Thanks to its wide range of multimedia functions and convenient organization of contacts, the program is optimal for holding conferences.
[+] Wide functionality free version
[+] Conference tools
[+] Security
[+] Presentation capabilities
[−] Restriction remote session(5 minutes in free version)
Ammyy Admin
Ammyy Admin does not require installation and combines a simple interface and flexible functionality. The program is free and has no restrictions. home use. Distributed for Windows, Linux/FreeBSD platforms, mobile devices are not supported.

Client and operator modules are available in the main window. The user receives an ID that is generated in connection with the equipment. Optionally, you can use IP when connecting.
The client part can be activated or stopped, thereby prohibiting connections; By default, Ammyy Admin works in standby mode. You can track the connection status using indicators, the explanation of which is in.
There is an address book, contacts can be combined into groups, the order of contacts can be changed, and new addresses can be manually added. The network status of computers, however, cannot be monitored.
The main connection modes include Desktop (remote desktop), File manager (File manager) and Microsoft RDP. RDP allows you to connect to a remote desktop; standard Windows functions are provided.
Other modes include Voice Chat and Speed Test. It's obvious that multimedia capabilities they are not presented as fully as in TeamViewer: Ammyy Admin is not positioned as a kind of corporate solution. You can note the screen sharing function, which in combination with voice chat makes Ammyy Admin a program suitable for remote assistance.
By going to “Ammyy → Settings → Operator”, you can specify RDP parameters, select the encryption type and codec profiles, thereby reducing the load on the network. More importantly, the “Network” tab allows you to configure the Ammyy Admin connection, manually specify routers, enable or disable data transfer via global network Ammyy (Ammyy Worldwide Network).

The file manager is a two-panel one, through which standard file operations between the client and the operator are available.
In the access rights settings (“Client → Access Rights”), you can set separate parameters for each ID. The authentication mode (connection to a PC) is available to choose from: by Hardware ID, password or user permission. Thus, you can minimally protect your computer from unauthorized remote connections.
Summary
The main advantages of Ammyy Admin are its speed, simple and fast interface, relative independence from Ammyy servers and free of charge. This is probably not the best for team work. optimal solution, but for individual use, with several computers at disposal, it’s fine.
[+] Speed
[+] Easy to set up
[+] RDP support
[−] No support for mobile devices
Supremo Remote Desktop
Supremo Remote Desktop is a convenient portable tool for remote control and remote assistance to other users. Works under Windows control XP and higher, mobile devices are not supported.
The program starts without installation; to start working, the host and client must download Supremo Remote Desktop from the developer’s website. Traditionally, two operating modes are supported: using a computer as an access point and connecting to a remote device. In the first case, access is opened by pressing the Start button. In the Your credentials section, the data required for connection is available: ID and password generated at the beginning of the session. The client requests authorization when logging in (Ask authorization option), thereby preventing unauthorized access attempts to the computer.

To connect to the host, use the Your partner field; you can also select an address from the Address Book. The list of active connections is displayed in the Connections section of the main program window.
During transmission, the HTTPS (SSL) protocol is used, the data is encrypted. The security settings are poorly disclosed: you can set a password to launch the program and specify the IDs allowed for the connection.
Other tools available in Supremo Remote Desktop include multiple connections of users to one machine. To transfer files, a manager is used that is similar to the classic two-panel one; uploading and downloading files is available. There are no presentation or multimedia functions provided. This certainly limits the use of Supremo as a remote assistant.
Summary
Supremo Remote Desktop is an easy-to-use program that has a standard set of tools for remote control. Users who do not need multimedia functions may pay attention to it.
[+] No router setup required
[+] Simple interface
[−] Few settings
[−] Slow screen rendering
mRemoteNG
Speaking about universal tools that allow you to work with several protocols simultaneously, it is worth mentioning mRemoteNG. The program provides access to VNC, ICA, SSH, Telnet, RAW, Rlogin and HTTP/S, and also has RDP support. Distributed in a portable and standard version of the installer for the Windows platform.

The mRemoteNG interface is presented in several sections, there are panels, tabs - as a result, it is easy for the user to configure appearance programs in your own way. Basic options are available in the “Configuration” section. Here you can specify the protocol required for connection and related parameters: connection settings, protocol, gateway, appearance, resources and others. “Configuration” displays the host connection status.
Connection to devices is carried out through the quick connection panel - here it is easy to create several configurations, which, in the case of multiple protocols, is very convenient. Connections can be grouped and configurations can be easily imported/exported.
File transfer is carried out via SSH protocol- which is not very familiar to the average user and at the same time, more reliable in terms of security. Additional features include a port scanner, and you can add external tools to the list.
The vagueness of mRemoteNG is striking. This is manifested in an unusual interface: it is not so convenient to work and configure with each specific protocol. In the connection configuration, many parameters are reduced beyond recognition - this can be attributed to the quality of localization. When trying to find a description of the functions, the documentation is silent, its sections are empty.
Summary
A notable feature of mRemoteNG is the combination of popular protocols into a single graphical shell. By setting up multiple connections, there is no need to use multiple specialized solutions. This plus to some extent compensates for the unintuitiveness of the program and the lack of documentation.
[−] Unintuitiveness
[+] Support for multiple protocols
[+] Transferring files via SSH
[−] Lack of documentation
TightVNC
Homepage: http://www.tightvnc.com/
TightVNC Software develops several products: TightProjector, RFB Player, VNC Reflector and TightVNC. TightVNC is a program for remote control; it can be used to solve computer problems, educational purposes, and administration.
TightVNC is a cross-platform solution. For Linux, however, at the time of writing this review is only available old version programs, Mac OS is not supported. However, there is a version of TightVNC available on the Java platform, which allows for remote control via a web server. On Windows platform, TightVNC installs as a regular application or as a system service. “Silent” mode is supported, it is quite easy to transfer the configuration to other computers or update servers remotely.
The TightVNC toolkit is divided into two modules: WinVNC - server part, installed on a remote machine, and a Viewer application designed to view the contents of the remote server’s screen. In the Viewer connection settings, the VNS server address and transmission speed are set.

It should be noted that TightVNC does not generate an access password; you need to define it yourself in the settings. The connection status can be recognized by the icon displayed in the notification area: if at least one user is connected to the computer, the colors of the icon change.
The developers hint that data transfer via VNC, despite the initial DES password protection, is imperfect. For security reasons, it is recommended to use SSH tunneling. At the same time, TightVNC settings reduce the likelihood of unauthorized access to zero. In future versions of the program it is also planned to introduce more reliable protection methods.
Summary
TightVNC surprises with a large number of settings regarding connection and security. This a good choice for the administrator, but in terms of transfer to the server and further maintenance - not the best option for an inexperienced user.
[+] Flexible setup
[+] Java version
[−] Non-operative setting
[−] Unintuitive interface
Remote Utilities
Remote Utilities is a solution, according to the developer, intended for small and medium-sized businesses. Remote control is possible directly, via a local network or the Internet. When working with a set of utilities, no firewall adjustments or preliminary configuration are required.

The complex works only under Windows; for Linux it is suggested to install the Wine emulator - but only for working with RUT-Viewer. mobile version absent.
Remote Utilities consists of three modules: viewer - installed on local computer, host - to remote, agent - module for user support. The agent, it should be noted, is optimal for quickly establishing communication between the client and the host. Remote installation, as well as updating, is easy thanks to the Remote installation tool.
A connection in one of the above modes is made using the New connection dialog (Connection → Add Computer), you can specify an IP address, Internet ID or DNS as an access point. The connected computer is added to the list address book, from which the necessary devices are subsequently selected.
Standard tools for remote control are provided, such as a remote device manager, registry viewer, terminal and file manager. The manager is two-panel, with the ability to copy and move data, launch and open applications and documents on a remote host. Also available is terminal support and power control.
Text chat is quite simple, but be aware that Remote Utilities also offers audio/video chat for users. Here it is worth mentioning the ability to capture video and adjust the transmission quality - from 24-bit color transmission to an optimized “picture” for a network with limited transmission (in addition, there is a Network usage mode parameter in the Properties settings of the remote computer). In a word, there are those features that have been repeatedly listed in similar programs with RDP support.
Remote Utilities provides 3 types of authorization, AES encryption with a 256-bit key, and a 2048-bit public key. Incoming connections are filtered by IP, and you can also create a list of trusted users with different access rights. The security subsystem is optional: you can choose RUT or WinNT. Both modes allow you to flexibly configure access to certain functions for each user; there are no significant differences between them.
Summary
A simple set of utilities for remote connection, without selecting a connection protocol, but extremely easy to install and configure. Essentially, it lacks cross-platform functionality and a user-friendly interface for working with multiple devices simultaneously.
[+] Remote installation and update in remote mode
[+] Availability basic settings for RDP
[+] Work via local and Internet
[+] Free (for non-commercial use)