This article will look at ways to configure routers using specialized programs, and not through the web interface. As a rule, the program for setting up a router is written by the manufacturer of this device, and you can install it either from the CD included in the package, or download it from the manufacturer’s official website.
There are also assistant programs for a specific provider, if the latter cooperates with the router manufacturer.
These programs are aimed at facilitating connection setup for inexperienced users, and the user is only required to select a provider from the list and enter a username and password, but first things first.
Assistant program from the manufacturer
First of all, let's get acquainted with the program automatic settings from the manufacturer ZyXEL. The program is called Netfriend.
Before starting the setup, if the router has already been configured before, then do full reset settings. To do this, press the “Reset” button on the back wall of the device and hold it for 10 seconds.
Program installation
Insert the CD into the computer's CD drive and the main program window will open. If autorun of disks is disabled on the computer, then launch the disk through “my computer”.

Main program window
Attention! During the first steps of setup, there is no need to connect the network wire from the provider (WAN port)!
Select the first item in the list – setting up Internet access. The installation of the Netfriend program will begin.

Program Installation Wizard
During the installation process of the program, the installation wizard will offer to install Yandex Bar. Whether or not to install the add-on is at your discretion.
After successful installation of the program, a shortcut will appear on the desktop, with which we launch the assistant.
Selecting the router operating mode
The first window after starting the program will be brief instructions on preparation for settings. It is advisable that all recommendations be followed.

Introductory instructions before starting setup

Choosing further actions
Of course, we are interested in setting up the router, so we select the first item in the list. Netfriend will start immediately automatic search router connected to the computer. Our router should already be connected to the computer and turned on (except for the WAN port).
Selecting a provider, setting up a connection
In the next two steps, select the items connected to a leased line and setting up an Internet connection. Next, Netfriend will ask you to select a country, city, and provider from the list provided.

Choosing a provider
This list is quite large, all large and medium-sized providers are present in it, the probability of not finding yours is very small.
On next step We will be required to enter the physical mac address of the router. It’s difficult to give any advice here, since further actions depend on the specific provider and connection technology. Some providers link the user account to a mac address, some do not. For your case, take the agreement with the provider and carefully read the relevant section. If everything is too complicated, we take the phone and call tech. support.
For example, let's enter the mac address of the router.

Selecting a mac address
And the final part of setting up the connection is entering your login and identification password. They are also necessarily present in the contract.

Internet access
On at this stage the program will ask us to connect the Internet cable. We connect it to the WAN port.

Connecting an Internet cable
After the indicator LED on the front panel lights up, thereby informing us that the Internet cable has been detected, click Next.
Finally, the program will offer us further actions:
- Tune wireless Wi-Fi net;
- Change administrator password;
- Finish setup and exit.
Select the last item (or the one you need), reboot the router and try to access the Internet. If everything is done correctly, there should be no problems.
Provider program
Now let's look at a helper program developed not by the router manufacturer, but by the provider. Let's take the Rostelecom provider as an example; the assistant program was written for the Sagemcom F@st 2804 router.
As in the first case, insert the supplied CD into the computer drive and install the program. A shortcut will appear on the desktop - launch the program.
Setting the provider region
In the first step of quick setup, we will be asked to select the wizard’s operating mode.

Master mode
Since we are setting up for the first time, we select the item full customization. Click Next. Next we will show a program where we intend to access the Internet.

Selecting a provider region
For convenience, we see a map of Russia - just click the mouse in the region where we are now, and the wizard will recognize the region itself. Click “Next”, where we will be asked to indicate the provider’s branch (if there are more than one in this region).

Selecting an area
Connecting wires

Selecting a connection type
Of course, if we connect via Ethernet, then we specify it. But in most cases it is ADSL.
The wizard will tell us with a picture what to connect and where.

Internet cable connection
And in the next hint picture, he will ask you to connect the power to the router. We connect the power supply.

Connecting the Router Power
We turn on the router with the button, the LEDs on the front panel will light up.
Setting up an Internet connection
The only thing left is to configure the connection itself. We take out the agreement with the provider, and in the next window of the assistant program we write the login and password specified in the agreement.

Entering your username and password
Check the box if your provider does not require this information. Click “Next”.

Equipment connection example

Automatic router configuration
Setting up a Wi-Fi router
And at the last step, after the setup has been successfully completed, the assistant will ask about the wireless Wi-Fi network.

Wi-Fi setup
You can leave it as is (all data is visible), or you can change it.
Question Login to the router from your phone at addresses 192.168.1.1 and 192.168.0.1 is relevant if you don’t have a computer at hand. There is a solution, because today most modern routers do not require a cable connection for initial setup, as was the case just a few years ago. This means you can do this without a computer at all.
How to connect and log into the router via phone - 192.168.0.1?
As soon as you turn on the device, it automatically starts distributing password-free WiFi. The network is usually named by its manufacturer + a prefix in the form of the router ID, for example “TP-Link_1234”
If it is protected, as for example with Zyxel Keenetic, then the connection data is printed on a sticker located on the router body.
Accordingly, we can connect to it from any laptop or smartphone that has wireless module.
If the password is not suitable, or the standard network name has been changed, this means that the device has already been set up before you and to log into the router from your phone, you first need to do a full reset using the “Reset” or “Default” button.
Logging into the router from your phone via 192.168.1.1 via a browser
So, our procedure is as follows:
- We insert the cable from the Internet provider into the port marked “WAN” on the router’s connector panel
- Plug it into a power outlet and turn on WiFi
- We turn the case over and on the sticker we find the name of the network that it creates by default, as well as the address for entering the administrator section, login and password for entering
- Now you need to go into the router settings from your phone through a browser using this data, and then configure the connection to the Internet and set the parameters wireless network- exactly the same as if you were doing it from a computer.
Logging into the router from your phone is also identical - using the IP address of the router, which looks like . Which one is needed in your case - look again on the sticker.
Let's launch mobile browser— Opera, Crome or whatever you usually use, and enter it into address bar « http://192.168.0.1", or " http://192.168.1.1«.

How to log into the router through the application?
The option described above is suitable for absolutely all routers.
However, today more and more manufacturers network equipment come to develop their own cross-platform mobile applications to make the process of setting up a router via phone more convenient and intuitive.
Free program for changing network settings. The program is intended for non-commercial use and free version allows you to create up to six profiles containing different configurations networks.
Changing created profiles in NetSetMan (short for Network Settings Manager) is very easy - just select the tab with the desired settings and click the "Apply" button.
You pay in advance necessary settings into separate profiles, and then simply switch to the one you need when changing the connection method!
Key Features
NetSetMan allows you to change:
IP- computer address on the Internet.DNS- a system that associates domains with IP addresses.
Hosts - text file with instructions for redirection.
- IP addresses;
- DNS, WINS and SMTP servers;
- computer name and workgroup;
- Wi-Fi settings;
- network printers;
- entries in the Hosts file;
- some system properties (monitor operating mode, sound devices and power configuration).
In addition, NetSetMan can execute any BAT, JS or VB scripts, which allows you to change almost any settings accessible from the command line and/or thanks to third party programs!
Comparison with analogue
NetSetMan has a paid PRO version, but the differences between them are minimal. In fact, by paying €18, you will receive:
Proxy- an intermediate server between the computer and the Internet.- the right to use NetSetMan on a work PC;
- activate an unlimited number of settings profiles;
- functions of changing proxy server, network domain and home page browser.
Therefore, it seems to me that it would be more successful to compare NetSetMan with a third-party application called WinAgents HyperConf:
In fact, the WinAgents HyperConf program is a kind of analogue of NetSetMan for system administrators, since it is designed not only for automatically changing network settings, but also for maintaining these settings in working order.
And the license for it is sold for at least 10 cars. Therefore, for the average user, working with NetSetMan will be preferable.
Program installation
NetSetMan is installed like all programs: you download the archive, open it and run the installer, and then follow the wizard’s prompts.
During the first stages of installation, you will need to select the application language and accept the terms of the license agreement, after which you will be faced with the following choice:
There are three here possible options settings:
- The standard installation is the way NetSetMan will be installed on the system, like all regular applications. That is, in the Program Files folder (by default), a directory with the program will be created, which will contain all the files necessary for work. In this case, the utility settings will be saved in the system registry.
- Update - allows you to install a newer copy of the program on top of the one you already have installed. This method will only be available if you have already used NetSetMan before.
- Extract files. This method allows you to simply unpack all program files into the directory you specify. In this case, nothing is written to the registry, and you can use NetSetMan as a portable application.
We'll probably finish installing the program in the standard way, although if you are a fan of portable software, you can complete the installation in a third way :).
Creating your first profile
After the installation of the program is completed, its working window will appear in front of us:
![]()
It consists of a menu bar (at the top), a row of buttons (to the right of the program name) and six tabs, which, in fact, contain all possible settings.
In order to create the first settings profile, you need to call the context menu of the required tab (for example, Set 1):

First of all, let's rename our tab to something convenient and understandable. To do this, click “Rename” and in the window that opens, enter a suitable name, for example, call the tab “Home” :).
After this, we will need to go to the context menu of the tab again and activate the “Get all current settings” item there.
This action will automatically fill in all fields with the settings that you currently use to connect to the Internet:
In addition, you can automatically fill in the required fields by clicking the arrow button located to the right of the required field (see screenshot above).
Working with the program
So, we have our first profile ready - it’s time to create another one so that you can switch between them.
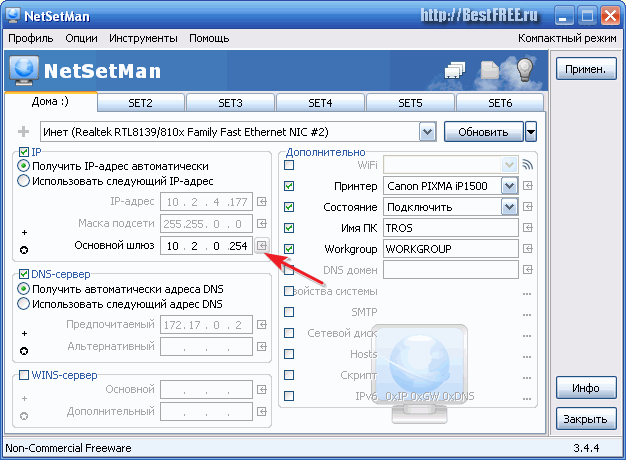
I have a connection at home from a city local network, so as an example I will give the settings that I have to use if I want to connect to the Internet at my parents:
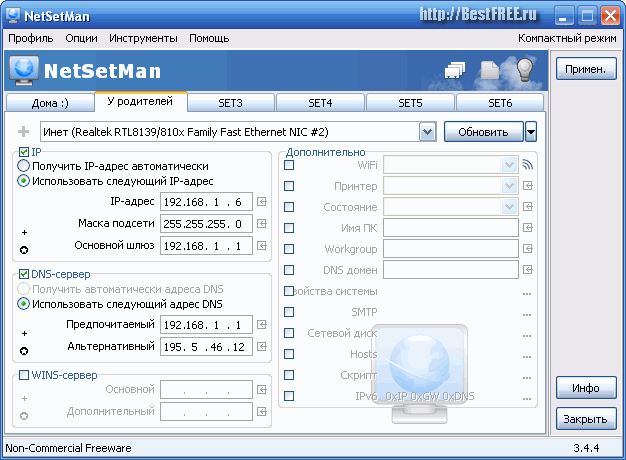
As you can see, for the Internet to work, we usually only need to know our IP address and the IP of our DNS server (which in this case is the modem). However, there are also more complex cases that NetSetMan will help us deal with.
MAC address(English) Media Access Control) - unique device number on the network.The first such case is the problem of changing the MAC address network card.
Usually such a need does not arise, however, if you have to work in several local networks, where traffic is distributed to physical addresses network devices, then without this function you cannot do anything.
Officially, NetSetMan does not yet have such a feature (although the author announced its implementation in the next beta version), but it is possible to execute almost any script, which significantly increases the functionality of the program!
The script can be created in advance (and then simply opened), or you can write it directly in the window of a special built-in editor, to access which you need to activate the “Script” item in the desired program tab and click on the button to the right of the item name:

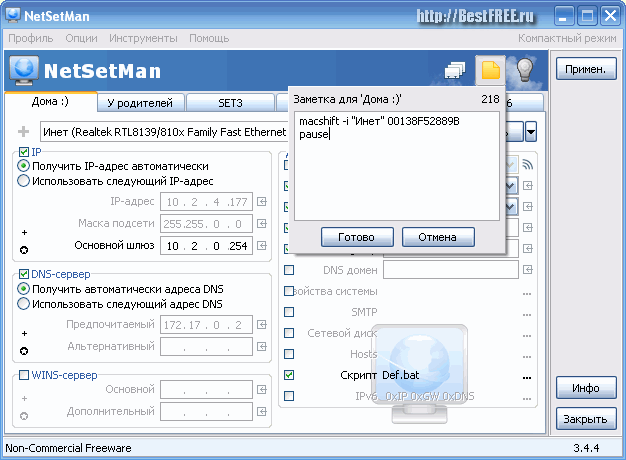
Let's look at working with scripts using a specific example. Default in Command line There is no function for changing the MAC address, but it can be implemented using a third-party console program - macshift.
This utility You will find it in the archive with the NetSetMan program. All you need to do is unpack the files "validmacs.h" And "macshift.exe"(third file is optional) to the root of the disk C:\ or to a folder C:\Windows.
Console(English) console) - window for entering text commands.Thus, you have the opportunity to change the MAC address of the network card through the console. Now the small matter is small - you need to write scripts.
The syntax of the macshift commands is very simple: macshift -i "Connection name" 2889-82-002B (required address).
We enter the line (changed to the MAC address you need) into any editor such as Notepad and save it as a BAT file.
Now all that remains is to open the created file in the NetSetMan script editor (see screenshot above). Moreover, the execution time of the script can be set both “Before” changing the settings and “After”.
Hosts file management
Next to the “Script” item there is the “Hosts” item. Activating it allows us to make changes to the same name system file, which is responsible for resolving and forwarding the addresses specified in it.
One way to use the edit function is this file There may be restrictions on access to some sites from your PC.
For example, I suggest “banning” the site vk.com :).
This can be achieved by assigning the local host address to the site (by default 127.0.0.1 ). We activate the “Hosts” item in NetSetMan and using the button on the right (with the ellipsis) we open the window for editing the system host file:

Now, following the syntax, on each new line we first write the local host address, and then, separated by a space, the address of the site to which we want to block access.
After generating the list, click the “Finish” button.
The most important thing is that NetSetMan does not touch the standard host file entries, but can both add and delete site addresses added through the program.
Thus, you can create a profile, for example, for your children, in which you can limit their ability to access certain sites!
Managing system properties
The last function that I would like to draw your attention to is “System Properties”. By activating this item in the NetSetMan window, you will be able, using a profile, to change not only network settings, but also some monitor, sound and power settings:

We've figured out the capabilities of NetSetMan, so it's time to try using the profiles we created. To do this, just go to the desired tab (profile) and click the “Apply” button. in the upper right part of the program window:
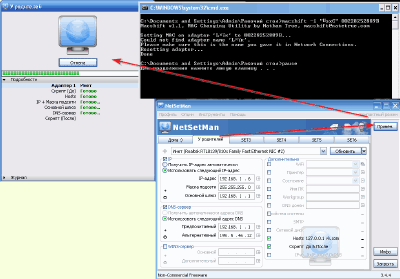
This will open a window in which all actions performed by the program will be displayed.
Above the list of actions is a progress bar for applying new settings, and above it is a “Cancel” button, which will change to a “Finish” button when the network configuration is complete.
Click the last one and you will have a completely reconfigured Internet connection at your disposal!
Additional tools and program settings
So, above we have already figured out the operating principle of the NetSetMan program and examined in detail some of its capabilities. Now it's time to get acquainted with some non-core but sometimes necessary functions. We'll talk about the buttons on the toolbar. There are only three of them:
- Profiles. This button opens the profile management window. Unfortunately, in the free version we cannot delete any of the six profiles, but we can rename them.
- The note. This button allows you to leave short entries (up to 256 characters) with comments on the active profile. Here you can, for example, insert the text of the script so that you can restore it if the file is lost (see screenshot above).
- Auto switch. This button opens a window in which we can configure automatic switching to a Wi-Fi profile when a signal from an open network is detected.
Without proper attention, we are left with only the menu bar.
The first item - “Profile” - activates a menu similar to context menu described at the beginning of the section about creating the first profile. Therefore, there is no point in describing it separately, and we move on to the second point - “Options”:

Here we have three sub-items:
- import;
- profile export;
- and the “Settings” itself.
For example, if you forgot to set the interface language to Russian or want to disable NetSetMan autostart, then you can do it here.
Also pay attention to the “Administration” tab. With its help, you can activate encryption of all data stored in the program!
The third menu item - “Tools” - contains some standard links to built-in system network connection management tools and more:

The last thing I want to talk about is the ability to work with NetSetMan in “Compact Mode”:

To switch to this mode, just click on the corresponding inscription in the upper right corner. It is worth noting that editing profile settings in this mode you can’t, but switching the network configuration is much more convenient (at least in my opinion) :).
Advantages and disadvantages of the program
- simplicity of the interface;
- convenient system for changing profiles;
- expanding the functionality of the program by executing scripts;
- the ability to quickly automatically obtain current settings;
- Access the most popular built-in Windows features.
Flaws:
- there is no built-in function for changing the MAC address of the network card;
- There is no built-in task scheduler.
conclusions
If you are a modern laptop owner and often use it when traveling to access the Internet, then NetSetMan is an indispensable tool for you that will allow you to forever forget about the inconveniences associated with changing network settings.
If you yourself are not very good at configuring network settings, then you can always ask your friends or colleagues (for example, an office system administrator :)) to do this just once, and then always enjoy uninterrupted access to the Internet!
Afterword
In the modern world, there are probably practically no people left who do not use computer technology in one way or another. Most people today have more than one PC at home... Moreover, the second computer is most often a laptop.
Of course, with modern capabilities for almost universal access to the Internet, laptops are still the most successful solutions for replacing a full-fledged office (and even multimedia) PC.
However, all the variety of options for connecting to the Internet has one (and sometimes very significant) disadvantage - the need to change the connection settings every time.
Let's say you use a laptop as a work machine at home, in the office and with friends. At the same time, at home you “sit” on an ADSL connection, at work on a “local” connection, and with friends on a “dedicated” connection. Your laptop also has Wi-Fi, which can be used to surf open networks...
And for each case you have to climb into Network connections and play around with the settings! Scary? Of course :) But today we learned how to rid ourselves of this nightmare once and for all with the help of a fairly simple, but practically irreplaceable utility, NetSetMan.
P.S. Permission granted to freely copy and quote. this article provided that an open active link to the source is indicated and the authorship of Ruslan Tertyshny is preserved.
In the instructions for setting up TP-LINK routers, I always write about setting up via a browser. When we open the router control panel through the browser and set required parameters. But there is another simple one, and quick way configure the TP-LINK router using the Easy Setup Assistant program, which is located on the disk that comes with the router.
With all the TP-LINK routers that I had, in the kit you could find a small disk on which this very Easy Setup Assistant utility is located. With which you can quickly configure your TP-LINK router. By the way, many are looking and want to download drivers for the TL-WR841ND router and other models. It seems to me that people will introduce this particular utility for quick setup. Since there are no drivers for routers (except for some mobile devices).
The disadvantages of this setup are that you can only set basic parameters there. (connect, set up Internet and Wi-Fi network). But on the other hand, the average user doesn’t need anything else. And yet, not everyone has computers or laptops. And even if there is, it is not a fact that there is a CD/DVD drive. Nowadays many laptops are already sold without a drive.
And the advantages of setting up a TP-LINK router from a disk are that the Easy Setup Assistant utility allows you to step-by-step setup. Now we will look at everything, using the TP-LINK TL-WR740N router as an example (there is also one). I wanted to show you, but this model is not available now. And this instruction will be universal. Suitable for any TP-LINK router. True, I don’t know what’s going on with the new devices. But with the new Archer C20i router, the kit included exactly the same disk with the utility.
Well, don’t forget that TP-LINK also has . Which is designed to configure and manage routers from mobile devices.
Where can I download the TP-LINK Quick Setup Wizard?
It is best to run the Easy Setup Assistant utility from the disk that was included in the kit. If there is no disk, or there is no way to start it, then a quick setup utility can be downloaded. Follow the link http://www.tp-linkru.com/download-center.html. Select your device model, then hardware version (look at the bottom of the router on the sticker, for example, V2), go to the "Utility" tab and download the archive with the utility by simply clicking on the link with the name, for example: "Tp-Link TL-WR841N_V8_Easy Setup Assistant_131119_CA". Then, simply open the downloaded archive and run the file "EasySetupAssistant.exe".
But, in this case, the utility will most likely be on English language, which will complicate the setup process a little. On the disk, the Easy Setup Assistant utility will most likely be in Russian.
Step-by-step, quick setup of a TP-LINK router using the program
We are not connecting the router yet. Take the disc and insert it into the drive of your computer or laptop. If the utility does not start automatically (it didn’t start for me), then open “Computer” or “This PC” (in Windows 10), then open the “CD drive” and run the file “Autorun.exe”.
The Quick Setup Wizard will open. We do everything strictly according to the instructions. We point the mouse at our model (in my case it is TL-WR740N), and select "Quick Setup Wizard".

The window of the wizard itself will open. Select the Russian language (if available), and click "Start".

Attention! At this point, the utility itself will turn off Wi-Fi on your laptop, if it has one. So that it does not interfere with us in setting up the router.
In the setup wizard window, we will see instructions that will tell us that we need to connect the router to the computer via cable. We use the cable that was included. Click Next.

The next step is connecting the Internet to the router. Connect the cable from your Internet provider or ADSL modem to the WAN connector. After connecting, click on the “Next” button.

On the next page, the setup wizard will ask us to connect power to the router. We connect the power adapter and plug it into a power outlet. If the indicators on the front panel do not light up, check whether the power is turned on with the button on the router (if there is such a button, the TL-WR740N does not have it, for example). Click the "Next" button.

We will see a description of the operation of the TP-LINK router indicators, by which you can determine whether the router is connected correctly and whether it is working correctly.

The scan will begin network adapter, and network status.
If during this check you see a message that setup is impossible and you need to check the router connection, then disable the antivirus (or firewall built into it). I haven’t completely disabled my Dr.Web yet, but an error appeared when checking the parameters. Perhaps such problems will not arise with your antivirus.
We wait until the verification is completed successfully and click “Next”.

The router installation is complete. The Easy Setup Assistant utility will proceed to setting up the router.
Automatically setting up an Internet connection on a TP-LINK router
Now we need to set the most important settings. Configure our router to work with an Internet provider. Nothing complicated. Just select your country, region, provider, and connection type from the list. It's done something like this:

If you have NOT Dynamic IP, and for example PPPoE, L2TP, PPTP, you will also need to set a user name and password. As well as other information, if necessary. All this data should be given to you by your Internet provider.

If your country, region, or provider is not in the list, check the box next to "I did not find suitable settings" , and set the settings manually.

All data is provided by the Internet provider.
If your router is connected to ADSL modem, then in manual settings select "Dynamic IP Address".
Everything should work.
If the settings are correct, the router will connect to the Internet and proceed to setting up the wireless network.
TP-LINK: quick setup of a Wi-Fi network via a program from the disk
A window will appear in which we need to set the name of the Wi-Fi network. Think of any name. You can even leave it as standard (which is already registered).


A window will appear with the result of setting up our TP-LINK router. There will be information on setting up the connection, the name of the Wi-Fi network, and the password. You can write down the password somewhere, or leave a checkmark next to “Save the settings data in a text file on my desktop” and click “Next”. A text file will appear on the desktop containing the Wi-Fi password.

Again, wait for the Easy Setup Assistant utility to save and check the router settings. And click “Next” again.

A window will appear with information on setting up a WPS connection, click “Next”.
Next we will see the last window in which you just need to click on the button "Complete". If you want to go to the settings via a browser and open the control panel, then click on the link "WEB settings interface".

This is how we configured the router step by step.
Some more useful information
I would also advise changing the standard admin password, which protects access to the settings. This can be done through the control panel, following the instructions.
After completing the setup, you can disconnect your computer or laptop from the router. It does not have to be connected via cable. You will now be able to connect to your Wi-Fi network. And if you had an Internet connection configured on your computer, then it is no longer needed. This connection will start the router.
Perhaps you still have some questions about this article, leave them in the comments. If you get an error or something can’t be done, write in detail at what step you have a problem with the setup.
I decided to make another separate page on which to collect everything useful programs, which can be useful when setting up/connecting to Wi-Fi, distributing Wi-Fi from a laptop, and when working with 3G/4G modems. Well, other programs that somehow relate to this topic. There are many good, free programs that allow you, for example, to start distributing the Internet via Wi-Fi from your computer. Or look up your forgotten Wi-Fi password. Well, and separate software with which you can configure 3G/4G modems and perform other operations with them (firmware, uploading .prl files, etc.).
All the programs that you can find and download on this page have been tested by me, and most likely they were used to write detailed instructions, a link to which will also be provided.
Programs for setting up Wi-Fi distribution
– with this program you can quickly start distributing the Internet via Wi-Fi from your computer. The program is completely free, and in Russian. Just set the network name, password, click on the Start button and open general access to the Internet. There are settings, you can configure the program to start when you turn on the computer, and automatic start virtual Wi-Fi networks.
A list of clients that are connected to your Wi-Fi is also displayed. Switch Virtual Router works fine in Windows 10, I checked it. Well, in Windows 7 and 8 there will be no problems.
Programs for working with Wi-Fi networks
 – free program, which allows you to view information about Wi-Fi networks that your computer sees. More often inSSIDer program used to find the most free channel for Wi-Fi network.
All information in the program is displayed in the form of graphs. In addition to the channel of a specific Wi-Fi network, you can find out its MAC address, name (SSID), signal strength, type of protection, operating mode, etc. The program supports Wi-Fi networks at a frequency of 5GHz.
 - another free program that shows necessary information about Wi-Fi networks: channel, signal strength, RSSI, MAC address, etc. It is a little simpler than inSSIDer. True, less functional.
Some antivirus programs see this program as a threat. I think this is a false positive due to the somewhat spying features of the program.
Programs for working with 3G/4G modems
 AxesstelPst EvDO BSNL 1.67– a program that allows you to configure a 3G/4G modem (antenna) for maximum reception. I believe that this program should be used by everyone who connects to the Internet via a 3G modem.
We launch the program on the computer, look at certain indicators, and then use them to configure the modem or antenna and record them. This will increase the speed of 3G Internet and improve the stability of its operation.
I am gradually filling up the page. You can suggest your programs in the comments.


