Everyone is accustomed to the fact that a smartphone is not the most suitable photographic equipment for shooting something “quick”. As long as you turn on the display, while you unlock the screen, find the “Camera” icon and click on it, there will be nothing to photograph. In fact, in almost all modern smartphones the camera can be turned on instantly - with two presses of the volume down key (Huawei/Honor, LG), the Home key (Samsung) or two turns of the wrist (Motorola, Google Nexus). In some smartphones of other brands, the camera can be activated by double pressing the volume up key or a separate “special key” (for example, the Boom key in Alcatel Idol 4/4S).
Don't neglect tricks for quick launch cameras (source: androidcentral.com)
Neither the password on the lock screen nor the number of background tasks will prevent you from turning on the camera directly from standby mode as quickly as possible. You'll have to get used to weird key combinations or gestures, but it's worth it so you don't get confused every time you need the camera “here and now.”
Sign in to apps using your fingerprint
Unlock using fingerprint scanner - useful thing, although not everyone needs it. Because many people have no need to hide information on their mobile phone under a password, and attackers will find a way to reset/reflash their smartphone after theft.
Using a fingerprint scanner, you can log into applications without a password and pay for purchases online
But even in this case, the fingerprint scanner comes in handy - not in order to set a password for every application, but in order not to enter a password where it is impossible without it. For example, it is much nicer and faster to touch a fingerprint scanner than to type numbers and letters when logging into a bank application or when paying for a game/program/music/video from your phone. However, those who like to “hide, be embarrassed and conceal” information on a mobile phone can put a request to “show your fingers” for every sneeze in Android - proprietary shells from Huawei and ZTE in new models, for example, provide this opportunity.
Don’t be shy to ask your smartphone - it will understand
But programmers at Google/Yandex and other software-writing corporations eat their bread and butter and caviar for good reason, so voice search is becoming more and more savvy. This means that in an unfamiliar city you can easily ask your mobile phone for “the nearest Sberbank ATM” or “Pyaterochka supermarket nearby” and get what you are looking for without going to the Google search bar.
Google will always help. Well, or at least he'll try
Hints Google Now so far they are less impressive and are associated only with weather information stuck to the notification bar, but Google remembers your movements using GPS, tastes and preferences according to search queries and sites visited, information in your contact list, after which over time Now becomes smarter, automatically reminds you about the birthdays of loved ones, the results of matches of your favorite teams, traffic jams on the way to work and changes in the weather in the morning. This is far from ideal in its ingenuity, but it is already a useful system in many ways. artificial intelligence- Why not use it, since it’s free and not for the needs of the special services?
There is an infrared port - there is a remote control
Once upon a time, you could share ringtones, funny videos and pictures using the infrared port. Those wonderful times are in the past, but the IR port is still installed in new models. In budget Xiaomi Redmi Note 3/Redmi 4, LeEco, mid-range models like Honor 8, ASUS ZenFone 3, Meizu Pro 6, and even in flagships, Huawei Mate 9, HTC One M9 and Samsung Galaxy S6, for example.
For what? For driving household appliances- TVs, VCRs (what other kind of tape recorders in 2017?), air conditioners, microwave ovens, and something else very smart. It’s not a vital function, but turning down the volume when the doorbell rings, and your TV is screaming throughout the entire apartment, and the remote control is lost in an unknown place, will always come in handy.
Controlling equipment from a smartphone is not always necessary, but very often useful
As a rule, applications included with smartphones are designed to control equipment of a similar brand to the smartphone - Xiaomi, LeEco or Samsung, for example. But nothing stops you from going to Google Play and according to the words “IR remote control” or “IrDA”, find an alternative suitable for your household appliances. For gourmets, there are even applications that organize the transfer and reception of files via the infrared port - useful for those who have not yet lost their Siemens CX65 or Sony Ericsson K500i, but the cable to connect to the PC is already irretrievably lost.
Transfer files via Wi-Fi
By the way, about exchanging files between mobile phones - Bluetooth, which we are all used to using for such needs, is also a rather poor and archaic option for exchanging videos and current-sized applications. It is much wiser to use Wi-Fi for this, which is about 5 times faster than Bluetooth of the same degree of relevance.
The problem is that there is no single standard for sending and receiving files from using Wi-Fi does not exist for Android - Google either encourages putting files in cloud storage"Disk" or stands for hybrid option“Android Beam” data transfer - when smartphones need to be leaned against each other, they will establish a connection via NFC, and then continue to transfer files using Bluetooth.
Instead of slow Bluetooth, you can transfer files between smartphones using Wi-Fi
Therefore, for our undertaking we will need auxiliary means. For example, ES Explorer, known to every ES enthusiast. One smartphone, two smartphones, each with an installed application. Both actors select the “sender” item, one selects “receive”, the second “send”, selecting files - and transferring at a speed of 30-50 Mbit/s (depending on smartphones). All! As a last resort, download this very ES Explorer from the official website and transfer it to a friend via Bluetooth - 10 MB “will not make a difference”, especially since posting a file of several hundred MB in the cloud instead of direct transfer to a smartphone is a much stupider idea, especially after the death of unlimited mobile tariffs in Russia.
We connect flash drives and hard drives to a smartphone/smartphone to a TV
“I’m far from the computer right now, I won’t be able to transfer the file to you” is a nice excuse if you want to relax, but in other cases you should keep in mind such a smartphone function as USB OTG (On-The-Go). This is when a connector, which, as we are used to, is only suitable for recharging a phone or for connecting it to a computer, turns out to be able to work with flash drives, hard drives, card readers, keyboards and mice, game controllers and even printers! Through an adapter to a full-size USB connector, of course.
No drivers or other dances with tambourines are required - you connect it, and everything works. Thus, for example, you can immediately send photos from your camera to your family/employer “in the field”, download a pack of movies from the HDD to your smartphone to watch them on a long journey, or vice versa, urgently free up the memory card on your mobile phone so that there is enough space for hours of video recording .
Almost all new smartphones support connection via USB OTG, but we won’t say “for the whole of Odessa,” so make sure that your model is able to handle this type of connection by searching with the words “smartphone_name OTG,” or just buy a cable for 50-300 rubles and experiment !
USB OTG allows you to connect devices to your smartphone like a computer
When connecting smartphones to a TV, things are more complicated. In ancient times, mobile phones were equipped with a separate micro-HDMI output, which worked predictably, and the cable for it was relatively easy to get. Then, when smartphones began to get rid of “extra” connectors, it was replaced by the MHL standard. You connect one side of the cable to micro-USB/USB-C, and the other to HDMI - the smartphone displays the image on the TV and even recharges at the same time (if the connector on the TV also complies with the MHL standard. If it does not, it does not charge). For some time it was popular among smartphone manufacturers - the Sony Xperia Guard stands out among the list of smartphones that support this standard.
But then MHL “deflated” due to licensing proceedings and was replaced by SlimPort - the same principles of connecting devices to TV, only free of patent royalties. Found in most new LG, BlackBerry smartphones, some HTC and ASUS models.
In most cases, Google and company recommend using wireless transmission data to the screen using Miracast. You connect the receiver to the TV, select “screen broadcast” (or something similar) in your smartphone - and with a delay of a second or two, the image begins to arrive on big screen. What-not, but “video recorder”.
Guest mode - when you can’t refuse to let someone use your smartphone
Supporters of radical methods of solving problems will not understand this, but there are situations in life when you need to give a smartphone to your spouse/child for calls, games or something else, but to show off the list of applications, photos, correspondence in instant messengers or bank accounts in the client I don’t really want software. Requesting a fingerprint saves you from prying eyes, but in most smartphones you cannot additionally “cover” sensitive information with a fingerprint. Once you unlock your smartphone, it is at the complete disposal of your child/significant other/Petya, who came to visit your child.
Smartphones have long supported separate accounts for the owner and strangers
But there is also a compromise option - to create a second smartphone user, just for cases when “I just need to call/play.” We discussed in detail the scheme of these (and many other) “sanctions” for curious mobile phone users in the corresponding article, so today we will not dwell on the instructions. Just know that in any modern mobile phone you can build an “empty” part of the system from which it will not be possible to access your personal data.
NFC - pass, bank card and travel card replenishment from a mobile phone
In addition to all sorts of Bluetooth, Wi-Fi and 4G modules, many modern smartphones support NFC technology. It is with her help that the owners new iPhones and Samsung pay for goods in stores using a smartphone instead of a bank card. Technically, such tricks can be implemented in a huge army of smartphones with NFC support, but only Apple and Samsung bothered with bureaucracy and contracts with banks, so in all other devices the technology will be “marinated” for payment until better times.
But here and now NFC can be used as a short-range connection for short-range communication sessions. For Moscow residents, a smartphone with NFC can already replace a travel card (it is applied to the turnstile instead of transport cards), and can work as a terminal for reading the validity period and the number of remaining trips (you need an application, NFC enabled and touch the card once to the back panel of the smartphone).
Everyone is accustomed to the fact that a smartphone is not the most suitable photographic equipment for shooting something “quick”. As long as you turn on the display, while you unlock the screen, find the “Camera” icon and click on it, there will be nothing to photograph. In fact, in almost all modern smartphones the camera can be turned on instantly - with two presses of the volume down key (Huawei/Honor, LG), the Home key (Samsung) or two turns of the wrist (Motorola, Google Nexus). In some smartphones from other brands, the camera can be activated by double pressing the volume up key or a separate “special key” (for example, the Boom key in the Alcatel Idol 4/4S).
Don't neglect tricks to quickly launch the camera (source: androidcentral.com)
Neither the password on the lock screen nor the number of background tasks will prevent you from turning on the camera directly from standby mode as quickly as possible. You'll have to get used to weird key combinations or gestures, but it's worth it so you don't get confused every time you need the camera “here and now.”
Sign in to apps using your fingerprint
Unlocking using a fingerprint scanner is a useful feature, although not everyone needs it. Because many people have no need to hide information on their mobile phone under a password, and attackers will find a way to reset/reflash their smartphone after theft.
Using a fingerprint scanner, you can log into applications without a password and pay for purchases online
But even in this case, the fingerprint scanner comes in handy - not in order to set a password for every application, but in order not to enter a password where it is impossible without it. For example, it is much nicer and faster to touch a fingerprint scanner than to type numbers and letters when logging into a bank application or when paying for a game/program/music/video from your phone. However, those who like to “hide, be embarrassed and conceal” information on a mobile phone can put a request to “show your fingers” for every sneeze in Android - proprietary shells from Huawei and ZTE in new models, for example, provide this opportunity.
Don’t be shy to ask your smartphone - it will understand
But programmers at Google/Yandex and other software-writing corporations eat their bread and butter and caviar for good reason, so voice search is becoming more and more savvy. This means that in an unfamiliar city you can easily ask your mobile phone for “the nearest Sberbank ATM” or “Pyaterochka supermarket nearby” and get what you are looking for without going to the Google search bar.
Google will always help. Well, or at least he'll try
Google Now's suggestions are still less impressive and are associated only with weather information stuck to the notification bar, but Google remembers your movements using GPS, tastes and preferences according to search queries and sites visited, information in your contact list, after which Now becomes smarter over time, automatically reminds you about the birthdays of loved ones, the results of matches of your favorite teams, traffic jams on the way to work and changes in the weather in the morning. This is far from ideal in its intelligence, but it is already a useful artificial intelligence system in many ways - why not use it, since it’s free and not for the needs of the special services?
There is an infrared port - there is a remote control
Once upon a time, you could share ringtones, funny videos and pictures using the infrared port. Those wonderful times are in the past, but the IR port is still installed in new models. In budget Xiaomi Redmi Note 3/Redmi 4, LeEco, mid-class models like Honor 8, ASUS ZenFone 3, Meizu Pro 6, and even in flagships, Huawei Mate 9, HTC One M9 and Samsung Galaxy S6, for example.
For what? To control household appliances - TVs, VCRs (what other kind of tape recorders in 2017?), air conditioners, microwaves, and anything else very smart. It’s not a vital function, but turning down the volume when the doorbell rings, and your TV is screaming throughout the entire apartment, and the remote control is lost in an unknown place, will always come in handy.
Controlling equipment from a smartphone is not always necessary, but very often useful
As a rule, applications included with smartphones are designed to control equipment of a similar brand to the smartphone - Xiaomi, LeEco or Samsung, for example. But nothing prevents you from going to Google Play and using the words “IR remote control” or “IrDA” to find an alternative suitable for your household appliances. For gourmets, there are even applications that organize the transfer and reception of files via the infrared port - useful for those whose Siemens CX65 or Sony Ericsson K500i has not yet died, but the cable for connecting to the PC has already been irretrievably lost.
Transfer files via Wi-Fi
By the way, about exchanging files between mobile phones - Bluetooth, which we are all used to using for such needs, is also a rather poor and archaic option for exchanging videos and current-sized applications. It is much wiser to use Wi-Fi for this, which is about 5 times faster than Bluetooth of the same degree of relevance.
The problem is that there is no single standard for transmitting and receiving files using Wi-Fi for Android - Google is either promoting storing files in the “Disk” cloud storage, or advocating for a hybrid version of data transfer “Android Beam” - when smartphones need lean against each other, they will establish a connection via NFC, and then continue to transfer files using Bluetooth.
Instead of slow Bluetooth, you can transfer files between smartphones using Wi-Fi
Therefore, for our undertaking we will need auxiliary means. For example, ES Explorer, known to every ES enthusiast. One smartphone, two smartphones, each with an installed application. Both actors select the “sender” item, one selects “receive”, the second “send”, selecting files - and transferring at a speed of 30-50 Mbit/s (depending on smartphones). All! As a last resort, download this same ES Explorer from the official website and transfer it to a friend via Bluetooth - 10 MB “will not make a difference”, especially since posting a file of several hundred MB in the cloud instead of direct transfer to a smartphone is a much stupider idea, especially after the death of unlimited mobile tariffs in Russia.
We connect flash drives and hard drives to a smartphone/smartphone to a TV
“I’m far from the computer right now, I won’t be able to transfer the file to you” is a nice excuse if you want to relax, but in other cases you should keep in mind such a smartphone function as USB OTG (On-The-Go). This is when a connector, which, as we are used to, is only suitable for recharging a phone or for connecting it to a computer, turns out to be able to work with flash drives, hard drives, card readers, keyboards and mice, game controllers and even printers! Through an adapter to a full-size USB connector, of course.
No drivers or other dances with tambourines are required - you connect it, and everything works. Thus, for example, you can immediately send photos from your camera to your family/employer “in the field”, download a pack of movies from the HDD to your smartphone to watch them on a long journey, or vice versa, urgently free up the memory card on your mobile phone so that there is enough space for hours of video recording .
Almost all new smartphones support connection via USB OTG, but we won’t say “for the whole of Odessa,” so make sure that your model is able to handle this type of connection by searching with the words “smartphone_name OTG,” or just buy a cable for 50-300 rubles and experiment !
USB OTG allows you to connect devices to your smartphone like a computer
When connecting smartphones to a TV, things are more complicated. In ancient times, mobile phones were equipped with a separate micro-HDMI output, which worked predictably, and the cable for it was relatively easy to get. Then, when smartphones began to get rid of “extra” connectors, it was replaced by the MHL standard. You connect one side of the cable to micro-USB/USB-C, and the other to HDMI - the smartphone displays the image on the TV and even recharges at the same time (if the connector on the TV also complies with the MHL standard. If it does not, it does not charge). For some time it was popular among smartphone manufacturers - the Sony Xperia Guard stands out among the list of smartphones that support this standard.
But then MHL “deflated” due to licensing proceedings and was replaced by SlimPort - the same principles of connecting devices to TV, only free of patent royalties. Found in most new LG, BlackBerry smartphones, some HTC and ASUS models.
In most cases, Google and Company recommend using Miracast wirelessly to cast your screen. You connect the receiver to the TV, select “screen broadcast” (or something similar) in your smartphone - and with a delay of a second or two, the image begins to appear on the big screen. What-not, but “video recorder”.
Guest mode - when you can’t refuse to let someone use your smartphone
Supporters of radical methods of solving problems will not understand this, but there are situations in life when you need to give a smartphone to your spouse/child for calls, games or something else, but to show off the list of applications, photos, correspondence in instant messengers or bank accounts in the client I don’t really want software. Requesting a fingerprint saves you from prying eyes, but in most smartphones you cannot additionally “cover” sensitive information with a fingerprint. Once you unlock your smartphone, it is at the complete disposal of your child/significant other/Petya, who came to visit your child.
Smartphones have long supported separate accounts for the owner and strangers
But there is also a compromise option - to create a second smartphone user, just for cases when “I just need to call/play.” We discussed in detail the scheme of these (and many other) “sanctions” for curious mobile phone users in the corresponding article, so today we will not dwell on the instructions. Just know that in any modern mobile phone you can build an “empty” part of the system from which it will not be possible to access your personal data.
NFC - pass, bank card and travel card replenishment from a mobile phone
In addition to all sorts of Bluetooth, Wi-Fi and 4G modules, many modern smartphones support NFC technology. It is with its help that owners of new iPhones and Samsung pay for goods in stores using a smartphone instead of a bank card. Technically, such tricks can be implemented in a huge army of smartphones with NFC support, but only Apple and Samsung bothered with bureaucracy and contracts with banks, so in all other devices the technology will be “marinated” for payment until better times.
But here and now NFC can be used as a short-range connection for short-range communication sessions. For Moscow residents, a smartphone with NFC can already replace a travel card (it is applied to the turnstile instead of transport cards), and can work as a terminal for reading the validity period and the number of remaining trips (you need an application, NFC enabled and touch the card once to the back panel of the smartphone).
In four years, Android has transformed from a small but ambitious project into perhaps the most complex and feature-packed mobile OS of our time. Android supports a huge number of technologies and functions, many of which are hidden from the user or hidden in places you wouldn't even think to look at. This article is a collection of tips and tricks that can be applied to any Android device without the need to root.

01. DISABLE THE AUTOMATIC CREATION OF ICONS ON THE DESKTOP
I think I’m not the only one who is annoyed by the way the market behaves when installing an application. For some reason he thinks that for any more or less software or the next game I definitely need an icon on the desktop, and he successfully creates it. And I have to delete it. And then another one. And so every time.
Fortunately, this behavior is easy to disable - just open Google settings Play (in the left panel) and uncheck the “Add icons” option. There you can also disable the forced password request every 30 minutes when purchasing applications, as well as the hated auto-update of applications.
02. DISABLE GOOGLE SEARCH AND OTHER USELESS SOFTWARE
The standard firmware of Android smartphones includes a huge amount of useless software, ranging from a bunch Google applications(do you know that Google requires manufacturing companies to include almost all the software it develops in the firmware of their devices?) and ending with all sorts of junk from the smartphone manufacturer. All of this (or at least most) can be disabled.
Go to “Settings → Applications → All”, tap on the desired software and click “Disable” (of course, you will be warned how “dangerous” this is). By the way, when disconnecting Google search Google Now will also disappear, as well as the search bar from the desktop (after a reboot), instead of which there will be an empty area.
03. RESET TO SAFE MODE
Few people know, but Android, like many other operating systems, has a so-called Safe mode. This is a mode in which the operating system boots with disabled third party applications. Malware that is not very skillfully written (one that is not registered in the system partition) then falls off, like any software that interferes with the normal operation of the system. Safe mode can be used to bypass screen blockers, applications that cause the smartphone to freeze, or, alternatively, to identify who is actually eating up the battery - the next firmware or software update.
The mode is turned on in a rather simple, but not at all obvious way: by holding down the power button and then holding your finger on the “Turn off power” item. After rebooting, the culprit of the problem can be removed through “Settings → Applications”.
04. GET RID OF INSTRUCTIVE NOTIFICATIONS
“The construction of the castle is finished!” - how did you get these notifications? Everyone who is not too lazy is trying to notify me about all possible and impossible events: “Vasya Dzhubga replied to you on Twitter,” “You have 100,500 new messages,” “You won surgery to enlarge your right leg.” You swipe away one notification, and three new ones appear in its place.
How to get rid of all this slag: hold your finger on the notification for a long time and uncheck the “Stop” button. This is the recipe for KitKat. In Lollipop, everything is a little different, but the essence is the same: hold down, then the i button, in the window that opens, put a checkmark on “Block”. There you can also force the notification to be a priority so that it is always at the very top.
05. DON'T FORGET ABOUT THE SERVICE MENU
Another not at all obvious function is service menu. It can be opened by dialing *#*#4636#*#*. Basically there are different Technical information such as IMEI number, signal strength, current location or network type. But there is also a very useful function for some situations to force the smartphone to switch to desired type networks (2G, 3G, LTE).
In conditions of poor 3G/LTE signal levels, the device tends to reset to 2G in order to save battery power and ensure subscriber availability. This behavior can be disabled. Open the service menu and in the “Set up preferred network type” item, select WCDMA only or LTE only. In the same way, you can switch your smartphone to 2G - GSM only. It will help if you need to save battery power and the Internet is rarely used. By the way, you can also disable the radio module there altogether (until the next reboot, of course). 
Smartphones based on Chinese MTK chips have their own and much more sophisticated service menu. His number is *#*#3646633#*#*. There is various system information and a huge number of tests, among which you can find several useful settings, such as adjusting the call volume or, for example, changing GPS/AGPS settings. The menu itself is terribly illogical and contains so much varied information that I don’t even dare to describe it, but simply send the reader to three letters - XDA.
06. USE A STANDARD BROWSER
I don't know why users don't like the built-in one so much Android browser. In my opinion, he is wonderful. Lightweight, fast, based on the Chromium engine, can synchronize with Google account(that is, it immediately includes all bookmarks and passwords from Chrome), but most importantly, it has a very convenient and almost ingenious navigation method. This is the so-called radial menu, which can be activated in the settings (only in Android 4.0–4.4).
07. MANAGE YOUR CONTACTS FROM YOUR COMPUTER
Google has web services not only for remotely installing software, blocking and searching for a smartphone, but also for managing contacts. All people's contacts ever saved and synchronized when connecting a new smartphone can always be found on the page google.com/contacts. They can be viewed, edited, added and deleted. Moreover, oddly enough, it is essentially part of Gmail.
08. MONITOR YOUR PROCESSOR LOAD
Android has a built-in feature that displays the current CPU load and currently active processes on top of the screen. In theory, it is intended for application and firmware developers and is hidden from ordinary users, but no one is stopping us from activating it. But first you will have to reach the “For Developers” settings section, which by default does not exist at all.
Go to settings, then “About phone”, find the line “Build number” and tap on it seven times in a row. The message “You have become a developer!” should appear on the screen. This means that the “For Developers” item is now open, and we go to it. We rewind almost to the very bottom of the screen and in the “Monitoring” section we find the “Show CPU load” switch.
Turn it on and see a list in the upper right part of the screen. The first line is the so-called loadavg, which shows the number of processes that had to run or wait their turn to run in the last minute, five and ten minutes. To put it very roughly: if these values, divided by the number of processor cores, are above one, this means 100% processor load in the last minute, five or ten minutes, respectively. Below is a list of the most power-hungry processes (essentially, an analogue of the top command from Linux).
09. USE ADB TO BACKUP SOFTWARE ON YOUR COMPUTER
We have already written more than once about a wonderful tool called ADB, which can significantly simplify managing a device from a computer for a person who is familiar with the console (here we are mainly talking about Linux, of course). In addition to the ability to install software, transfer files to a smartphone, view logs and other useful things, ADB has recently made it possible to backup all smartphone settings and applications.
To use this functionality, install the universal ADB driver (goo.gl/AzZrjR), then download ADB itself (goo.gl/3P7klM), install the driver, then expand the archive with ADB, connect the smartphone to the computer with a USB cable, launch command line and execute the command
$ adb devices
If no devices are found, it means that ADB debugging mode is disabled on your smartphone. To enable it, go to “Settings → For Developers”, turn on the “USB Debugging” switch. Now we execute the previous command again and agree to the warning that appears on the smartphone screen. Now you can make a backup:
$ adb -apk -shared -f backup.ab
A message will appear on the smartphone screen asking you to specify the encryption password for the backup - you can safely press “Next”. The application backup process will begin, which will affect both the APK packages themselves (the -apk flag in the command) and their settings. All applications from the memory card will also be included in the backup. You can restore a backup using the following command:
$ adb restore backup.ab
10. DISABLE BACKGROUND DATA TRANSFER IN APPLICATIONS
Working in the background, applications can actively use the Internet for a variety of purposes, from updating their content to leaking information about your location. In addition, such activity in any case leads to increased battery consumption. 
Android has the ability to selectively restrict applications from transferring data in the background, but it is located in a place where most users would hardly ever look. To prevent any application from using the Internet in the background, you need to go to settings, then “Data transfer”, scroll down the screen to the list of applications actively using the network (for some it will be a surprise that it is there at all) and tap on the desired software. At the bottom there will be an option “Limit background mode" It is worth keeping in mind that the option will disable data transfer only via mobile network, so by Wi-Fi data will continue to flow.
11. USE THE SEARCH BAR
Often, smartphone owners Android based neglect the search bar at the top of the main screen. This is really logical, given the ability to search by typing a query into address bar any mobile browser.
Meanwhile, the desktop search bar does much more than just redirect your request to google.com. It allows you to search contacts, applications, calendar events, bookmarks and web browser history in automatic mode. For normal smartphone use, it may not be as useful, but when connecting an external keyboard, it is an indispensable tool. Just click
12. USE SMART LOCK
Smart Lock is one of those features that you don’t think about, but once you try it, you can’t live without it. This is one of the most notable new additions to Android Lollipop and one of the most useful features added to Android recently. The idea of Smart Lock is extremely simple - it disables the PIN code or other lock screen protection if there is a specific Bluetooth device or map location nearby.
By default, Smart Lock is “sort of” disabled. That is, it does not light up anywhere, but after pairing with a new Bluetooth device (of any type), it will definitely offer to add it to your White list. After this you will forget about her again. But only until you enable lock screen protection in the “Security” section of the settings. Now it will work as it should.
Sami Smart settings Lock are in the same section, and, in addition to adding new Bluetooth devices, you can specify “safe places” there, and immediately with a list of options based on Google Now “observations”. By the way, if you disable it, as described in the first tip, then this functionality will also be lost.
13. SAVE ENERGY RIGHT
Another notable innovation from Lollipop is its power saving mode. IN standard Android it migrated from the firmware of smartphone manufacturers, who previously sold it independently. Now the function is available in pure Android - you use your smartphone to the fullest, and when the battery charge reaches 15%, the system prompts you to turn on the power saving mode, which turns off background data transfer, reduces the brightness to a minimum, turns off some sensors and reduces the screen rendering FPS to a couple of dozen frames per hour. give me a sec. For clarity, the status bar and on-screen buttons at the bottom of the screen turn red - so you don’t forget.
To save battery life on a smartphone with an AMOLED screen, you can set black wallpapers and use apps with black backgrounds.
The energy saving mode is customizable. Go to “Settings → Battery → menu → Power saving mode.” Here you can specify a condition automatic switching on mode (though the choice is meager: 5%, 15% or never) and, most importantly, turn on the mode right now. Very convenient if you have a long trip ahead without the possibility of recharging.
14. MONITOR TRAFFIC
Most likely, smartphone manufacturers, as usual, will shovel standard interface Android 5.0 and everything will change (hello Samsung - the biggest fan of breaking interfaces), but in the standard Lollipop curtain, or rather, in the “second curtain” with  flasks quick settings There is one highlight. The data transfer button in the center does not switch data transfer at all, but expands into an interface that allows you not only to view the current traffic consumption, but also to disable data transfer using the switch on top.
15. SHARE NOT YOUR PHONE, BUT THE APPLICATION
Especially for those who like to give their phone to other people, Lollipop has a Screen pinning feature that allows you to lock your smartphone on one application without the ability to close it or switch to another. Like many other useful features, it is completely invisible and hidden quite deep in the settings. To activate, go to “Settings → Security”, scroll almost to the very end and turn on the “Block in application” option.

Now, if you click the View running applications (Browse) button, an pushbutton will appear at the bottom of the current application's thumbnail. Once you tap the icon, the screen will be locked on the selected app and you will need to hold the Back and Overview buttons simultaneously to go back. In this case, you will have to enter a PIN code if it is set for the lock screen.
XX. USE ACITIVITY LAUNCHER
Any graphic Android application includes one or more so-called “activities”. Each of them is an application window (screen), for example the main screen or the settings screen, maybe even a file selection window. By default, you can open directly (from the desktop) only those activities that the application developer marks as main; the rest are accessible only through the application itself and only if the developer himself allows this.
However, having at hand the right tool, you can reach any other activity of any application and even create a shortcut for it on the desktop. Activity Launcher does just that. Just install the application, select “All actions” in the menu at the top and find the software you need. All of her activities will appear on the screen, and any of them can be opened with a simple tap or placed on the desktop by holding your finger for a long time.
An example of useful “internal” activities is the Chrome bookmarks window (Chrome →Bookmark), access to the hidden AppOps mechanism in Android< 4.4.2 (Настройки → AppOps), запуск поиска в TuneIn Radio (tunein.ui.activities.TuneInSearchActivity). Очень много активностей имеет в себе ES Проводник, включая редактор, music player, image viewer and much more. Any of them can be launched directly from the desktop. In the same way, you can open any section of the settings and gain access to some OS functions that are difficult to reach. This is completely legal functionality and does not require root.
Android has a large set of hotkeys for connected keyboards. You can use Arrow, Tab, and Enter to navigate the desktop and various menus. In addition, the following key combinations are available:
Esc - “Back” button;
Win + Esc - Home button;
Ctrl + Esc - “Menu” button;
Alt + Tab - switch between applications;
Ctrl + Space - switch layout;
Ctrl + P - open settings;
Ctrl + M - control installed applications;
Ctrl + W - change wallpaper;
Win + E - write a letter;
Win + P - music player;
Win + A - calculator;
Win + S - write SMS;
Win + L - calendar;
Win + C - contacts;
Win + B - browser;
Win + M - google maps;
Win + Space - search;To find out your MAC and IP address, go to “Settings → Wi-Fi → menu → Advanced
new functions". MAC and IP will be at the very bottom.Lollipop has a built-in Flappy Bird style game. Go to “Settings → About phone”,
Tap on the “Android Version” item several times, then hold your finger on the “Lollipop” that appears. Let's play.Google Now supports a large number of Russian-language voice commands. All of them can be divided into two groups: voice search and the voice commands themselves. Voice search allows you to perform an intelligent search on Google, when the system displays a specific answer on the screen instead of a list of links, and voice commands allow you to perform certain actions, for example, send an SMS or set an alarm. The list of commands is shown in the image " Voice commands Google Now." Voice search includes more than a dozen various types questions:
Weather. What will the weather be like tomorrow morning?
Addresses. Where is the nearest pharmacy?
Flight information. When does Aeroflot flight number 2336 depart?
Time. What time is it in London?
Events. When is sunset today?
Computing. What is the square root of 2209?
Translation. How do you say "cucumber" in Spanish?
Sport. When does Spartak play?
Finance. What is the S&P 500 index today?
Data. What is the height of the tallest building in the world?
Exchange Rates. Convert 2600 rupees to US dollars.
Images. Show photos of the Golden Gate Bridge.
Interestingly, Google Now understands a large number of much less obvious questions in English. As an example we can give:
Should I wear a jacket today?
How much tip for 420 rubles?
Where is my parcel?
This, of course, is not all that could be talked about, but it will not be possible to lengthen the article, and many of the other possibilities are already known. Don't forget about these tricks, and your smartphone will become
a little more convenient.
This guide completes a series of reviews of applications related to viewing, processing and shooting photos. Last time we talked about editors, today we’ll try to find a replacement for the standard Android camera. The checklist for selected participants is as follows:
- Shooting modes, video recording capability
- Availability of effects
- Editor capabilities, if available
- Saving formats, export to the Internet
Key review participants:
Applications will also be mentioned:
- Candy Camera - Selfie Selfies
- Cymera - Photoeditor & Camera
Camera MX allows you to take photos and videos, use real-time effects in the process, edit and upload the results to the cloud and social media. The application is available for Android OS 2.3 and higher in Russian.
Not in Camera MX additional modes shooting photos and videos, except “as is”. On the top panel of the application there is a switch for the flash and a timer for the front and rear cameras. You can use the volume keys to control. Effects, overlays and frames are available in the left panel (FX) list.

In Camera MX, effects are applied not only in real time, but also after capture on camera. There are about 20 effects to choose from: HDR, TiltShift & Little Planet, Vintage, Lomo, Color Splash, Pop Art, Black & White, Sepia and others.
The camera settings have several interesting options for optimization - including for the Android 4.3 platform and higher, so you can distribute resources optimally. However, it should be noted that when shooting video, inevitable freezes begin, while photos can be taken with effects turned on.
In addition to the camera itself, Camera MX includes a functional editor. With it you can use standard operations for photos and videos: auto-adjustment and white balance, brightness, contrast, saturation, clockwise rotation, etc., right down to trimming the video after shooting. From pictures you can create a full-fledged slideshow with an audio track, it is possible to add effects, overlays and borders to an existing image, and add text.
The resulting images are saved in their original format; for JPG, you can specify the quality. The camera takes photos in a 16:9 ratio, even if it is not officially supported by the camera.
It is possible to save files to the cloud (on home page applications have corresponding sections), publication on Facebook, Flickr, Tumblr and Twitter, Instagram. When saving a photo, location information (GPS) will be included in the file - which will be useful for Instagram.
Summary. There are a few things to note about Camera MX: interesting features. First, adjust JPG quality and device optimization. Secondly, the ability to seamlessly store data in the cloud. Thirdly, a convenient and functional editor that allows you to make changes after capturing an image or video.
ProCapture expands the capabilities of a standard camera by adding a range of interesting features shooting. There is no own editor here, although there is minimum set for photo post-processing. There are two editions of ProCapture - paid and free. Paid version allows you to save pictures in more high resolution, use the selective focus function, etc. The application also does not include a video camera; you can only shoot a video through an external application.
In the camera settings, on the main screen, you can specify the focus mode, enable location recording, histogram, grid or Fibonacci spiral.
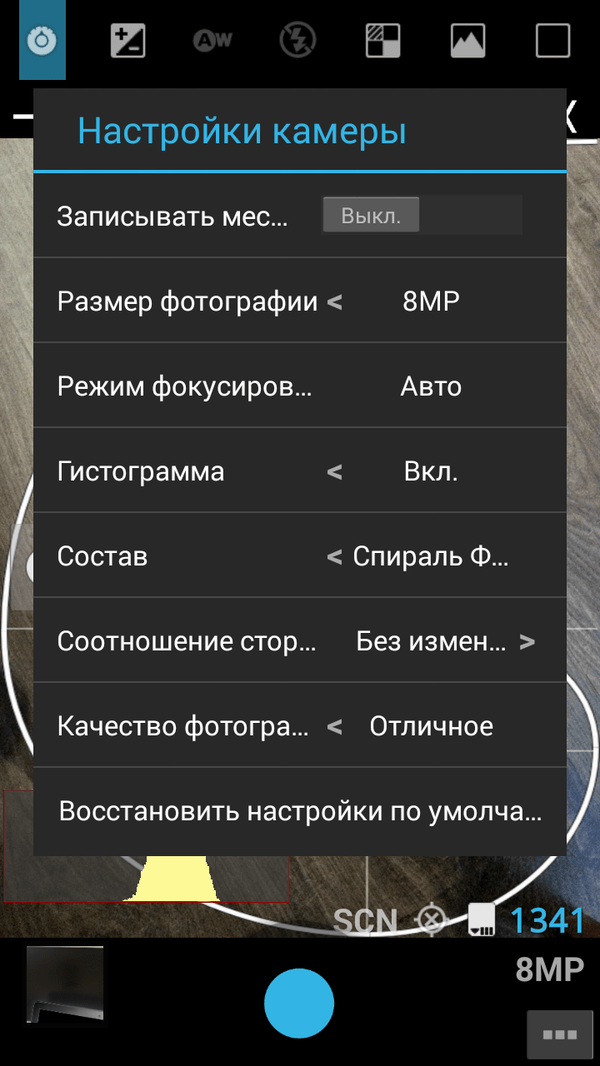
The Fibonacci spiral is an asymmetrical grid that is convenient for focusing. Just like a standard composition grid, it is overlaid on top of the image. These tools are accordingly complemented by custom focus and histogram.

Next comes: exposure adjustment, white balance, color effects - they are applied in real time. There are also many shooting modes, including night, sports, etc. - about two dozen to choose from. The adjacent ProCapture section also applies to shooting modes - you can set up timer shooting, turn on noise reduction, take a wide-format photo or panorama. Most interesting in this section Noise reduction mode: you can take two pictures and combine them into one, thereby improving the quality of the result.
The panorama and extended shot modes are similar in nature and processing speed to the capabilities of a standard camera.
When saving a photo, the user can specify the aspect ratio, size and quality of the photo, and the original saving format.
Summary. ProCapture features focus on creating the right image. This is done through fine tuning camera: the required focus is set, the shutter mode is set, etc. Transformations after shooting, in this case, are secondary.
A special feature of the Camera FV-5 is full control when creating a photo. The viewfinder is slightly similar in design to a “DSLR” (DSLR). Effects and editor are not provided here.
The viewfinder displays a histogram (RGB) and a grid, both of which are highly customizable: you can turn on a live histogram, change the style of the grid, and more.

The user can flexibly control shutter speed, exposure, and focus in real time. The left panel presents the following parameters: white balance, focus mode, sensor sensitivity (ISO), exposure compensation.
On the top panel there are shooting utilities: exposure bracketing, intervalometer, auto-starter, stabilizer, continuous shooting.
Let's talk a little more about some parameters. Shutter speed is specified from 1/80000 to 2", depending on the device. Long shutter speeds are supported, which allows you to shoot in night mode and more. Focusing works in the following modes: autofocus, macro mode, point sharpness, manual focus, lock focus.
Additional options that are also important when shooting include the volume of camera sounds, camera behavior when focusing, and control keys.
Camera FV-5 works with various formats: JPEG, RAW (16 bit) DNG format, lossless PNG. The saving format is determined in the main settings. For long exposure photographs it can be specified separately.
Summary. Camera FV-5, like ProCapture, gives you complete control when shooting. Again, there is no editor or any decorations or effects, but exposure settings, shutter speed, focus can be adjusted in detail, and there are additional tools. Several save formats are supported - which is actually rare for such applications.
Camera360 Ultimate is another well-known photo and video app for Android. Available for Android OS 2.3 and higher, there is no Russian version available.
First, a few words about shooting modes. There are more than a dozen of them - selfies, with effects, posters, “funny” cameras, tilt-shift, audio and video modes, etc. The options available on the screen include flash, timer and tapping. Additionally, in the application settings you can enable the grid, real-time viewing, enable/disable sound, etc.
In total, there are more than 200 filters with the possibility of expanding the list; add-ons can be purchased on the Camera360 website. If Live View is activated, all changes are displayed through the viewfinder, but enabling this option results in a noticeable decrease in the screen refresh rate.

Camera360 includes basic editing tools: crop, rotate, blur, texture, color adjustment, and more. Facial recognition functions - perhaps main feature editor, making the camera suitable for selfies and portrait photos. After shooting, the photo is analyzed, the shape of the face is determined, after which adjustments can be made. Tools include smoothing the skin, changing the shape of the face and eyes.

The cloud in Camera360 is free. Photos can be uploaded to protected albums with synchronization capabilities. The cloud also provides editing and file management functions; you can access uploaded photos at cloud.camera360.com. Speaking about the network capabilities of the camera, we should note the quick publication in social services Facebook, Flickr, Instagram and Twitter.
When saving a photo, the aspect ratio (16:9, 4:3, 1:1) and the resolution of the image are indicated. If necessary, a GPS and time stamp can be recorded in the file.
Summary. Of course, Camera360 can't compete with functional applications in terms of setting exposure, ISO and other shooting parameters. This camera has different tasks - taking selfies, using quick effects. The editor will be primarily useful when processing portraits on a mobile device. Additionally, Camera360 has two features worth highlighting: cloud storage and photo album management.
comparison table
| Application | ||||
| Developer | Appic Labs Corp. | NEast Studios | FGAE | PinGuo Inc. |
| Full version price | for free | $3,97 | $3,55 | for free |
| Russian localization | + | + (machine translation) | + | − |
| Android version | 2.3+ | 2.2+ | 2.2+ | 2.3+ |
| Shooting video | + | − | − | + |
| Effects | + | + | − | + |
| Graphics editor | + | − | − | + |
| Cloud storage | + | − | − | + |
| Posting on social networks | + | + | + | + |
Worth mentioning
Candy Camera - Selfie Selfies

Candy Camera is a simple camera in terms of functionality. There are few control buttons on the main screen: turning on/off the flash, overlaying a grid, setting a timer, and activating shooting by touching the screen. The effects are divided into two categories - selfies and regular ones and, for the most part, give the photo a “vanilla” tint.
The fact that Candy Camera is suitable for selfie photos is indicated not only by the effects, but also by the editor’s adjustment tools. In particular, there is a filter for smoothing the skin - it will help hide individual imperfections and various artifacts after shooting on camera. Correction functions are as follows: whitening, stain removal, make-up. Post-processing tools include adjusting brightness, contrast, saturation and resolution, crop and rotate, mosaic, lomo effects and blur.

The Retrica camera has practically no settings; it cannot be optimized - despite the fact that the application does not work quickly. And yet, the program is valuable for its effects. There are about hundreds of them, they are used in real time.
The main effects include blur, vignetting and collage. The collage is created directly during shooting, the time interval is pre-set. As a result, there is no need to contact a separate editor; the collage can be immediately saved to a file and quickly posted on the Internet.
Other useful features Retrica: add a watermark and/or logo, add geotags and set a timer when shooting.
Line camera - Selfie & Collage

Similar to Candy Camera, Line camera will benefit from correction functions. The editor's tools allow you to “smooth” the skin, lighten certain areas in the photo, eliminate dark circles under the eyes, change the size of the eyes, and improve detail.
Line camera includes several auxiliary functions: Quiet mode, timer, grid, shooting by tapping on the screen. You can specify the aspect ratio yourself: 1:1 or 3:4.

Instagram, a service for publishing photos and videos, needs no introduction. The Android application of the same name allows you to conveniently integrate your device’s camera with this service.
At first glance, the camera on Instagram is modest: there is a shooting button on the screen, a composition grid overlay, a flash, and switching the camera from the front to the inside. Nearby you can find about three dozen filters for subsequent processing of the material (the application does not support real-time effects).
Conveniently, filters can be organized through the settings, disabling unnecessary ones from the list. In addition to filters, the editor contains basic tools: control of brightness, contrast, saturation, sharpness, shadows, darkening edges, etc. - that is, a complete set of possibilities for creating Instagram.
Captured images and videos can be uploaded directly to the service (optional: Facebook, Twitter, Flickr, Tumblr and Foursquare), added to your feed, shared with friends, and commented on.

Compared to other cameras for Android, GIF Camera is somewhat different. The footage shot with this camera is compiled into an animated GIF file. Moreover, this is the only possible format for export. When saving, you can specify the frame rate (up to 20 per second), set the cards to reverse order(reverse). As an option, it’s easy to “glue together” a GIF video from local photos by selecting the necessary ones from the gallery.
Briefly about other features of GIF Camera. There are built-in albums - with examples and user records. The program contains advertising, but the functionality is not limited.

Open Camera features an informative and customizable viewfinder. When shooting, you can control the angle and direction of the camera, and the format for saving the future image. The screen also displays the time and battery charge.
Second important point. The Open Camera user has a full set of saving options for both photos (format, JPG quality, resolution) and video (bitrate, frame rate, video duration, audio availability, etc.). You can include geotags, date and time in the saved file.
Other conveniences available when taking photos in the Open Camera app:
- flash control (you can turn on silent mode)
- Lighting, color, balance, ISO and exposure settings
- setting up the composition grid
- selecting focus mode (macro and custom focus, i.e., touch)
- auto image stabilization.
Cymera - Photoeditor & Camera

Cymera is an all-in-one solution: it's a photo sharing app, a camera, and an image editor at the same time.
On the top panel of the viewfinder you can control blur, select a shooting mode (selecting timer, touch shooting and stabilization); on the bottom panel there are zoom controls. In addition, you can enable the composition grid and silent shooting mode.
One of distinctive features Cymera - the ability to use lenses with various effects. The lenses imitate “analog” effects and more: film, collage, fisheye, etc. The Cymera supports Bluetooth monopads and is generally great for taking selfies.
After capturing, the photo is sent to the editor, where photo retouching is available: enlarging, cleaning up spots, “pulling out” certain areas of the skin. Decorative elements (annotations, frames, backgrounds), filters (more than 100), and creation of collages are possible.
As for online features, this includes creating private albums and publishing photos online.

Little Photo is a small camera with a built-in editor and the ability to add vintage effects. There are about 70 tools and filters available - this is perhaps the main thing that is in the application. There are practically no interesting options, except that when applying a particular filter you can specify the intensity.
Little Photo has a minimalistic interface. On the screen there are only flash and camera control buttons, there is almost no graphic design. The application is not demanding on resources; in the main settings you can specify the original resolution for pictures (low rec camera) in case of system errors.


