FastStone Image Viewer is a program designed to view images in the Windows operating system. Considered one of the best programs to view images in the free group. The interface is multilingual and includes Russian, which will allow you to easily and quickly use all the functions of this program. You can download and install it absolutely free from the official website. This application for viewing images is perfect for inexperienced users, as it has an intuitive Russian interface with a set of the most necessary tools for editing and working with images various formats.
The utility includes a file manager and a database. The main features of the program include viewing, editing and converting images. FastStone Image Viewer supports a large number of image formats, as well as some video file formats.
Main functions of the program:
- Ability to view images in three modes: slide show, full screen, and normal view.
- Ability to open a large number of different image formats, including RAW (high-quality photo storage format).
- View complete information file, including EXIF data.
- Built-in file manager for easy navigation through folders and images.
- Editing tools: filters, effects, contrast correction, levels and curves, etc.
- Print and scan images using the program itself.
- The ability to quickly edit and create desktop wallpaper from the current image.
- Program navigation system: the ability to select files, use tabs, move between folders on the disk.
- Ability to rotate images.
- Red-eye removal function.
- Crop images and resize.
- Possibility of drawing and creating inscriptions on the top of the image.
- Ability to add a frame to an image from the frame library.
- Opportunity batch processing data (simultaneous work with several images).
- Image comparison function.
- Ability to create slide shows. When creating, you can customize effects during slide transitions, add background music and saving it to a file in exe format (executable file).
- Screen capture function.
- Sending an image to an email address.
- Setting up and creating hotkeys for quick launch and working with program functions.
- Ability to create an indexed list of images or your own photo database.
This list does not describe all the functions, but only the main ones that this device offers us. software.
How to use FastStone Image Viewer
First, you need to download and install the program from the official website, since it is completely free for non-commercial use. On the website you can download as full version program, and Portable (portable, which does not require installation to work in it), it is also possible to download or view instructions for working with the program in English.
After you have downloaded the distribution, install it. Follow the installer's steps during the installation process. After the installation is completed. Launch the FastStone Image Viewer program.
On first launch this application will scan the system and determine where all the images for fast work with them. The first thing you will see is this program’s file manager, with which you can open the file you need for viewing or editing.
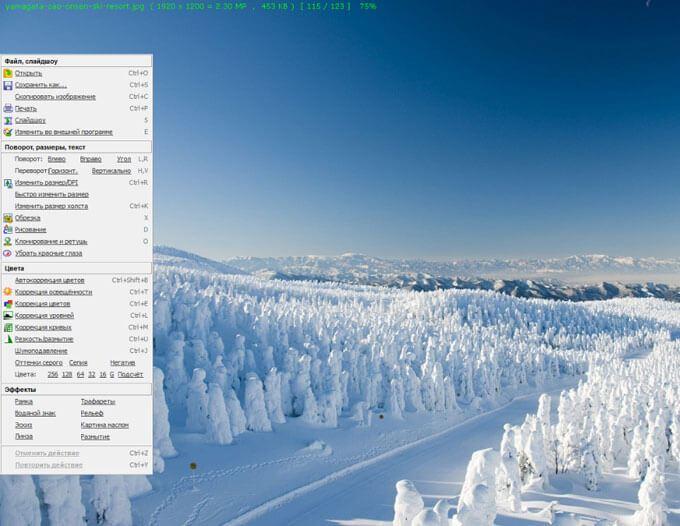
The program has a classic interface. At the top you can see the main menu with which you can perform fine settings programs and work with various tools. For ease of use, under the main menu there is a toolbar designed to quickly call and launch the necessary functions without the need to open and search for them in the tabs of the main menu.
In the central part, you can observe the program's file manager, which displays folders and files that you can interact with and open. On the left side, you can see the Explorer tree, which displays all the drives and folders present in your operating system.
In the lower left corner there is a preview window, with which you will not need to open the file to view, but just select the image and see what is depicted in it. You can also resize all the fields in the program window by simply hovering over the border you want to expand or reduce. 
When you open the image you want, you can use the toolbar or click right click mouse over the image and select the tools you need for editing (cropping, rotating the image, adjusting colors, etc.) or retouching.
To open an image in full screen, you just need to double-click on it or right-click and select the first item “Full screen” in the drop-down menu. 
To create a slide show, you need to select the required number of images or select a folder with images that will be used in the slide show and right-click on it, select “Slideshow” from the drop-down menu. After this, a settings window will appear in which you can define the background color, the duration of display of one slide in seconds and mark the options you need when playing your slide show. After completing the settings, you can run and view the created slide show or save it.
Conclusion
Today you got acquainted with the FastStone Image Viewer program, which is great solution for those who need to edit images quickly and easily. It is worth noting its fairly broad functionality, which fits perfectly into a very simple and intuitive interface.
I advise you to download and install this software as standard application for viewing images, as it is quite lightweight with quite a lot of functions and tools. This program is an excellent replacement standard means Windows image viewer.
It is also worth noting the quite popular and necessary batch file processing function, which will help you simultaneously rename a large number of images or convert files from one format to another, as well as perform a large number of actions simultaneously with a large number of files.
If you are thinking about which program you should choose for viewing and editing photos, I can say with confidence that by choosing FastStone Image Viewer you will never regret it.
Recently on the Odnoklassniki website, one subscriber asked me a question, which free graphics editor I can recommend pictures. And since I myself use Image Viewer to view graphics, I decided to write this review with a short description. Today, FastStone Image Viewer is one of the best free analogues ACDSee for both editing and converting pictures and photos. And the most important thing is that this program has a huge number of functions on board that are simple and easy to configure.
Description of the main functions of FastStone Image Viewer
Here is a description of some of the main features of Image Viewer. This program includes viewing pictures of any format, the ability to compare any graphic files, removes red eye, ability to send files via e-mail, plus batch processing, resizes, crops, improves colors, batch renaming function, can flip JPEG images without degrading quality. Sketch databases (their cache), which many competitors do not have, a multifunctional magnifying glass. There's a great slideshow feature, many of which include music slideshows, as well as about 150 effects and transitions.
Currently, all new versions of FastStone Image Viewer are completely free, and since we are looking for a free image editor, this means that such a program will suit us.
This software can be easily downloaded on the OF website by clicking on the link “”. After downloading and installation, the main program window, after launch, will look approximately as shown in the picture below.
After launching the program, you need to execute it initial setup. And it will start with the simplest. First, let's make sure that FastStone Image Viewer opens all our graphic images as the default program. In addition, we select a mode that will open our photos without any problems.
To do this, in the main program window at the top, look for the “Settings” tab or use ( hotkey F12). In the additional window that opens, select “View”. Here we find the “Open associated files” section as shown in the picture below and select “In windowed mode”.

We have chosen the mode for opening pictures, now in the same window we look for the “Associations” tab, opening which we put a checkmark in the item “Browse in FastStone Image in the Windows Explorer menu” and below we check the boxes opposite the types of files that you would like and open with of this program. Let’s say you decide to open any file with this utility, in this case, simply click on the “Select all” button below, by clicking this you will select all file formats.

Confirm the selected action with the usual “OK” button and close the program. Then we check the functionality of the settings we made. To do this, open any graphic file, your photo, if the above steps are performed correctly, then the photo will open with the provided editor.
If you noticed that the picture or photograph opened in windowed mode, if you remember this opening mode, we set it ourselves a little higher, respectively, if this mode does not suit you, go back to the settings and select full-screen mode or as an overview. It's up to you to decide which one to use. In order not to mess around with the settings once again, there is also quick way change the mode shown in the picture below.

You can scroll through pictures or photos either using the index arrows located on the navigation panel, or using the “Left” or “Right” keyboard, if it is a mouse, then simply turn the wheel to “Back” or “Forward”, there is a slide show mode.

Please note that FastStone Image has a huge range of different tools, and I will only focus on some of them, describing them in more detail.
Removing red eye using Image Viewer
The most popular photo editing is most likely the red eye effect, which usually requires correction. So, launch Image Viewer, select a photo in which we will remove red eyes, then select the “Edit” tab in the main menu of the program. We move along the drop-down menu to the “Reduce red-eye” item.

Place the cross of the mouse on the red area of the eye, trying to pull it down from the center and a little to the right. It is advisable during the selection not to touch the area of the eye itself, only the red area. Having selected the required area, click “Remove redness”. We perform the same manipulations with the second eye, details in the screenshot below.

Let's say you decide to save not only the converted file, but also the original one, for this you just need to press the combination shortcut keys Ctrl + S or “Save As”, while giving a different name to the file, thereby saving two pictures at the same time with different names.
After saving, you can compare our photos. In order to compare them, we press Ctrl key and select those photos that you are going to compare, then on the control panel select a tool called “Compare selected photos”. This program has the ability to compare up to four photographs or pictures at the same time.

We crop and encode photos
We've sorted out the red eyes, let's move on to cropping and encoding images and photos. For example, we liked a certain section of the picture and wanted to cut it out. To do this, double-click on the photo we need, and then select a tool such as “Crop”. After entering the editor, hold down the left mouse button and, using the cursor, select the area of the photo we need and click “Crop to lossless file.”

After the cut file is ready, save it, you can do this with the same combination of Ctrl + S buttons and then assign a new name to the picture.
Resizing pictures or photos
Now a little about changing the image size; you can do this directly in the Explorer of the Image Viewer program itself. To do this, select a picture or photograph and then select a tool such as “Resize”.
This program is capable of resizing images in several ways, these parameters depend directly on your goals and objectives. And they change in the form: pixels, percentages or print size.

Let's say you wanted to compress an image by reducing the size of the picture to half its real (weight). To do this, select the “Percentage” item in the control panel and reduce the size of our file to 50%. In order to maintain the proportionality of our picture, check the “Maintain proportions” sub-item; this item will allow us to simultaneously reduce the height and width of the file. It happens that the file size requirements are set for certain pixels, in which case we will use a subsection called “Pixels”; in this case, we deliberately indicate the size of the image in terms of width and height in the required pixels.
We decorate pictures with stencils or watermarks.
The Image Viewer program can very quickly decorate your pictures or photos with beautiful frames, watermarks, and other special features. effects, quite quickly in a couple of clicks.
Consider making a stencil. Everything is simple, as usual, click on the picture that we will decorate twice, go to the “Effects” tab, then “Stencils” and look for the template format that we like, after choosing we confirm our actions with the “OK” button. All of our above actions, including this, must be saved using the standard Ctrl+S button combination.

As I said, the functionality of the FastStone Image Viewer program has no limits; it is quite capable of solving many problems in editing your graphic files, pictures and photographs. It has a very simple and easy-to-use interface with a huge number of functions, and will be an indispensable image editor for many users.
On this short review with a description of the program for editing pictures can be considered complete, if you liked this material, we share it in social networks By clicking on one of the buttons below, don’t forget about Comments, subscribe to new posts on this. All reviews with descriptions of free programs are located in this section “”. With respect to you!
FastStone Image Viewer - free program to view, organize, edit and convert images. In addition to the convenient viewing function, the program has necessary tools for working with images.
FastStone Image Viewer has built-in image manager functions for organizing the storage of graphic files on your computer. FastStone Image Viewer is free for non-commercial use.
Viewer FastStone photos Image Viewer has many useful functionality, works quickly, the application has a simple and intuitive interface, convenient navigation using the keyboard.
Key features of FastStone Image Viewer:
- support for major graphic formats;
- image editing;
- full-screen view with pop-up menu;
- applying effects to the image;
- comparison of images;
- scaling and cropping;
- batch image processing;
- batch conversion(converting) images to others graphic formats;
- creating slideshows with more than 150 transition effects and music;
- support for working with a scanner.
In the FastStone Image Viewer program, you can perform the necessary actions with photos: crop, rotate, resize the image, reduce red-eye, correct colors and lighting, set sharpness or blur, add a watermark, apply effects (relief, sketch, oil painting , lens), add a stencil or frame, batch rename or convert graphic files, etc.
The following graphic formats are opened in FastStone Image Viewer:
- JPEG, JPEG 2000, GIF, PNG, PCX, TIFF, BMP, PSD, ICO, TGA, EPS, WMF, CUR.
Saving is done in the following formats:
- JPEG, JPEG 2000, GIF, PNG, PCX, TIFF, BMP, TGA, PDF.
The program supports different kinds RAW format for popular cameras:
- CRW, CR2, NEF, PEF, RAF, ARW, SRF, SR2, MRW, RW2, ORF, DNG.
All operations to change image parameters are carried out in separate windows. You can immediately see the result and, if necessary, cancel the changes.
You can download the FastStone Image Viewer program from the official website of the manufacturer, FastStone Soft. On the download page there are regular version a program that is installed on a computer, and a portable version that does not need to be installed on a computer. The portable version of the application can be launched from a computer or removable media, for example, from a USB flash drive.
download FastStone Image Viewer
FastStone Image Viewer runs on the Windows operating system in Russian.
FastStone Image Viewer Interface
At the top of the FastStone Image Viewer main program window there is a menu bar for controlling all actions in the program. Below the menu bar is a toolbar with the most popular tools needed to work in the application. The necessary functions are called by pressing the corresponding buttons.
On the left is a folder tree resembling Windows Explorer. Below the folder tree there is a preview area.
Most of the window is occupied by the area in which the open content is displayed, in this moment, folders.
FastStone Image Viewer Settings
You can enter the settings of the FastStone Image Viewer program from the “Settings” menu, or using the F12 key. Here you can change specified parameters default program operation: change file associations, adjust the magnification ratio of the Magnifier, change settings for saving files in JPEG format, etc.

You can add the “Browse in FastStone” item to the Explorer context menu. To do this, go to the program settings (F12), in the “Settings” window, open the “Associations” tab, check the box next to “Add the “Browse to FastStone” item in the Windows Explorer menu.”
Full screen mode in FastStone Image Viewer
After switching to full screen mode (item context menu“Full screen”), it becomes possible to view individual images on the entire screen. In this mode, all the program's capabilities for editing, sorting and processing photos are available.
Move the mouse cursor to the edge of the monitor screen to access necessary functions(at each part the edges of the screen will pop up individual elements program management).
Using the Loupe tool, you can zoom in on a specific area of an image to see more detail.
Taking a screenshot in FastStone Image Viewer
Using FastStone Image Viewer, you can take screenshots (screenshots) without the help of other programs. The Screen Capture function is accessed from the File menu, or by clicking the Screen Capture button on the toolbar.
Select the desired context menu item:
- Capture active window - a screenshot of the active window will be taken.
- Capture window/object - the window or object will be captured in active window, which is highlighted with a red frame when you move the mouse cursor.
- Capture a rectangular area - capture an arbitrary rectangular area on the monitor screen.
- Capture an arbitrary area - capture an arbitrary area on the monitor screen that is selected by the mouse cursor.
- Full Screen Capture - A snapshot of the entire screen.
Select save location:
- In the viewing window - by default the file opens in FastStone Image Viewer.
- To clipboard - the file is saved to the clipboard, from where it can be pasted into a program or document.
- To file - the screenshot is saved to a file on your computer.

Slideshow in FastStone Image Viewer
Create a slideshow in FastStone Image Viewer for playback using the program, or a slideshow in an EXE file for later viewing of photos without using the program.
First, we will create a slide show to view in the Fast Stone Image Viewer window.
On the toolbar, click on the “Slideshow” button. In the Slideshow window, select necessary settings.
If you do not need information about image files, uncheck the box next to “Show text (name, date/time and EXIF)”. Set the playback order (autoplay, random, repeat in a circle, autoplay by folder).
Add music. Check the box next to “Music”, and then click on the button that appears.

In the “Settings” window, in the “Music” tab, using the “Add” button, select an audio file (or several audio files) from your computer. The program supports the following audio formats: MP3, WAV, MIDI, WMA.
Use the Up or Down buttons to place the audio files in the desired order.

Click the button to select effects. Select the effects you want, their duration, and see how it looks in the preview window.

If necessary, configure the display of text in the slideshow.
After completing the settings, click on the “Start” button to automatically view the slides.
Creating a Slideshow File in FastStone Image Viewer
Enter the “Create” menu, click on the “Create slideshow file” context menu item.
In the “Create Slideshow File” window, use the “Add Files” or “Add Folders” buttons to add images or folders with images.
Add music, the necessary effects, customize the display of images according to your preferences.
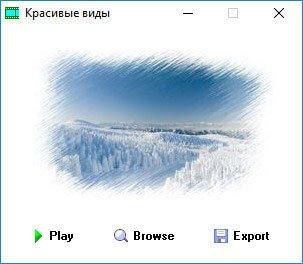
You can create an initial window to launch the file. In the initial window, add a title, description, select a cover photo, add, if necessary, “List” and “Export” buttons.

The slide show file will be saved to your computer with the selected name. To start playing the slide show, click on the EXE file, and then click on the “Play” button in the initial window.
Conclusions of the article
The free FastStone Image Viewer program is designed to view, edit and convert images. The application performs the necessary actions for organizing photos, editing images, batch processing, converting image files to other graphic formats, the program supports creating a slideshow.
Igor. Update: April 22, 2019.
Hello, dear readers! Today I would like to start a conversation about the incredible useful program, which is called FastStone Image Viewer. Those who are familiar with English language first-hand, they will immediately understand from the name that this is an image viewer (photo).
However, Faststone's capabilities are much broader than its name suggests, and the options that this software offers make it indispensable when working with photographs and various types of images. In fact, we are dealing with a combination of an easy-to-use photo editor and a manager that provides storage of graphic files on a computer.
The tools available in the application functionality allow you to scan and edit any pictures (convert them to other formats, rename, resize, rotate, crop, change color depth, brightness, contrast, saturation). And most importantly, you can batch convert and rename selected photos.
Fast Stone also makes it possible to apply a variety of effects (add frames, watermarks, use stencils, as well as relief, sketch, oil painting, lens, etc.).
For webmasters who have started creating their own websites, and in general for those who have decided to engage in activities related to posting images on the Internet, it will be useful to find out how using this program you can, including, reduce their size and reduce their weight (compress) to the desired limit, while maintaining acceptable quality.
Where to download FastStone Image Viewer in Russian for free
If you want to purchase this application for personal or educational use, then you can download the program for viewing photos, absolutely free, from the official website (), where you select the installation file (.exe) with the latest version:
If necessary, you can choose compressed format installation file(ZIP), which will be needed if you are using networks where downloading exe files is prohibited. After downloading the archive, you unpack it and receive the installer in its pure form.
In addition to the usual option, there is the possibility download FastStone Image Viewer Portable (portable version), which does not require installation and can be easily placed on a flash drive (for security purposes, it can also be corrupted) to work in Viewer from any computer.
It must be said that the program is intended for use on devices with operating Windows system. Faststone Image has been translated into two dozen languages (you can see the list on the download page), including into Russian, and of very high quality.
By the way, if for some reason after installing the program its interface suddenly turns out to be in English, you can correct the situation very simply. To do this from top menu you must select “Settings” - “Languages” - “Russian”:

Thus, from among the available ones, you can install any language that you need.
As I already said, the program is absolutely free for private use. However, if you plan to use it for commercial purposes, you will have to buy a license. The information needed in this regard, including price, is located.
Installation, configuration and functionality of Fast Stone Image
Well, now it’s time to take a closer look at how to install Faststone, what kind of program it is and how to use it. Let's go in order.
Installation of the stationary version after running the installation file.exe occurs in the usual way and does not take much time. The application interface, where all elements are located in their places, is very convenient. The main window is divided into three parts:

At the top left there is a tree of folders with pictures (there you can create new folders, rename them, move them, delete them, load new photos into them from the camera or from a memory card). You can initiate any of these actions by moving the cursor to the name of the desired folder and calling up the context menu by clicking the right mouse button.
On the right are all the pictures included in the selected folder with necessary information in accordance with the settings (format, size, creation date, name). And at the bottom left is a preview of the selected image with its data.
All options in Faststone, including actions on photos, are hidden in the top menu (they are highlighted in the screenshot below yellow). But, since the functionality of the program is very wide and it is not very convenient to use a drop-down list to select the desired option every time, the popular tools are presented below in the form of corresponding icons:
For convenience, let me list what opportunities are hidden behind each menu item:
- File— open, save the image; send it by email using the appropriate mail client; print; get a photo from a camera or memory card; capture the screen in order to take a screenshot; scan;
- Edit— cancel or repeat a previously performed operation; add or remove an external editor that will work in conjunction with Fast Stone; select a part of an object in one mode or another and, on this basis, copy, cut, crop or delete the selection; copy/paste whole image; rotate photo; resize photo/canvas; apply your elements using a drawing tool; reduce red eye; add comments to a JPEG file;
- Colors— auto color correction; correction of illumination, shades, levels, curves; sharpening/blur; noise suppression; reducing and counting the number of colors; color effects: grayscale, sepia, negative;
- Effects— you can add various frames, stencils, and a watermark to the image; relief, sketch, oil painting, lens; blur;
- View— full screen output; photo presentation layout: “Left review”, “Right review” (review modes contain a display of the selected picture, which is located on the left or right side), “Window view” (the image is located in a separate window). The same menu item allows you to create a slide show; open the folder with the file; study the attributes and properties of the photo; customize magnifying glass; select scale; update; shuffle images;
- Mark— placing marks on graphic files, removing them, selecting exclusively marked (and their display) or unmarked images;
- Favorites— setting up and adding photos to this section;
- Create— file with slide show; index-list; multi-page file; image feed;
- Service— conversion and renaming of selected graphic files, including in batch mode; date/time change; turn JPEG images lossless and metadata removal; photo comparison; creating a background for the Windows desktop;
- Settings— here you can select the language; set the interface theme; open the thumbnail database, which is created automatically in this photo editor; configure functionality;
- Reference— call up the manual for using Faststone (where there is also a list of hot keys as an alternative for activating this or that option); download full instructions from the Internet; read if necessary license agreement and enter the registration code; provide financial assistance to developers, switch to home page official website and get brief information About the program.
The first thing that would be nice to do after installing FastStone Image Viewer is to configure the Viewer according to your wishes. To do this, click “Settings” in the top panel and select “Program Settings” from the context menu (or press the F12 key):

The selected default settings option is very successful and is suitable for the average user, especially a beginner. But if you want to adjust Faststone for non-trivial actions and well understand the essence of the upcoming changes, then you can experiment with the settings. For example, change the image viewing mode, size and color scheme of photo thumbnails, edit magnifying glass settings, etc.
Yes, it should also be mentioned that FastStone understands the so-called RAW format , in which you can save pictures using modern photographic equipment. Why is it needed?
The fact is that if you correct a photograph saved, for example, in JPEG and received with optical errors during shooting, then under certain conditions the correction of such a photo will be accompanied by a significant loss of quality, while the RAW format minimizes such losses. True, there is another side to the coin - RAW files are very voluminous, but here you have to put up with it and use them strictly for their intended purpose.
Full screen mode in FastStone Viewer photo editor
One of the features of this program for viewing images is the ability go to full screen mode. To do this, first of all, select the desired picture by clicking on it with the left mouse button. Then click on the corresponding icon in the toolbar:

Or you can simply double click on the selected image file. After these simple steps, a field for full-scale activity will open up for you. If you move the mouse cursor to each edge of the monitor screen, information blocks will be displayed one by one.
If you place the cursor at the left edge of the monitor, you will get a list of various functions, in principle duplicating the tools from the top panel, which help edit a picture or photograph. The convenience is that they are all collected in one place:

When you move to the right edge, a table will appear with various file attribute data, they can be very useful. Go ahead. Drag the cursor alternately to the top and bottom edges of the monitor.
A feed will appear at the top with thumbnails of all the photos located in the same folder as the one you are viewing. Just above it there will be a panel, through a set of tools you can easily navigate through folders, as well as perform various simple operations, such as copying, moving photos, rotating, deleting, printing, comparing images, creating slide shows, and so on. :

If you hover your mouse cursor over the bottom edge of the screen, the navigator will appear in the light of day, where icons for various tools for changing the picture are also located.
As expected, each of the icons on all toolbars is equipped with a tooltip that appears when you hover the cursor, and the text of these tooltips is very informative. Even a novice user can navigate here without any problems.
How to reduce the size and weight of a photo in Faststone
To begin with, I will say that reducing the size (or its resolution), optimizing weight (compression) and cropping (cropping) are the most common actions when working with photographs or simple images. This can achieve the most optimized image, which can be uploaded to the desired resource without any problems.
Well, there is no need to say what positive impact internal optimization in the form of correctly processed images has on the promotion of a website or blog (in the fifth paragraph from the beginning of this manual there is a link to an article on image optimization).
Therefore, I will dwell in more detail on the above operations, which can also be carried out in batch mode, that is, optimizing many images at once in one fell swoop. But we will talk about this in more detail below.
When discussing changing the size of photographs, I deliberately do not focus on the possibility of enlarging them, which would seem to be necessary in certain cases. But the whole point is that enlarging the original results in a significant and dramatic deterioration in quality. On this basis, I don’t see any practical point in developing this topic in optimization.
So, in order to reduce image size, click “Edit” in the top menu and select “Resize” from the context menu:

After this, a dialog box with options will appear:

As you can see, you can change the image by setting the width and height in pixels. In addition, it is possible to save it as a percentage of the original image.
I note that the “Maintain proportions” checkbox is checked by default, since in the vast majority of cases you need to leave the relationship between the sides unchanged, otherwise the picture will be greatly distorted. Therefore, when the checkbox is filled, changing one parameter (width or height) leads to automatic change another according to proportion.
I would also like to mention the choice of photo sizes when outputting it to a printer for printing, which can be set in inches, centimeters or millimeters. There is such an indicator as image resolution, measured in DPI (“Dots per Inch”), selected based on the goal you want to achieve. Right set resolution makes it possible to obtain high quality images.
If you are satisfied with the result of the resizing manipulations, right-click on the photo and select “Save As” from the context menu or click on the same item in the drop-down list of the “File” tab from the top menu.
If you are in full screen mode, then among the tools on the left there is an option such as “Quick resize”, where the list of standard dimensions(resolutions are given here in pixels and values as percentages of the dimensions of the original image), any of which you can apply to the current picture:

After selecting one of the sizes, the photo opened in the viewer will immediately change to the new option. If you are completely satisfied with the preliminary result, you can immediately save the edited image by right-clicking the context menu and selecting “Save As”. If you are not satisfied, you can try another option from the “Quick change...” option.
How to compress a photo in FastStone Image Viewer
Let's say you've done some work with an image and want to post it on the Internet (on your website or a third-party resource). All images for the web are subject to optimization (about it vital importance I have already mentioned several times), including their compression.
It is also important to know what format raster graphics It is better to choose when saving to get the optimal result when compressing the image (reducing its weight). This weight (or rather, the volume of information) is measured in .
The most common raster formats, which are widely used when placing pictures on web resources, are JPG or PNG (there is also GIF, but it is not used in Lately former popularity), we will talk about them in more detail in a separate article.
If you are reducing the weight of an ordinary photograph where there is a smooth transition of colors, then the most optimal option for saving it will be JPG. In this format, compression usually causes a loss of quality, but if you apply it to the desired image, then these losses are visually almost invisible. Moreover, in the Faststone viewer you can manually compress the image until it reaches the size you need. “weight - quality” proportions.
If a contrasting image is compressed, for example, various screenshots that you can find on Golbusinessnet and in which the text is adjacent to various pictures, then after reducing the weight it is most optimal to save them in PNG format, since saving such pictures in JPG can cause serious distortion.
Let's now see how the image compression mechanism works in the Faststone program. To do this, select the desired graphic file, click on the “Window View” button in the upper right corner of the viewer window, located next to the icon to switch to full-screen mode:

As a result, we go to the image editing window, where you can make various abuses of the selected picture. After all the abuse that you allowed to be applied to the image, it’s time to save the file.
As I said above, if you want to reduce the weight of a screenshot or other high-contrast image with text, you should select the PNG format from the drop-down list, and the FastStone program will automatically compress it to the required standards.


As you can see, the weight of the original image is 51 KB. If you try to save it in JPG format, then with exactly the same weight indicator, noise distortions will already be visible at the boundaries of the text and background. When using PNG, quality loss is completely eliminated. But such a picture will be too heavy to upload to the site.
Therefore, for example, I select the line “256” from the “Colors” option. In this case, the image will weigh 16 KB. This is a completely different matter, such a picture can be used for its intended purpose, since her weight has decreased by more than three times!
How can you reduce the weight of a photograph or image with a smooth color transition? For such a case, it should already be noted JPG format and save it in it. But even in this case, it would be useful to click “Options”, try to analyze the “Before” and “After” options, and then, if possible, further compress the photo.

When comparing two images, manually move the slider left and right to get the desired weight-to-quality ratio of the photo. As the weight decreases, the quality decreases, but, as follows from the screenshot, not so much as to sound the alarm. The example shows that even more than threefold compression does not lead to a significant deterioration in quality.
This could be the end of this part of the publication, but I want to focus your attention on something else. The fact is that in practice very often one comes across what is called mixed options. That is, when the screenshot contains, say, an area with color scheme. In this case, a dilemma arises in what format to save such an image.
If you reduce the weight using the JPG format, then with the slightest compression, distortions begin to appear at the boundaries of the text and the main light background. When trying to do the same in PNG format (with color 256), the following picture emerges:

As you can see, it doesn't turn out very nice. For such a case, there is a fallback option. We save the file in PNG format, but in the option we set the color mode to 24-bit:

As a result, the weight of the final image after compression did not decrease much, but the quality did not suffer. This is how you need to weigh each time what is more important in a particular case: slight distortions in the picture, but a serious reduction in its weight, or high quality and low compression.
If you optimize images for your resource, then correct compression will give the right balance, which will speed up page loading () and maintain the required quality of images, which will be one of the components of successful project promotion. In general, choose the “golden mean”, and you will be happy.
Batch conversion and renaming
Now let's look at how you can edit different parameters in Faststone simultaneously for a large number of graphic files (that is, in batch mode) that need to be brought to a single denominator. Here are the batch conversions you can perform in this viewer:
- rename graphic files according to certain patterns;
- convert selected images into a single format;
- reduce the size for a group of images;
- rotate photos in the desired direction;
- change color depth, brightness, saturation, contrast;
- add the same text to all pictures;
- set the required resolution for all selected photos;
- crop photos properly;
- add a watermark to all pictures;
- frame a group of photos;
These are just the basic changes that can be made. To perform any of the above actions, you need to select “Tools” - “Batch conversion/renaming” from the top menu of FastStone Image Viewer:

If you want to simply rename or change the format of photos, then all the settings in both tabs are available here. Add necessary files from the left window to the right using the button of the same name and perform the necessary actions with them.
To select the location into which the converted photos or pictures will be loaded, check the “Output folder” checkbox, and then select the desired one by clicking on the “Select” link. First, of course, you need to set the output format into which the modified images will be converted. At batch renaming a group of files You can use two options: a specific template or the “Search and Replace” option.
If the task is resize photo in batch mode or some other parameters from the list above, then fill in the checkbox opposite the “Change settings (dimensions...)” option (however, the checkbox is already checked by default) and click the “Advanced” button, the result of this action will be a new dialog box:

Make the necessary settings on the appropriate tabs. By the way, there is an opportunity to save the settings you have made in order to apply them in the future (there is a button at the bottom for this). Upon completion of the preparatory steps, click “OK”. To start batch processing, click on the “Start” button (previous screenshot).
How to take your own image and screenshot
If you have your own website, then you often need to provide the content with explanatory drawings and screenshots, which will allow you to diversify the content and retain visitors, which can, therefore, contribute to successful promotion.
It must be said that FastStone Viewer provides all the possibilities for this. To apply this functionality, you need to move to the main editing area - “Window View” (let me remind you that the transition icon is located in the upper right corner of the program window).
In order to create a simple drawing, an explanatory diagram or stand-out inscriptions in the form of an image, you first need to prepare the necessary space.
To do this (after you find yourself in the editing window), first of all, you should select “File” - “New” from the top menu in case there is another previously selected finished image. Then from the same menu select “Edit” - “Change canvas size”. In the window that appears, enter the required dimensions of the canvas on which you will create:

You can select the background color from the palette if you click on the button of the same name. Additionally, I note that “Expansion Mode” is used for those cases when you want to place a ready-made photo on the selected background (in the middle or with one or another offset from its borders).

A separate window will appear, where on the left there is a vertical panel with drawing tools, with which you can draw a wide variety of elements (straight and curved lines, arrows, shapes, highlight areas, callouts, text) that will be components an independent drawing or an addition to a previously created screen.
In addition, in the bottom panel you can configure for each tool located in the left panel the corresponding components that determine the appearance of the future figure, namely: the color of the element, the color of the borders, set a shadow by checking the box and even customize appearance this shadow by clicking on the button next to it:

Now I'll tell you how to take a screenshot() on the fly using the same editing window. To carry out this task, open the web page or window of the program whose screen you want to create. Next, again in the top panel of the window where you make all the changes (window mode), click on the icon with the “Screen Capture” pop-up tip, and then select the shape of the capture area from the context menu:

You can immediately mark the place where the screenshot will be placed with a checkmark. By default, “To the viewing window” is checked, which is logical, since most often screenshots require modification, which can be done using the drawing tools discussed just above.
Immediately after selecting the desired item in the drop-down list, you will be transferred to the web page from which the area (or its entirety) you want to capture. Two red intersecting lines will appear on it to help mark the desired coverage area.

Hold down the left mouse button and, without releasing it, circle the required area of the page. After you release the button, the finished screenshot will be in front of you. Moreover, in the lower right corner, as you move, the width and height of the screenshot will be reflected. Very convenient in terms of instant tracking and selection of suitable sizes.
How to put a watermark on a picture in the FIV program
Well, the last detail of the functionality of the application we are researching, which I would like to talk about, is the ability to add watermarks to pictures (). This is important if necessary to prove when trying to appropriate your property (?).
Technically, it is not difficult to implement this idea in FastStone Image Viewer; I will demonstrate this with a specific example. First, let's create an inscription (this could be the name of a website or brand) and apply one of the effects included in the application's functionality to it.
First, let's prepare a small canvas (how to do this is described above). For me it turned out to be 200x30 pixels in size. In the top menu, click the drawing icon again, then in the left vertical panel, click the symbol to call the text writing function. Create an inscription:

In principle, a watermark of this type can already be used. But in order to simultaneously understand Faststone’s capabilities, let’s complicate the task a little. Therefore, by right-clicking on the resulting image, we call up the context menu and from it select “Effects” - “Relief”, after which we get a dialog box where there are two images: the original and the one that will be obtained after applying the relief effect.

Using the tools present here, including the slider located at the bottom, through which you adjust transparency, you can change the appearance of the watermark:

After completing the settings, click “OK” and get final watermark image:
Now we save the resulting image in the desired folder by selecting “Save As” from the context menu (which can be opened either with the right mouse button or from the top menu in the “File” tab). Don't forget to compress the image first by clicking the "Options" button.
To add a watermark to a photo or screen, you must again right-click on the image in the FastStone Image Viewer editor window (windowed mode). Next, select “Effects” - “Watermark” (the “Effects” tab is also present in the top menu).
Faststone will prompt you to determine where and what file you will use as a watermark. Find the folder in which the drawing was saved for these purposes, then click on the desired file from it:

Before saving the watermark that appears, you can freely move it around the canvas space and place it anywhere in the image. Next, click “OK”, then save it completely, having first compressed it to optimal conditions by applying “Options”.

Well, now, perhaps, that's all for today. It looks like I set a record for the volume of the manual, but I think I explained in detail all the capabilities of the FastStone Image Viewer program and, I hope, there are no blank spots left. If you liked the article and found it useful, don’t hesitate to click on any button social networks. Well, in conclusion, another video
Modern digital photography allowed anyone to take pictures in almost unlimited quantities. There is no longer any need to save film, and there is no need to print photos, everything is stored on the computer. Now any amateur photographer has thousands of photographs stored on his computer.
FastStone Image Viewer (or FS Image Viewer) is one of the most popular programs for viewing, editing and managing photos. The program has a huge range of functions that will be more than enough for any amateur photographer. Moreover, the program is completely free and can be downloaded from the official website ().
FastStone Image Viewer is also regularly updated with new features. At the time of writing current version program is 4.6. In addition, the program is completely Russified. Therefore, understanding its capabilities will not be difficult.
With FS Image Viewer you can work with photos in all popular formats. The program supports BMP, GIF, CUR, ICO, JPEG, JPEG 2000, PCX, PNG, TGA, PSD, TIFF and WMF. In addition, FS Image Viewer allows you to view some RAW formats from popular cameras (CRW, NEF, PEF, CR2, RAF, ORF, MRW, SRF and DNG).
The FastStone Image Viewer program interface consists of two parts: a full-screen interface for viewing and editing photos, and a file manager for managing your photo archive.
When opening any photo (using the usual double click) opens a full-screen interface for viewing and editing. This interface has hidden toolbars. You can open these panels by moving your mouse pointer to the right, left, top, or bottom edge of the screen.

You can see one of these panels in the screenshot. This is a panel designed to launch photo editing tools. This panel can be considered the main one; it is the one you will use most often. Among the main functions that can be launched from this panel are functions such as photo cropping, resizing, red-eye removal, lighting correction, color correction, level correction, curve correction and sharpening/blur. These features are more than enough for any amateur photographer.

The file manager (screenshot above) can be launched by clicking on the FastStone Image Viewer program shortcut or from the full-screen interface. Interface file manager is divided into three parts: a folder tree, a photo preview and a list of files in the folder.
At first glance, the file manager seems like a useless feature that only gets in the way. But over time you get very used to it. Using a file manager, you can manage your photo catalog much faster and more efficiently. You can launch any of the photo editing tools described above directly from the file manager.

Also worth mentioning are features such as batch conversion and batch renaming. You can see the window interface for batch conversion in the screenshot above.
Sometimes these functions turn out to be incredibly useful. For example, you need to send several photos by email. If your photos are 5-10 megabytes, this could be a problem. In this case, the batch conversion function will help us. With its help, you can quickly reduce the weight of photos by choosing a lower resolution and specifying the compression level. Moreover, these parameters can be applied to a group of files at once, thus saving a lot of time.


