BIOS is the most important part of a personal computer. This small piece of code, written into non-volatile flash memory, provides access to storage devices - flexible and hard drives, I/O ports, keyboard and mouse. At first main task BIOS searched for an operating system on available drives and launched it. Over time, the BIOS acquired a settings menu, graphical interface and even the ability to surf the Internet without loading the main operating system. Today, motherboards are equipped with BIOS of two different types: classic and UEFI. How to call, configure, update the BIOS is the topic of our article.
What is BIOS and what is it for?
The Basic Input/Output System (BIOS) consists of two parts. The first part includes programs that simplify the interaction of the operating system with hardware: processor, RAM, hard drives and input/output ports. This is a kind of underwater part of the iceberg, access to which is used or application programs or programmers when writing programs, and a simple user may not even be aware of it. The second part is an interactive computer setup system, which you can run even without an operating system. Its capabilities are quite wide: you can change the system date and time, configure settings for working with hard drives, change the boot order from media, enable or disable peripherals and ports, as well as manage the performance of the computer by changing the frequency of the processor and random access memory.
The first personal computers equipped with a BIOS were the IBM PC/XTMore advanced BIOS version were equipped with a simple graphical interface with mouse support, built-in performance optimizers, an Internet browser and even an antivirus that protected the boot partition from infection hard drive.
 The interactive BIOS menu allows you to both view system information and make numerous computer settings
 What is the difference between UEFI and BIOS
Already at the beginning of the 2000s, it became clear that the archaic text-based BIOS interface no longer met the requirements of the time - the gap between the bright and lively Windows operating system and the dull two-color BIOS text mode looked too huge. In addition, the BIOS had restrictions on the maximum size of supported hard drives and addressable RAM, which did not allow it to be equipped with a high-quality graphical shell. Therefore, already in December 2000, INTEL Corporation released a specification for a new interface between hardware and the operating system, called EFI - Extensible Firmware Interface. His commercial development became UEFI (Unified Extensible Firmware Interface) - a joint development of Intel, AMD and Microsoft, which motherboards began to be equipped with in 2007.
 DeepDive - UEFI interface on Gigabyte motherboards
 In addition to a beautiful graphical interface with mouse support, network support and a built-in Internet browser, UEFI demonstrates the following advantages over the classic BIOS:
- the ability to boot the operating system from large hard drives (BIOS cannot load the OS from drives larger than 2 TB);
- calling the UEFI shell directly from a Windows operating system session;
- safe start Secure Boot, which will allow you to check the installed operating system for viruses and malware without using special boot media;
- the ability to boot the operating system over the network - it is possible to create diskless workstations;
- installation of add-on applications for UEFI that can be executed before loading the operating system: browser, antivirus, client Email or Internet messenger.
Since UEFI is a hardware and software solution, you cannot equip an old motherboard or laptop with it. As a result, on computers with UEFI it is difficult or even impossible to run older operating systems such as Windows XP or Windows 2000.
BIOS versions on computers
Depending on the manufacturer motherboard or laptop, the BIOS version may be different, and accordingly, the user interface in the configurator control program may be different. The classic BIOS version provides approximately the same functionality for setting up the motherboard; depending on the BIOS developer, only the appearance interface and hot keys for calling BIOS settings when starting the computer.
 The BIOS chip is installed in the socket: if the update is unsuccessful, it is possible to remove the chip and flash it with a programmer
 AWARD BIOS
One of the most common BIOS on motherboards in the mid-range and budget segment. The proprietary interface is a main screen with a list of sections, which can be navigated using the cursor keys - “arrow”. Using the Enter key, you can go to the desired section in which you can carry out necessary settings.
 BIOS Award main menu
 To get into the AWARD BIOS settings, hold down the DEL key when turning on the computer. By holding down the F12 key while turning on the computer, you can call up the selection menu bootable media. This is useful if you are reinstalling the operating system and need to boot from a flash drive or optical disk.
 Home screen BIOS boot Award
 BIOS of this type can be found both on motherboards of desktop computers and on laptops; the control program interface is Top Menu with sections and settings screens you can navigate through. When you turn on your computer, press the DEL key to go to the main BIOS screen, which contains system information (processor type, amount of RAM, connected hard disks) and settings for the current time and date.
 BIOS AMI Initial Boot Screen
 Exiting the BIOS and saving the settings is done using the F10 key.
Phoenix Inc. for a long time developed BIOS for laptops, as well as motherboards for workstations and servers. After the company acquired AMI, the BIOS functionality became unified, and the interface of AMI BIOS and PHOENIX BIOS was absolutely the same.
 Phoenix BIOS main menu
 The laptop version of PHOENIX BIOS has a reduced number of settings - all the features fine tuning RAM, processor and chipset controls are locked to reduce the risk of damage to the laptop by an untrained user.
UEFI
Unlike the classic BIOS, where almost all motherboards were equipped with two varieties, the UEFI interface differs: ASUS, Gigabyte, Lenovo, MSI - everyone approached the development of the UEFI shell in their own way, equipping it with their own proprietary features.
Asus offers a performance tuning utility, EZ Booster, which automatically configures the system for maximum performance, selecting the maximum high frequencies for RAM and processor.
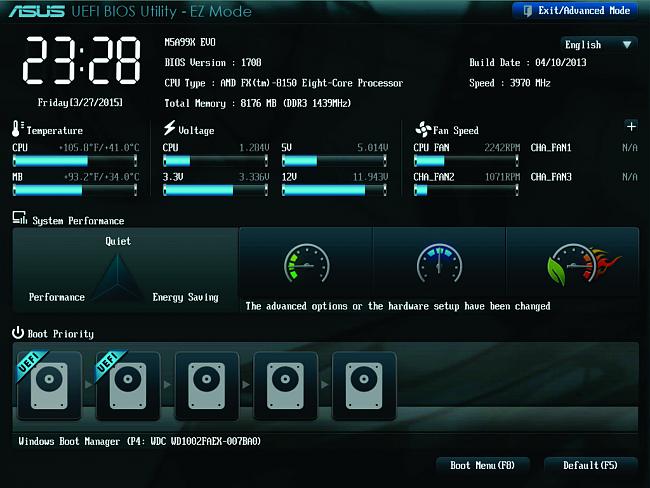 Motherboard UEFI interface ASUS boards
 Gigabyte has equipped its UEFI systems with a proprietary 3D BIOS shell, which combines graphics and mouse controls with the classic BIOS menu from a decade ago. This interface will appeal to conservative users.
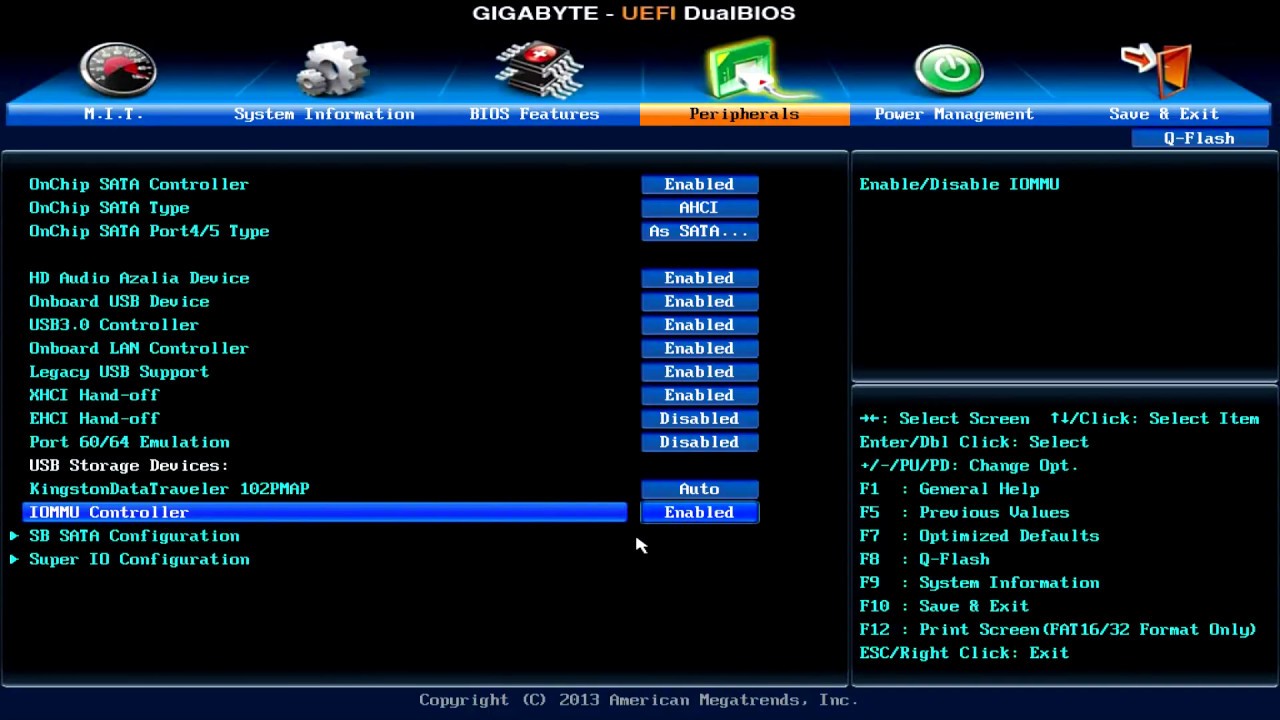 3D BIOS - a bridge between the classic BIOS interface and modern UEFI graphical shells
 All modern maternal MSI boards are equipped the latest development company - Click BIOS 4. This graphics system UEFI, which provides the user with the most flexible level of settings for computer components, antivirus protection bootable media and a built-in UEFI Internet browser.
 Click BIOS 4 - maximum settings in a colorful graphical interface
 As you can see, practically the shell is a mini-operating system with an intuitive graphical interface, so managing UEFI settings on different motherboards will not be difficult even for a beginner.
As a second-year student, I purchased second-hand IBM laptop Thinkpad, whose BIOS turned out to be a “tough nut to crack” for me - the laptop did not display any prompts on the screen when booting, and attempts to get into the BIOS settings using the DEL or F1 keys were unsuccessful. As it turned out later, to enter the BIOS settings, the manufacturer placed a special key on the keyboard - THINKVANTAGE, pressing which allows you to enter the BIOS settings both when loading the operating system and from WINDOWS environment. Now the Thinkpad line of laptops is manufactured by Lenovo, and the BIOS on them has changed to UEFI, but the blue THINKVANTAGE button is still present on the keyboard.
How to find out the BIOS version in Windows 10
You can find out the BIOS version using CPU-Z programs, which is distributed completely free of charge. The program works in any current version Windows - from XP to Windows 10, does not require registration and, in addition to information about the BIOS, allows you to learn a lot of interesting things about the components of your computer: motherboard, video card, processor, RAM modules.

How to enter BIOS on Windows 10
Depending on the version and manufacturer of the BIOS, the methods for entering its settings menu also differ. If most versions of the classic BIOS provide for entering the settings menu before loading the operating system, then with UEFI everything is exactly the opposite: entering the settings is carried out using the boot menu of the operating system.
Entering BIOS when turning on the computer
When you turn on the computer, an image of the boot screen appears on the monitor, which displays the type of processor, amount of RAM and connected drives. At the same time, a hint appears at the bottom line of the screen which key needs to be pressed in order to get into the BIOS settings. Depending on the motherboard model, these may be the DEL, F1 or F2 keys.
 HP ProLiant Workstation Boot Screen
 BIOS hotkeys
When you start or restart your computer, in addition to entering the BIOS settings menu, there are also hotkeys for accessing some other functions that are available before the operating system boots. Most modern laptops have an operating system recovery feature available. hidden section hard drive, which is also launched using keyboard shortcut BIOS.
Table: keyboard shortcuts for calling various BIOS functions of desktop PC motherboards
| BIOS version | Hotkey | Function | |
| Acer | AMI | Del | Entering BIOS settings |
| F12 | Selecting boot media | ||
| ASRock | AMI | F2 or DEL | Entering BIOS settings |
| F6 | |||
| F11 | Selecting boot media | ||
| TAB | |||
| Asus | Phoenix Award | DEL | Entering BIOS settings |
| TAB | Display BIOS POST Message | ||
| F8 | Selecting boot media | ||
| Alt+F2 | Starting the program BIOS updates | ||
| F4 | Asus Core Unlocker | ||
| BioStar | Phoenix Award | F8 | Enable System Configuration |
| F9 | Selecting boot media | ||
| DEL | Entering BIOS settings | ||
| ChainTech | Award | DEL | Entering BIOS settings |
| ALT+F2 | Running the BIOS update program | ||
| ECS (Elite Group) | AMI | DEL | Entering BIOS settings |
| F11 | BBS POPUP | ||
| FoxConn (WinFast) | AMI | TAB | Display home screen downloads |
| DEL | Entering BIOS settings | ||
| ESC | Selecting boot media | ||
| GigaByte | Award | ESC | Skip memory test |
| DEL | Entering BIOS settings | ||
| F9 | Call for disaster recovery | ||
| F12 | Selecting boot media | ||
| Intel | AMI | F2 | Entering BIOS settings |
| MSI (MicroStar) | F2 | Entering BIOS settings |
Table: keyboard shortcuts for calling various BIOS functions of laptops
| Laptop manufacturer | BIOS (model) | Hotkey | Function |
| Acer | Phoenix | F2 | Entering BIOS settings |
| F12 | Selecting boot media | ||
| Alt+F10 | |||
| Alt+F11 | Running Disk Checker | ||
| Asus | AMI | F2 | Entering BIOS settings |
| ESC | Popup Menu | ||
| F4 | Easy Flash | ||
| Phoenix Award | DEL | Entering BIOS settings | |
| F8 | Selecting boot media | ||
| F9 | Running System Restore | ||
| Benq | Phoenix | F2 | Entering BIOS settings |
| Dell | Phoenix, Aptio | F2 | Entering BIOS settings |
| F12 | Selecting boot media | ||
| Ctrl+F11 | Running System Restore | ||
| eMachines (Acer) | Phoenix | F12 | Selecting boot media |
| F2 | Entering BIOS settings | ||
| Fujitsu Siemens | AMI | F2 | Entering BIOS settings |
| F12 | Selecting boot media | ||
| Alt+F10 | Running System Restore | ||
| Gateway (Acer) | Phoenix | Click mouse or Enter | Menu |
| F2 | Entering BIOS settings | ||
| F10 | Selecting boot media | ||
| F12 | PXE Boot | ||
| Alt+F10 | Running System Restore | ||
| HP (Hewlett-Packard)/Compaq | Insyde | ESC | Selecting boot media |
| F1 | System information | ||
| F2 | System diagnostics | ||
| F9 | Selecting boot media | ||
| F10 | Entering BIOS settings | ||
| F11 | Running System Restore | ||
| Enter | Continue Startup | ||
| F12 | Run disk check | ||
| Lenovo (IBM) | Phoenix SecureCore Tiano | F2 | Entering BIOS settings |
| F12 | Selecting boot media | ||
| Alt+F10 | Running System Restore | ||
| MSI (Micro Star) | Phoenix | DEL | Entering BIOS settings |
| F11 | Selecting boot media | ||
| TAB | Displaying the POST screen | ||
| F3 | Running System Restore | ||
| Alt+F10 | Running System Restore | ||
| Packard Bell (Acer) | Phoenix | F2 | Entering BIOS settings |
| F12 | Selecting boot media | ||
| Samsung | Phoenix | ESC | Selecting boot media |
| Toshiba | Phoenix | Esc, F1, F2 | Entering BIOS settings |
| Toshiba Satellite A300 | Phoenix | F12 | Entering BIOS settings |
Entering UEFI Settings from Windows 10
IN operating system Windows 10 enters the UEFI settings through the operating system boot menu. To get into it, do the following:

How to update BIOS on a computer with Windows 10
Modern Personal Computer is a modular device, and its motherboard is the longest-lived component. To support system components that were released later, such as new processors, hard drives, or memory modules, you may need to update the BIOS microcode. This can be done in several ways - using Windows applications, using the BIOS itself or by creating a special bootable media.
 To support new processors, the motherboard BIOS will probably need to be updated.
 Updating with a system utility in Windows environment
ASUS has released the WinFlash utility, which allows you to update the BIOS directly from the Windows operating system. Although the utility is intended for updating the BIOS of laptops and computers only from ASUS, enthusiasts have posted modified versions of the program on the Internet, which can now update the BIOS of any computer. To carry out the update procedure, you will need to follow a few simple steps:
- Make sure that the laptop battery is charged at least 75%; if you have a desktop computer, connect it to the mains via an uninterruptible power supply.
- Download the required BIOS version from the motherboard or laptop manufacturer's website and unzip the archive with the file.
 Download the latest BIOS version from the website
 - Download and install the WinFlash program on your computer, and then run it.
 Start screen WinFlash programs
 - Open the downloaded BIOS file with the program.
 On equipment ASUS file BIOS can not only be opened from the disk, but also automatically obtained via the Internet
 - Before clicking the UPDATE button, make sure that the model is old and new version BIOSes are the same. Completing the BIOS update process
- The computer will automatically restart and perform additional settings new BIOS version in automatic mode.
- The BIOS has been updated and the system is ready to use.
Updating using BIOS
Most modern motherboards contain a built-in BIOS update utility, for ASUS it is EZ FLASH2, for MSI it is QFlash. The procedure for updating the BIOS using these utilities is no more complicated than updating from a Windows environment.
- Prepare a 1-2 GB flash drive and format it in file system FAT16 or FAT32, then write the new BIOS file to this disk.
 To update the BIOS, the media with the firmware file must be formatted in the FAT file system
 - Restart your computer and run the update utility. To launch the QFlash utility, you must press and hold the END key when starting your computer.
 Confirm QFlash launch in the main BIOS settings screen Select the disk containing the firmware file
 - The utility will first write to the drive backup copy old BIOS, and then begin the update procedure, which will take 2-3 minutes.
- After rebooting, the computer will be ready to use.
Some motherboard models from 4-5 years ago could only read the BIOS update file from floppy disks. For such devices, before the update procedure, you need to enable the USB-FLOPPY emulation mode in the BIOS settings.
Video: updating the motherboard BIOS using the qFlash utility
Updating in DOS environment (via bootable USB flash drive)
Award, AMI and Phoenix companies have developed simple utility programs that run in the DOS environment. Updating using such utilities is the most universal, although also the longest, method, because it works on absolutely any model of motherboard and laptop, even very old ones. The update process will consist of two stages: creating bootable media and running the update program in a DOS environment. Let's look at the update procedure using the Award BIOS as an example:

Video: BIOS update in DOS environment
Computers and operating systems are becoming friendlier and simpler; now, for an inexperienced user, the operating system is the desktop and the icons on it. It's likely that computer architecture will change enough over time that the BIOS will no longer be necessary, but for now it is a powerful configuration tool that allows the advanced user to configure a PC to perform at its best. If you have to assemble a PC yourself, install operating systems, or you are simply planning to upgrade your pet, BIOS skills will help you carry out the process “without a hitch.”
Flashing the BIOS is not a labor-intensive process and will take a little time. It is recommended to install a new version and only from the manufacturer if the previous one was observed incorrect work. Let's look at the question in this article: how to update the BIOS on Windows computer 10.
Checking the firmware version
You can check the current firmware version in several ways:
- By looking at the information on the motherboard itself or on the remaining packaging. Look for a similar inscription rev 1.0, rev 1.1, rev 1.3.
- In the operating room Windows system. Open the Run command (Win+R) and enter the command msinfo32
In the “System Information” window that opens, look at the “BIOS Version” element.

- In the BIOS menu itself (read the article:) in Main or at the bottom of the screen.

Where can I download?
BIOS installation files can be downloaded from the official websites of motherboard developers or from the websites of laptop manufacturers (for example Dell, Lenovo, HP, Acer) in the “Download” section.
 | asus.com |
 | |
 | msi.com |
Update instructions
There are several ways to flash the BIOS.
On Windows
To update, download the required firmware to your computer. Then use the proprietary utility from the motherboard manufacturer:

If the downloaded file is executable (extension .exe), run it and wait for the installation to complete (the manufacturer writes about this in the firmware instructions, for example Dell).
Advice! The update is performed on all Windows versions 10, 8, 7, XP.
In BIOS
Most modern motherboards support a version upgrade method in the BIOS environment. For firmware download installation file to a flash drive and connect to your PC. Use the utility in motherboards to install the BIOS:

In DOS
To update the BIOS using the DOS environment, you need to create bootable USB flash drive with DOS and the BIOS itself. In addition, you may need a utility for the update process (Gigabite use DOS Flash utility). The update must contain a file with a .bat extension (Update.bat or Autoexec.bat) to run the firmware in DOS. This method is becoming obsolete and is applied to older models of motherboards.
Do you have any questions regarding your computer's firmware? Ask about it in the comments or use .
Many users do not know the answers to the question. They don't know how to update the BIOS. Don't think about updating this program- this is supernaturally difficult. Believe me, everyone can figure it out.
The abbreviation of this system translated into Russian sounds like basic system I/O
Why do you need a BIOS?
- When the computer starts, the BIOS checks the standard hardware and its viability. If any of this equipment burns out, a special sound signal.
- The program starts boot program, which directly loads Operating System.
- Provides interaction between the OS and various peripheral equipment.
- Gives the user the ability to configure PC hardware components.
Do I need to update the BIOS and why?
Updating this program is a deeper process than usual. computer programs. This implies a short algorithm of changes. Basically, this is correcting the malfunction of some rare components of the system or adding support for the latest processor models.
If the computer works without problems, it is better not to deal with this program. And it's not worth updating. You will not see any differences between the previous and new versions, and on the contrary, the update can generate unexpected problems for your PC. Most often they occur when the previous version was tested more thoughtfully than the new one.
The update should only be launched for your motherboard model. If you try to update the BIOS designed for a different model, it may bring you a number of unpleasant difficulties and problems.
But there are times when updates are necessary, and sometimes urgently:
- The motherboard requires the installation of a new processor, the support of which is capable of providing updated version. In this case, it is necessary to update the program.
- Need to connect HDD a size that is not supported old version programs.
- Required to activate additional functions chipset (a set of microcircuits that are designed to work together to provide a set of various functions), not included in the original version.
- It is necessary to replace the outdated OS on the computer.
- In case you plan to overclock your computer.
- The system functions slowly or incorrectly due to errors in the BIOS code.
- The version you have installed is broken, which is why the system does not function partially or completely.
What does a BIOS update do?

Updating the motherboard BIOS, as you already understand, is done mainly so that new processors and new memory, which are released very often, are supported motherboard installed on your computer. Because of this, updating the program is sometimes simply necessary.
Is it worth updating the program unnecessarily? Is it possible to update it constantly without thinking about the consequences? Programming professionals advise against doing this.
How to view the current current version of your system program?
- Most quick way to find out the current version is to use command line on your computer.

- Enter: Wmic bios get smbiosbiosversion. A window will open in which you will see the current version.


After you have found out the information you need, you should go to the website of the manufacturer of the motherboard that is on your computer.
There are five most popular manufacturers:
How to update BIOS on a laptop?
Special programs for updating BIOS
Top 3 programs:
- Asus – Asus Update,
- MSI - Live Update,
- @BIOS.
General instructions for the programs:

Let's look at the option of how to update the BIOS from a flash drive:

How to make a bootable floppy disk for updating the BIOS?
The update method from a floppy disk is considered one of the most reliable in terms of security.

After all these manipulations, you need to restart the computer and boot from the floppy disk. Make sure that the disk drive is set as the first boot device in the BIOS. During the reboot, open the BIOS setup menu by pressing the special open keys. We select - Advanced BIOS Features, Boot Sequence, which are sometimes called Advanced, Advanced BIOS Features.
How to update BIOS without battery?
For update purposes, you often need to charge your computer to at least 10%. If this condition is not met, then the message “Power Check Error” will pop up in front of you, preventing you from updating the program.
In order to update it, you need to find out one key. What do you need to do for this?

Windows won't boot after BIOS update
It happens that after an update, Windows stops loading. In this case, you need to start the computer's BIOS. Find the parameters of SATA devices and try to change the operating mode. If the settings are set to IDE, you need to activate AHCI (or vice versa). After this, save the new settings and restart the computer. 
And remember that entering this system do not do it unnecessarily, as it may harm your computer! If you still don’t understand or can’t figure out some subtleties, contact a specialist!
Have a great day!
BIOS... the average user rarely encounters this word. If a computer or laptop works normally, then its owner does not even know what it is.
BIOS (or UEFI) is the input/output system on your computer. BIOS is those same 1-2 seconds when, just after turning on the computer, you look at the splash screen of HP, MSI or another manufacturer of your system.
Some attentive readers will notice that they do not have a BIOS (Basic Input-Output System), but rather a UEFI (Unified Extensible Firmware Interface). Both solutions are low-level programs that run before your computer boots. UEFI is more modern solution, which replaced the BIOS. By the way, Intel promised to completely replace the BIOS with UEFI by 2020. And this is true, since the history of BIOS stretches back to the 1980s!
In 2007, Intel, AMD, Microsoft and other PC manufacturers agreed and adopted the UEFI standard. It brings support for large hard drives, new security standards, a beautiful interface and dozens of other changes.
It's 2018, but many computers have a BIOS on board, albeit a very advanced one. We will update it.

Need to update Computer BIOS most often caused by compatibility problems with RAM, video cards and SSD drives. If you are going to buy a RAM module or the latest video card, you should think about updating the BIOS. True, if your computer already works like a clock, it’s better not to touch the BIOS.
Here is one typical description of the BIOS changelog:

But be careful when updating the BIOS. In case something goes wrong, or the electrician Vasya turns off the electricity in your house during the update, your computer will turn into a “brick”. That is, it will not even turn on after this, and you will have to take it to a service center.
You perform all the actions described below at your own peril and risk!
Let's find out the versionBIOS
The update version is listed in the BIOS menu, but there is no need to restart the computer to find it. There are several ways to find out the BIOS version without restarting the computer.
- Just go to Start – Run (Win + R) and type “msinfo32 » , then press Enter (for Windows 7-10). The System Information program opens. The line “BIOS Version” contains the treasured value;


- The second method is almost as simple. Again go to “Start” – “Run” (Win + R) and type “cmd » . Then in the console that opens we write “wmic bios get smbiosbiosversion » and press Enter. After running this command, you will be able to see the BIOS version in the console;


- Download third party program and look there. AIDA64 is perfect for this. download AIDA64 Extreme and launch it. After that, go to the “Motherboard” - “BIOS” section.

And there the BIOS version and its date are already displayed.
Update
When updating the BIOS, you need to be as prepared as possible. This is not the usual procedure like “Let me update the drivers for the video card...”. Here the responsibility is higher, so if you do something wrong, the computer simply will not boot.
Various manufacturers offer different ways BIOS updates. Some use built-in utilities, others allow you to update the BIOS from USB flash. However, you will follow the same steps before you start updating.
The first thing you need to do is go to the website of the manufacturer of your motherboard (computer).
Section – Support.
The following are direct links to the websites of the largest motherboard manufacturers: Gigabyte, MSI, ASUS, ASRock.
For example, we need to download Last update BIOS for MSI Z370 KRAIT GAMING motherboard.
Go to the MSI website:

We enter the name “Z370” in the search bar and see our board in the search results.

After we have found our motherboard, click on “Downloads”. Then select the “BIOS” section.

It is best to use the latest BIOS version.

The downloaded file is usually an archive with update instructions and the update file itself.

When the computer boots, press Del to enter the BIOS. There we select the “M-flash” option and specify the files from the USB flash to update the BIOS. Don't forget to write down the name of your previous version BIOS. Just in case.
Sometimes your motherboard manufacturer has a utility to check for the latest drivers and BIOS. For example, MSI calls it Live Update.

The utility can automatically find BIOS updates on its own. To do this, you need to launch it and go to BIOS section Update.
Then click Scan:

We see if updates are available:


In some cases, to flash a new BIOS version, you will need to create a bootable USB flash drive for DOS and run .exe from there to update.
It's better to choose DOS mode. It's more stable. Moreover, we do not recommend updating via Windows utilities. There were cases when even branded programs updates killed the BIOS. Although they used correct versions BIOS. When updating via Windows work A BIOS flasher can interrupt antivirus and other programs.
When you select DOS mode, you will most likely be asked to boot from a flash drive (use a capacity of no more than 4 GB). In the DOS window you will need to enter a command like: firmware program.exe bios2356.bin (example).
Therefore, carefully study the instructions on the manufacturer’s website to find out the best and safest way to update the BIOS. After flashing under DOS computer will reboot, and all you have to do is configure the BIOS correctly. After this, you can work with the latest version and safely boot into Windows.
Good luck everyone (and you will definitely need it)!


