When you see the B250 chipset in the title of the review, don’t rush to leave the page right away. Despite the release of the three hundredth Intel system logic chipsets and next generation processors, motherboards based on the B250...
When you see the B250 chipset in the title of the review, don’t rush to leave the page right away. Despite the release of the three hundredth Intel system logic chipsets and next-generation processors, motherboards based on the B250 are still relevant. Moreover, the model we are considering belongs to the Mini-ITX format. And when faced with the task of assembling a compact multimedia PC based on an Intel processor, not tomorrow, but today, you will have practically no choice. There are no low-end chipsets of the 300 series on sale yet, and assembling them on a Z chipset and with a budget Pentium or Celeron processor is not very profitable. The performance of these Kaby Lake generation processors and their built-in video cores is quite enough for a compact multimedia PC, or as they are also called - HTPC (Home Theater PC). You can verify this by reading the relevant reviews on our website.
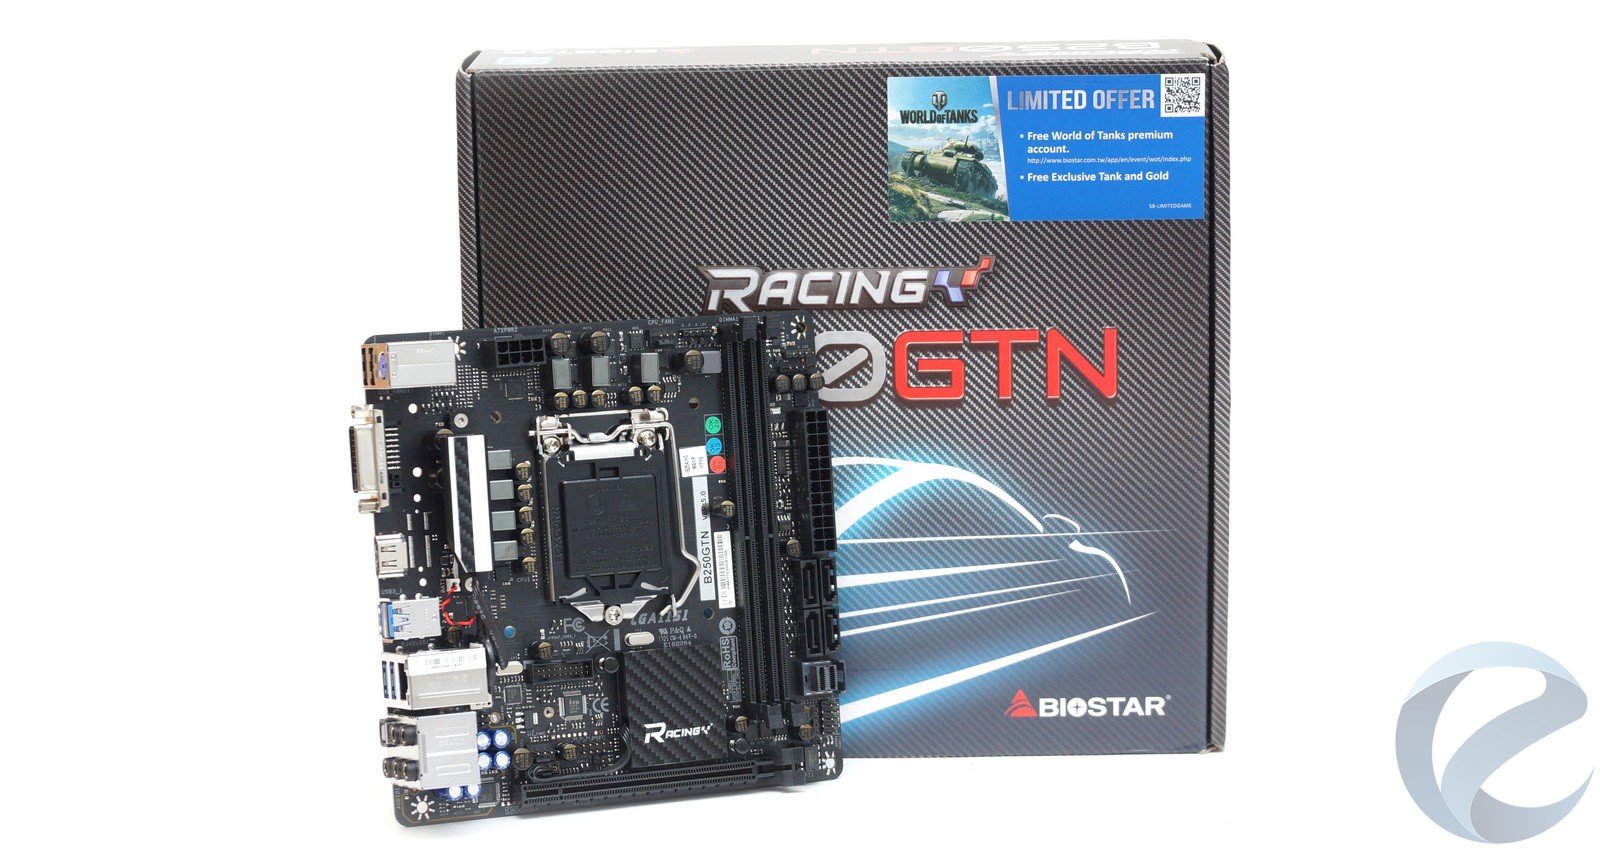
Model reviewed today motherboard Biostar Racing B250GTN was released in the spring of 2017. It is the flagship of the racing series. Despite the Mini-ITX format, the board has almost all the advantages of full-size models. There is an M.2 slot, a U.2 port, Hi-Fi audio codecs, and the ability to output images via HDMI in 4K resolution.
Specifications
- Socket: Intel LGA1151;
- Supported processors: 7th/6th Intel generations Core i7/i5/i3/Pentium/Celeron;
- Chipset: Intel B250;
- RAM: 2 × DIMM DDR4 1866 - 2400, max. up to 32 GB;
- Expansion slots: 1 × PCI-e ×16 v3.0;
- Graphics: 1 × HDMI port supporting a maximum resolution of 4096x2160 at 30 Hz, 2560x1600 at 60 Hz, 1 × DVI-D with a resolution of 1920x1200 at 60 Hz;
- Storage system interfaces: 4 x SATA 6 Gbit/s, 1 × M.2 slot (Key M) 2260/2280;
- 1 U.2 port supports PCI-e 3.0 ×4 speed;
- USB ports: 6 × USB 3.0, 4 × USB 2.0;
- Sound: Realtek ALC892 8-Channel Blu-ray Audio, Biostar Hi-Fi support;
- Network card: 1 × 1000 Mbit/s, Intel I219V;
- Form factor: Mini-ITX;
- Dimensions: 17 cm × 17 cm;
- Average cost: 6000 rub.
Packaging and equipment
The motherboard comes in a compact cardboard box with color printing. The lid of the box has a laconic design: against a background stylized as carbon, there is a silhouette of a racing car, the model of the motherboard and its affiliation with the Racing series are indicated.

In the upper right corner there is a sticker with a QR code to activate a premium account in World of Tanks, an exclusive tank and gold.
On the reverse side there is more detailed information about the product: a detailed diagram of all connectors and connectors, as well as a description of additional functionality - connecting LED backlight, the ability to connect U.2 and M.2 drives.

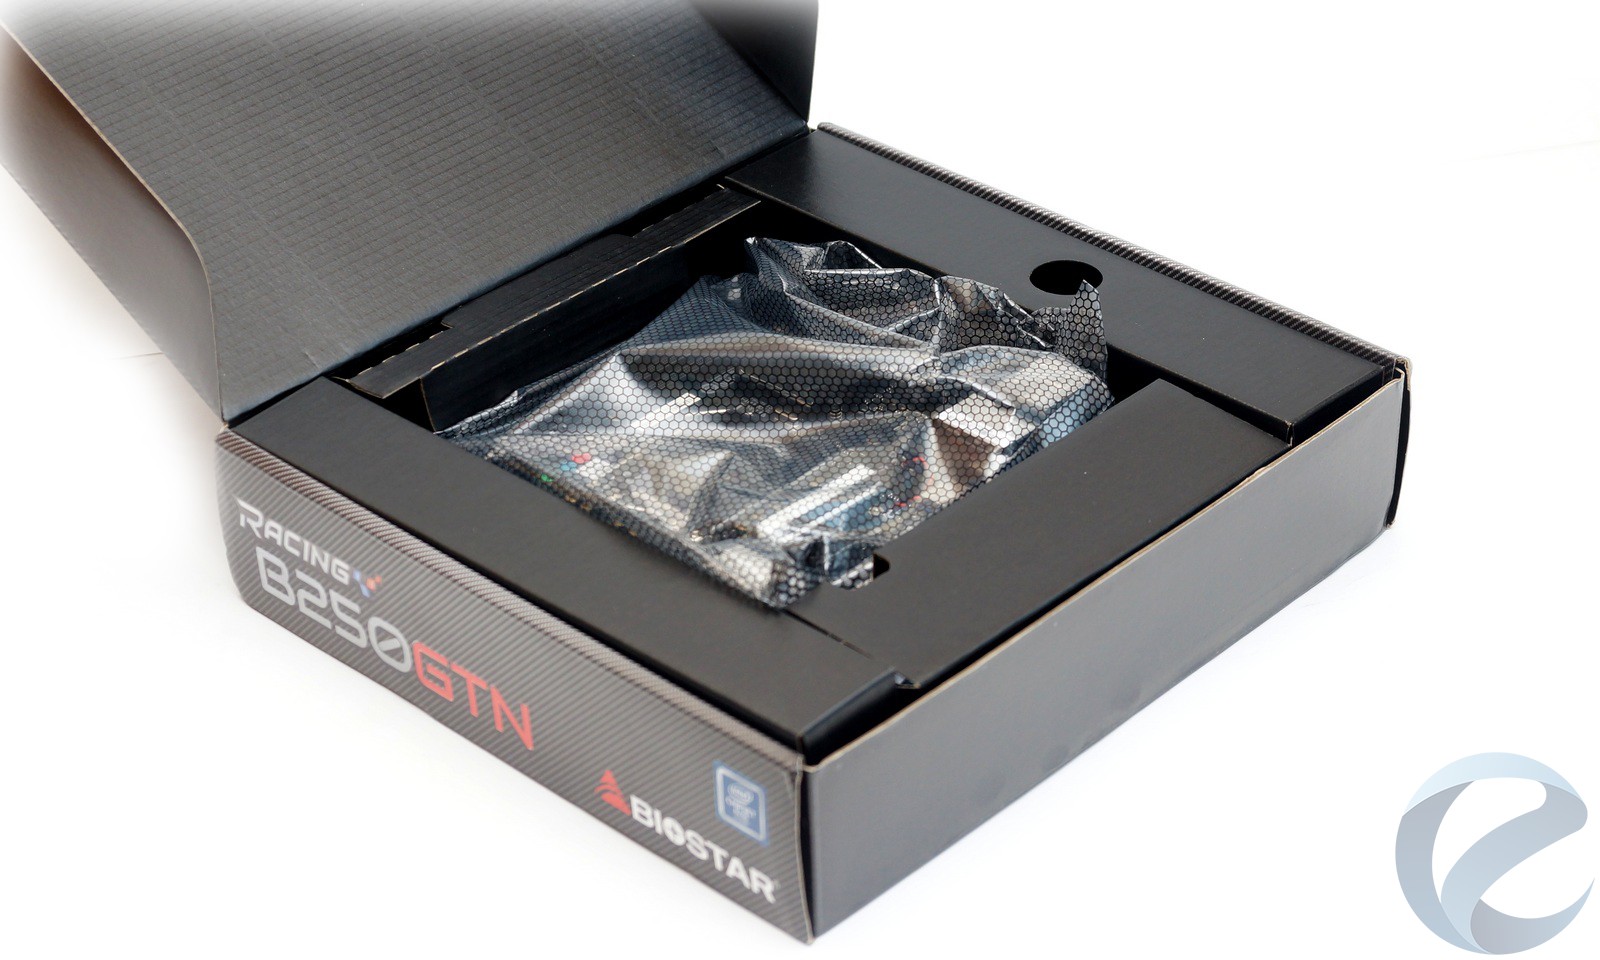
Inside the box, in an antistatic bag, is the board itself, fixed between cardboard buffers.

The kit includes a user manual, a brochure describing the Vivid LED DJ program, a software disk, a blank for the interface panel and four SATA cables. Since the ability to connect LED strips stands out as one of the main features, I would like to see an extension cable for connecting them included in the kit.

Appearance and features of the board
For those who are used to the look of full-size motherboards, the appearance of the Racing B250GTN will seem like a toy. The main purpose of the Mini-ITX format design is to build compact multimedia PCs. It will not be possible to place many elements on a piece of textolite measuring 17 by 17 centimeters. Therefore, everything is kept to a minimum: two slots for memory modules, one slot for PCI-e.
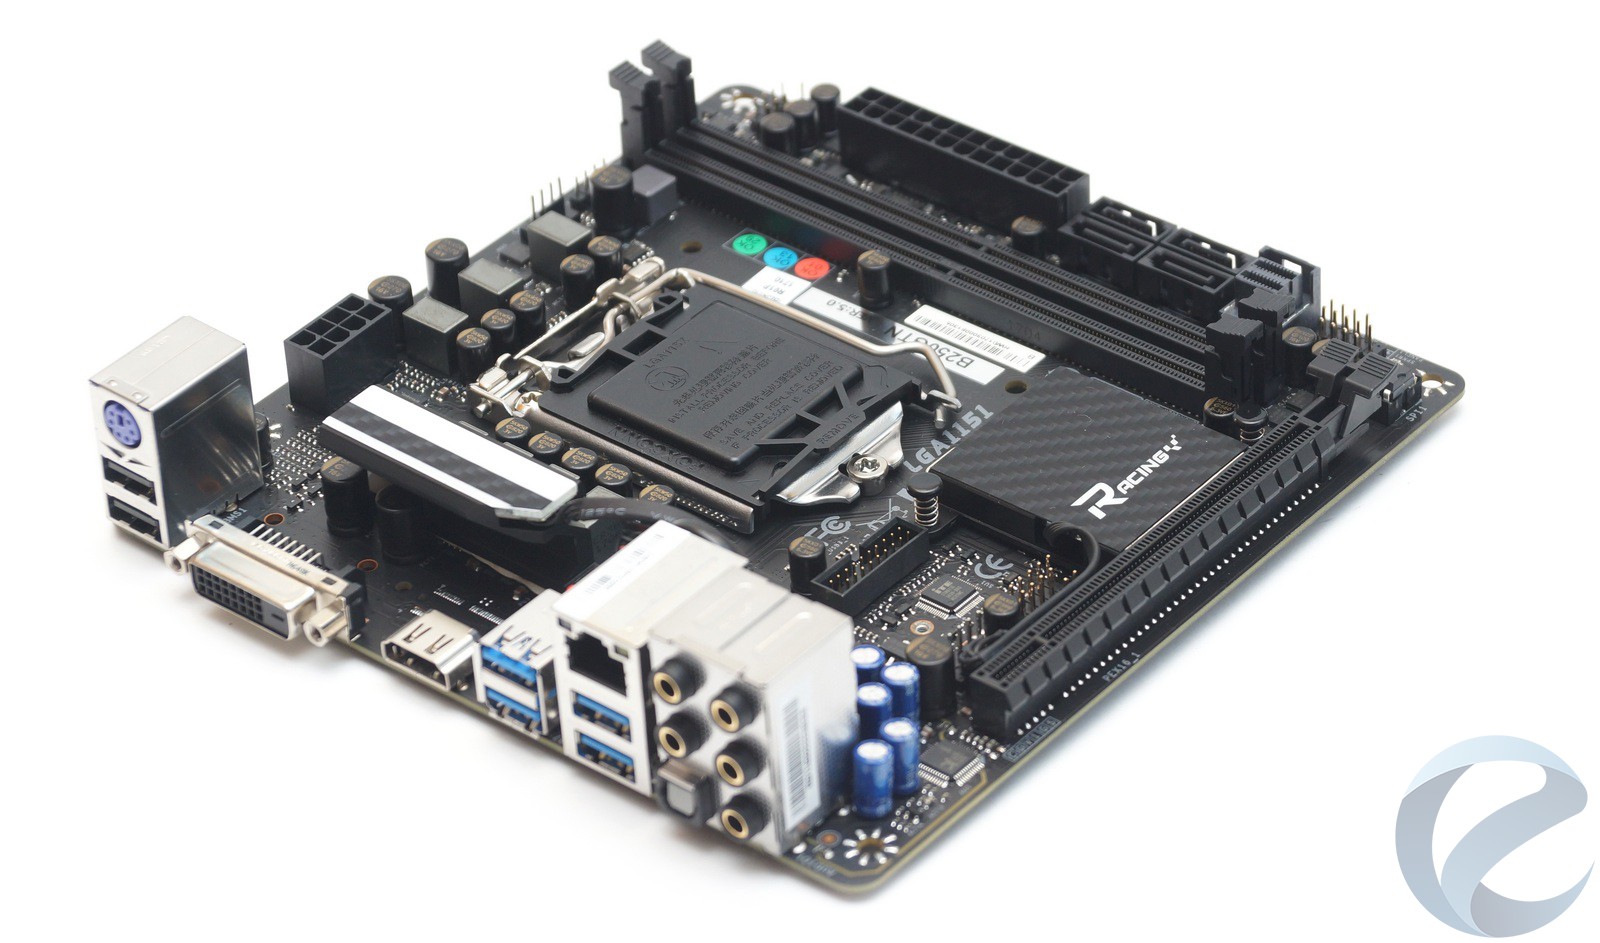
But the manufacturer did not stop there and found a place for an M.2 standard drive on the back of the motherboard.

The textolite is painted in a standard black color, no patterns are provided.

Slightly above the center is the LGA1151 socket. Traditionally, to the right of it are two DIMM DDR4 slots. You can install up to 32 GB random access memory. The chipset has a maximum RAM frequency limitation of 2400 MHz.

On the right edge of the board there is a 24-pin power connector, under it there are four SATA 3 connectors, support for RAID 0,1,5 and 10 is stated. Below them is a U.2c connector PCI-e support 3.0 x4 high-speed drives, declared support for Intel Optane Technology. Even lower are connectors for connecting the front interface panel - buttons and indicators. Installed in the very corner of a special slot removable chip BIOS based on Winbond 25Q64FVAIG flash memory with a capacity of 64 Mbit. This decision looks strange for a motherboard without overclocking features.

Along the lower edge of the PCB there is located PCI-e slot Gen3 x16. Above it are USB 2.0 connectors for two ports and USB 3.0 for two ports. There is also a 4-pin connector for connecting SYS FAN and a jumper for resetting BIOS settings.
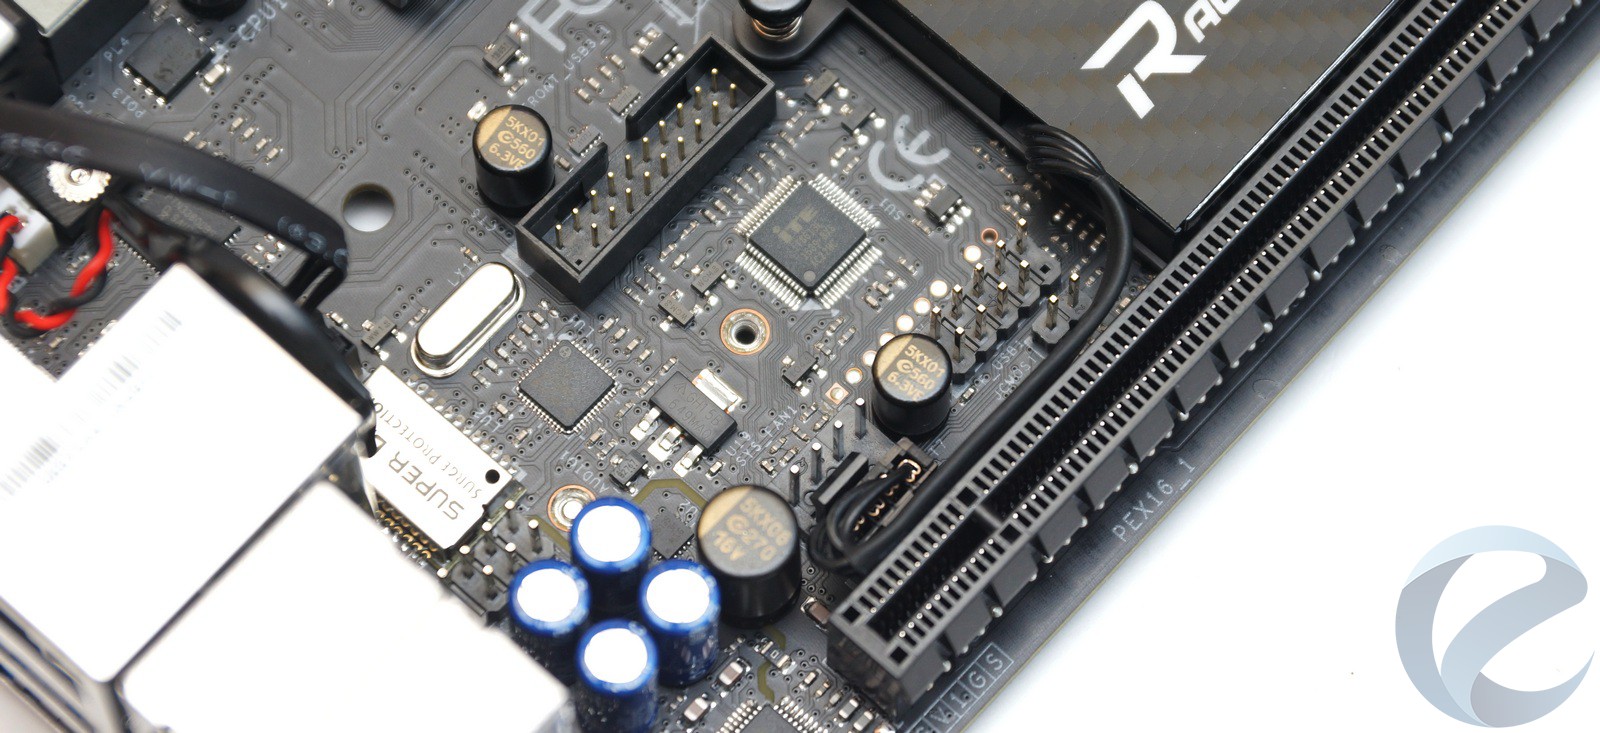
Between the connectors we see the ITE IT8613E chip, it is responsible for Multi I/O, monitoring and operation of the PS/2 port.
In the corner of the board there is a separate audio path. The sound is provided by the 8-channel Realtek ALC892 HDA codec. Not the latest option, but it provides good sound. The installed audio capacitors also contribute to this.

Above the sound zone is an Intel I219V gigabit network controller with proprietary technology for protection against short circuits, static and lightning - “Super Lan Surge Protection”.
Even higher we see the PTN3360DBS chip that ensures the operation of video connectors, including HDMI version 1.4 with a maximum resolution of 4096 × 2160 at 30 frames per second.
There is a battery located on the inside of the expansion slots; it is connected to the board with wires. There was no place for it directly on the PCB.

The CPU power supply is based on a seven-phase circuit. If we look at the phases in more detail, we will see a traditional scheme. There are actually three converters here. The first four-phase (in the photo it is to the left of the socket) and the second two-phase (on top of the socket), form the voltages of the CPU Core and iGPU. The third single-phase (stand-alone) generates the CPU voltage VCCSA and additionally by lowering the CPU VCCIO.

The power subsystem is controlled by an Intersil ISL95866 PWM controller. Another phase is responsible for nutrition DDR memory and is controlled by a uP1811C PWM controller manufactured by uPI Semiconductor.


The passive cooling system is represented by two radiators. One is located on the mosfets of the CPU power supply circuit, the second is located directly on the chipset. The first is attached with screws, the second with plastic clips. On top, the radiators are covered with transparent plastic inserts and a stylized carbon fiber texture; RGB LED lighting is installed underneath them; the Racing series logo is illuminated on the chipset radiator.
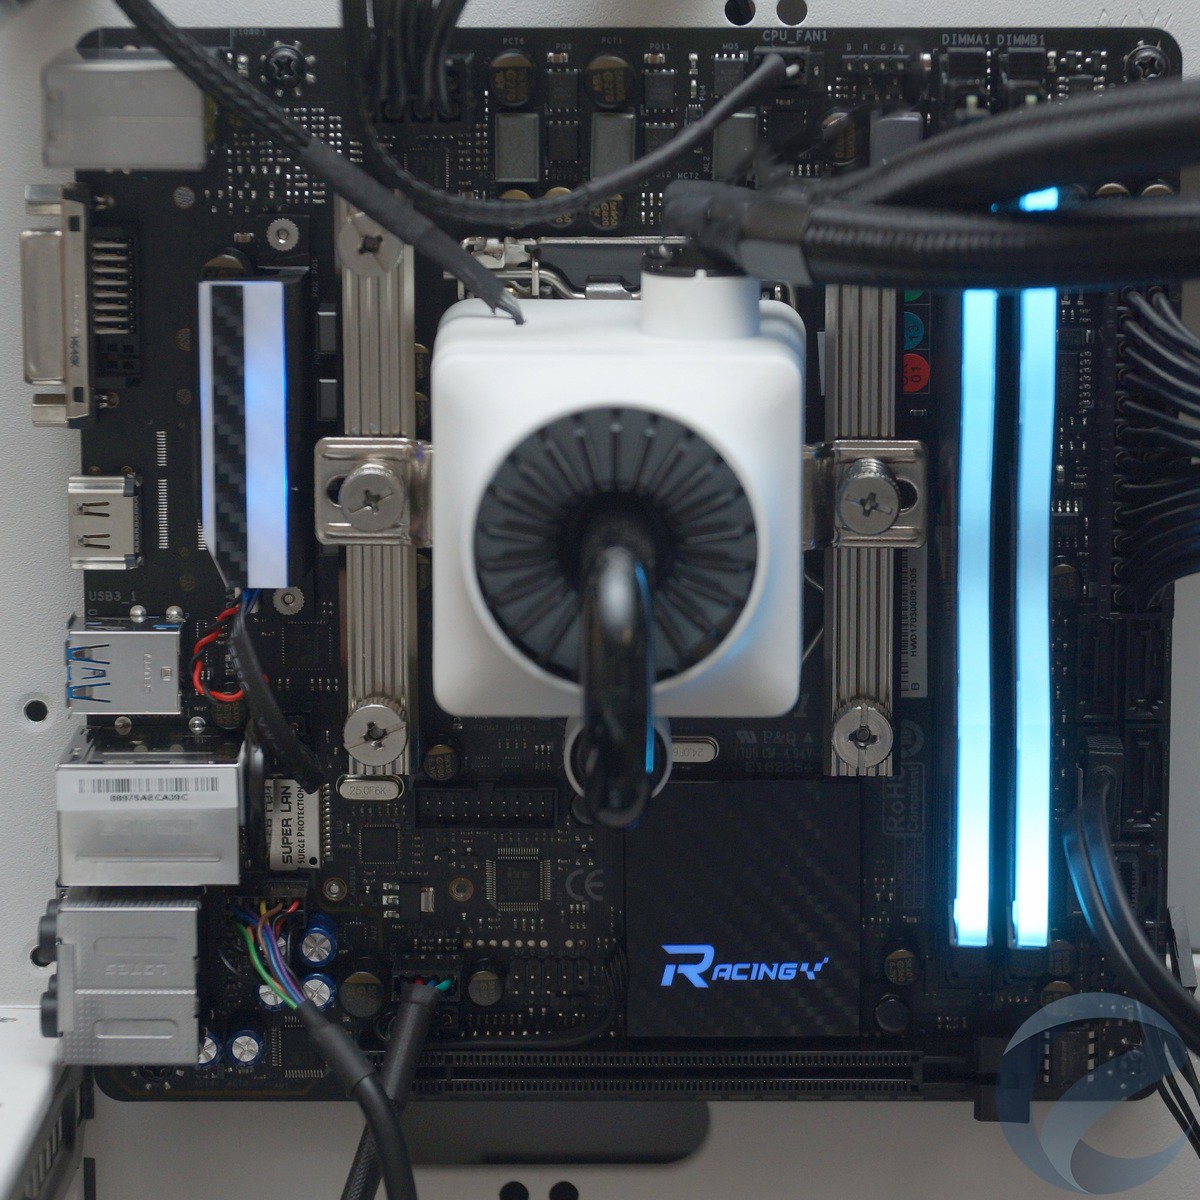

To connect active cooling, only two 4-pin connectors are provided. If this is not enough, you will have to use a special hub.
Additionally, the board has two 4-pin connectors for connecting the LED strip; two connectors to which the radiator lighting is already connected.
The interface panel is quite laconic: two USBs of the second version, four of the third, PC/2 for connecting a keyboard, one LAN connector, two video outputs - HDMI and DVI-D, audio outputs are represented by five 3.5 mm connectors and one S/PDIF output. Another audio connector for connecting headphones and a microphone on the front panel is located on the board in the area of the audio path.

The reverse side of the board is no less interesting. Here we see a contour highlighting the audio path area, as well as a connector for SSD drives in M.2 format - 2260 and 2280. Both SATA III and PCIE 3.0 x4 drives are supported. In addition, a Wi-Fi module of size 2230 can be installed in this slot.

The board is secured with four screws. In the area of the interface panel we see a couple of through holes. Here, apparently, provision was made for installing the commonly found plastic casing over the interface slots.
BIOS and proprietary utilities
Modern preloader with graphical interface UEFI is made in an original design. There is no division into “simple” and “special” operating modes. There is only one window, on the left side of which the processor and memory frequencies, fan speed and temperature are displayed, the time and date are shown below, and when you click on the time, a calendar with settings will be displayed.
The central frame displays the main sections, and you can navigate through the sections using the icons at the bottom of the window. Tips are displayed in the right tab.
There are seven sections in total:
“Main” - basic information about the board; only English and Chinese are available in the interface languages.
.jpg)
“Advanced” - contains subsections with various settings: fan speed, USB setup and SATA controller, as well as CPU configuration.
.jpg)
.jpg)
.jpg)
.jpg)
.jpg)
.jpg)
“Chipset” - disabling the network and audio controller, setting up the built-in graphics.
.jpg)
.jpg)
.jpg)
.jpg)
“Boot” - select a boot device.
.jpg)
.jpg)
“Security” - setting a password.
.jpg)
“O.N.E” - settings of processor and memory frequencies, selection of timings and operating voltages. In the same tab you can adjust the backlight.
.jpg)
.jpg)
.jpg)
.jpg)
.jpg)
.jpg)
.jpg)
.jpg)
“Save & Exit” - saving or resetting settings.
.jpg)
On the manufacturer's website, except for all necessary drivers and utilities for updating the BIOS, there is a multifunctional proprietary utility “Racing GT”.
The program has four tabs:
System information - brief information about the processor, memory and the motherboard itself.

Sound settings - headphone volume and sensitivity.
.JPG)
Setting the backlight - choosing a color, mode, and setting color music.

Monitoring - setting up fans and controlling temperatures.
.JPG)
Testing
Test bench:
- CPU: Intel Pentium G4620;
- Cooling: LSS Deepcool CAPTAIN 240 EX;
- Thermal interface: ARCTIC MX-2;
- RAM: Geil DDR4 Super Luce RGB 2 × 8 GB;
- Power supply: Thermaltake Toughpower DPS G RGB 850W Gold;
- Storage: SSD WD Blue 250 GB;
- Case: Thermaltake Core P3 Snow Edition;
- Operating system: Windows 10 64-bit.

The B250 chipset does not offer any overclocking capabilities. The memory frequency can be set to a maximum of 2400 MHz.

Let's test the possibilities Pentium processor G4620 and compare its results with tests on a full-size motherboard based on the Z270 chipset.
.JPG)
.JPG)
.JPG)
.JPG)
.JPG)
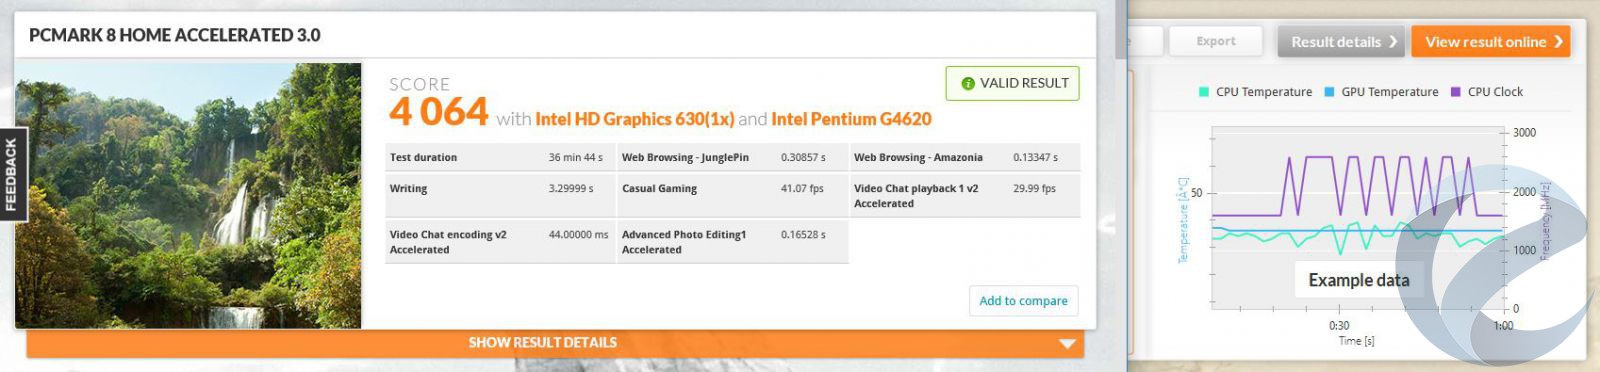
The difference in performance is insignificant, it fits into the measurement error, in some tests there is parity or even an advantage of the lower-end chipset. This comparison demonstrates the fact that the performance of identical components practically does not depend on the motherboard itself, be it a model stripped down in many components on a low-end chipset or a sophisticated full-size model on an older chipset.
Additionally, we will test the temperature indicators of the radiators. The maximum indicators during the stress test were:
- Chipset heatsink - 37°C;
- Radiator on the mosfets of the CPU power subsystem - 33°C;
- Power subsystem chokes - 30°C.
The hottest processor core reached a maximum of 46°C.
At such temperature values, there is clearly no risk of overheating of the components, even in a compact case.
Conclusion
The Biostar Racing B250GTN motherboard surprised us with its equipment, which is rich enough for the Mini-ITX format. It will be an excellent basis for building a compact multimedia computer based on intel Kaby Lake processors. You can use either the video core built into the processor or install a discrete video card. The HDMI video output supports 4K resolution output. The motherboard is equipped with a pretty decent audio codec with the ability to connect multi-channel acoustics. Versatile storage options - traditional SATA drives, solid-state drives of the M.2 and U.2 form factor, a sufficient number of USB ports.
An undoubted plus is following the fashion in terms of the presence of RGB lighting on both radiators, and the ability to connect LED strips, as well as the presence of two 4-pin connectors for connecting fans.
One of the disadvantages is the lack of a built-in Wi-Fi/Bluetooth module required for such a system. But this problem can be solved by purchasing an M.2 form factor module.
As a result, we get a functional board from a time-tested manufacturer for quite reasonable money. It will cope with its duties perfectly, and our editors can safely recommend it as the basis for a compact HTPC system.
- Affordable price;
- Well equipped for the Mini-ITX form factor;
- RGB backlight;
- Expanded drive connection options;
- M.2 slot and U.2 port;
- HDMI port supporting 4096×2160 resolution;
- High-quality audio codec;
- Efficient passive cooling.
- There is no built-in Wi-Fi/Bluetooth module.
What is needed for a gaming computer? A powerful processor, a powerful gaming video card, more memory and, highly desirable, an SSD drive. Well, there’s also a monitor and a gaming mouse. All? No, not all. You can't do without a motherboard. Moreover, you don’t always need a large motherboard in the ATX or mini-ATX form factor. If you do not plan to install additional (second, third, etc.) video cards, RAID controllers and other devices, then why not opt for a compact option by assembling gaming computer in a small building? Today we are talking about mini-ITX motherboards, choice and, at the same time, short review of which in today's material.
Criterias of choice
As usual, before choosing anything, let’s determine the requirements for a future purchase. Today we’ll see what to buy for Intel processors the latest generation, if you want to build a computer in a small case.
We are talking about motherboards in the mini-ITX form factor. Actually, there are no particular criteria here. At the moment (beginning of December 2017), for Coffee Lake generation processors, the choice of chipsets fully corresponds to the famous expression of Henry Ford:
"The car can be any color, as long as it is black"
So in this case, of the 300 series chipsets, only Z370 is available. There should be more available early next year, but for now this is the only one available. Therefore, today there is only one selection criterion – the mini-ITX form factor.
The main thing is that there is support for the processors we are interested in, there is a slot for installing a video card, and the number and types of USB ports, connectors for storage devices, etc. – that’s how it will turn out.
Available models
Almost all motherboard manufacturers have a model, or several, in this size. The exceptions are EVGA and Biostar. Maybe for the better. And, frankly, the choice is small, not only in terms of the number of models, but also in the differences between them.
Key Features of Available Mini-ITX Motherboards
| Model | ASRock Fatal1ty Z370 Gaming-ITX/ac | ASROCK Z370M-ITX/AC | ASUS ROG STRIX Z370-I GAMING | GIGABYTE Z370N-WIFI | MSI Z370I GAMING PRO CARBON AC | |
| Supported Memory | DDR4-2666 | |||||
| Number of memory slots | 2 | |||||
| Max. memory capacity, GB | 32 | |||||
| Expansion slots | 1 PCIE 3.0 x16 | |||||
| Quantity SATA 3 | 6 | 4 | ||||
| RAID support | 0,1,5,10 | |||||
| M.2 | 1 x M.2 Socket 3, M Key type, 2260/2280, PCIe Gen3 x4 (PCIe & SATA) | 1 x M.2 Socket 3, M key, type 2242/2260/2280 PCIe Gen3 x4 (PCIe) | 1 x M.2 Socket 3, M key, type 2242/2260/2280 PCIe Gen3 x4 (PCIe & SATA), 1 x M.2 Socket 3, M key, type 2260/2280 PCIe Gen3 x4 (PCIe) | 1 x M.2 Socket 3, M key, type 2242/2260/2280 PCIe Gen3 x4 (PCIe & SATA) | ||
| Sound | Realtek ALC1220 | Realtek ALC892 | SupremeFX (Realtek) S1220A | Realtek ALC1220A | ||
| LAN | Gigabit, Intel® I219V | Gigabit, Intel® I219V+ GigaLAN Intel® I211AT | Gigabit, Intel® I219V | Gigabit, 2 x Intel® GbE LAN | Gigabit, Intel® I219V | |
| Wi-fi | Intel® 802.11ac WiFi Module AC3165 | Intel® 802.11ac WiFi Module | Intel® 802.11ac WiFi Module | Intel® Dual Band Wireless-AC 8265 | ||
| Bluetooth | 4.2 | 4.2, Intel® Dual Band Wireless-AC 8265 | ||||
| Interfaces | 1 x USB Type-C (USB 3.1 Gen 2, with Thunderbolt 3 support) 8 x USB 3.1 Gen1 1 x DisplayPort 1.2 | 8 x USB 3.1 Gen1 1 x DisplayPort 1.2 | 1 x USB 3.1 Gen 2 Type-C 6 x USB 3.1 Gen 1 | 1 x USB Type-C (USB 3.1 Gen 1) 6 x USB 3.1 Gen 1 | 1 x USB Type-C (USB 3.1 Gen 2) 1 x USB Type-A (USB 3.1 Gen 2) 4 x USB 3.1 Gen 1 1 x DisplayPort 1.2 |
|
| Number of power phases | 7 | 6 | 8 | 6 | 8 | |
| price, rub. | 14300 | 10500 | 14500 | 11000 | 149.57 euros * | |
* At the moment (beginning of December) I have not found this board for sale in Russia, it has not yet reached us, but in the computeruniverse online store it costs about 10,400 rubles. Considering that it is slightly cheaper than the ASRock Fatal1ty Z370 Gaming-ITX/ac, I assume that its retail price will be about 13,500-14,000 rubles.
As you can see, the differences between the boards are small. The number of SATA and M.2 connectors varies, the number of USB also varies, and different audio chips are used. Otherwise, all models have similar characteristics, and differences in the number of power phases can be ignored.
Let's take a closer look at each motherboard.
ASRock Fatal1ty Z370 Gaming-ITX/ac
One of the very sophisticated boards in this form factor. In general, only this manufacturer can boast of the ability to connect 6 drives with a SATA interface. How necessary this is is another question, since it is still assumed that boards of this form factor are used in compact cases, where it is not always possible to install such a number of even 2.5-inch drives.

The chipset and (VRM) are covered by heatsinks connected by a heat pipe. The M.2 connector is located on the back of the board.
The power system is 7-phase, built on the new ISL69128 PWM controller from Intersil. To ensure Thunderbolt 3 operation, the JHL6340 controller is used. The TSP65982 chip manufactured by Texas Instruments is needed to provide the functionality of the USB 3.1 Gen 2 interface. Compatibility with HDMI 2.0 is provided by the MCDP2800 manufactured by MegaChips.
If we talk about RGB backlighting, then the situation is twofold. It is there, but just a few LEDs near the PCIe connector are unlikely to satisfy those who like “to make everything shine and sparkle.” There is a backlight on the board, but that's all that can be said about it. You will have to color the system unit using additional LED strips or other devices. Fortunately, the installed nuvoTon N76E885AT controller will provide this opportunity.
The board realizes the potential of the chipset well and allows you to overclock processors with an unlocked multiplier (“K” version). A powerful power supply also has a beneficial effect on overclocking capabilities.
The board has no problems with overheating. When installing a processor cooler with VRM airflow, the temperature of the power circuits was about 50 °C, which is very good, and, as you can find out from the reviews, the installed VRM heatsink does an excellent job.
The board has no problems with interfaces either; there are a lot of connectors on the back, for every taste. In general, the Fatal1ty Z370 Gaming-ITX/ac is packaged very well and is definitely worth paying attention to when choosing. Its only problem is the illumination made “for show”.
ASROCK Z370M-ITX/AC
To some extent a simplified version of the previous model. Firstly, there is no big name Fatal1ty, there is no word “Gaming” in the name. However, this does not in any way detract from the possibility of using it for a gaming PC.

Secondly, the number of power phases is one less - 6. In this case, more simple system Chipset and VRM cooling. Installed separate radiators without a heat pipe.
Thirdly, the M.2 connector was placed on the front surface of the board, thanks to a smaller heatsink on the chipset.
Fourthly, the PCIe x16 connector is not reinforced with a metal frame, as was done in the previous model.
There are other differences as well. This is also simpler Wi-fi module, lack of Thunderbolt 3, but there are 2 gigabit network interfaces on Intel controllers. The lighting here is also very poor. Just a few LEDs on the bottom edge of the motherboard.
If the lack of a connector supporting Thunderbolt 3 is not critical for you, the unreinforced connector for the video card does not bother you, and simpler radiators on the chipset and power circuits do not bother you, then you can easily save almost 4,000 rubles. and choose this particular model.
ASUS ROG STRIX Z370-I GAMING
The name of the board strongly convinces that we are dealing with a gaming model; not only does it belong to the ROG (Republic of Gamers) family, but there is also a separate word GAMING in the name, like a kind of control shot, so that no one doubts the purpose of the motherboard .

The board has interesting solutions. For starters, an 8-phase power system. Since it’s a gaming game, and even on an overclocker chipset, why waste time on trifles? A radiator for batteries is also installed. The PWM controller ASP1400BT is used.
By the way, the chipset also has a heatsink, but it’s not a simple one. It's two stories high. Its upper part is removed, revealing space underneath for installing an M.2 drive. That is, one radiator cools both the chipset and the drive.
There is also a second M.2 connector. It is located on the back of the board, only supports PCIe drives (SATA SSD is not supported), and it does not have a heatsink.
Those who want to overclock can afford it, since the board provides everything they need. Thus, the Core i7-8700K processor, often used in reviews, worked stably at frequencies of 5 GHz at a voltage of about 1.3 V, and you can certainly squeeze more out of successful copies.
The backlight is located along the edge of the board, rather modest, but somewhat more fun to use than the ASROCK models.
As a result, we have a board with virtually no flaws. Personally, I'm a little confused by the placement of the first M.2. A radiator is good, but right under the drive there is heating in the form of a chipset, even if it is also covered by a radiator. Given the tendency of high-speed PCIe SSDs to overheat, will such cooling be sufficient?
For a complete set, the only thing missing is USB 3.1 Gen 2, although this is more of a nitpick. Buying this board, I think, is a win-win option.
GIGABYTE Z370N-WIFI
A very interesting fee for a reasonable price. In principle, it differs little from the same ASUS, offering everything the same, with the exception of a smaller number of power phases (6 versus 8 for the ROG STRIX Z370-I GAMING) and the absence of USB 3.1 Gen 2. Otherwise, everything is approximately the same.

Including two M.2 connectors. In this case, there are no double-decker radiators, both the chipset and the drive in the first M.2 connector located on the front side are cooled individually. The second M.2 connector located on the reverse side does not have a heatsink.
In general, having two M.2 is a good idea, which will allow you to build a computer without traditionally connected hard drives or 2.5-inch SSD drives. No extra cables, everything you need is located on the motherboard. All that remains is to get a couple of solid-state drives.
And here a certain subtlety arises, which, by the way, is completely true for the ASUS model discussed above. Let's imagine, if we plan to get by with a pair of M.2 drives, then what would be the optimal thing to do? Buy one on the PCIe bus, high-speed, and install it in the slot on the front side. It's no secret that fast models of such drives are prone to overheating and additional cooling is good for them.
Okay, one SSD has been installed. The system and main programs will now work quickly. Now you need to deal with the second drive, for data. Agree, the same performance as the first SSD is not really needed, and it would be quite possible to get by with an SSD on the SATA bus. By saving on the interface, it would be possible to take a larger model.
And here an ambush awaits us. The second, rear-mounted M.2 connector does not support SATA drives. What happens? The system drive, which is fast and hot, will have to be placed back, leaving it without cooling, and the SATA SSD will have to be placed under a heatsink that it does not need.
To be honest, the logic of the developers' reasoning is strange. It is clear that there are some technological reasons, and SATA interface, applied to solid state drives, does not allow them to work at full capacity, but since there is support for this interface, why not swap the connectors?
Otherwise, it’s a very interesting and worthy fee. Overclocking is also fine. The reviews write that the heatsink on the processor power circuits heated up to 80 °C under high load, but no problems with instability were noticed. The heatsink on the SSD works very efficiently. For example, the temperature of the Samsung 960 Evo used in one of the tests was reduced from 75 °C to 59 °C.
A more than interesting option for purchase, especially since the price is very attractive.
MSI Z370I GAMING PRO CARBON AC
The model is new, and has not yet been particularly featured in detailed reviews. Judging by the characteristics, it is difficult to complain about the lack of anything. There is only one M.2 connector, located on the back side and not equipped with any heatsink.

All modern versions of USB 3.1 are present, for which the latest ASMedia 3142 controller is responsible.
The board, in fact, is a complete analogue of the ASRock Fatal1ty Z370 Gaming-ITX/ac, with virtually no different characteristics, except for a slightly different number of interface ports, and the backlight is slightly better. And they are clearly similar in price. Which option to choose is a matter of taste.
Conclusion. Z370 mini-ITX motherboards, choice without much choice
There are few motherboard models of this form factor. Not the most popular size. Added to this is the fact that such a baby stands like an adult. Judge for yourself, for example, a full-fledged ATX ASUS board ROG STRIX Z370-F GAMING can be purchased for 14,000 rubles. There are also two M.2 here, but already 4 memory slots, a bunch of PCIe connectors, not to mention more impressive lighting. True, its size is larger.
It seems that for the mini-ITX form factor a simpler chipset will be better suited, and, accordingly, cheaper. Overclocking is not the thing for which you buy such a motherboard. More important is stability of operation, the ability to install any, even the most powerful, video card. All this can be done with currently existing boards.
Therefore, for me personally, the most interesting options are the cheaper models, i.e. ASROCK Z370M-ITX/AC and GIGABYTE Z370N-WIFI, and the latter is even more attractive. If you absolutely want to assemble something compact but powerful, then why not pay attention to one of these models. And if you make do with only M.2 drives, then the number of wires and other devices will be reduced to a minimum.
Good choice and good shopping.
Company Fractal Design continues to delight its fans with new products, and we continue to review them from the point of view of overclockers. This time, a new MiniITX case of the Core series arrived on the table of our test laboratory - Core 500. This case is a kind of “return to origins”, because, despite the external similarity with Node 304, it was given back the 5.25″ compartment and the reset button.
What else is interesting Core 500 How it works and why fans of air defense systems in compact cases will like it - you will find out in this material.
0. Packaging
Let's start the description with the packaging, which is very typical for the product. Fractal Design. Thick unpainted cardboard, high-quality foam inserts, recesses for easy carrying - everything is as always with FD. The box is not very large in size (450 x 285 x 335 mm 3) and weight (5.3 kg), so you can carry the case from the store on foot without fear of compromising your health.
The front side shows the assembled case, the left side shows a set of identification barcodes and the case frame, and the back side shows circuit diagram body, and on the right is a table of technical characteristics, which is difficult to read from the picture, so we will duplicate it.


1. Specifications
| Specification | |
| Type of shell | Mini-ITX |
| Color | Black |
| Size | 367 x 250 x 213 mm 3 |
| Mounting places for drives | 1 bay 5.25″ |
| 3 3.5″ bays, compatible with 2.5″ devices | |
| 3 compartments 2.5″ | |
| 2 USB 3.0 connectors, audio input, audio output, power and reset buttons | |
| PSU compatibility | ATX, length up to 170 mm |
| Compatibility with video cards | Length up to 310 mm, may conflict with power supply |
| Compatible with CPU CO | Processor CO height up to 170 mm |
| Cooling | |
| Top panel | Space for 2 fans 120 or 140 mm |
| Back wall | Series R3 140mm fan pre-installed |
| Dust filters | On the top, side and bottom edges of the body |
| Compatible with SVO radiators | 2 sections 120 or 140 mm on the top panel |
| 1 section 120 mm on the rear wall | |
2. Appearance and delivery package
Put the box aside and look at the contents. In addition to the 5.25″ compartment cover on the front panel, attention is drawn to the leakiness of the case. There are perforations on all edges except the front panel, and this can be both an advantage (better air exchange means a smaller temperature difference between the case and outside) and a disadvantage (air passing through the holes creates noise). From an overclocker's point of view, the more leaky the better, but we'll come back to noise later.
Regarding the 5.25″ compartment, I want to say right away that the author himself was previously an opponent of this compartment, and then unexpectedly received a collection of more than a hundred films on BlueRay as a gift and was forced to purchase an external BD drive, because... There were no compartments for internal ones. As a result, another device appeared on the table, and there was still plenty of space in the case. Now my opinion is this - the 5.25″ bay is completely justified in cases suitable for assembly multimedia systems and media centers, because from this area optical discs If they leave, it won’t be very soon.
And they finally returned the reset button, which was reported missing in Node 304 I regretted it a lot at one time. This button is very helpful when overclocking and testing overclocked equipment, and it costs the manufacturer almost nothing to make it. And here she is with us again!

The rear panel of the case is entirely inherited from Node 304, with one small exception - the fan speed switch disappeared, and with it the rheobass that this switch controlled. On the one hand, this is correct, because now there is one pre-installed fan in the case instead of three, and on the other hand, on most Mini-ITX boards there are only two fan connectors, and when installing a CBO, one of them will be occupied by the pump, and the second by the fans on the radiators of this same CBO, i.e. There will be nowhere to connect the supplied fan on the back wall.

There is nothing interesting on the outside side edges except holes.


At the bottom of the case there is a dust filter for the power supply and 4 rubber feet that grip any surface well.

In addition to the case, the box also contained space for accessories and a product catalog Fractal Design, a mention of the procedure for returning a damaged product and assembly instructions in nine languages at once, very visual and at the same time very detailed - the designer clearly knows his business.

The general impression of the appearance is similar to Node 304, but different. Something was added, something else was removed, but if you liked the shape Node 304, but didn’t like the lack of a compartment for optical disks and reset buttons, as well as the position of the connectors on the front panel - in Core 500 These shortcomings have already been corrected. If you want to compare visually - please, on the left - Node 304, on right - Core 500.

3. Interior decoration
Remove the top cover, open the case, and take a look.


The content is quite unexpected. The entire top panel is occupied by a removable frame for installing a two-section CBO radiator (or two fans), almost the entire right panel is occupied by fasteners for hard drives and SSDs. Seat for power supply since the time Node 304 has not changed, but the place of the hinged drive mounts is now occupied by a removable optical drive tray.

The front panel is held on by plastic clips, and under it there is another place for a 2.5″ SSD - an interesting solution, I have never seen anything like it.

All components are made of very high quality, sharp corners are smoothed out, fasteners are thought out - everything is done so that the user does not have any problems during assembly.
4. System assembly
When prepared to begin assembling the system, the case looks like this:

Suddenly it turned out that the disk panel on the left side of the case is non-removable, and even if you only have one 2.5″ SSD, you will have to put up with its presence. I can’t say that this greatly interferes with the assembly, but, in my opinion, this is the first significant flaw in this case.

The next step is to install the power supply. If you have a long video card, make sure that it does not overlap the power supply connectors for SATA devices. In my case, this did not happen, but sometimes you have to install non-modular or shortened power supplies. I also note that the power supply is attached with three screws out of four possible, but this does not affect the quality of the fastening - it fits perfectly and does not try to fly away.


All that remains is to connect the wires and install the video card, as a result I got something like this:

The wires are a little messy, but they won’t create any problems for air flow, so you can leave it like that. All that remains is to close the lid, while paying attention to the presence of dust filters with magnetic fastening.

Well, the system is assembled, we start it - everything works as intended, the power LED, which may seem overly bright to some, shines white through the button, the hard drive activity LED also blinks white, and the USB 3.0 ports are really 3.0.
5. Temperature and noise
After two weeks of testing, the following became clear: the case is very well ventilated, the temperature in it is the same as when using an open stand. After installing the SVO radiator on the top panel, the noise of air bubbles is sometimes heard, and although this is a problem with my factory SVO, not the case, to reduce the noise I had to move the radiator to the rear wall - this way the SVO is much quieter.
The case itself turned out to be subjectively not very quiet - there is no sound insulation in it, on the contrary, it is all covered with holes for ventilation, so it is better not to place the system in this case on the table in front of you.
6. Conclusion
Based on the results of assembling the system and testing, the case left a pleasant impression: the same strict Scandinavian design, the same attention to detail, new interesting ideas and a return to old successful solutions, plus the not-so-high price - in fact, an excellent case as for a multimedia system and for a compact gaming machine.
Yes, it is no longer possible to install 6 3.5″ drives in it, as could be done in Node 304 but otherwise Core 500 either better than its predecessor or on par with it.
Advantages
Design and thoughtfulness
Sufficient number of disk spaces
Compatible with tower airborne systems
Compatible with full-size graphics cards
Possibility of installing a two-section radiator SVO
Excellent temperature conditions
Flaws
— Fixed panel for mounting disks
May not suit
* Availability of a 5.25″ compartment (many people don’t like them)
* Reobass for three fans from Node 304 didn't migrate
* Lack of sound insulation and some noise
7. Reward
Based on the test results, the corps receives a well-deserved award - “ Editor's Choice«.

8. Other materials
Promo video:
Introduction Over the past couple of years, we have increasingly seen a rather curious phenomenon: the usual motto “faster, higher, stronger,” which pushed for ever larger gigahertz and terabytes, is being replaced by the expression “small, but big.” It is perhaps the easiest way for them to describe what has begun to happen in the computer equipment market. Many were surprised to discover that the power modern computers grew to such a level that daily tasks A very weak system unit is quite enough. At first, this resulted in a very loud and impressive invasion of netbooks into the mobile device market - people liked these compact and lightweight devices, the power of which is quite enough to surf the Internet or watch a movie on a trip. Now, desktop brothers of netbooks, called “nettops,” are becoming increasingly widespread.
In principle, compact desktop systems have existed for quite a long time, although for a long time they were known to any extent only as thin clients - network computers operating under the control of a single server operating system. It was on the server that all operations took place and programs were executed, and the thin client was only a small local device that provided the connection of the necessary external interfaces: both data input (keyboard, barcode scanner) and output (monitor, printer). Also, the compact Apple MacMini computers, which gained some popularity, were much more versatile and relatively powerful, but also expensive - the manufacturer had to use components designed for laptops. And only the advent of Intel Atom processors radically changed the situation - they turned out to be powerful enough to cope with various “everyday” tasks themselves, without the participation of third-party computing power, while they turned out to be very inexpensive and with such low heat emission, which made it possible to use them with passive cooling. At the same time, the situation with other typical components turned out to be equally quite successful: prices for compact optical drives have dropped significantly, 2.5-inch hard disks significantly increased in volume, increased speed and reduced the cost of data storage. Manufacturers of motherboards did not stand aside either, intensifying the production of them in the mini-ITX form factor. Let me remind you that this format implies the location of all the necessary microcircuits and connectors on a square textolite substrate with a side of only 170 mm.
However, one should not think that the world compact systems blocks is limited exclusively to low-power platforms: in our previous article on compact cases we showed that based on the mini-ITX board Zotac GeForce 9300-ITX WiFi you can build a small but quite powerful gaming system, using, albeit not the most powerful, but still a quad-core processor for the Socket 775 connector. Do you want something more modern? No question: there already exist at your service similar boards for Socket processors 1156
.
However, this time we decided to be more modest and limited ourselves to assembling compact systems based on Intel Atom - and more specifically, on the Pine Trail platform, represented by the Intel D510MO motherboard. If you are not satisfied with the modest capabilities of the integrated graphics in Intel chipsets, but you don’t need a more expensive processor either - well, you can always change the platform to NVIDIA ION 2.
So, it’s up to the buildings, of which we have as many as five at our disposal today.
Antec ISK300-150
Full-size cases from Antec have already been in our test laboratory several times and have consistently received very flattering ratings, take, for example, the same NSK1380 - a compact “cube” for microATX format boards. Well, let's see what the company can offer us in such a market segment as ultra-compact models, which it entered with the new ISK300 series.
You take the case out of the box, pick it up... and can hardly believe that you have a future system unit in your hands. The dimensions of the case are so small that it can easily be considered either an external optical drive or an external drive for a pair of 3.5-inch hard drives. The rest of the look is not anything particularly impressive - we have a black metal “brick” with a glossy front panel. Compactness and predisposition to passive processor heatsinks require appropriate ventilation, which we see on the side panels.


Those who like to save space will certainly appreciate the fact that the case can also be installed vertically - a special stand is included for this. Frankly speaking, it seemed to us that in this position the body looks more advantageous. Perhaps, the ISK300 managed to retain a certain charm inherent in many Antec models - it looks simple, strict, but at the same time attractive. Perhaps this is a sign of the designers' talent?


The plastic stand, by the way, is not attached to the body in any way - it rests on it solely due to the force of friction and two small protrusions. However, do not be afraid: special pads on the stand will protect the case from scratches. Despite the fact that even when assembled, the system unit will have a very light weight, it will not ride on the table - the stand has special pads that at the same time reduce the transmission of vibrations (if any arise in the mini-ITX system). It is almost impossible to accidentally drop a case standing on a stand - the stand has fairly widely spaced supports. Interestingly, on one side the supports are much wider apart than on the other.

All controls are located on the front panel. The square power button is easy to notice, but guessing that the thin strip located next to it in the slot is the reset button is not so easy. Of course, this provides excellent protection against random clicks(unless you have someone nearby who tends to poke their fingernails into any crevice), but this cannot be said to be very convenient.
We were pleasantly pleased with the set of connectors: in addition to the usual two USB and a pair of audio connectors, we also see one e-SATA port. It's funny, but we have nowhere to connect it - the case supports up to three drives, we are going to install two, our motherboard has just two SATA connectors - where should we connect the external port? However, any problem can be solved if there is a desire - many mini-ITX boards have not two, but four SATA ports; again, you can always install a low-profile (a full-size one simply won’t fit into this case) expansion card with two more ports.

The third option for saving connectors is to eliminate the optical drive. Fortunately, its tray is located behind a hinged lid, which means that the lack of a drive will not affect appearance housings. It is quite unusual that the lid is made to hinge when pressed - the drive itself is not able to open it. Obviously, this is done because the button on thin drives is located on the pull-out tray itself, and the usual designs with a lever that presses this button would be ineffective.

Most of the rear panel is occupied by a hole for the connector block - in such a small case, the board connectors occupy more than half of the rear panel area. Nearby there is one slot for a low-profile expansion card, a connector for connecting power, with no sign of the unit itself, a switch and a certain hole.

This hole, apparently, was originally intended as a seat for some kind of button. Perhaps this is where it was originally planned to place the reset button, as in SilverStone cases, but this is just our guess. But the three-position switch will be recognized by everyone who has come across Antec products - these are the switches they use in the TriCool series of branded fans to select the rotation speed. Moreover, it seems that the creators of the case, without further ado, took a ready-made block for two switches from one of the older cases - otherwise it is impossible to explain the fact that it has two seats, but only one switch.

Before moving on internal structure case, I suggest taking a look at the very elegant option for mounting the expansion card used in this case - this function is performed by one simple folding bracket located at the very edge of the case, without any enclosing frame. Despite its simplicity, it copes with its function quite successfully. It is worth noting that the plug on the slot is removable, which is not what you would expect from such a simple case.

After freeing the case from the U-shaped cover, its insides appear before us. More precisely, only a small part of them, since the frames intended for installing drives interfere with the view. Well, let's get rid of them by unscrewing the necessary screws and look at a really empty case.


But, by and large, there’s nothing to see. The chassis of the case consists of a minimum number of elements and does not even have a solid top frame - the U-shaped cover sits directly on the front and back panel having small stiffening ribs. These panels were held together from above only by the very frame for the drives that we had just gotten rid of. However, it cannot be said that the design of the case is not rigid enough - the use of 0.7 mm steel with small overall dimensions provides sufficient torsional resistance. And after putting on the top cover, made of the same steel, the assembled body becomes a pleasant and solid “brick”.
Unusual, from the point of view of the layout of a standard case, is the location of the power supply - it is located immediately behind the front panel, under the optical drive, and a power cable runs from the connector on the rear panel to it through the entire case. As is usually the case with cases so small sizes, the power supply it uses is non-standard: in this case we see a rather curious L-shaped design, in the protrusion of which there is a fan, only about half of whose area works to cool the power supply. It seems that in such a complex way, Antec decided to do without using very small fans, the noise characteristics of which are traditionally far from comfortable. All this L-shape is called Antec FP-150-8, capable of providing up to 150 W (as shown by our a little research, this is more than enough for compact systems with built-in video cores) and has the following set of connectors:
Trains:
motherboard power cable with 20+4-pin connector, 25 cm long;
CPU power cable with 4-pin connector, 25 cm long;
a cable with two power connectors for PATA hard drives and one for a disk drive, 25+20+20 cm long;
cable with two power connectors for SATA hard drives and one mini-SATA connector, length 25+20+20 cm;
cable with two power connectors for SATA hard drives, 25+20 cm long.
Well, the range is more than exhaustive and covers everything with a margin possible options. The length of the wires is also quite sufficient, perhaps some of them could be made shorter, however, there is not so much space in the case. However, looking ahead, we’ll say right away that thanks to the successful design of the case, we didn’t have any problems with laying the wires.

A quick note: there are two power connectors in front of you. On the left is a standard power connector for SATA hard drives, and on the right is a so-called mini-SATA power connector. It is easy to notice that it is noticeably more compact and uses only a 5 V line. These are the connectors you will find on all modern thin optical drives, which is not surprising - they are used in laptops, where space is extremely expensive, and the 12 V line is practically not used outside the motherboard, so reducing the connector makes sense. And in this case, we can only note with respect that Antec did not forget about this feature when creating the power supply.

In the photo above, you probably noticed a special frame in which the same TriCool fan is installed. The rotation speed of the 80 mm model used in this case is selected using a switch from the values 1500, 2000 and 2600 rpm. Typically, fans of this series can be called very quiet at minimum speeds and quite noisy at maximum speeds. Our case was no exception. Interestingly, there are two fan slots on the frame, so you can install a second one or rearrange the first one. In any case, you will have to remove the frame from the case, and here you will have to suffer a little. The fact is that the frame must be moved in order to be lifted from special small brackets, and the power supply interferes with this. So first you will have to remove it, but this is not so difficult - it is secured with several screws and the same small brackets, but located across the body.

And moving the fan in our case was very useful - on our board the processor under the radiator was located further from the edge than usual, and the fan in the default position would blow past it, which we clearly did not want.


The final stage of assembly in this case is the installation of drives. First, an optical drive is placed on the large frame. By the way, for this operation you will need a Phillips screwdriver with a very thin blade - very small screws are used to fasten thin drives. The hard drives are mounted on a separate small frame, which in turn is mounted on a larger frame and attached to the front panel above the optical drive. Please note that this case can only accommodate hard drives of standard thickness - three-platter models with a thickness of 12.5 mm simply will not fit into it.


In general, the assembly of the case goes without any problems, and even the installation unnecessary wires does not cause serious difficulties - there is enough free space. Finally, it is worth mentioning that if you are going to use boards with more than powerful processors and, accordingly, individual coolers, then you will be limited to 80 mm in height. Well, if your cooler is wide enough (or the processor socket is poorly placed on the board) to fit under the drive frame, then its height should not exceed 50 mm.
Delux DLC-MS126
Our review continues with the Delux case. This manufacturer cannot boast of being widely known, and yet, perhaps, some will remember the inexpensive cases found under this brand.

Like the previous participant, the design of this case clearly suggests use in both horizontal and vertical positions. Moreover, judging by the inscriptions on the front panel, it was the vertical that was calculated by its creators as the main one. Again, it is in the vertical position that the case looks a little better due to the fact that the silver inserts on the front panel look most appropriate. It must be said that, despite its modest pedigree, the case looks very nice - a person who is not without a sense of taste worked on its appearance (albeit spoiled by a craving for the shiny, but this seems to be a general disease that has affected many companies in recent years).
The impressive lid of the 5.25-inch compartment, accompanied by a characteristic button, immediately attracts attention - it is obvious that this case, unlike many competitors, uses full-size drives.
Nearby is a lonely power button - the creators of the case believe that a reboot is useless. The power button leaves a somewhat unpleasant impression: it has a very long travel, it needs to be recessed into the body by about a centimeter, which is somewhat annoying and may be inconvenient for people with thumbs.

Additional connectors are located on the edge of the front panel, under the sliding cover. Their set is absolutely standard: two USB port and two audio jacks.
The rear panel shows us that the case uses a familiar rectangular power supply, the 40mm fan of which is immediately alarming: they usually turn out to be quite noisy. This unit is called Delux DLP-260IP4. As is often the case with complete power supplies, don't be fooled by the name - 260 W is the peak power, while the nominal long-term power is 200 W. However, this is more than enough for those systems that will be assembled in such compact cases.
The set of cables for the block is as follows:
motherboard power cable with 20+4-pin connector, 33 cm long;
CPU power cable with 4-pin connector, 33 cm long;
cable with two power connectors for SATA hard drives, 24+26 cm long;
cable with two power connectors for PATA hard drives and one for a disk drive, 33+15+15 cm long.
Please note that the case has two expansion card plugs, which, by the way, are secured by a small strip with a screw protruding beyond the rear panel. This very clearly tells us that the case was originally created for the little-known DTX format developed by AMD, and it can have up to two slots on 203 x 170 mm boards. For us, with mini-ITX boards, this only means that we will have a small amount of free space.

After removing the top panel, we can see the extremely modest interior of the case. First of all, you pay attention to the material of the chassis of the case - we have 0.6 mm thick steel, which has a tin shine characteristic of inexpensive cases. Typically, products made from such steel have very mediocre rigidity, but in this case the case is saved by its small dimensions - we could not notice any special problems with the increased flexibility of the case.

The optical drive, and it is truly full-size in this case, is installed in special removable slides, which are attached with screws to the metal part of the front panel under a removable plastic cover. They are needed both to open access to the hard drive cage and to free up space for the motherboard, over which these very skids, not to mention the drive, hang fairly over.

As for the hard drive, this case can only install one, but a large one, 3.5 inches. The disc basket couldn't be simpler, but it is still worth noting the presence of small rubber washers on it at the points where the disc is attached to the basket, which are obviously responsible for reducing the transmission of vibrations.
This is probably where everything interesting in the case ends, and we proceed to assembly.


Assembly is quick - you install the board with memory installed on it, connect the cables (it’s better to do this now, while everything is in plain sight), attach the disk, then the optical drive - and that’s it, all that’s left to do is arrange the wires. But this is also not a problem - the wires lie very well along the side panels, and all unnecessary cables are well hidden in a remote corner behind the power supply. Just make sure that the ventilation holes on the block are not completely blocked. If you are going to use a board with a more powerful processor, then you will have a fairly impressive space for the cooler, which can reach up to 85 mm in height, so there should not be any special problems with the cooling arrangement.
HKC 003
Our review continues with a case under the HKC brand. However, you may come across it with another name, for example Morex Cubid 3388. To be honest, we did not figure out which of the options was the original one; it is possible that the true manufacturer is some third, little-known plant - with products supplied from China, this happens quite often: if you contact the factory with a large enough order, they will make you a case with any marking you desire.

Be that as it may, we must pay tribute to this unknown manufacturer - for all its simplicity, the case looks like a feast for the eyes. Of course, if you have a high-tech design in your apartment with a widespread reign of polished aluminum, it may not be very suitable, in other cases the pretty front panel of this thin flat case will serve as an interior decoration. Even the ubiquitous ventilation holes are not made of a simple rectangle, but wavy, reminiscent of the logo of a well-known operating system. Alas, the front panel, made of glossy black plastic with a nice pattern, is somewhat spoiled by the connectors located on it and not covered by anything, and the chrome strip around the power button is, perhaps, superfluous.

The front connectors, consisting of a traditional set of two USB ports and two audio connectors, are simply located in a small niche in the lower right part of the panel. Above them is a fairly solid power button, framed by two LEDs. But we are again deprived of a reset button.

The back panel is boring. Perhaps the only thing that attracts attention on it is the presence of three characteristic stampings intended for installing, if necessary, serial port connectors (COM ports, remember those?). Of course, these connectors are sometimes still used in industrial equipment, but somehow it’s hard to imagine this beautiful case somewhere in a workshop. It seems that this is just a legacy of old times.


Although the case does not have fans, it seems that there will be some kind of air circulation in it other than zero. This will be driven by a small 60mm fan on the side of the 150W MGP MX-150 power supply installed in this case. The set of connectors on this unit is generally standard for small power supplies:
motherboard power cable with 20+4-pin connector, 32 cm long;
CPU power cable with 4-pin connector, 32 cm long;
cable with two power connectors for SATA hard drives, length 32+14cm;
cable with one power connector for a SATA hard drive, one connector for a PATA hard drive and one for a disk drive, 32+14+14 cm long.
After removing the top frame intended for mounting drives, we are presented with an impressive amount of free space. Perhaps this case could also accommodate a micro-ATX board if it were a little longer. The case material is steel, only 0.5 mm thick. This does not really affect the rigidity of the case itself, since it has a clear “desktop”, that is, horizontal, design, but when you pick up the top panel, you can already feel this small thickness from the characteristic “play” of the metal in your hands.

As already mentioned, the drives in this case are attached to a special removable frame, which at the same time increases the lateral rigidity of the case. First we attach one 2.5-inch HDD, opposite which a thin optical drive rests on top.


When reviewing the first case in this article, we already said that thin drives have their own special power connector. In the Antec case it was implemented on the power supply, while the HKC package includes a special adapter.

What's most impressive about building this case is the huge amount of unused space next to the motherboard. Yes, there is a hard drive and an optical drive above it, but the space is still used very irrationally: if desired, an entire array of 2.5-inch hard drives could be arranged here.

The process of laying wires in the case also turned out to be somewhat inconvenient. There seems to be a lot of space, but the need to somehow hide them under an impressive frame that blocks all access spoils the whole process.
In the case of boards with powerful processors, you can easily consider coolers that are fairly wide in width as cooling system options, but remember that the height at your disposal is only 55 mm.
HKC 007
And another case with the HKC logo. Like its just-reviewed brother, this case can also be found under a different name - Morex Cubid T-3320.


Here we have one of the most compact cases that can be created. For the sake of compactness, the 5.25-inch bays were completely removed from it (yes, no optical drives), and the power supply was made external. As a result, the dimensions of the case have become really small - by and large, they are determined by the overall dimensions of the board installed in it. Most of all, it is similar to the same thin clients that were discussed at the beginning of the article. This case will be more than appropriate on tables next to monitors in all sorts of offices, shops and institutions. It has a corresponding appearance - a neutral mixture of gray and black plastic, smooth lines that do not attract attention. In principle, the case can be positioned either vertically, on a stand, or horizontally (I’d like to add: “by making a monitor stand out of it”), but still, it looks a little more advantageous in a vertical position. Please note that its side panels are, in fact, a solid ventilation grille - and this is absolutely correct, because removing the power supply from the case not only allows you to reduce the dimensions of the latter and somewhat reduce the heating of the system unit, but also completely deprives all components of any or active ventilation. Everything that stands in this case will be cooled exclusively passively, all possible air flows will be only convection.

Let's return briefly to the topic of the stand of this case. On the one hand, it is made as simply as possible, with one plastic part. On the other hand, tell me, do you know a lot of stands for cases that would not only be attached to them with a screw, but would also be an integral element of the appearance of the case? And this is exactly how things are in our case - the silver part of the front panel smoothly transitions into the stand if the case is used with it.

Since we are somewhat distracted from the body, let's immediately finish with it external elements, which in this case includes not only the stand, but also the power supply, which has an external design. The one for this case was the Seasonic SSA-0651-1, with a power of 60 W, which enters the case exclusively in the form of a 12 V line. Further necessary transformations occur on a small board inside the case, from which, as we will see later, only two wires extend : a processor power cable, 22 cm long, and a rather unusual cable with a 20+4-pin power connector, followed by one power connector each for a PATA hard drive, a SATA hard drive and a floppy drive. The length of this single power cord is 22+9+9+9 cm.

Now let’s return directly to the case, or more precisely, to its front panel, on which there is a typical set of connectors consisting of two USB ports and two audio jacks. An inconspicuous, although rather large, power button modestly nestles on the corner of the case.

The rear panel of the case is generally absent as such - it is made up of small curved edges of the two side panels. And the dimensions of the case are such that the landing pad for the rear panel connectors takes up almost the entire space - only the connector for connecting the power supply was able to fit nearby. By the way, the fact that it ends up in the upper part of the case when it is installed vertically is a somewhat unfortunate moment - the cord going down will try to pull the case onto its side in case of any distortion.

The side panels in this case are also somewhat unusual - not only do they have almost more ventilation holes than material, but they also mainly consist of plastic, which is attached to a metal base. It is difficult to say what dictated this decision: most likely, this option turned out to be a little cheaper than all-metal panels, but at the same time still retained sufficient rigidity. The latter in this case is at a fairly high high level: the small amount of metal in the structure is more than compensated by the minimal dimensions and the use of 0.7 mm steel.


Inside, the case is practically empty - in addition to racks and a bracket for mounting drives, it only contains a small board with power voltage converters. And how can it not be empty, with such and such dimensions?

The drive mounting bracket remains a bit of a mystery to us. An impressive number of holes were found in it, but we were never able to place more than one drive on it. Then why the rest of the holes? However, is it possible that it is planned to install not 2.5-inch drives on the board, but some others?


Assembling a system unit, with all its simplicity and minimal number of operations, unexpectedly comes up against an extremely funny moment. The case is so small in size that the wires running inside from the connectors on the front panel make it difficult to insert the motherboard into the case. This problem can be solved simply - you first need to pull the wires out of the hole through which they are inserted inside, install the board, and only then insert them back.
Laying the wires goes quite smoothly: there are very few of them, so you can neatly scatter them around the corners of the case without any problems.
If you suddenly decide to use a motherboard and a processor with a separately installed cooler in this case, then when choosing the latter you will have to proceed from the fact that its height should be no more than 45 mm. Yes, yes, less than five centimeters, I didn’t misspell, so it’s better to immediately count on boards with an integrated processor and passive cooling.
Thermaltake RSI H SD100
Our review is completed by a miniature case from a company that has long been known in this market, however, mainly due to its large models, which can accommodate almost a dozen participants in our current review - we are talking about Thermaltake.

Perhaps what Thermatake has always managed to do is give the case an excellent appearance through the front panel. Their cases are often quite controversial in terms of internal design and cost, but in the vast majority of cases their appearance is unrivaled. So the SD100 looks just great. It seems like nothing special: solid black color, glossy lacquered metal (in press releases the varnish is called “piano” - and indeed, there is some similarity in appearance), a glossy plastic front panel that collects all the dust and fingerprints, neat round silver the buttons and the strip along the front panel - individually everything is well known and is often found on other cases, but in total it turns out to be a very attractive appearance.
The connectors and buttons are located in the corners of the front panel: the standard set of two audio connectors and two USB ports went to the left, and the power and reset buttons, noticeably different in size, ran to the right, taking with them the only available LED.


In principle, you can use a pair of special plastic supports and install the case vertically. But, in our opinion, it is better not to do this - in this position the SD100 does not look so advantageous, and not least because the right side panel(formerly with the lower body in a horizontal position) shows us four softening supports glued to it. Of course, they are not that scary, but the charm of the glossy case disappears completely.

It is worth noting that only the top and right (for a horizontal position of the case) panels have ventilation holes - those panels that can be bottom are solid.

The rear panel shows us that the case was created exclusively for mini-ITX boards, which carry everything within themselves - there are no traces of expansion board plugs. The power supply warns in advance of possible high noise levels by demonstrating a 40mm fan. The name of this unit is Thermaltake TT-120AL5NH, it has a power of 120 W, and its set of cables is as follows:
motherboard power cable with 20+4-pin connector, 33 cm long;
CPU power cable with 4-pin connector, 33 cm long;
cable with one power connector for a SATA hard drive, two power connectors for a PATA hard drive and one for a disk drive, 13+5+19+5 cm long.
Two points immediately attract attention. Firstly, the 60mm fan on the right side panel attracts attention. Of course, we are happy to welcome active cooling of the case, but why is it installed opposite the drives, and not opposite the motherboard, where the fan would blow the processor heatsink?
The second point is the somewhat wasteful use of case space, which has led to the fact that an impressive piece of the case in front of the power supply simply disappears.


Before installing the board into the case, you need to remove the drive mounting frame, which has a very tricky shape in this case. In addition to the fact that it carries drives, it also serves to increase the rigidity of the case, connecting the front and rear panels in it, which is not at all superfluous for the SD100, made of 0.6 mm steel.
Installation of drives requires a strict sequence - first a 3.5-inch hard drive is attached, and small shock-absorbing pads are used for this, and then an optical drive is installed exactly opposite it, blocking access to the drive mounting screws.


In general, the assembly of the case proceeds without any special incidents and hardly requires any special comments - everything, in my opinion, is extremely simple and understandable without words. Some difficulties are caused only by laying the wires, but in the end it is still possible to reduce them to a compact form, collecting most of them in that same “useless” space in front of the power supply.
In case you use separate coolers, we warn you that this case leaves only 55 mm in height for them.
Cooling Test Method
Testing is carried out in a closed and fully assembled case at a constant external temperature, which is maintained by the air conditioner. We usually test at a room temperature of 23 degrees Celsius, but this year’s extremely hot summer made its own adjustments, complicating the testing process by raising the room temperature to 29 degrees.As test bench we used the following set of components:
Intel D510MO motherboard;
processor - integrated on the Intel Atom D510 board;
hard drives Western Digital Raptor WD740GD;
Seagate Momentus 5400.4 ST9250827AS;
2 GB DDR2 memory Kingston ValueRAM KVR800D2N6/2G @ 800 MHz;
operating system Microsoft Windows XP Professional SP2.
To take readings of the processor temperature and the temperature of the integrated video core, the “SpeedFan” program was used; the processor temperature was considered to be the temperature of the hottest core. The temperature of the hard drives was measured using the HDD Thermometer program. A Velleman DTO2234 optical tachometer was used to measure the fan speed.
Testing is carried out in the following modes:
Idle- computer idle mode;
IOMeter- the “Access time” test from the IOMeter program is simultaneously launched on all hard drives, ensuring maximum load on the drives;
Prime95- the Prime95 program was launched in the “in-place large FFTs” mode, ensuring maximum load on both processor cores;
Our regular readers probably noticed that we abandoned 3DMark load testing. And the point here is not even that we didn’t want to watch the slide show, but that we absolutely do not understand why the system should be loaded in such a perverse way if the most typical load for it would be the load on the processor, due to the weakness of the built-in video core motherboard
All temperature readings are taken after at least half an hour of operation in the appropriate mode, after their values have stabilized.
The noise level was assessed only by a subjective method during testing of the described configurations.
As a starting point for comparing systems, we chose the results obtained on an open stand:

Separately, it is worth noting that the temperatures of a 2.5-inch disk are indicated here. The 3.5-inch model heats up a little more, up to 38 degrees in “Idle” mode and up to 45 degrees under load.
Test results
I would like to say right away that except for one test subject, about whom we will talk specifically, all cases coped with cooling the components without noticeable problems, even with the ambient temperature increased to 29 degrees. Thanks for this, of course, are the damn economical Atom processors (glory, glory to ever-finer technical processes!). The fact that all cases successfully coped with the cooling of 2.5-inch hard drives was not a sudden discovery for us: their consumption is still very low, but the fact that cases with 3.5-inch drives inside did not hit us head-on the dirt, to be honest, was a pleasant surprise.So now we will mainly talk about noise, and we will provide plates with temperature values for the most curious readers.

The Antec case pleased me with its low level noise. Unfortunately, we cannot call it completely silent; nevertheless, some noise from the fan in the power supply could be heard, but it was not pressing at all, but was only a slight addition to the background noise (to be honest, in the conditions of our laboratory such “ quiet noise” you usually still have to try to hear, since there are almost always louder sound sources around). The Tricool fan, as expected, turned out to be almost silent at minimum speeds, and was able to provide cooling in the case at a very good level. In general, the case deserves a solid “good”.

But the Delux case sounded extremely unprofitable after the previous participant. And the point here is not at all due to the use of a 3.5-inch hard drive, which is noticeably louder than its smaller brother, especially during active search. The main source of very annoying noise was, as expected, the power supply fan. It produced such a nasty buzz, so characteristic of high-speed small fans, that the case lost and lost its charm with every minute of operation.

As you remember, the HKC 003 power supply uses a relatively large fan, which gave us hope for a low noise level. Unfortunately, this turned out not to be the case, and the culprit seems to be the poor quality of the fan. When turned on, it began to crackle, and quite loudly. After some time, the crackling noise decreased slightly, but then another point came into play: probably, the temperature in the power supply increased noticeably, and to reduce it, the fan speed was increased. And it made noise, quite clearly, but at the level of an inexpensive 120 mm fan model, rotating at a speed of 1200-1400 rpm. It's sad, but this noise pretty much spoiled the final impression of this nice case.

Next in line was HKC 007. Perhaps only extremely sensitive people will be able to understand without even looking that the computer in this fanless case is working, because it is very difficult to hear a 2.5-inch drive, especially if it does not move the heads. But unfortunately, in this case there was a fly in the ointment. A glance at the temperature sensor readings, touching the top ventilation panel with your hand - and you already begin to worry. Any serious load on the processor leads to its temperature starting to rise, reaching around 80 degrees in the case of serious loads. This, of course, is not yet a disaster, but it is a rather unpleasant situation, and the corps itself cannot cope with it.
As a curiosity, we tried to organize at least some kind of cooling in this case, which turned out to be very difficult, because the dimensions of the HKC 007 hardly allow us to place a fan anywhere in it. And yet, I came across an old cooler for socket 370, from which I managed to get a 60 mm fan with a thickness of 13 mm. We attached it using traditional methods directly to the processor heatsink, after which, with difficulty, but still, we closed the lid and re-tested it.

Well, it's just a completely different matter! Temperatures are great, but unfortunately even a 60mm fan, if it rotates at 3000 rpm, is not at all quiet.
In principle, there is nothing wrong with the normal operation of this case, you just need to choose the most economical processors, do not place the system unit in rooms with high temperatures, and do not engage in 12-hour video transcoding. And then it is quite possible that this system unit will serve you faithfully for many years, and on its top panel you will warm your chilled hands on cold nights... Otherwise, it is better to immediately look for a thin (10 mm) and at the same time fairly quiet fan in order to install it on the processor radiator.

Unfortunately, the small high-speed fan in the power supply spoiled the impression of the Thermaltake case. The 60mm case fan turned out to be almost silent, but this small but furious beast produced a rather characteristic and very unpleasant noise with an abundance of high-pitched tones.
In conclusion, I propose to compare the cooling efficiency of the cases with each other.


In all modes we have a clear winner and a clear loser. The Antec case was the first, and it has an 80mm fan to thank for this, which can be extremely effectively installed opposite the processor radiator. Well, the loser was the HKC 007, which has exclusively passive cooling - even the temperature of its 2.5-inch hard drive turned out to be higher than the temperature of its competitors' 3.5-inch drives.
Summarizing
The clear favorite of today's review is the Antec ISK300-150. This case once again confirmed the reputation of its manufacturer and turned out to be not only the coldest, but also the quietest. So if you are not afraid of the need to use 2.5-inch hard drives and thin drives, take a closer look at it, it is unlikely to disappoint you.HKC 003 and Thermaltake RSI H SD100, competing in the “horizontal” case sector, finished with approximately equal results. On the first side, there may be a lower noise level if you get a case with a better fan in the power supply. But the second one looks a little better in appearance and uses cheaper and larger 3.5-inch hard drives.
HKC 007 demonstrated a strange duality, which, however, is explained by its essence. Yes, its disadvantages are the high temperature of the components, caused only by passive cooling. On the other hand, it is the most compact of all, and if you install an SSD in it, it will become absolutely silent, since it will be completely devoid of any moving parts.
As for the Delux DLC-MS126, this case does not stand out with any special merits compared to its competitors. But it will certainly be appreciated by corporate buyers, because it is on its basis that the most inexpensive can be assembled, due to the use of ordinary rather than compact components, but at the same time it is still very modest in size. overall dimensions nettop.
Check the availability and cost of cases for mini-ITX motherboards
Other materials on this topic
The charm of compactness: testing five mini-ITX cases
Meet NVIDIA ION2: Zotac ZBOX HD-ID11 nettop
Gigabyte GA-H55N-USB3: great capabilities of a small board
For several years now, the Cougar company has been delighting with wonderful design solutions that can find a place in the hearts of both ordinary users and gamers. This material is dedicated to one of these interesting products, standing a little apart from its huge and not so big brothers, the Mini-ITX Cougar QBX case.
Packaging and equipment.
The case comes in a beautiful box, the advantages and features of this case are indicated on the sides, the styling fully corresponds to the company’s website and exactly repeats the technical specifications and features of the product. Unfortunately, during transportation, the packaging was hopelessly damaged by stickers from the Domodedovo airport terminal and the tape of the transport company “Little Horse Express”.
Specifications.
Case type: Mini-ITX
Motherboard form factor: Mini-ITX!
Physical Dimensions (w/h/d): 178 x 291 x 384 (mm)
Optical drive type: Only Slot Loading Slim ODD is supported (like laptops)
Space for installing a 3.5" hard drive (HDD): 1
Space for installing a 2.5" hard drive (HDD/SSD): 4
Expansion slot output (for example, for video card): 2
Front panel: 2 x USB 3.0 / HD audio
Cooling system
Maximum number of installed fans: 7 pcs.
Face: 80mm x 1 (not included)
Top: 120 mm x 2 (according to the website, it is not included in the kit, but it is included in this copy)
Rear: 90mm x 1 (factory installed)
Body Bottom: 120mm x 2 (not included)
Left side: 120 mm x 1 (manufacturer installed in this example)
240mm water cooling radiator with one 120mm fan
Cable management system: present
Fan filter (reusable and cleanable)
1 x bottom filter (pre-installed, removable)
1 x front panel filter (included in delivery, user installable)
Liquid cooling support:
Left side: 240mm water cooling radiator with one 120mm fan
120mm water cooling radiator with one 120mm fan
Maximum overall video card length: 350mm (high-end graphics cards supported)
Maximum CPU cooler height: 105 mm
Power supply installation: PS2 ATX power supplies with a maximum length of 140 mm
Appearance and equipment.
The kit is all-inclusive, everything you need is pre-installed by the manufacturer, and the missing elements are in a separate box along with assembly instructions in pictures (English only).

Despite its rather compact dimensions, the body is not too light, but at the same time very rigid and stable. This fact is due to the presence of a fairly durable metal frame with a large number of stiffening ribs and rubber feet at the base, which is also a niche for a removable dust filter.

The side panels are made of plastic with metal ventilation grilles. They are very easy to remove and install due to their low weight.

The fairly voluminous interior space actually disappears once the power supply is installed, but the cable management system involves routing some of the wires behind the motherboard and the back wall.

One more interesting solution is a flip-up, removable panel that mounts the liquid cooling system/mounts space for hard drives. This panel has 3 mounting points, which theoretically should prevent vibration from the only installed fan and the operation of the hard drive.


Installing the power supply is one of the highlights of this case. Despite the “modest form factor”, this case requires the installation of a standard size power supply, albeit no more than 140 mm long and with a specific location of the 220 volt power connector, which allows you to install almost the most high-performance components. Despite the fact that the manufacturer does not require a cable management system (removable wires) at the power source, I recommend installing just one, because There is not just little space for wires, but catastrophically little.


The location of the power connector in the red frame is indicated for a reason - the original shape of the extension cord, bent at an angle of 90 degrees, does not allow installing a power supply with this location of the power connector.
Although no, it does, with some skill.


There is the possibility of installing an optical disk drive, although only a slim size (these are installed in laptops). To load/unload a disc, the top plastic cover moves, which acts as an air intake.

The manufacturer has implemented a small number of interfaces on the front panel, which in principle corresponds to the compact design. There are 2 USB 3.0 ports, headset jacks and a power off button.

Cooling system
Air flow distribution is one of the most important factors in successful cooling of a system. The classic and most effective “wind tunnel” design, when air is taken in from the front part and blown out in the opposite direction, is completely absent from the Cougar QBX. Externally, the monolithic structure is essentially a sieve with removable panels. The design does not pretend to be original, but do not forget about the form factor. The Mini-ITX system is perhaps not designed for extreme overclocking, even though there are motherboards with chipsets for unlocked processors. Therefore, the most heat-producing item in this assembled system is, first of all, the video card, and in most cases it doesn’t care about the distribution of air flows in the case, because air is blown out in all directions (of course, if you do not take into account cooling systems with turbines).
Fans
The package includes 3 pre-installed fans
1. Two pieces 120x120 mm

The nine-blade impeller has shark fins to improve air flow, but bad luck - there are no fans on the manufacturer’s website, and the Internet does not show anything when searching for the CFU120 markings. Judging by the shape of the impeller, this is a lightweight version of the CF-D12HB presented on the manufacturer’s website, it is distinguished by the absence of a vibration damping housing, LED backlight and 4 pin fan connector.
The technical characteristics are quite good and are found today in many well-known manufacturers.
Operating voltage: 12V; 0.3A
Speed: 1200 rpm
Airflow: 109.42 m2/h
Bearing type: Hydraulic (according to Cougar website)
2. One 90x90 mm

Absolutely ordinary seven-blade low-speed fan (designation S in the serial number)
Without any clarifying characteristics on the site.
By the way, the company does not have its own production. In both cases, products are purchased from famous manufacturer Hong Sheng labeled
1. A1225L12S 12v 0.3A, most likely taken as a base with subsequent installation of an impeller ordered by Cougar).
2. A9225L12S 12V 0.18A, (most likely no modifications were made, they just pasted a sticker with a logo).
Complete absence of wow effect is guaranteed)
Noise indicators
Testing was carried out with a fairly popular CEM DT-805 device, which allows you to measure the sound range from 30 to 130 dB as standard frequency range dBA and low frequency dBc. The sound level meter was installed in a stationary stand, at a distance of 30 cm from the system unit.

In order to roughly understand what these numbers say, below is a clipping from the table
35 - Quite audible (muffled conversation)
40 - Quite audible (normal speech)
(Norm for residential premises during the day, from 7 to 23 hours)
45 - Quite audible (normal conversation)
50 - Clearly audible (conversation, typewriter)
These indicators are valid for standard dBA noise, the dBc level is always significantly higher because includes a low frequency component.
What can be said about the operation of the standard cooling system?
According to the test results, it fully complies with noise standards in an average apartment during the day. But it’s not even a stretch to call it ideal. Unfortunately, all fans have 3-pin power connectors, which does not allow the speed to be adjusted on some motherboards, and there is absolutely no space for a reo-bass in the case.
The two included 120mm fans with “hydraulic” bearings hum at maximum speed and create vibration due to the lack of vibration damping housing or gaskets.
But unexpectedly, I was very pleased with the included 90 mm fan - when operating at maximum speeds, it is practically inaudible, especially compared to its larger counterparts, and this despite the simpler and more common design.
CPU cooling system installation and assembly
By default, any boxed cooler, low-profile heatpipe cooling system, or liquid cooling with a 120/240 mm radiator can be installed in the case. This fact is associated with a very dense arrangement of elements in the internal space of the system unit, and a 240 mm radiator can only be installed on the side hinged cover, sacrificing the box for installing a standard 3.5-size hard drive. In this installation option, space for the drive remains only under video card.
Installing an SSD drive is much easier; it is placed on the right side of the frame behind the motherboard, but only if the processor cooling system fasteners allow it.

As you can see in the image, the standard DeepCool MaelStorm 240 backplate interferes with the installation of the drive, and installation of this fastener is impossible due to too strong pressure on the case (at startup, the motherboard is switched off by short-circuit protection)
Indicated in the instructions is the possibility of installing 2x 120 mm fans on the bottom of the case for better cooling"Video cards" is listed for some reason.

It is certainly possible to install them, they will act as a stand, the idea is very doubtful because there will be no required air flow.
Complete system

Conclusion

COUGAR was founded in Germany in 2007 by a group of computer peripheral enthusiasts. Professional team, adheres to the philosophy of design technology, focused on the use of human and aesthetic factors. This combination has developed products that meet the global demand of high-end professional gamers. Continuous testing of Cougar cases goes beyond normal development, resulting in a diversified line of gaming computer peripheral products that meet today's needs. This enthusiasm and innovative spirit are the basis of COUGAR's activities.
This is approximately how the company describes its aspirations and developments, but what can be said in essence. The Cougar QBX body is definitely a quality product.
The extremely robust frame construction combined with removable panels is not only a great design idea, but also an excellent embodiment of engineering developments.
The plastic is of excellent quality and does not have a hint of easily stained gloss, and the fully ventilated design allows the installation of the most modern components. As for the supplied fans, they can be considered consumables, which can be replaced at the user’s request for less noisy ones, although this increases the budget.
1. Light weight
2. Sustainability
3. Rubber feet
4.Easy to install side panels
5. Excellent, non-staining plastic
6. Rigid frame
7. Cable management system
8. Fans included
9. Great design, size and functionality
1. Noisy 120mm fans
2. Where is the power supply switch off button on the case? But it doesn’t exist, so to completely turn it off you will have to either unscrew the top cover or pull the wire from the outlet.
I express my deep gratitude to the Cougar company for providing a magnificent sample, as well as to the DNS company for everything.


